Equipment
How to remove an OEM adjustable sleeve for later use
Most golf equipment companies offer metal woods with adjustable features that allow golfers to change the loft, lie and face angle of the clubs. These clubs are made to be easy to adjust, but there are hurdles for golfers who wish to change the shaft of an adjustable club.
All of the current metal woods on the market that offer loft and face angle adjustability do so through an adapter or sleeve that is called an “adjustable tip.” So if golfers want to change the shaft of their adjustable clubs, they need to do one of two things:
- Buy another adjustable tip and install it on the new shaft.
- Remove the adjustable tip from the old shaft and install it on the new one.
Buying another adjustable tip is the best plan of action for golfers who want to try a new shaft, because it will allow them to compare the results of the shafts quickly and easily. But they’re not as cheap as many golfers might think — most OEM adjustable tips sell for between $25 and $40 each.
That’s why a lot of golfers, especially those who know the current shaft in their adjustable club isn’t right for them, might prefer to save the money and have their old adjustable tip put on their new shaft.
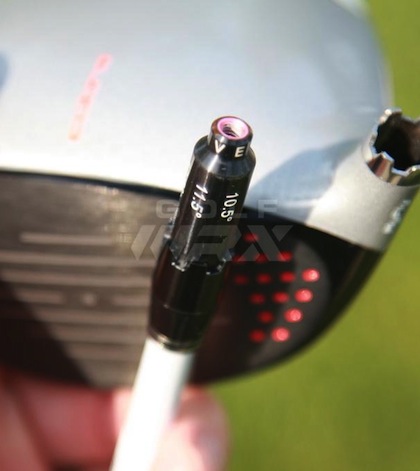
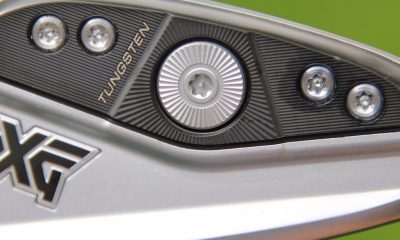
But removing an adjustable tip can be difficult due largely to the fact that the ferrule (on which most OEM’s print the loft adjustments) on can be ruined ruined in the process. That’s why I am going to share with you one method that I have found to work very well.
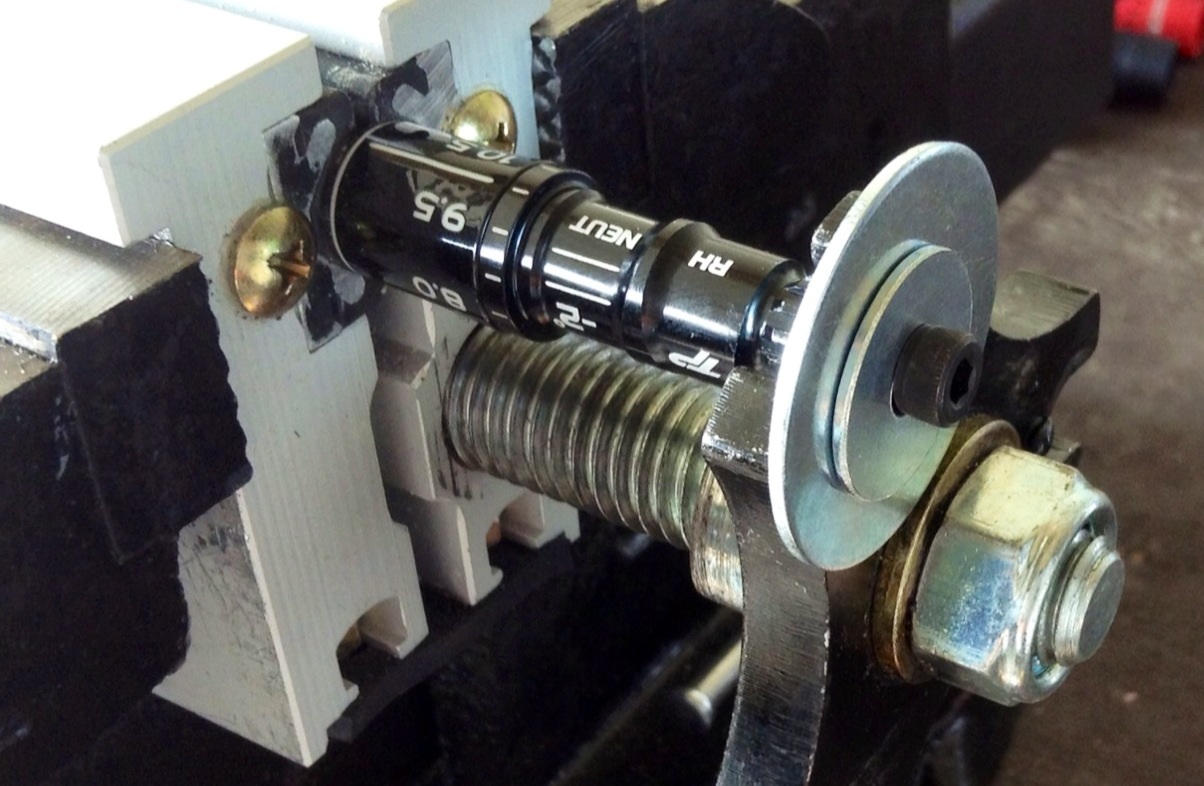
Supplies Needed
- Club Shield Paste (Jelly like substance that prevents burn marks)
- Small washers and a small screw
- Shaft extractor
- Bore Brush
- Torch or Heat Gun
- Small Strip of Cotton
Prep
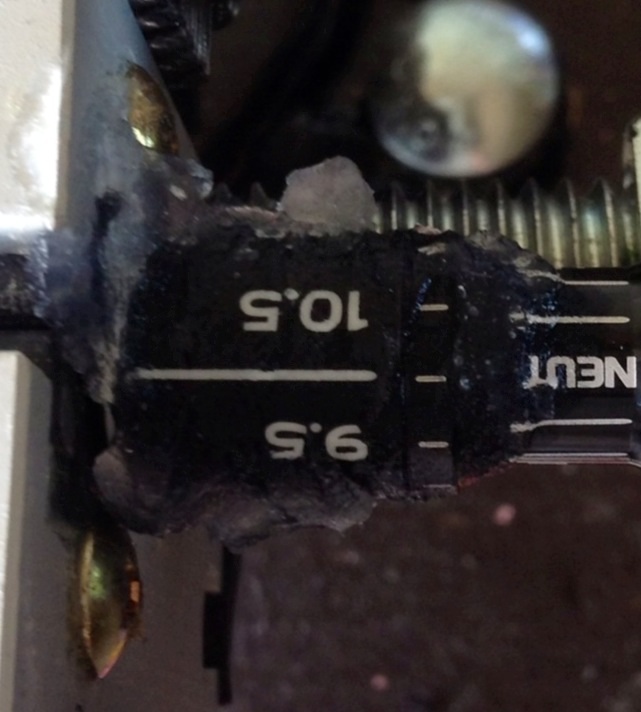
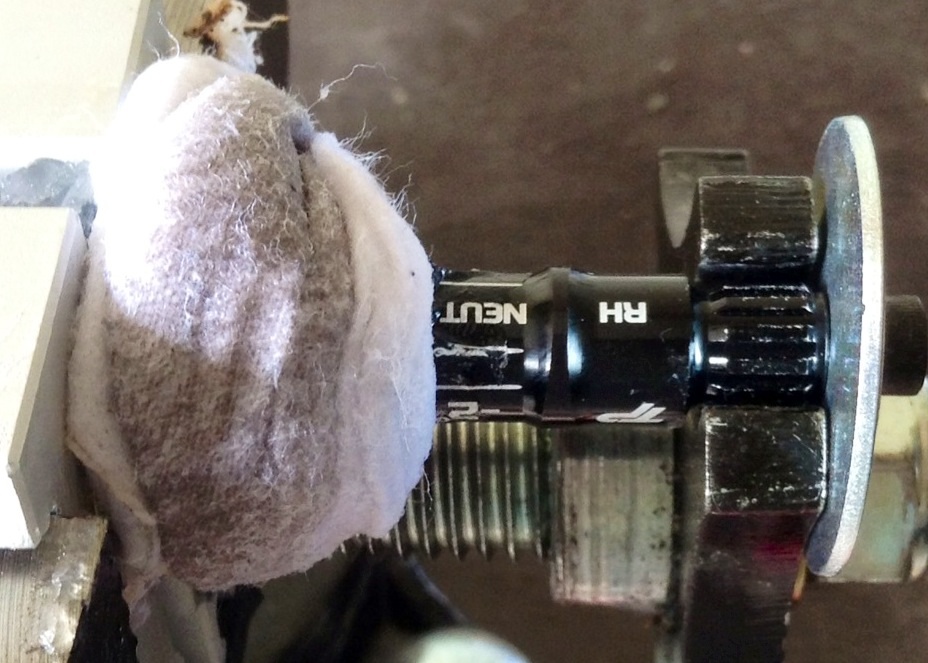
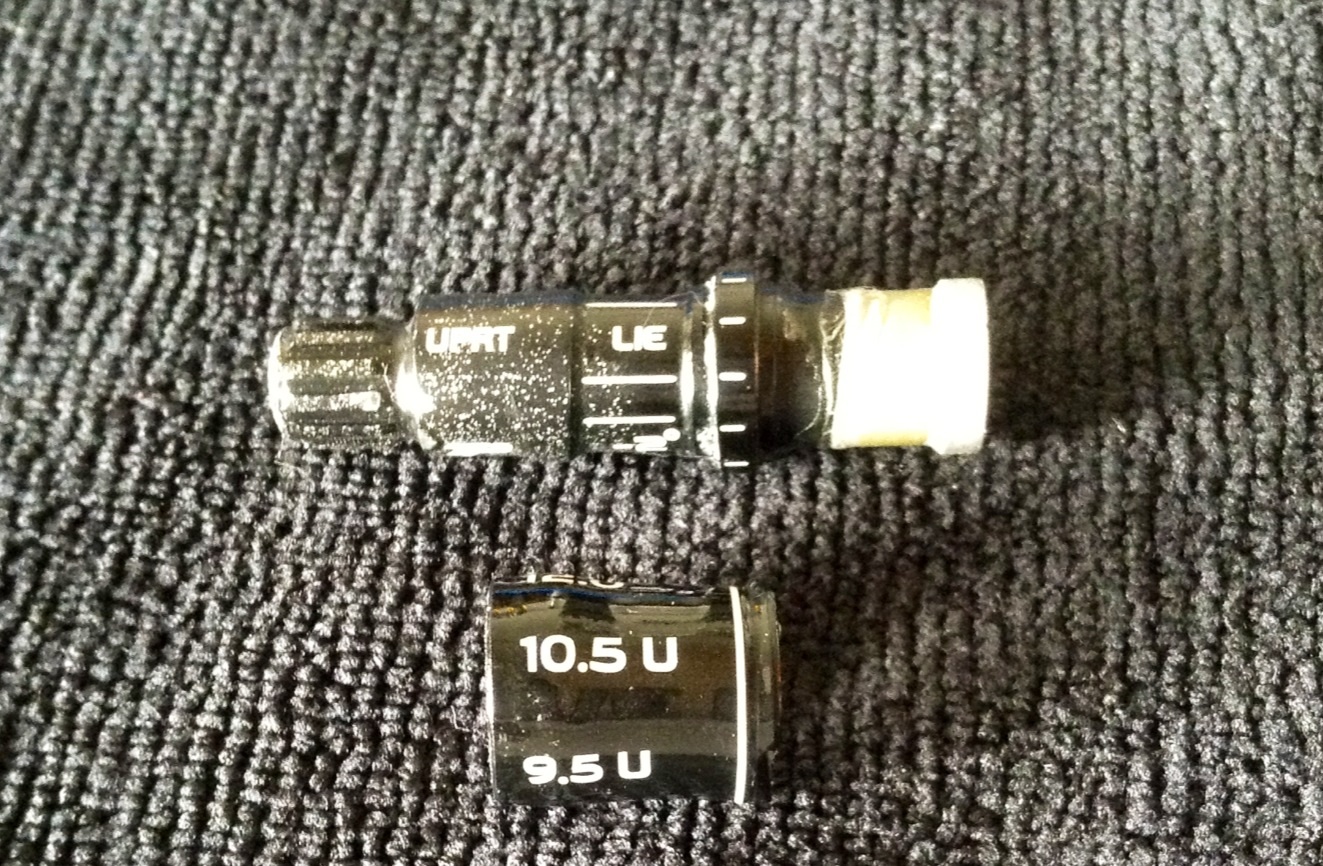
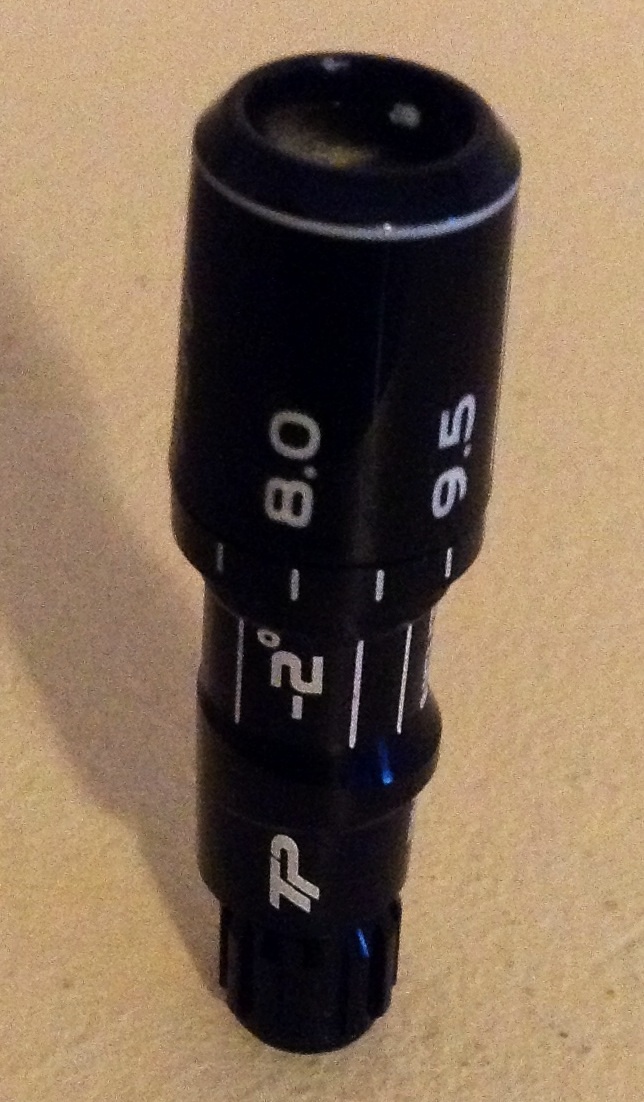
Apply the Club Shield Paste all around the ferrule. Place the washers on the small screw, and thread them into the tip of the sleeve. Secure your shaft in the shaft extractor. Take the small strip of cotton and soak it in some water and then wrap it around the ferrule. The club shield paste and wet cotton strip will protect the ferrule from heating up and getting damaged.
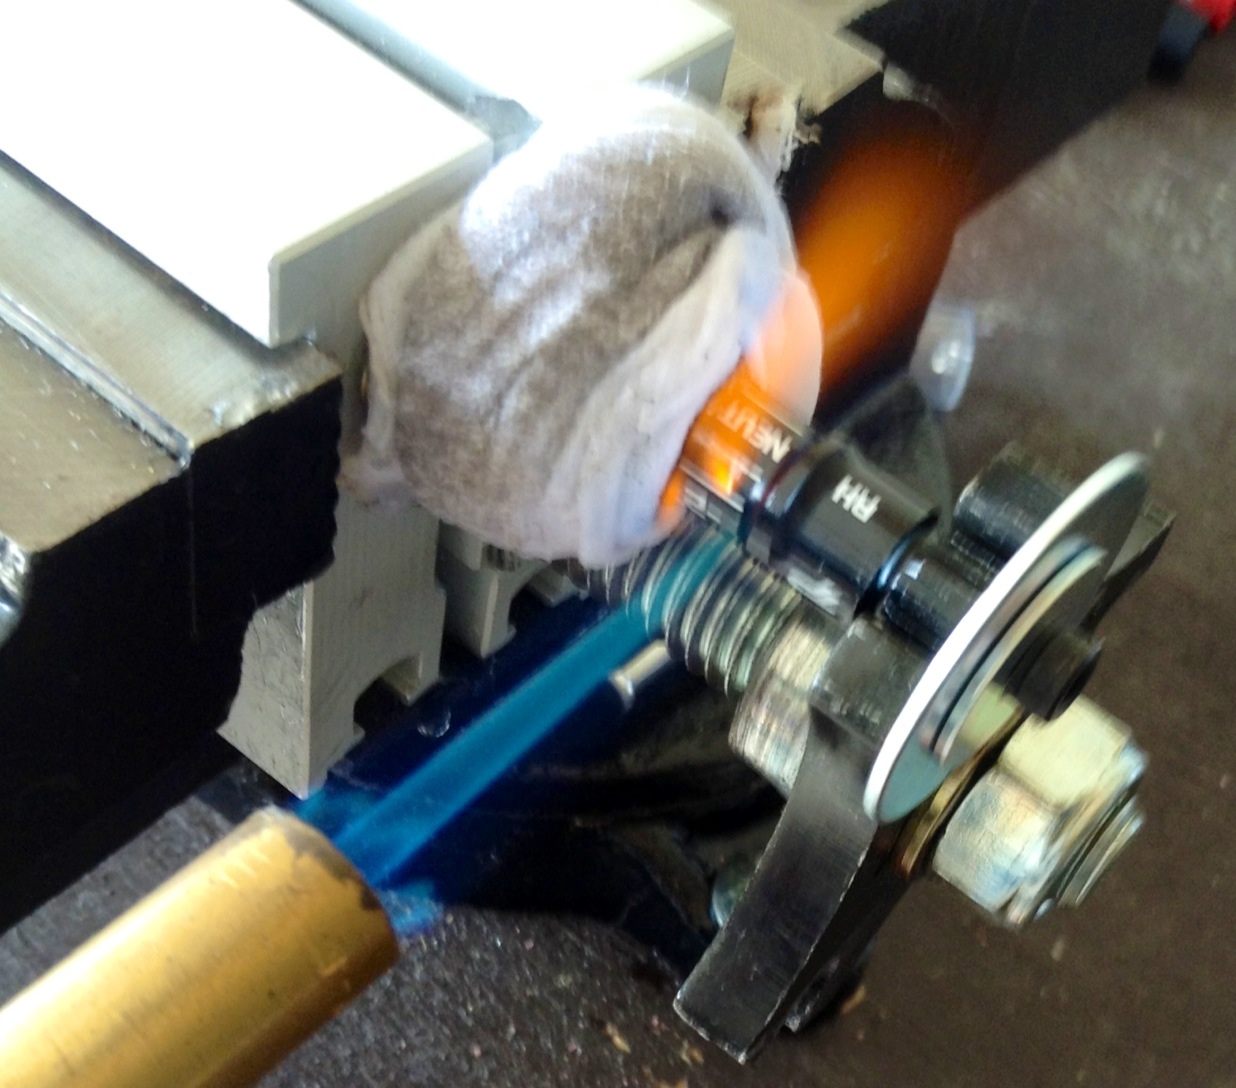
Step 1
Position the shaft extractor firmly against the washers to start just as you would to the head of a club for typical removal.
Step 2
Apply heat to soften the epoxy and slowly apply pressure to the washers as you would when removing a club head (patience is the key for success). Slowly continue repeating this process. After a few applications, the adjustable tip will start to slide off the shaft. When there is enough room between the tip and the ferrule, reposition the shaft extractor to the top of the tip and continue to remove.
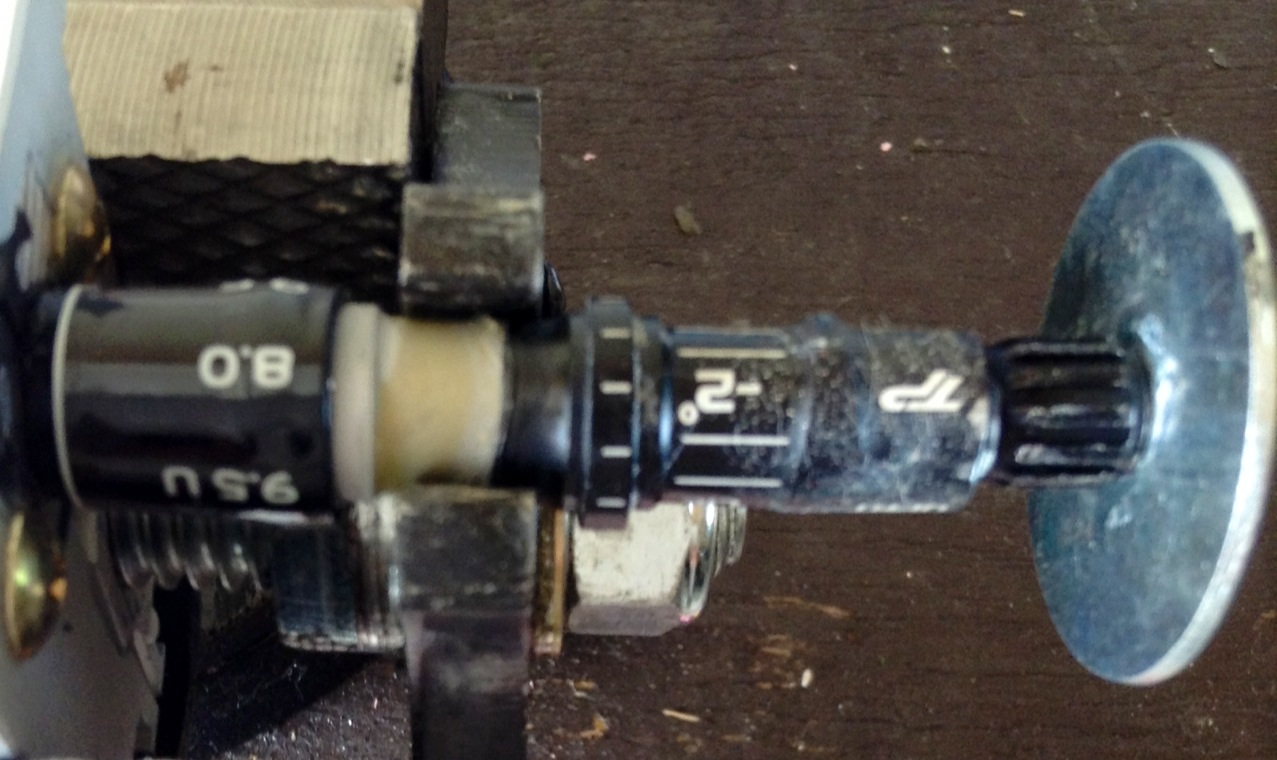
Step 3
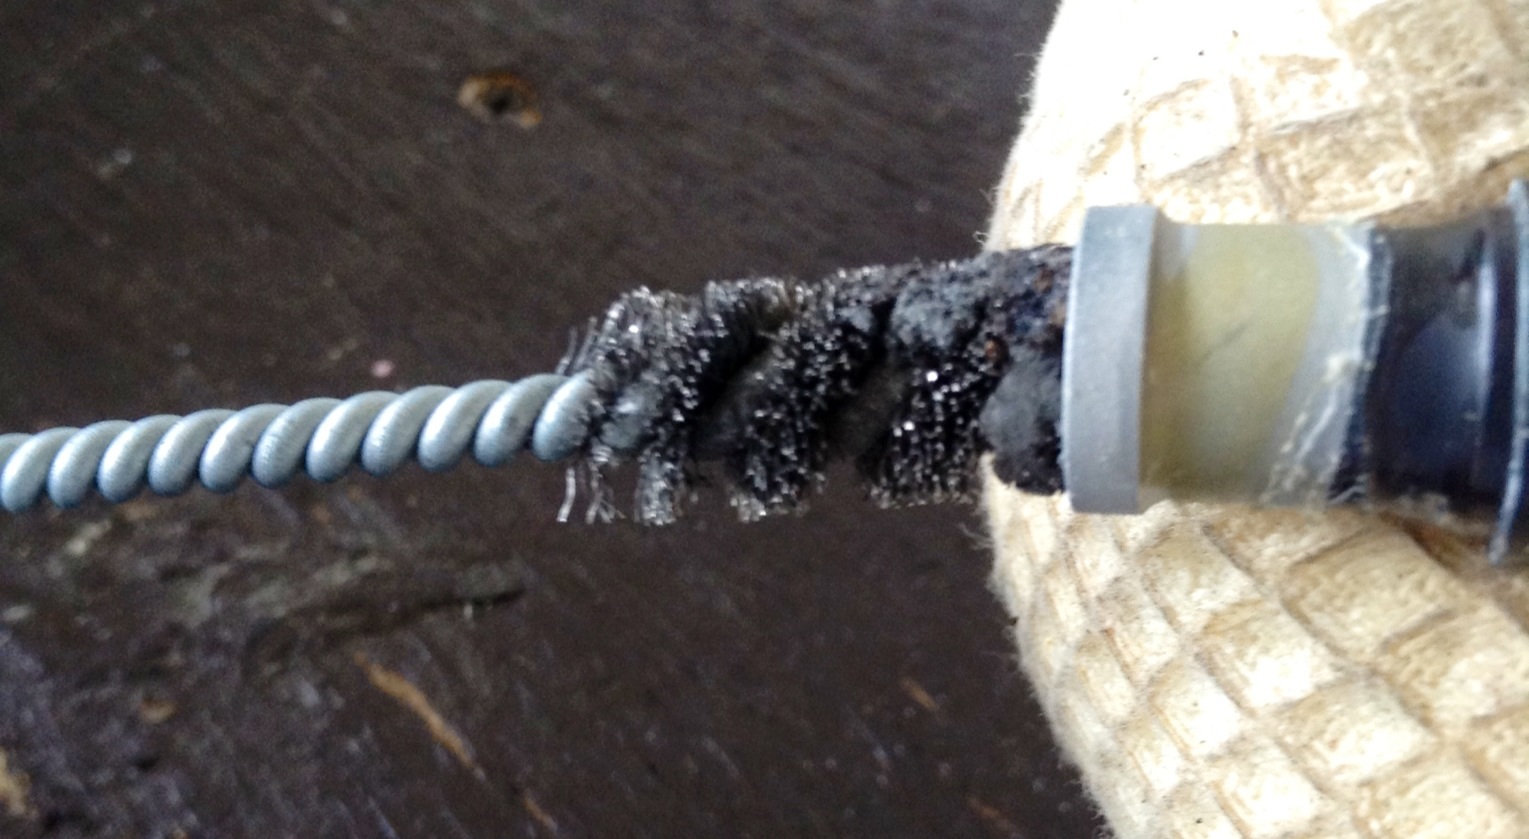
Once the tip is off, clean the inside of it with your hosel brush. It is best to do so while the epoxy is still heated and soft.
Step 4
Remove the cotton strip and slide off the ferrule. Note: You may want to clean up your tip and ferrule before installing it onto the new shaft.
There are many ways to skin a cat. This process has yielded the best results for me. Take your time and you will be able to save most tips through this process.
- LIKE66
- LEGIT12
- WOW3
- LOL5
- IDHT1
- FLOP2
- OB3
- SHANK11


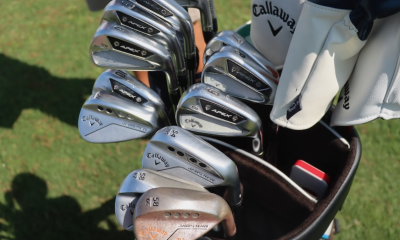
The tournament bearing the name of one of golf’s all-time greats is now known as the CJ Cup Byron Nelson. Back in 2017, it was still the AT&T Byron Nelson and Billy Horschel was still a full-bag PXG staffer. The Florida Gator leveraged those wares to a playoff victory over Jason Day securing his fourth PGA Tour win in the process.
Check out the clubs Horschel had in play seven years ago in Texas.
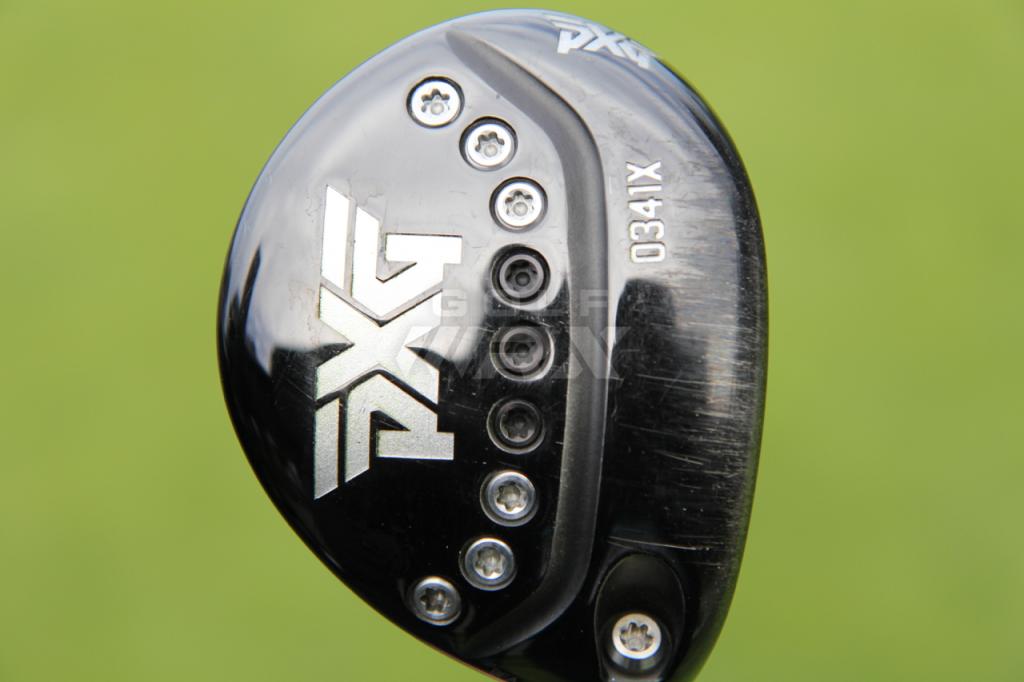
Driver: PXG 0811X (9 degrees)
Shaft: Fujikura Atmos Tour Spec Black 6 X
3-wood: PXG 0341X (15 degrees)
Shaft: Project X HZRDUS Black 75 6.5
5-wood: PXG 0341 (18 degrees)
Shaft: Project X HZRDUS Black 75 6.5
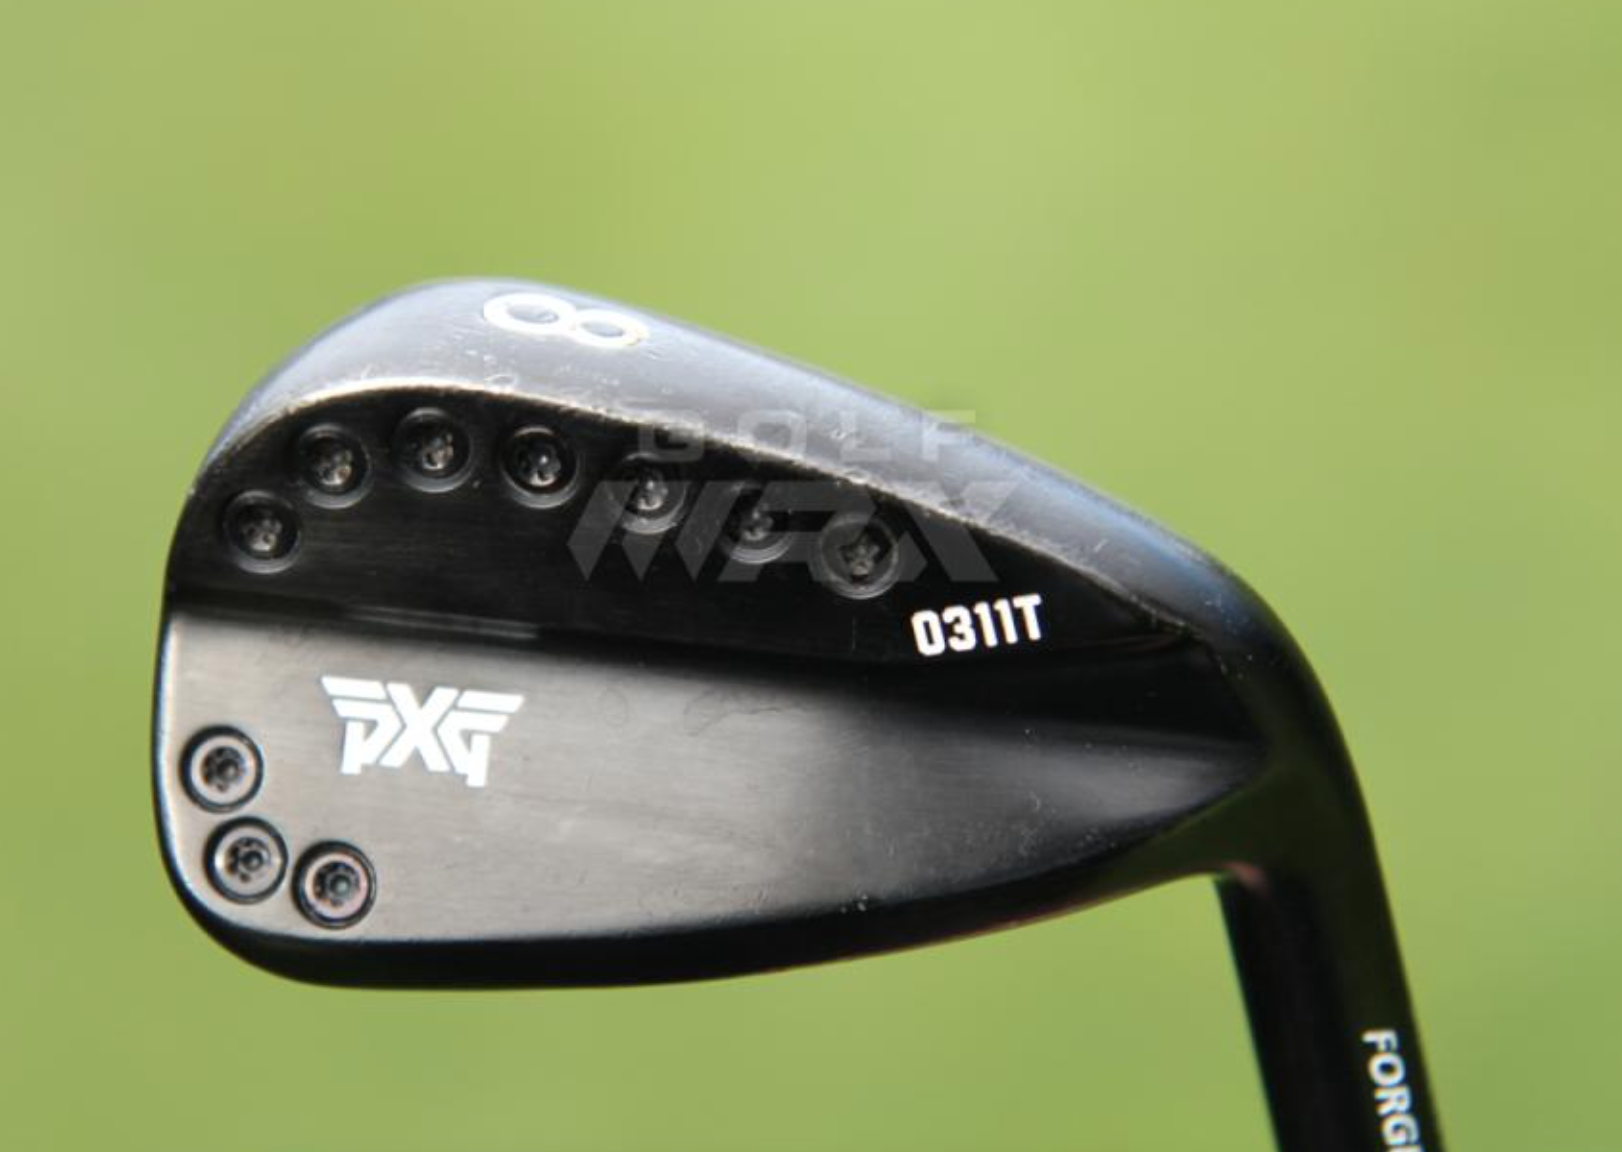
Irons: PXG 0311T (3, 5-PW)
Shafts: True Temper Dynamic Gold Tour Issue X100
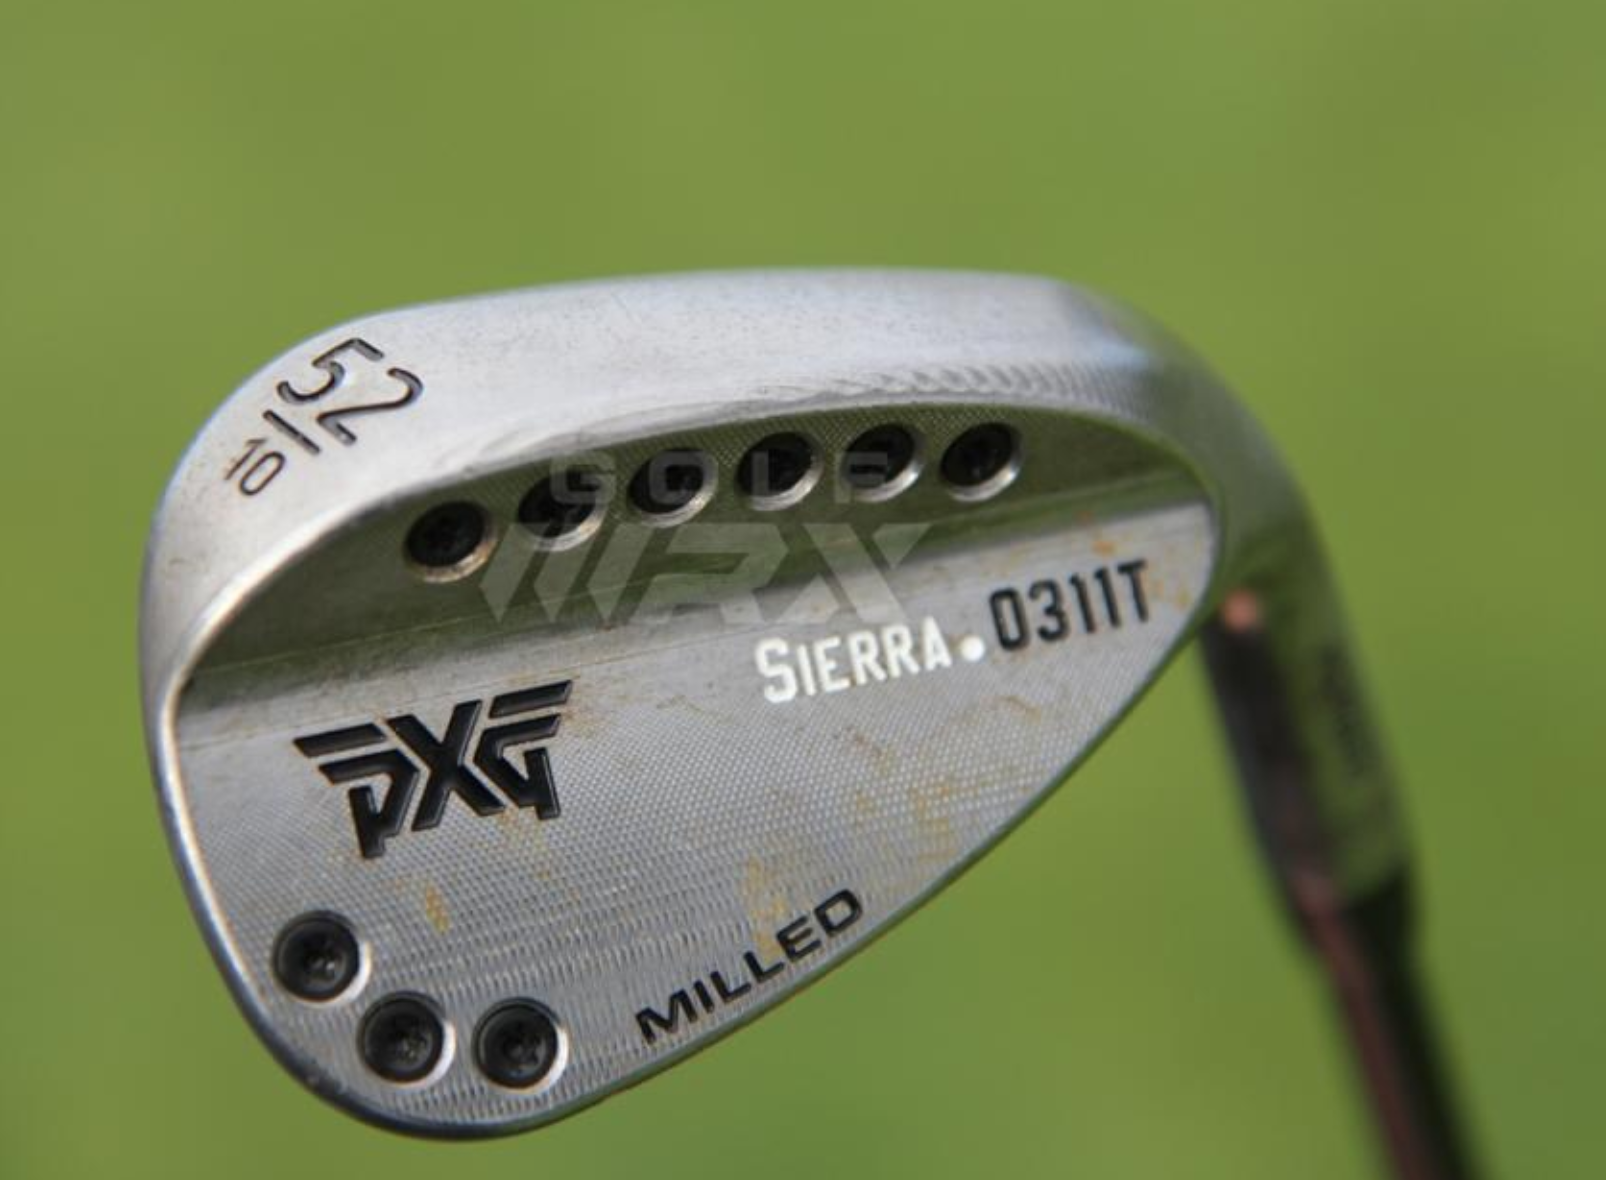
Wedges: PXG 0311T Milled (52-10, 56-10, 60-07)
Shafts: True Temper Dynamic Gold Tour Issue S400
Putter: PXG Bat Attack
Grip: SuperStroke Flatso 1.0
Ball: Titleist Pro V1x
Check out more in-hand photos of Billy Horschel’s gear from 2017 here.
- LIKE2
- LEGIT0
- WOW0
- LOL0
- IDHT0
- FLOP1
- OB0
- SHANK1
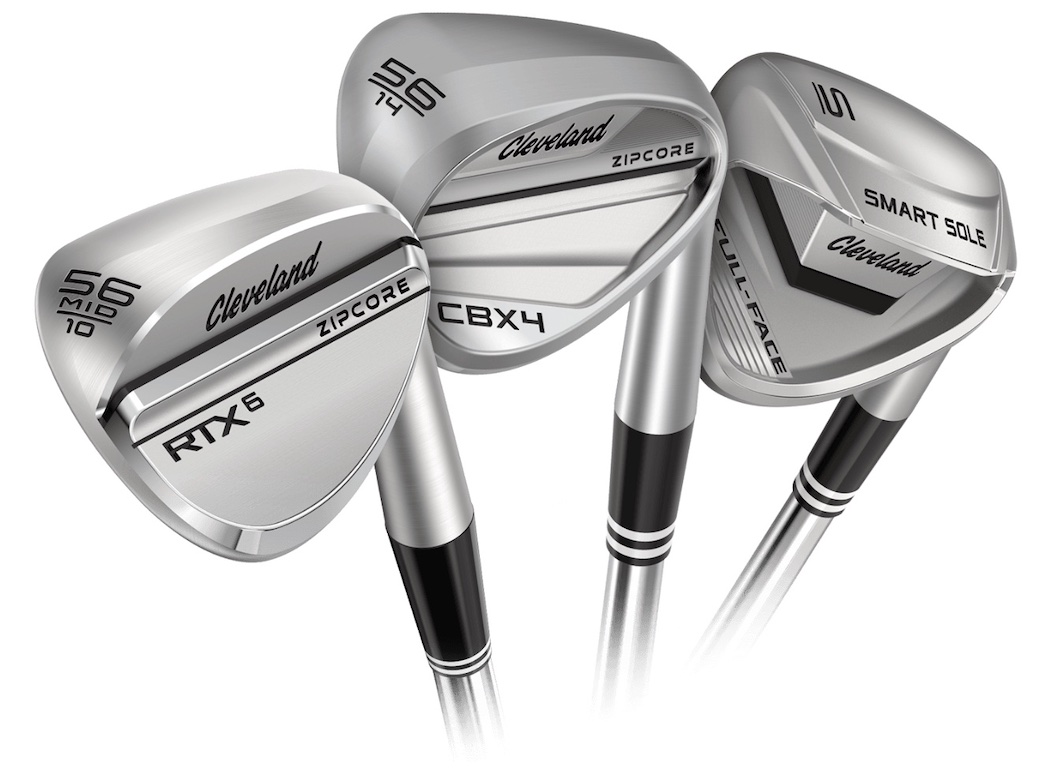
More than most golfers would care to admit, confusion often reigns when it comes to selecting a wedge — let alone configuring an entire wedge setup. Make? Model? Loft? Grind? Finish? Two wedges? Three wedges? Four? The questions abound!
While it’s easy to get off the fairway and deep into the rough quickly, the framework question for choosing wedges is the same as the entirety of the golf bag: How should I set up my golf bag to shoot the lowest score possible?
Manufacturers, in addition to, well, manufacturing golf clubs, also understand that golfers need to make informed decisions to get the most out of their equipment. It’s with this in mind, and to help golfers answer the aforementioned foundational question about their wedge setup, that Cleveland Golf has launched its wedge selector too.
To learn more, we talked with Cleveland’s Senior Product Manager, Casey Shultz.
GolfWRX: What was Cleveland seeing in the marketplace that led to the development of the wedge selector? How do golfers benefit?
Casey Shultz: Currently, there is a lot of talk about what grind players should play and what is right for their game in that aspect of selecting a wedge. But there is more to improving wedge play than finding the proper grind. We would even argue it’s one of the smaller dials for improvement. Players can find more success with wedges designed from head shape to shaft, sole width, gapping, and then the grind. Putting a system in place that makes the process of selecting the right wedge easier is something we feel can have a massive impact, especially for recreational players.
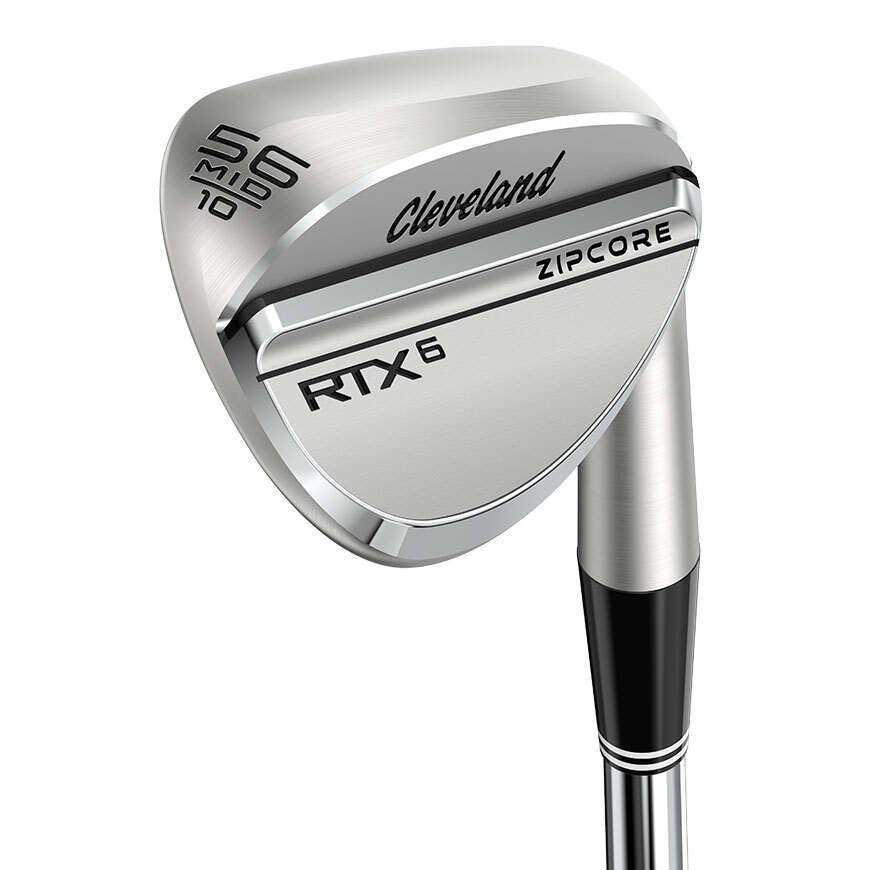
GolfWRX: Now, in breaking down Cleveland’s wedge selector tool, the point of departure is figuring out whether you’re an RTX or CBX player. Can you briefly spell out who each of these wedges is for?
CS: For lower handicappers, the RTX series is our tour-validated line of blade wedges. These are for players looking to play a lot of open-faced shots around the green, prioritize workability, and like to flight their wedges. CBX wedges are designed to make the short game easier, while still offering some level of versatility for the mid-high handicapper looking for a wedge that will reduce chunks and add forgiveness on all strikes. CBX’s are also a great option due to them blending well in weight and shaping with more cavity back iron sets.
GolfWRX: Proceeding through the RTX wedge selector, one of the first forks in the road is wedge finish. Can you break down the finish options and the considerations for a golfer in making their selection?
CS: With the RTX series we offer Tour Satin, Black Satin, and Tour Rack finishes. Tour Satin is our most popular finish and offers the most grind options. With HydraZip face blasts on the newest RTX Wedges, glare is significantly reduced at address compared to other silver finish offerings. Black Satin offers custom skin options as personalization and is one of the more durable black finishes on the market but will have some visible wear over time especially on the sole. Finally, Tour Rack is our tour authentic raw finish that will rust over time. The Tour Rack finish also comes with the option of applying any of our Tour Crafted leading edge and sole grind offerings to the Wedge for players really looking to fine-tune their performance.
GolfWRX: Can you walk us through the rest of the RTX wedge fitting process?
CS: Once players have selected their preferred finish, we gather information on their iron set and loft preferences to determine proper gapping. A properly gapped set of wedges, both with each other and transitioning from a player’s last iron, is key to ensuring their set covers a wide range of approach yardages well. We then ask specific questions about the performance the player is looking to achieve in their sand and lob wedges to determine proper grinds for each of those wedges. Lastly, we confirm a preference for traditional or Full-Face grooves at each loft. Full-Face grooves offer a new level of versatility, especially with open-face shots, but it’s up to the player if they want to transition to this groove design. Our algorithm will then take these results and determine a set of wedges best suited to the player’s game.
GolfWRX: Let’s circle back to grinds. Is there a grind configuration across their wedges you’re seeing the majority of players choose or is it pretty evenly divided?
CS: The MID grind is certainly the most popular grind across all lofts, with the blend of versatility and forgiveness in a wide range of conditions suiting many players. In sand wedge lofts, the second most popular grind is our FULL, which has a little more bounce than the MID and is especially effective out of the sand or rough. In lob wedge lofts, the popular alternative to the MID is the LOW grind, offering max versatility around the greens. We’re also seeing more amateur and tour players opt for our Full-Face models, especially in the lob wedge lofts where they are planning to open the face and get creative around the greens.
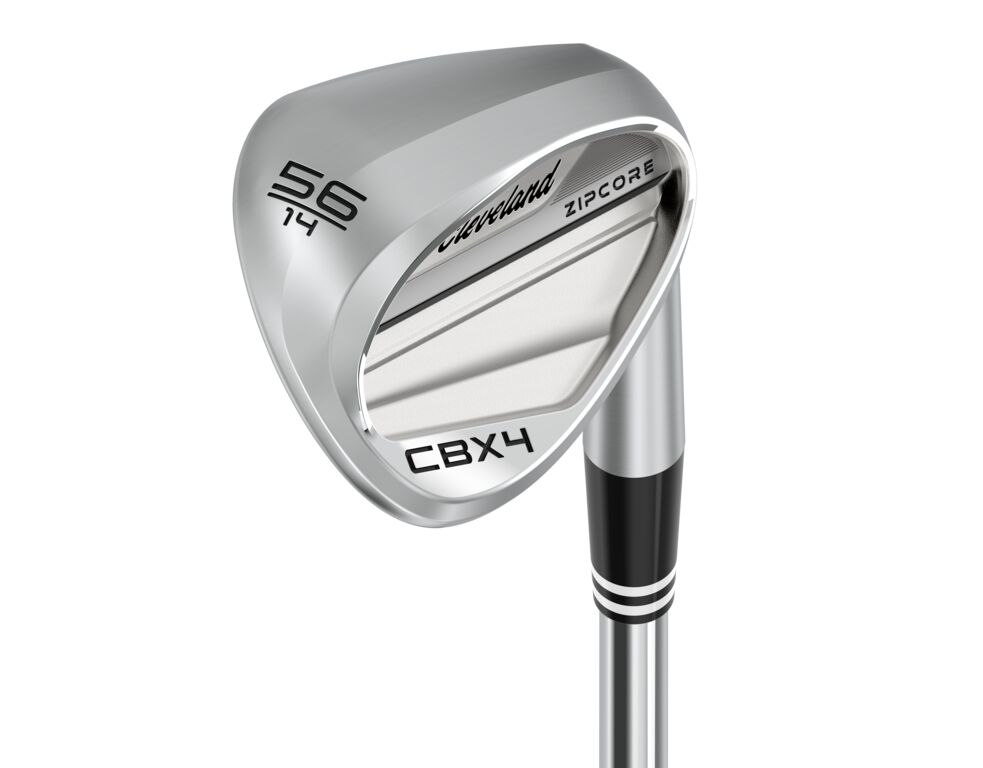
GolfWRX: Can you take us through the CBX wedge selector?
CS: In the CBX selector, we start by determining if a player is looking to play a lob wedge or not. For many recreational golfers, a lob wedge may not be necessary for the consistent short-game performance they are looking to achieve. Next, the CBX selector focuses on ensuring players end up with a set that transitions well into their irons, while also staying within the constraints of a player’s bag setup. With new players distance, game improvement, and super game improvement iron lofts becoming stronger than those of the past, creating a properly gapped set of wedges is trickier than ever for these players. The selector tool takes the guesswork out of the equation, while also considering a player’s set makeup and interest in replacing a wedge. Finally, players are given the option of when or if they would like to transition into a Full-Face design for added spin on strikes all over the face.
GolfWRX: Is there anything else you think GolfWRXers need to know about Cleveland’s wedge selector tool?
CS: Our wedge selector tool is designed to be used in concert with our set builder webpages. At completion of the selector, a player’s recommended wedge set will automatically be applied to the appropriate set builder. From there, they can easily adjust components or build specs to every Wedge all in one place. Players can also add Tour Crafted sole and leading edge grinds to refine their performance on our Tour Rack wedges, or personalize custom characters, skins, and paintfill in the same place. It’s a one-stop shop to build the perfect wedge set for any player’s game.
This article was presented in partnership with Cleveland Golf. Check out the wedge selector here.
- LIKE2
- LEGIT0
- WOW0
- LOL0
- IDHT0
- FLOP0
- OB0
- SHANK0
Equipment
Golf fans left surprised by LIV’s choice of course for its 2024 individual championship event

On Tuesday, LIV announced their individual championship will be held at Bolingbrook Golf Club just outside of Chicago. The event will take place September 13-15.
The late announcement is seemingly due to LIV looking for the right course in the Chicago area that has the infrastructure that can accommodate a professional event.
The choice of Bolingbrook Golf Club has received some feedback on social media.
Maybe Rich Harvest Farms wasn't available? RHF is 50miles from Chicago but at least it's surrounded by farm land so plenty of space to set up
— Crawf_Indiana (@captaincrawf) April 30, 2024
Awful course choice, it's a dog track!
— Rob (@piratedwight) April 30, 2024
????#LOOK: Bolingbrook GC in Illinois, site of LIV Golf’s just announced Individual Championship has tee times available around the $50 mark.
Are you teeing it up here? pic.twitter.com/b8Lgv9ZzhK
— NUCLR GOLF (@NUCLRGOLF) April 30, 2024
LIV fans were quick to point out that Bethpage Black, which is hosting the 2025 Ryder Cup, can also be played for a reasonable price, making the point the greens fees don’t always equate to the quality of the golf course.
During LIV’s first two seasons, LIV utilized Rich Harvest Farms in Chicago. It’s unclear why that course is off the rotation in favor of Bolingbrook.
More from the 19th Hole
- The wild reason why Mark Wahlberg was initially denied entry to an Australian golf club
- 2-time major champ announces shock retirement from the sport at age of 33
- Edoardo Molinari reveals the latest PGA Tour golfer to turn down ‘good offer’ from LIV Golf
New here?
- LIKE6
- LEGIT3
- WOW2
- LOL3
- IDHT1
- FLOP0
- OB0
- SHANK6


Dave Portnoy places monstrous outright bet for the 2024 Masters

John Daly stuns fans into silence with brutal opening tee shot on PGA Tour Champions

Justin Thomas on the equipment choice of Scottie Scheffler that he thinks is ‘weird’

Things got heated at the Houston Open between Tony Finau and Alejandro Tosti. Here’s why

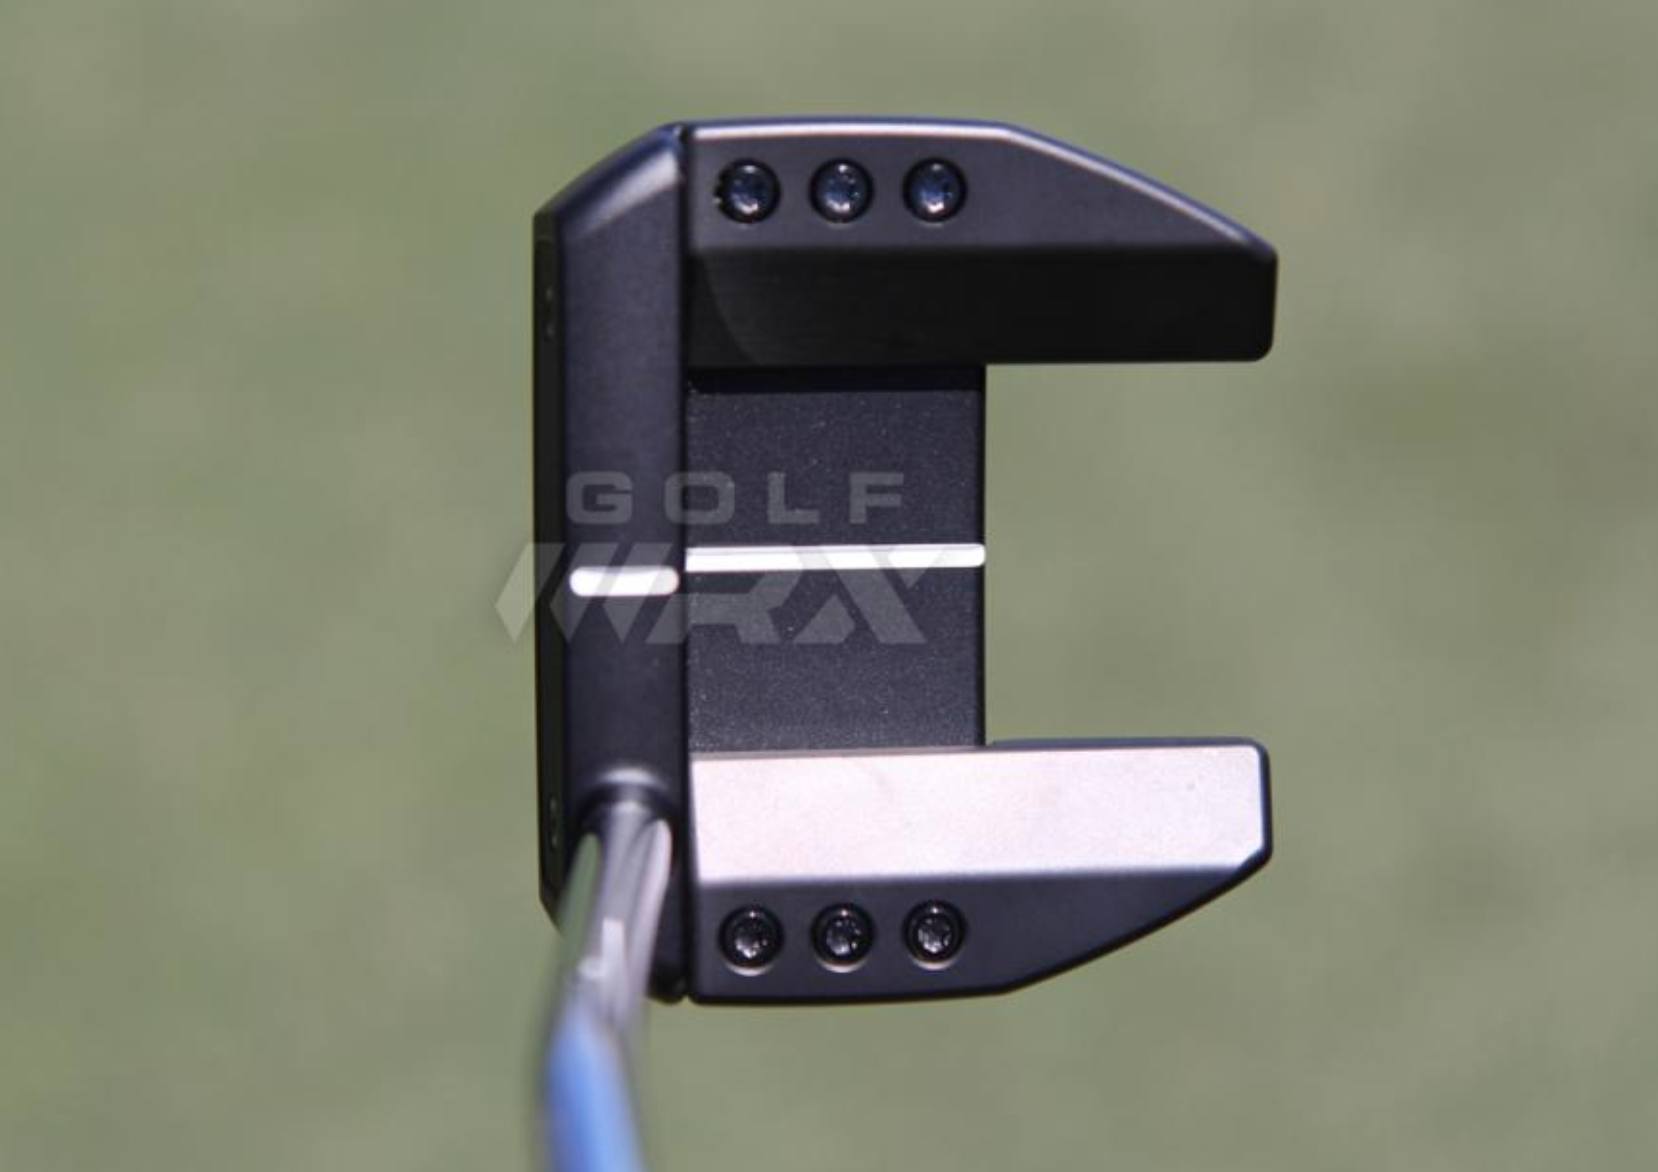
Tiger Woods arrives at 2024 Masters equipped with a putter that may surprise you

‘Absolutely crazy’ – Major champ lays into Patrick Cantlay over his decision on final hole of RBC Heritage

Report: Tiger Woods has ‘eliminated sex’ in preparation for the 2024 Masters

Two star names reportedly blanked Jon Rahm all week at the Masters

2-time major champ announces shock retirement from the sport at age of 33

Report: LIV Golf identifies latest star name they hope to sign to breakaway tour


WITB Time Machine: Billy Horschel’s winning WITB, 2017 CJ Cup Byron Nelson
The tournament bearing the name of one of golf’s all-time greats is now known as the CJ Cup Byron Nelson....


Austin Cook WITB 2024 (April)
Austin Cook what’s in the bag accurate as of the Zurich Classic. More photos from the event here. Driver: Ping...

Adrien Dumont de Chassart WITB 2024 (April)
Adrian Dumont de Chassart what’s in the bag accurate as of the CJ Cup Byron Nelson. More photos from the...

Kevin Streelman WITB 2024 (April)
Kevin Streelman what’s in the bag accurate as of the Zurich Classic. Driver: Titleist TSR3 (10 degrees, D1 SureFit setting)...
-
 19th Hole1 week ago
Justin Thomas on the equipment choice of Scottie Scheffler that he thinks is ‘weird’
-
 19th Hole1 week ago
‘Absolutely crazy’ – Major champ lays into Patrick Cantlay over his decision on final hole of RBC Heritage
-
 19th Hole2 weeks ago
Two star names reportedly blanked Jon Rahm all week at the Masters
-
 19th Hole2 weeks ago
Report: LIV Golf identifies latest star name they hope to sign to breakaway tour
-

 19th Hole2 weeks ago
Neal Shipley presser ends in awkward fashion after reporter claims Tiger handed him note on 8th fairway
-

 19th Hole2 weeks ago
Brandel Chamblee has ‘no doubt’ who started the McIlroy/LIV rumor and why
-

 Equipment3 weeks ago
What we know about Bryson DeChambeau’s 3D-printed Avoda irons
-

 19th Hole5 days ago
LET pro gives detailed financial breakdown of first week on tour…and the net result may shock you
chester event hire
May 15, 2014 at 3:24 am
I actually do consider all of the strategies you’ve got offered on your own submit. They are extremely convincing all of which will surely perform. Even so, your posts are far too speedy to begin with. May well you please prolong these a little bit out of next occasion? Was looking for article.
Golfer X
Sep 6, 2013 at 8:14 pm
You young guys have it way too easy. In my day, we played golf with the VC shooting at us. No time to waggle…
Regis Staley
Sep 5, 2013 at 9:00 pm
I’ve probably removed and re-used 20-30 tip adaptors. Mostly TM .Best result I’ve achieved is to use a torch and focus the flame on the very tip- The more pinpoint the better. The heat migrates up the adaptor at a reduced intensity. I can get sufficient epoxy breakup in less than a minute. Then if necessary Golfsmith or Billy Bobs sells just the plastic collar for about $4. You can either melt or cut off the damaged collar.
Freddy V.
Sep 5, 2013 at 9:58 pm
Seriously…spend the 20-30 bucks for a new TM tip or another 5 for a new ferrule. Trying to save the plastic tips are a waste of time and NEVER come off without damage in some form to the plastic. Stores don’t do it for 2 reasons. 1 the chance of pulling it cleanly is slim to none and if they gaurantee they can do it, they are on the hook for damage. 2. It takes more time to do and costs almost the same as a new tip. Kind of like paying 3-5 bucks to save a grip when it cost that much for a new grip. Don’t let this article fool you into thinking it is a flawless process. The plastic always gets damage on a TM tip because the plastic melts at a lower temp than the epoxy used by TM. Goodluck regardless.
Cody_gateway
Aug 14, 2014 at 1:43 pm
Freddy V sounds like the type of person with no patience. this tip worked out great don’t let this hot head tell you otherwise
Linkerpan
Sep 5, 2013 at 12:34 am
Both Golf Galaxy and Golfsmith have ruined the adaptor on my Callaway. The lesson I learned is that if you buy a new shaft, you buy a new adapter. I hope all store managers print this article and quiz the employees later.
cha4218
Sep 5, 2013 at 9:18 am
I guess it all depends on who is working on it. I recently had the adaptor for my Nike Covert Tour taken out and installed in another shaft. A guy named Tom (Paramous, NJ) did a killer job on it. I couldn’t thank him enough. Kudos to him at Golf Galaxy.
Ross Bailey
Sep 4, 2013 at 5:49 pm
I would recommend using a heat gun and not an open flame to get the
adaptor hot enough to remove. The rest of the sequence is great.
Ga
Sep 4, 2013 at 5:27 pm
9 out of 10, that plastic degree sleeve gets melted. They should just make it out of aluminum. I don’t understand why they didn’t.
Chester
Sep 4, 2013 at 1:46 pm
I work at a golf store, and run the club tech department. I’ve found that heat gun is much more tip friendly when it comes to saving the plastic ferrule on the TM adaptors, although I do cover the plastic with heat shield as well. I recommend pointing the heat gun away from the ferrule, and towards the tip to avoid melting the ferrule at all. The tips that are first time pulls from the manufacturers are much easier pull, than 2nd time installs that potentially use stronger bonding glue. Great article though.
Kadin Mahmet
Sep 4, 2013 at 2:00 pm
Thank You! I agree first time pulls are much easier.
Mo
Sep 5, 2013 at 3:28 am
That’s not necessarily true. It also depends on the kind of epoxy used and how much of it got to seal up the very top of the adaptor. For example, if, in this case of the TM adaptor, if the adaptor is fairly stuck on with a lot of hardened, strong epoxy near the top, no amount of heat shield or wrapping is going to break the bond of the epoxy enough to be able to pull that thing off safely without melting the numbers on the plastic, let alone the plastic itself.
It all depends on the amount of epoxy, what kind of epoxy and how much of the hard epoxy was used to make the shaft really hold firm inside the adaptor.
At some point the adaptors will become cheap enough like ferrules, as this is where everything is headed, and, they will also have figured out a way to do away with the plastic so we don’t keep ruining these things.
Mateo
Sep 4, 2013 at 12:11 pm
Not bad. You should never use a blowtorch though. Use a heat gun to avoid damaging the tip. The tip that was pulled is not the same as the tip in the final picture. You can see the damage to the paint in the second to last picture. Looks like he pulled the old switcharoo.
🙂
leif
Sep 4, 2013 at 1:09 pm
Actually, that is the Hear Shield residue still on the tip after it dried…just need to wet it down and wipe it off.
leif
Sep 4, 2013 at 1:10 pm
Heat Shield…sorry.
Joe Golfer
Sep 5, 2013 at 12:08 am
Yes, I think Golfworks.com sells that stuff to protect hosels and such that are painted, so I can see why it would be used here.
If using a torch, use Butane and not Propane, as butane burns at a lower temperature.
A heat gun will work, but it sometimes seems like it takes forever to get the job done. And some epoxies simply won’t break down with a heat gun, so then you wind up resorting to the torch anyway.
Mateo
Sep 4, 2013 at 3:21 pm
Oh. Didn’t think of that. I don’t use heat shield because I’ve never really needed to. 😉
Kadin Mahmet
Sep 4, 2013 at 1:11 pm
Thanks for taking the time to read and post…
This is the tip that was removed…
“Note: You may want to clean up your tip and ferrule before installing it onto the new shaft.”
I see now that it’s a little vague. I clean the tip and use a “sharpie” style marker to touch up any scratches or paint blems.
Deck
Sep 4, 2013 at 2:22 pm
Heat shield is a wonderful thing. You might want to try it. Agree with the above poster. Residue. Have you ever used it before you comment on it?
Mateo
Sep 4, 2013 at 3:22 pm
Don’t use it because I don’t need to. Only amateurs do. Lol
kirk
Sep 4, 2013 at 11:49 am
any golf store can remove to tip and put onto another shaft
Brian
Sep 4, 2013 at 12:02 pm
Actually, ‘many’ stores will not remove the tip and put it onto another shaft. Either because they don’t know how, have had an issue with customer being satisfied with the result, or just prefer not to. Good to have this bit of ‘how-to’ available when the stores won’t do it.
Kadin Mahmet
Sep 4, 2013 at 1:14 pm
The shops in my area will not provide this service though a lot of shops will.
The idea behind this topic was geared towards the DIY’er
Thanks for taking the time to post! 🙂
kirk
Sep 4, 2013 at 2:48 pm
well every store around me will do this, rather pay some 10-15 bucks,than n screw around doing in my self
AJ Jensen
Sep 4, 2013 at 4:10 pm
And I’d rather do it myself. This was a great step-by-step article for a guy like me.
AJ Jensen
Sep 4, 2013 at 11:46 am
OK, for what it’s worth, I’m giving this one the award for “How-To Article of the Year.” Very well done, sir.
Kadin Mahmet
Sep 4, 2013 at 1:06 pm
Thanks AJ ! I appreciate that!