Instruction
How to stop 3-putting and start making putts
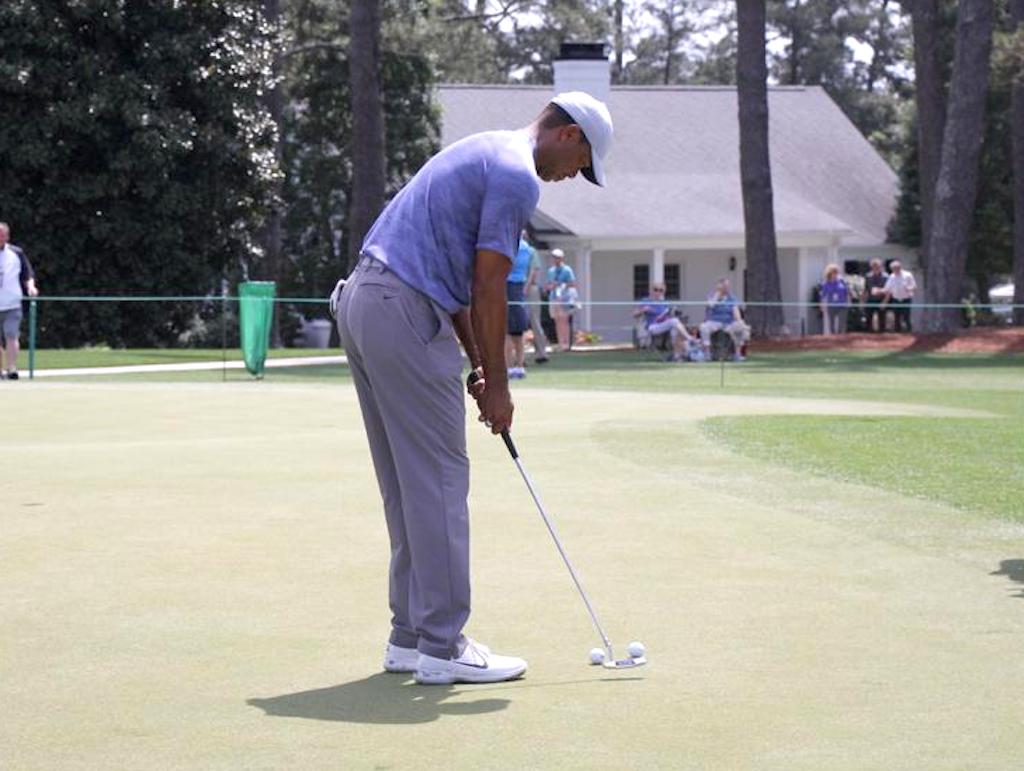
When we are 3-putting we are ‘stuck in the box’. This means that when we are standing over the putt the second before we make our stroke everything happens to ‘go downhill.’ When this happens, depending on your playing level, things can become a bit erratic on the putting surface.
When a 3 putt happens, it is typically because you failed to do something before you made your stroke. The large majority of my 3 putts happen when I am not completely SOLD on the line of my putt, aka not committed. Questioning anything over the ball will lead to 3 putts.
Here is a breakdown/checklist on how to approach the green and get your ball in the cup without hesitation.
1. It starts with the approach shot into the green and the decision of direction you make to enter the hole. Scan the entire green with your eyes on the walk-up. Left to right and right to left. Look for a few seconds before you step onto the putting surface. This helps determine the high side and the low side, or if the green is relatively flat. Don’t be picky, just look and make a decision.
2. Once you get to the ball, mark it. Take 3 steps behind your ball mark. Now you must pick a line… Left, Center, or Right of the cup. (Skip step 3 if you know the line) It should take seconds but for those that are not sure it will take longer. Understand that every putt has a statistical level of difficulty. So to increase the odds, players must avoid putting in the unsure mind, and take the time to figure out a line. I also find that people who are 3 putting are overly confident and just not committed aka too quick to putt.
3. To commit, you must find the angle of entry into the cup. Walk up to the hole and look at the cup. How is it cut? Determine if it is cut flat or on a slope angle. This will help you see the break if you are having a hard time. Then determine how much break to play. Cut the hole into 4 quarters with your eyes standing right next to it. Ask yourself, which quarter of the cup does the ball need to enter to make the putt go in the hole?
I encourage using the phrases ‘in the hole’ or ‘to the hole’ as great reinforcement and end thoughts before stroking the ball. I personally visualize a dial on the cup. When my eyes scan the edges, I see tick marks of a clock or a masterlock – I see the dial pop open right when I pick the entry quadrant/tick mark because I cracked the code.

Remember, the most important parts of the putt are: 1.) Where it starts and 2. ) Where it ends.
4. To secure the line, pick something out as the apex of the putt on the walk back to the mark. Stand square behind the ball mark and the line you have chosen.
5. To further secure the line, place your ball down and step behind it to view the line from behind the ball. Don’t pick up the ball mark until you have looked from behind. When you look, you need to scan the line from the ball to the cup with your eyes. While you are scanning, you can make adjustments to the line – left, right or center. Now, on the walk into the box, pickup the mark. This seals the deal on the line. Square your putter head to the ball, with feet together, on the intended line.
6. To make the putt, look at the apex and then the cup while taking your stance and making practice strokes to calibrate and gauge how far back and through the stroke needs to be.
7. To prove the level of commitment, step up to the ball and look down the intended line to the apex back to the cup and then back to the apex down to your ball. As soon as you look down at the ball, never look up again. Complete one entire stroke. A good visual for a putting stroke is a battery percentage and comparing your ‘complete stroke’ to the percentage of battery in the bar.

8. Look over your shoulder once your putter has completed the stroke, i.e. listen for the ball to go in and then look up!
If you find a way that works, remember it, and use it!
- LIKE106
- LEGIT15
- WOW2
- LOL2
- IDHT3
- FLOP2
- OB1
- SHANK27

Like Jordan Spieth, trying to go to a bowed wrist at the top or in the downswing to square the club is placing you in a dangerous position for your lead wrist; you are one tree root or deep rough situation away from a nasty injury that could easily require surgery. Don’t let this be you.
- LIKE1
- LEGIT0
- WOW0
- LOL0
- IDHT1
- FLOP2
- OB0
- SHANK3

Some call the image on the left laid off, but if you are hitting a fade, this could be a perfect backswing for it! Same for across the line for a draw! Stop racking your brain with perceived mistakes and simply match backswing to shot shape!
- LIKE2
- LEGIT0
- WOW0
- LOL0
- IDHT0
- FLOP0
- OB0
- SHANK1
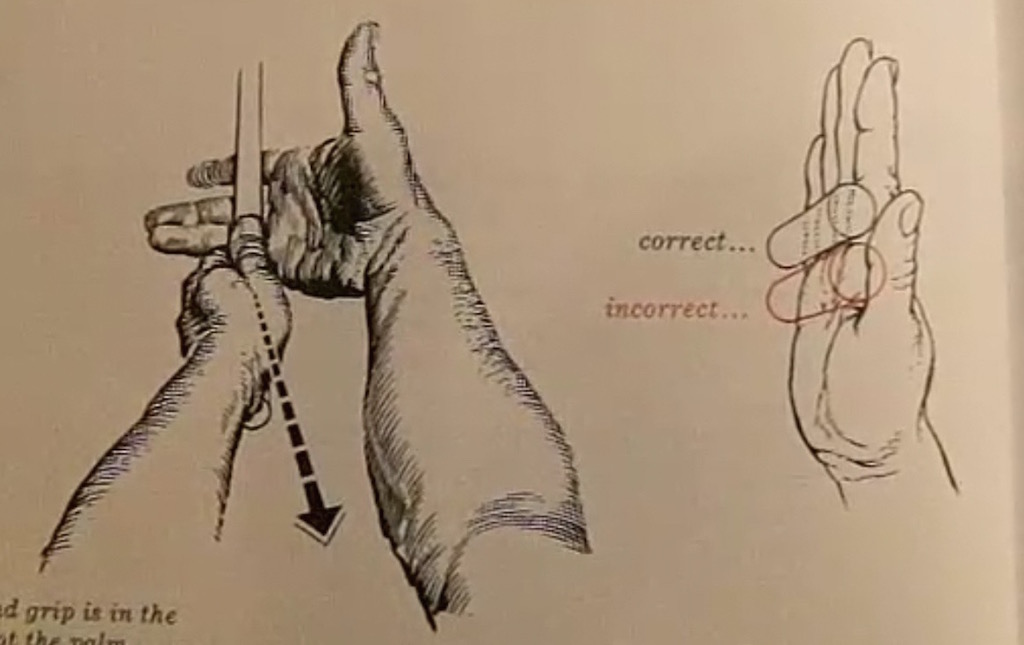
My golf learning began with this simple fact – if you don’t have a fundamentally sound hold on the golf club, it is practically impossible for your body to execute a fundamentally sound golf swing. I’m still a big believer that the golf swing is much easier to execute if you begin with the proper hold on the club.
As you might imagine, I come into contact with hundreds of golfers of all skill levels. And it is very rare to see a good player with a bad hold on the golf club. There are some exceptions, for sure, but they are very few and very far between, and they typically have beat so many balls with their poor grip that they’ve found a way to work around it.
The reality of biophysics is that the body moves only in certain ways – and the particulars of the way you hold the golf club can totally prevent a sound swing motion that allows the club to release properly through the impact zone. The wonderful thing is that anyone can learn how to put a fundamentally sound hold on the golf club, and you can practice it anywhere your hands are not otherwise engaged, like watching TV or just sitting and relaxing.
Whether you prefer an overlap, interlock or full-finger (not baseball!) grip on the club, the same fundamentals apply. Here are the major grip faults I see most often, in the order of the frequency:
Mis-aligned hands
By this I mean that the palms of the two hands are not parallel to each other. Too many golfers have a weak left hand and strong right, or vice versa. The easiest way to learn how to hold the club with your palms aligned properly is to grip a plain wooden ruler or yardstick. It forces the hands to align properly and shows you how that feels. If you grip and re-grip a yardstick several times, then grip a club, you’ll see that the learning curve is almost immediate.
The position of the grip in the upper/left hand
I also observe many golfers who have the butt of the grip too far into the heel pad of the upper hand (the left hand for right-handed players). It’s amazing how much easier it is to release the club through the ball if even 1/4-1/2″ of the butt is beyond the left heel pad. Try this yourself to see what I mean. Swing the club freely with just your left hand and notice the difference in its release from when you hold it at the end of the grip, versus gripping down even a half inch.
To help you really understand how this works, go to the range and hit shots with your five-iron gripped down a full inch to make the club the same length as your seven-iron. You will probably see an amazing shot shape difference, and likely not see as much distance loss as you would expect.
Too much lower (right) hand on the club
It seems like almost all golfers of 8-10 handicap or higher have the club too far into the palm of the lower hand, because that feels “good” if you are trying to control the path of the clubhead to the ball. But the golf swing is not an effort to hit at the ball – it is a swing of the club. The proper hold on the club has the grip underneath the pad at the base of the fingers. This will likely feel “weak” to you — like you cannot control the club like that. EXACTLY. You should not be trying to control the club with your lower/master hand.
Gripping too tightly
Nearly all golfers hold the club too tightly, which tenses up the forearms and prevents a proper release of the club through impact. In order for the club to move back and through properly, you must feel that the club is controlled by the last three fingers of the upper hand, and the middle two fingers of the lower hand. If you engage your thumbs and forefingers in “holding” the club, the result will almost always be a grip that is too tight. Try this for yourself. Hold the club in your upper hand only, and squeeze firmly with just the last three fingers, with the forefinger and thumb off the club entirely. You have good control, but your forearms are not tense. Then begin to squeeze down with your thumb and forefinger and observe the tensing of the entire forearm. This is the way we are made, so the key to preventing tenseness in the arms is to hold the club very lightly with the “pinchers” — the thumbs and forefingers.
So, those are what I believe are the four fundamentals of a good grip. Anyone can learn them in their home or office very quickly. There is no easier way to improve your ball striking consistency and add distance than giving more attention to the way you hold the golf club.
More from the Wedge Guy
- The Wedge Guy: Golf mastery begins with your wedge game
- The Wedge Guy: Why golf is 20 times harder than brain surgery
- The Wedge Guy: Musings on the golf ball rollback
- LIKE93
- LEGIT16
- WOW6
- LOL1
- IDHT0
- FLOP4
- OB1
- SHANK9


Experts on understanding ground force and how shoes can impact your golf game

Three Swing Challenge: Testing the Edel Array F-2 putter

‘Most overrated course in the world!’ – Major champ rips ‘awful’ Pinehurst No. 2

Miura launches new forged wedge series

AimPoint under attack again as footage from U.S. Open enrages golf fans

What clubs do equipment free agents choose to use on tour? We found out

‘You’re right, we’re always wrong!’ – Sergio Garcia receives warning during Open qualifier

Rory McIlroy releases statement following crushing U.S. Open loss

Patrick Cantlay switched driver, irons ahead of the U.S. Open

Highlights from the Wilson Golf Product Testing and Fitting Experience at Pinehurst


Maverick McNealy WITB 2024 (July)
Maverick McNealy WITB accurate as of the 3M Open. More photos from the event here. Driver: TaylorMade Qi10 “Dot” (10.5...


Sam Burns WITB 2024 (July)
Sam Burns’ what’s in the bag accurate as of the 3M Open. More photos from the event here. Driver: Callaway...


Club Junkie WITB league night, week 14: Soft conditions ahead
Week 14 is upon us and it looks like we are going with some more forgiving irons and a new...


Sahith Theegala WITB 2024 (July)
Sahith Theegala what’s in the bag accurate as of the 3M Open. Driver: Ping G430 LST (10.5 degrees @9) Shaft:...
-
 Product Reviews2 weeks ago
Three Swing Challenge: Testing the Edel Array F-2 putter
-
 Equipment2 weeks ago
What clubs do equipment free agents choose to use on tour? We found out
-
 News3 weeks ago
Highlights from the Wilson Golf Product Testing and Fitting Experience at Pinehurst
-
 News3 weeks ago
Davis Thompson’s winning WITB: 2024 John Deere Classic
-

 19th Hole2 weeks ago
Major champ ‘disappointed’ not to be chosen as U.S. Ryder Cup captain
-

 Whats in the Bag5 days ago
Xander Schauffele’s winning WITB: 2024 Open Championship
-

 19th Hole3 weeks ago
Ian Poulter explains decision to skip Open Championship qualifying
-

 19th Hole3 weeks ago
LIV pro explains how he believes players are ‘cheating’ on DP World Tour
Roger Barton
Oct 3, 2020 at 2:51 am
I make sure I look up once the putt is on its way to the hole because if the putt is to strong and goes by by about 18″ to 2ft you want to see the line once it passes the hole for the putt back.
Andrew J Walters
Oct 2, 2020 at 5:26 pm
If you misread a short putt, a simple tap in is left. Misread a long putt and 3-putting is the norm. There is no more 3-putting with P&SI EGOS..
jnak97
Oct 2, 2020 at 1:33 pm
I find that once I get lined up, I can’t look at the apex anymore because it will mess up my distance control (line fixation). I just look at the cup and then back down to my ball before pulling the trigger. Maybe I will give your method a shot and see what happens!