Instruction
How to properly screen a golfer

As a Level 3 TPI CGFI and 20-year Corrective Exercise Specialist, I have come to appreciate the great value that the TPI Golf Fitness Assessment along with a PAR-Q and a Static Flexibility Assessment can provide to the fitness professional.
With the advances in today’s technology, it is relatively easy for the fitness professional to uncover some of the once-hidden issues that cause dysfunction in the golf swing. With that being said, we have been strongly compelled into adopting newer high-tech variables into our evaluation process, one being an in-depth biomechanics screening procedure and the other being a 3-D motion and pressure pad screenings.
- BioSwing Dynamics is the brain child of top-100 teachers Mike Adams and E.A. Tischler. Their theory is that we are all biomechanically predisposed to swing the golf club in a fashion unique to our own body dimensions and tendencies. Players fail not based of lack of effort, but because their bodies simply cannot cooperate and perform the movements that we ask them to do efficiently.
- BodiTrak Dynamic Balancing System is a high-tech pressure pad that showcases data specific to details that concern your balance and how you transfer your weight during your golf swing.
- K-Vest is 3-D motion technology that diagnoses accuracy and distance issues, and provides biofeedback in relation to the efficiency of your golf swing.
- SAM Puttlab is a putting diagnostic tool that is pinnacle in the proper assessment of a players putting skill.
Once the golfer is screened and the dysfunctions and limitations are identified, we can then easily address the problems and correct them through the application of the Corrective Exercise Continuum. But first, every single golfer needs to be put through a variety of screens to help us to outline the problems and develop a plan of attack. We happen to use a one-of-a-kind, screening method to do this.
The Screening Process
We first need to find out a little subjective information from the client, such as family and medical history, any chronic injuries and finally exercise experience. We do this through an in-depth physical activity readiness questionnaire (par-q) to see what specific variables we are facing. Next we complete a few general moving assessments to see the golfer’s functional capabilities as well as any postural deviations from the norm.
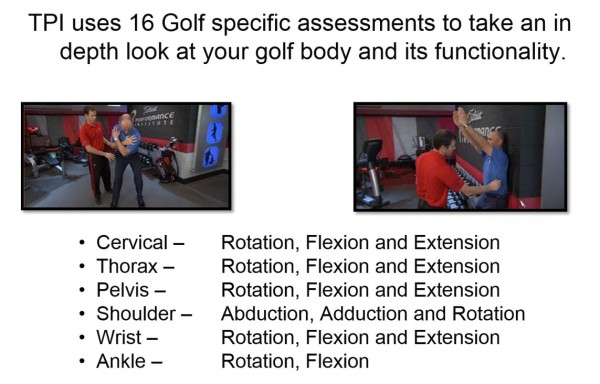
After the par-q and general movement assessments are completed we then need to move to the 16-point TPI Golf Specific Assessment to see how the body moves in relation to the golf swing. This assessment identifies any limitations and/or deviations in a player’s body that can adversely affect the golf swing and potentially lead to injury.
The third step in screening the golfer deals with is the individual biomechanics and how the body is intended to swing. The BioSwing Dynamics Assessment tells us key elements about the probabilities of how the body will move naturally and comfortably through the golf swing.
- Wingspan Screen = lateral motion
- Backswing Plane Screen = right-hand grip position, backswing plane, wrist hinge, linkage, release
- Arm Elevation Screen = top of the backswing position, down swing plane
- Post Screen = front, center, or rear post
- Hip Speed Screen = fast, medium, or slow hips, how much rotation, how much vertical
- Foot Flare Screen = foot flare need for their rotation and vertical package
- Grip Screen = ideal left-hand grip
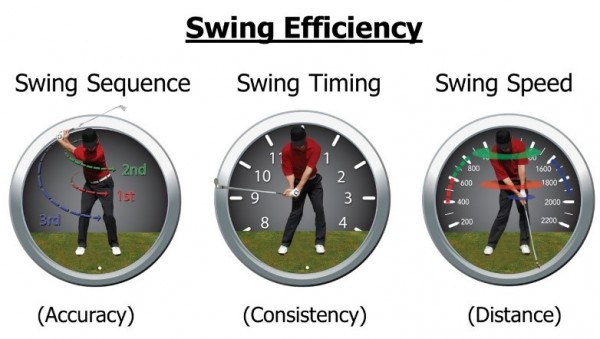
For the fourth step in our process we turn to K-VEST’s wireless 3D technology to capture the golf swing and more efficiently diagnose the true cause of accuracy and distance issues. As K-VEST Certified Professionals we can accurately analyze the golfer’s swing and design a custom game-improvement program specifically designed to help make them a more efficient ball striker. We use the same technology that the leading PGA and LPGA players use. The K-VEST system will report on swing information such as swing sequence, swing timing and rotational velocities.
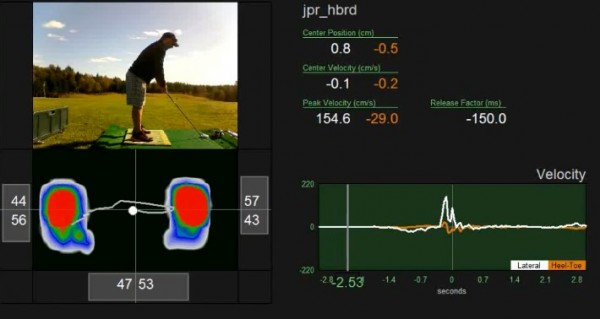
Another valuable technological tool is the BodiTrak Dynamic Balancing System which gives us information specific to your balance and how you transfer your weight during your golf swing. Motion-capture video is essential, but where it leaves off, BodiTrak picks up. In my experience, BodiTrak has become one of the quickest and easiest ways for a golfer to look at a video monitor and learn from what they see, truly feel it, and immediately implement it. The biofeedback that BodiTrak gives is simple but so effective.
Finally, we do our putting performance assessment via Science & Motion Sports PuttLab. The wonderful thing about golf is that it’s an imperfect sport played by imperfect people meaning, we all hit poor shots and we’re entitled to do so. The short game is the single biggest difference maker when it comes to lowering your handicap and your scores. Roughly 65 percent of the shots you take during a round of golf are from 100 yards and in. The game itself was designed around the idea that you’re provided two putts on each green during a stipulated round. Science & Motion Sports PuttLab is one of the best pieces of golf instruction equipment on the planet. With that being said, it has been determined that most players simply are not aware of what needs to happen between the club face and a ball when they are on a putting green. Below is listed the “top six” keys to putting when they are broken down via SAM PuttLab. (1)
- Loft/Lie: It’s important to remember there’s a significant difference between “Static Loft” & “Dynamic Loft.” Static Loft is the stated/measured loft on the putter. The Stated Loft is one portion of a putters “specs” and significantly less important than Dynamic Loft because very few players hit a putt from a true plum (vertical) position. Dynamic Loft is the actual loft the ball is coming off the face of the putter at impact and is based on shaft lean, attack angle, static loft and centeredness of contact (in relation to the putters true sweet spot). Two degrees of Dynamic Loft is ideal for most greens which are around 10 on the stimp meter, but the faster the greens get the closer you can adjust the loft of your putter to 0 degrees.
- Face Angle: The cup is 1-degree wide pace specific which means your ball speed off the face of the putter is very important. If your putter face is closed or open by 1 degree with perfect rolling speed (12 to 18 inches past the cup) you will make a 10-foot putt, but a 12-footer is a dead miss. Also, for every foot past the hole you roll the ball it reduces the effective size of the cup by 12 percent. There are plenty of stroke path training aids, but very few face aim devices. Using a putting laser will help improve your consistency of aim.
- Impact Location: Centeredness of contact on the true “sweet spot” on your putter is critical. You can measure this by tapping on the face of your putter with a tee with one hand while holding the base of the grip lightly in the fingertips of your other hand. If you can feel the face twisting you haven’t located the ideal position yet. One of the best practice drills to work on improving your center of contact is once you’ve determined your putters “sweet spot” you take two rubber bands and wrap them around your putter providing just enough room on the putter face for the ball to make contact with that predetermined spot. One of the other less expensive options to find out where you’re making contact with the ball is by using dry athlete’s foot powder in a can. Spray some on the face and you will see immediately where you’ve struck the putt.
- Rise: The degree of “rise” is dependent on a number of factors like shaft lean, static loft and face angle at impact. To base the adjustment of the static loft off the average of two separate measurements using SAM PuttLab. The more you lean the shaft at impact the greater the difference between Static & Dynamic Loft will be. You can lean it two directions. “Toward” the target is a reduction in Dynamic Loft and “Away” results in an increase of the putters Dynamic Loft. In this respect your driver and putter are very similar, the more “up” on the ball you make contact the less spin will be generated and therefore the better the roll on the fairways & greens.
- Ball Velocity (or Ball Speed): The ball speed off the face of the putter needs to be uniform, but this is also dependent on the softness of the face of the putter you choose and the consistency of contact. The ball speed can be fast or slow as long as it’s consistent. It’s hard to quantify this number, but what you should look at is your consistency of timing when looking at PuttLab data. The harder the face on your putter the faster the relative ball speed. Additionally, the faster the speed of the greens that you typically play on the softer the face on your putter should be. This is one of the areas that you should pay the most amount of attention to. The use of a metronome or music with a consistent rhythm would be helpful in developing tempo. Sam Snead used to hum the Blue Danube to help improve the tempo of his full swing, so if you’re looking for better distance control on the greens this is a great way to achieve it. A great method to determine the speed at which a player should set their metronome is by counting the number of steps they take (while walking at a normal rate) on a flat surface for 45 seconds. Repeat this measurement five times and take the average. The number you come up with is what your metronome speed should be while putting and regardless of the length of putt that tempo should stay the same.
- Path: Science & Motion Sports indicates that 17 percent of the initial direction a ball travels is based on face angle at impact. There are differing opinions on this number and some current experts are putting path in relation to face as high as 7 percent of the initial direction the golf ball travels at impact. This is the least important of the factors mentioned whenever putting is discussed. What this means is that anywhere between 83 percent and 93 percent of the initial direction the ball travels is face related (with a putter). The more you compress the ball the more direction plays a part, so your driver’s path matters more than that of your putter. There are an abundance of path-related training aids on the market place today, so test your stroke to see what you do naturally and find one that compliments it.
Now after all of the biomechanical screenings and the technological assessments are completed, we still need to find out what is causing the restrictions and the dysfunctions. With all of my experience I truly feel that nothing beats a good old-fashioned static flexibility test after a good warm up. The fitness professional performs a hands-on muscular flexibility assessment that will tell us what muscles or joint dysfunctions are causing the issues in the golf swing.
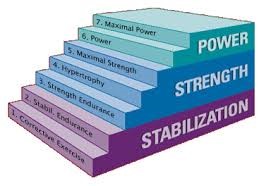
After all of the assessments are completed and the data has been recorded and analyzed, now the real work starts — it is time to develop a corrective exercise plan to get the body back on track to normal function. We accomplish through a four-step process called the Corrective Exercise Continuum. The Corrective Exercise Continuum is an integral part of the Stabilization phase in the three-phase, seven-step process called the N.A.S.M. OPT mode. In my opinion the Corrective Exercise phase is the most important step. Please, allow me to define the term of Corrective Exercise and the Corrective Exercise Continuum for you.
Corrective Exercise is the process of identifying both postural and movement dysfunctions as well as joint limitations combined with the development of a program to correct them. The focus of Corrective Exercise is on movements designed to create balance, stability, and mobility in areas that are currently dysfunctional.
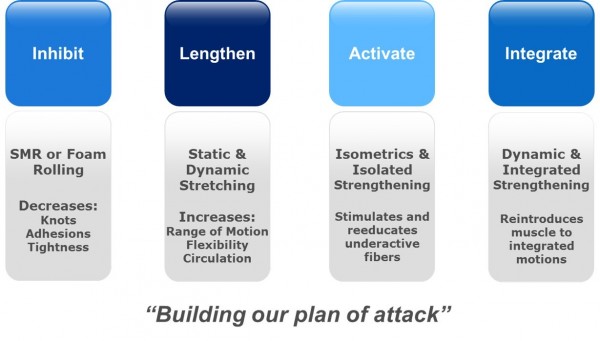
The Corrective Exercise Continuum is a four-step process and is defined as “the systematic programing process used to address neuro-musculoskeletal dysfunction through the use of inhibitory, lengthening, activation and integration techniques” (NASM Essentials, 2011). While that may seem like a lot, it is just a fancy way of saying “this continuum identifies a problem and solves it with a systematic and sophisticated plan.”
The Continuum is broken down into four phases:
- Inhibitory Techniques – these techniques are used to release tension, dissolve adhesions and decrease over-activity in the neuromyofascial tissues in the body (foam rollers).
- Lengthening Techniques – this is used to increase the extensibility, length and range of motion (ROM) of the neuromyofascial tissues (various stretches).
- Activation Techniques – this phase involves re-educating or increasing the activity of the underactive tissues (isolated strengthening).
- Integration Techniques – the integration techniques retrain the function of all the muscles through functionally progressive movements (multi-joint integrated strengthening).
Each and every corrective exercise plan is unique to the individual and their issues. Only a seasoned fitness professional with a corrective exercise background will truly be able to create a safe and effective program to restore optimal function. A great place to start to find answers in your area is the mytpi.com website. You will be able to find highly educated and experienced professionals to help you on your way to your best golf ever.
With all of that being said, the TPI 16-point assessment is an in-depth look into the function of the golfer’s body. There are many fantastic assessment processes — such as the FMS screen — that athletes partake in every day but not one nor all of them compare in the specificity to the golfer that the TPI assessment provides. The golfer can find qualified fitness professionals near his home or office by visiting the “Find an Expert” tab at www.mytpi.com.
For any additional questions or comments please feel free to contact me via email at [email protected]
1. Robb Gibb, PGA
Level III Senior PuttLab Instructor
Science & Motion Sports, GmbH
- LIKE73
- LEGIT12
- WOW12
- LOL2
- IDHT0
- FLOP5
- OB6
- SHANK35
Instruction
The Wedge Guy: The easiest-to-learn golf basic
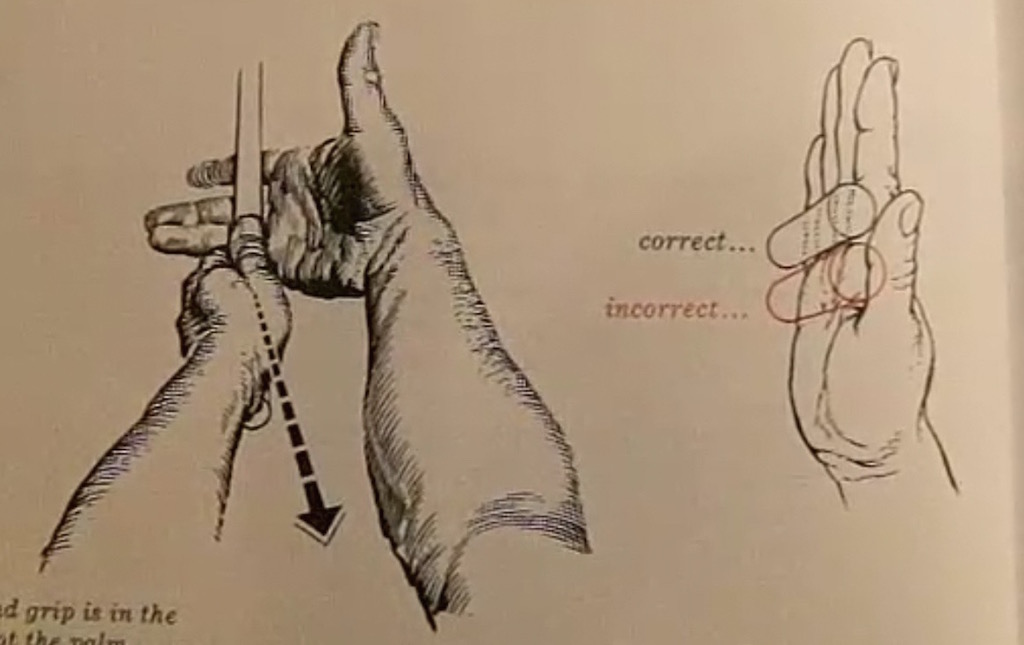
My golf learning began with this simple fact – if you don’t have a fundamentally sound hold on the golf club, it is practically impossible for your body to execute a fundamentally sound golf swing. I’m still a big believer that the golf swing is much easier to execute if you begin with the proper hold on the club.
As you might imagine, I come into contact with hundreds of golfers of all skill levels. And it is very rare to see a good player with a bad hold on the golf club. There are some exceptions, for sure, but they are very few and very far between, and they typically have beat so many balls with their poor grip that they’ve found a way to work around it.
The reality of biophysics is that the body moves only in certain ways – and the particulars of the way you hold the golf club can totally prevent a sound swing motion that allows the club to release properly through the impact zone. The wonderful thing is that anyone can learn how to put a fundamentally sound hold on the golf club, and you can practice it anywhere your hands are not otherwise engaged, like watching TV or just sitting and relaxing.
Whether you prefer an overlap, interlock or full-finger (not baseball!) grip on the club, the same fundamentals apply. Here are the major grip faults I see most often, in the order of the frequency:
Mis-aligned hands
By this I mean that the palms of the two hands are not parallel to each other. Too many golfers have a weak left hand and strong right, or vice versa. The easiest way to learn how to hold the club with your palms aligned properly is to grip a plain wooden ruler or yardstick. It forces the hands to align properly and shows you how that feels. If you grip and re-grip a yardstick several times, then grip a club, you’ll see that the learning curve is almost immediate.
The position of the grip in the upper/left hand
I also observe many golfers who have the butt of the grip too far into the heel pad of the upper hand (the left hand for right-handed players). It’s amazing how much easier it is to release the club through the ball if even 1/4-1/2″ of the butt is beyond the left heel pad. Try this yourself to see what I mean. Swing the club freely with just your left hand and notice the difference in its release from when you hold it at the end of the grip, versus gripping down even a half inch.
To help you really understand how this works, go to the range and hit shots with your five-iron gripped down a full inch to make the club the same length as your seven-iron. You will probably see an amazing shot shape difference, and likely not see as much distance loss as you would expect.
Too much lower (right) hand on the club
It seems like almost all golfers of 8-10 handicap or higher have the club too far into the palm of the lower hand, because that feels “good” if you are trying to control the path of the clubhead to the ball. But the golf swing is not an effort to hit at the ball – it is a swing of the club. The proper hold on the club has the grip underneath the pad at the base of the fingers. This will likely feel “weak” to you — like you cannot control the club like that. EXACTLY. You should not be trying to control the club with your lower/master hand.
Gripping too tightly
Nearly all golfers hold the club too tightly, which tenses up the forearms and prevents a proper release of the club through impact. In order for the club to move back and through properly, you must feel that the club is controlled by the last three fingers of the upper hand, and the middle two fingers of the lower hand. If you engage your thumbs and forefingers in “holding” the club, the result will almost always be a grip that is too tight. Try this for yourself. Hold the club in your upper hand only, and squeeze firmly with just the last three fingers, with the forefinger and thumb off the club entirely. You have good control, but your forearms are not tense. Then begin to squeeze down with your thumb and forefinger and observe the tensing of the entire forearm. This is the way we are made, so the key to preventing tenseness in the arms is to hold the club very lightly with the “pinchers” — the thumbs and forefingers.
So, those are what I believe are the four fundamentals of a good grip. Anyone can learn them in their home or office very quickly. There is no easier way to improve your ball striking consistency and add distance than giving more attention to the way you hold the golf club.
More from the Wedge Guy
- The Wedge Guy: Golf mastery begins with your wedge game
- The Wedge Guy: Why golf is 20 times harder than brain surgery
- The Wedge Guy: Musings on the golf ball rollback
- LIKE86
- LEGIT13
- WOW6
- LOL1
- IDHT0
- FLOP4
- OB1
- SHANK8
Instruction
Clement: Stop ripping off your swing with this drill!

Not the dreaded headcover under the armpit drill! As if your body is defective and can’t function by itself! Have you seen how incredible the human machine is with all the incredible feats of agility all kinds of athletes are accomplishing? You think your body is so defective (the good Lord is laughing his head off at you) that it needs a headcover tucked under the armpit so you can swing like T-Rex?
- LIKE0
- LEGIT2
- WOW2
- LOL0
- IDHT0
- FLOP0
- OB0
- SHANK2
Instruction
How a towel can fix your golf swing
This is a classic drill that has been used for decades. However, the world of marketed training aids has grown so much during that time that this simple practice has been virtually forgotten. Because why teach people how to play golf using everyday items when you can create and sell a product that reinforces the same thing? Nevertheless, I am here to give you helpful advice without running to the nearest Edwin Watts or adding something to your Amazon cart.
For the “scoring clubs,” having a solid connection between the arms and body during the swing, especially through impact, is paramount to creating long-lasting consistency. And keeping that connection throughout the swing helps rotate the shoulders more to generate more power to help you hit it farther. So, how does this drill work, and what will your game benefit from it? Well, let’s get into it.
Setup
You can use this for basic chip shots up to complete swings. I use this with every club in my bag, up to a 9 or 8-iron. It’s natural to create incrementally more separation between the arms and body as you progress up the set. So doing this with a high iron or a wood is not recommended.
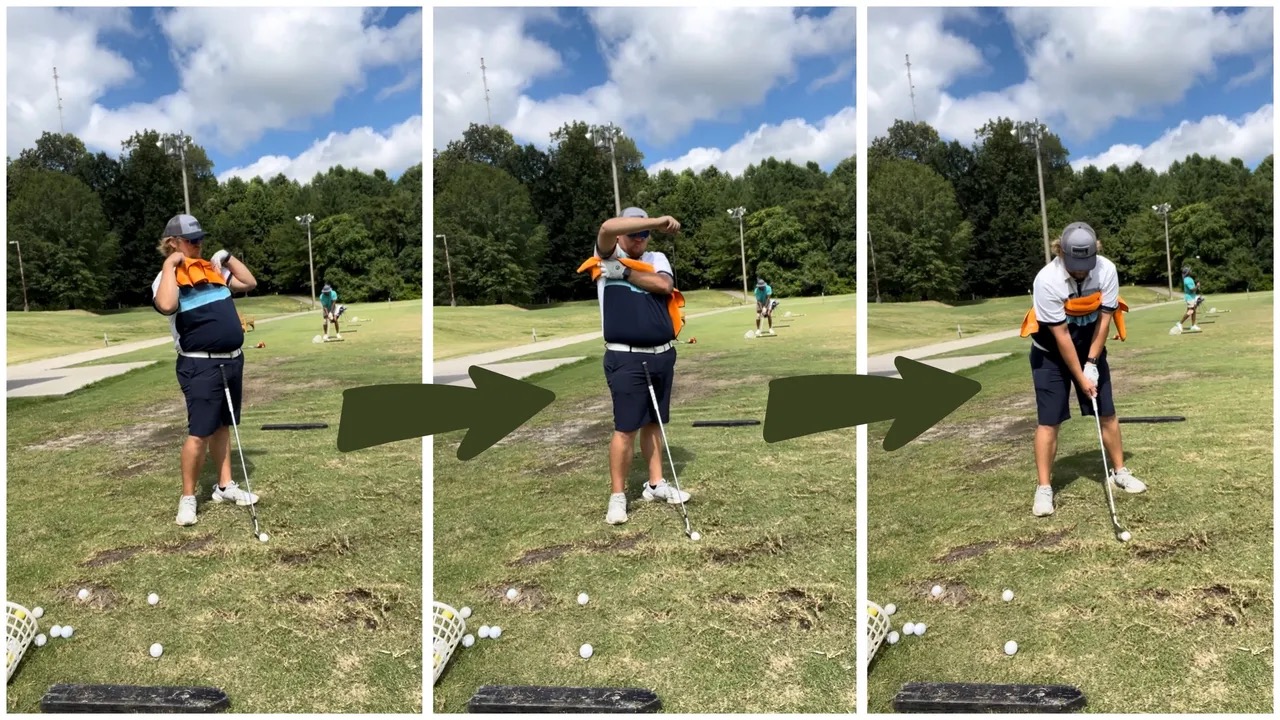
While you set up to hit a ball, simply tuck the towel underneath both armpits. The length of the towel will determine how tight it will be across your chest but don’t make it so loose that it gets in the way of your vision. After both sides are tucked, make some focused swings, keeping both arms firmly connected to the body during the backswing and follow through. (Note: It’s normal to lose connection on your lead arm during your finishing pose.) When you’re ready, put a ball in the way of those swings and get to work.
Get a Better Shoulder Turn
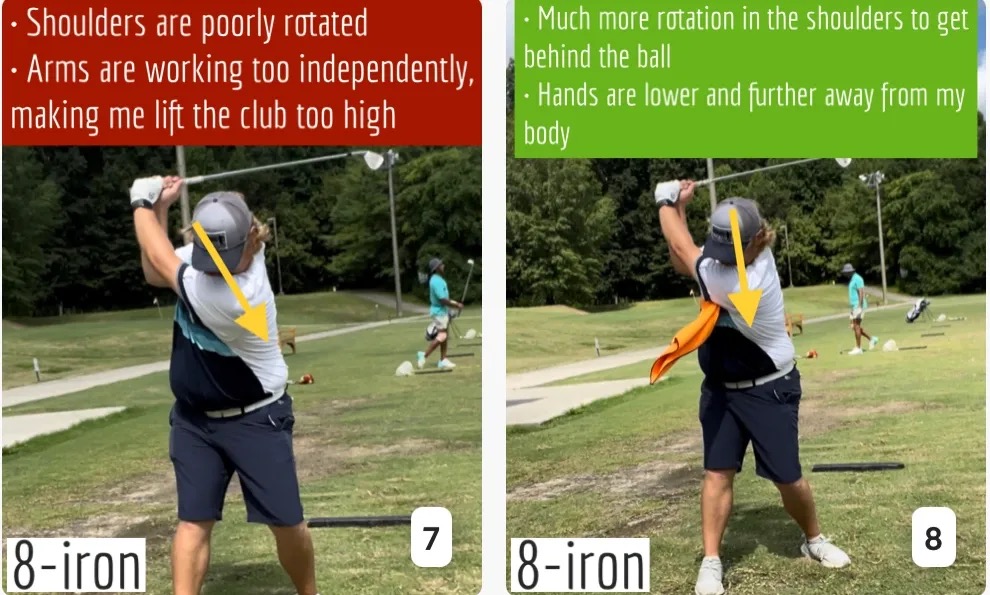
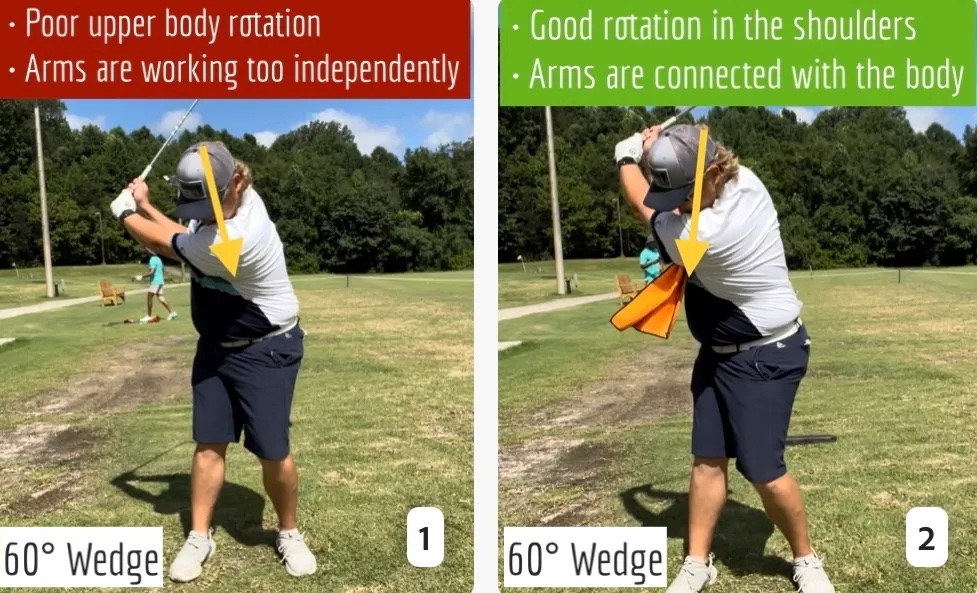
Many of us struggle to have proper shoulder rotation in our golf swing, especially during long layoffs. Making a swing that is all arms and no shoulders is a surefire way to have less control with wedges and less distance with full swings. Notice how I can get in a similar-looking position in both 60° wedge photos. However, one is weak and uncontrollable, while the other is strong and connected. One allows me to use my larger muscles to create my swing, and one doesn’t. The follow-through is another critical point where having a good connection, as well as solid shoulder rotation, is a must. This drill is great for those who tend to have a “chicken wing” form in their lead arm, which happens when it becomes separated from the body through impact.
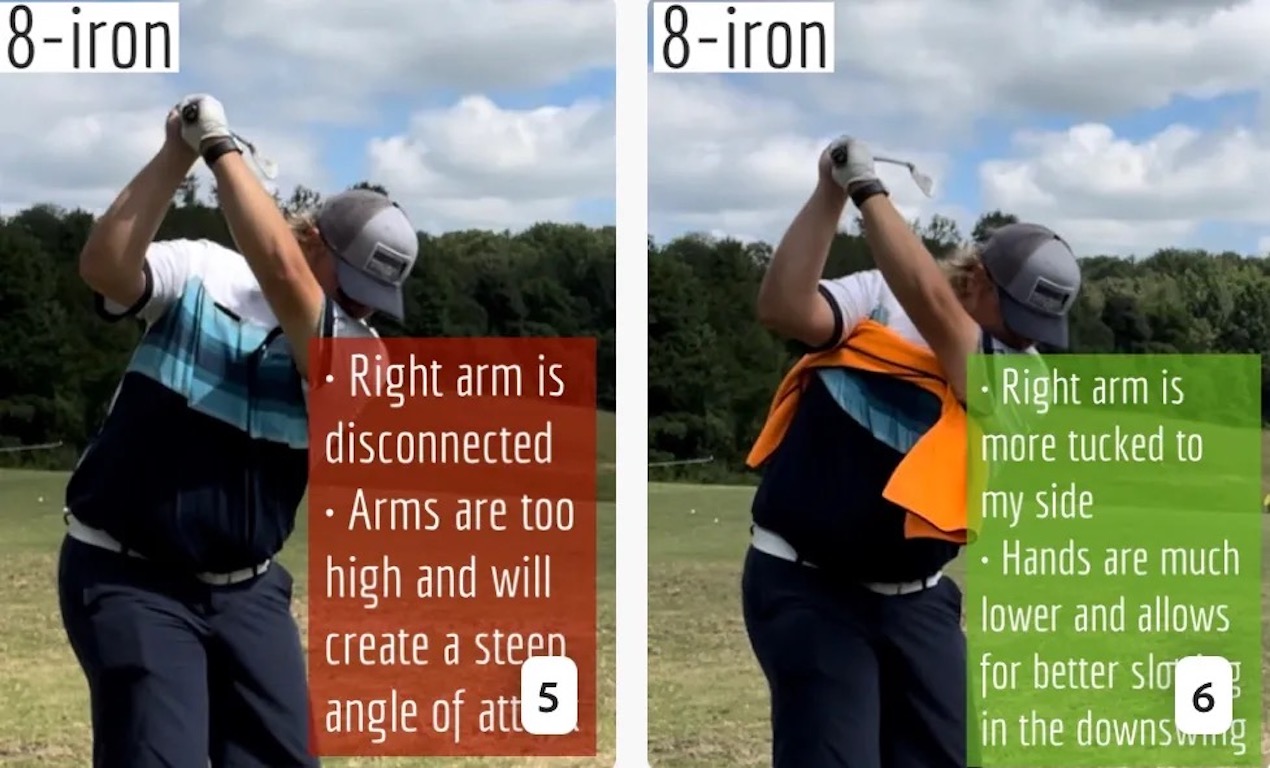
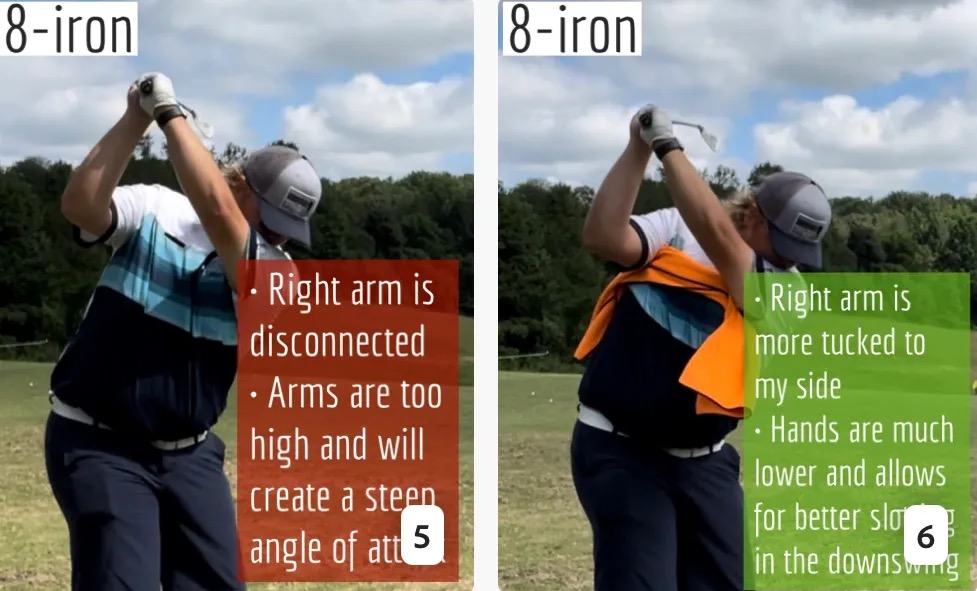
In full swings, getting your shoulders to rotate in your golf swing is a great way to reinforce proper weight distribution. If your swing is all arms, it’s much harder to get your weight to naturally shift to the inside part of your trail foot in the backswing. Sure, you could make the mistake of “sliding” to get weight on your back foot, but that doesn’t fix the issue. You must turn into your trial leg to generate power. Additionally, look at the difference in separation between my hands and my head in the 8-iron examples. The green picture has more separation and has my hands lower. This will help me lessen my angle of attack and make it easier to hit the inside part of the golf ball, rather than the over-the-top move that the other picture produces.
Stay Better Connected in the Backswing
When you don’t keep everything in your upper body working as one, getting to a good spot at the top of your swing is very hard to do. It would take impeccable timing along with great hand-eye coordination to hit quality shots with any sort of regularity if the arms are working separately from the body.
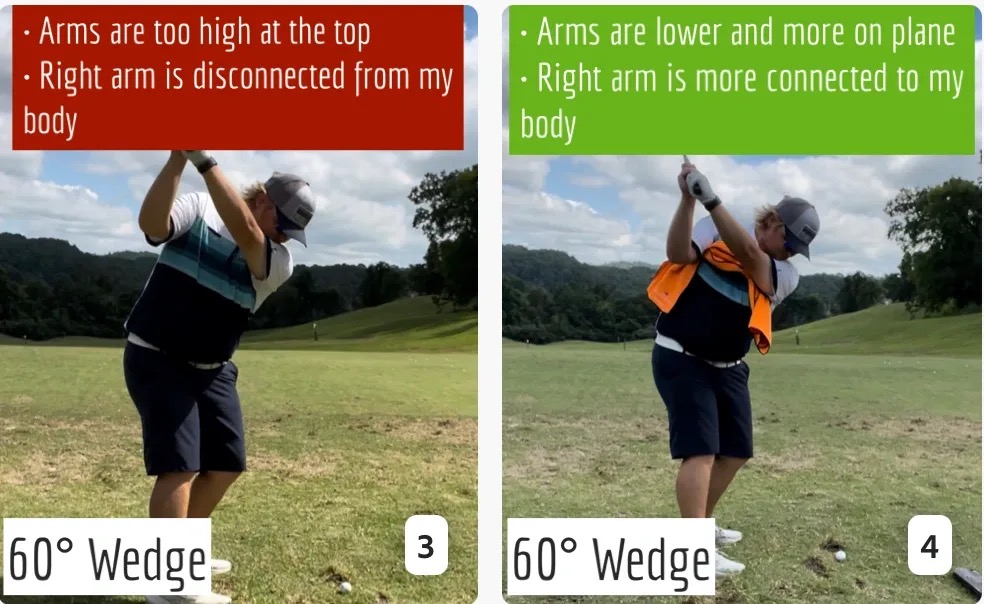
Notice in the red pictures of both my 60-degree wedge and 8-iron how high my hands are and the fact you can clearly see my shoulder through the gap in my arms. That has happened because the right arm, just above my elbow, has become totally disconnected from my body. That separation causes me to lift my hands as well as lose some of the extension in my left arm. This has been corrected in the green pictures by using this drill to reinforce that connection. It will also make you focus on keeping the lead arm close to your body as well. Because the moment either one loses that relationship, the towel falls.
Conclusion
I have been diligent this year in finding a few drills that target some of the issues that plague my golf game; either by simply forgetting fundamental things or by coming to terms with the faults that have bitten me my whole career. I have found that having a few drills to fall back on to reinforce certain feelings helps me find my game a little easier, and the “towel drill” is most definitely one of them.
- LIKE12
- LEGIT2
- WOW2
- LOL0
- IDHT0
- FLOP2
- OB0
- SHANK8
-

 19th Hole2 weeks ago
Dave Portnoy places monstrous outright bet for the 2024 Masters
-

 19th Hole2 weeks ago
Tiger Woods arrives at 2024 Masters equipped with a putter that may surprise you
-

 19th Hole13 hours ago
‘Absolutely crazy’ – Major champ lays into Patrick Cantlay over his decision on final hole of RBC Heritage
-

 19th Hole3 weeks ago
Report: Tiger Woods has ‘eliminated sex’ in preparation for the 2024 Masters
-
 19th Hole1 week ago
Two star names reportedly blanked Jon Rahm all week at the Masters
-
 19th Hole7 days ago
Report: LIV Golf identifies latest star name they hope to sign to breakaway tour
-

 19th Hole1 week ago
Neal Shipley presser ends in awkward fashion after reporter claims Tiger handed him note on 8th fairway
-

 19th Hole6 days ago
Brandel Chamblee has ‘no doubt’ who started the McIlroy/LIV rumor and why












Johnny
Apr 2, 2016 at 12:19 pm
Usually ppl spend 3k € to Join a club and 2k to buy clubs…
Every year….
Big Slice
Mar 28, 2016 at 2:33 pm
This would be incredible stuff if it was available at a price the average golfer could afford. Someone I know went to a golf specific training facility and they quoted him over $3k for a personal assessment and fitness plan.