Instruction
How to take memorable golf photographs

Rick Rappaport is a commercial photographer in Portland, Ore., specializing in people and producing targeted communications within dynamic compositions.
Sure if you had all those lenses the pros use as well as the time to wait for the perfect light, you’d shoot good pictures too. But all you have is this dinky point and shoot and about 30 seconds before it’s your turn to tee off.
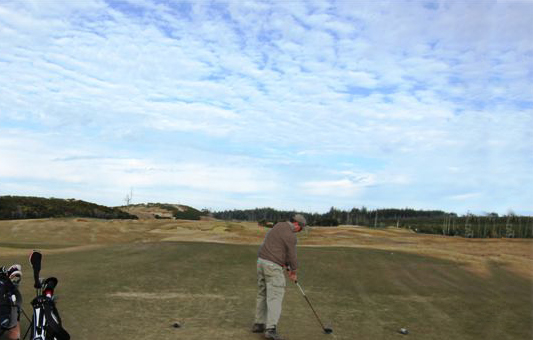
You’ll likely get something like this:
First tee photo jitters. Center of interest too centered, golfer mostly lost against similar background colors and too much bright sky. Bags on left neither wholly in nor out, just mostly a place your eye goes to even though it’s not of real interest.
It’ll still bring back memories, but if you’re going to show many pictures of this caliber you’re also going to have to provide extra pillows for the sleepy time that follows.
Photographing a golf course is challenging even for professionals, but by following three simple rules you will make great strides toward keeping your audience awake. Consider implementing these three rules as part of your picture taking pre-shot routine, because simply aiming the point and shoot in the general direction of beauty is not enough.
You see beauty with your brain not your eyes. Your eyes are merely windows for the brain. Your brain has an aesthetic and emotional connection to your world, the beautiful blue sky, the yellow flag stick and your golfing buddies. But your camera only records pictures of shapes, colors and light. Your goal is to be able to use your camera to produce images along the lines of what your brain told you was worthwhile about taking the picture in the first place.
Your camera sees that yellow flag stick too but as a thin vertical line occupying only about 3 percent of the viewfinder’s landscape. Your golfing buddies? They’re just more vertical blobs occupying about 20 percent of the viewfinder. So while your brain–through your eyes–is attracted to the overall beauty of the lovely scene, cherry picking objects near and dear to you, your point and shoot is just seeing objects, proportions and space. To produce the picture that represents what your eyes are honing in
on, you have to take charge and tell the camera to do some honing in itself. Which brings us to Rule No. 1.
Rule No. 1: Your picture must have a center of interest not in the center.
No fancy compositional theories here. Something in your viewfinder has to be large enough or otherwise attractive enough to immediately engage the
viewer.
No, your buddy standing 10 feet away, head to toe with lots of space above and below him, looks to your brain like a center of interest but not to your point and shoot. To the camera he looks like a vertical blob occupying about 5 percent of the viewfinder and the other 95 percent has no center of interest either — it’s just a mass of blue sky or green grass or trees or an unplanned combination of all three.
No, the flag stick 30 yards away isn’t a center of interest either. Nor is the gigantic expanse of green between you and the stick. A green piece of land alone is not a center of interest. Neither is the sky. Neither is the sand trap 20 yards away and neither is the ocean in the background 500 yards away.
Lost in Space. Not really necessary to always see your buddies head to toe. This svelte bunch might get away with it but for many of us it’s not the most flattering pose. Typical framing to keep moving back until you can see the full body. Your eye sees your guys but the camera sees the sky.
Size always matters here. Size does it. Get closer to the ones you love — or like, get closer to the flag stick, get closer to the sand trap. Just pick yourself up and move closer.
Saturday is moving day. Walking in closer makes our guys bigger and the image more personal. Understanding that the viewer of the picture sees your picture at the same height as the camera shoots the scene allows us to make the guys appear a bit larger than life as we lower our camera shooting height about two feet.
Sometimes the key object doesn’t have to be large so long as other visual elements “point” to it.
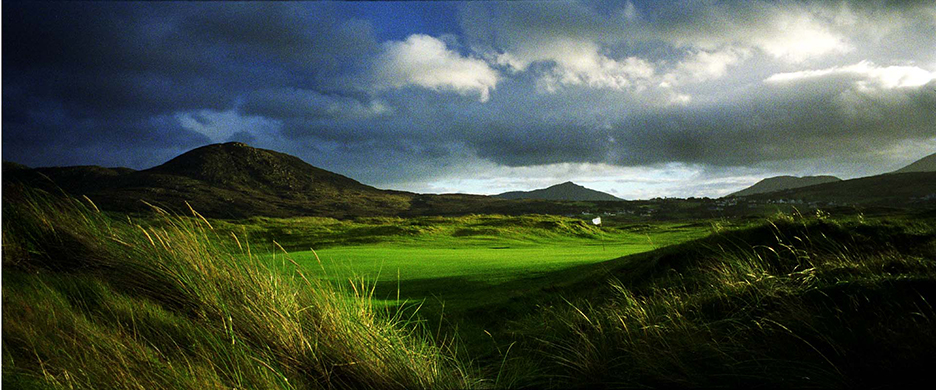
Oh to be here again, Carne Golf Links, Ireland. Can’t remember the hole, but I looked back after walking away with some godawful score and saw this scene as the storm moved in hard. The lighting from behind, the beach grass foreground almost pointing to the hole, and the flag the only thing bright white in the scene allows it to be very small in scale and still retain power in the composition.
Next, place your center of interest off center in the camera viewfinder. There is something called the golden mean, the rule of thirds, quite relevant for our discussion now, which basically divides a certain proportioned rectangle into thirds both in height and in width. Where those thirds lines intersect are highly likely to be good points for
placing your center of interest. Just take it as a given but you can research this yourself. (Here is a good place to start: http://www.jakegarn.com/the-rule-of-thirds/)
Moving in closer has helped create a center of interest by size alone. Moving that center of interest off to the side a bit has helped create a more interesting picture to view. By also moving up and down and not just standing at your full height you may find a better shooting angle too.
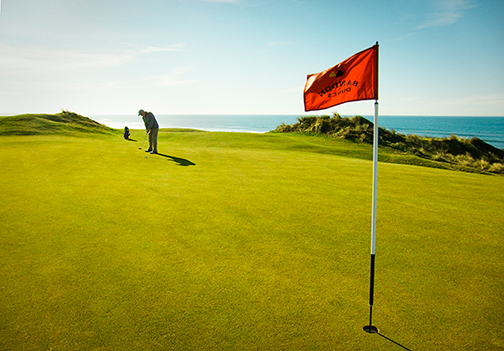
Moving down with the camera accentuates the height of the flagstick. Moving my body–which moves the camera–yes you actually have to move around–puts the stick and the golfer close to the thirds positions. Finding a hole where the light comes in at an angle somewhat behind the flag illuminates it and makes it a stronger center of interest. Its shadow provides a strong three dimensional feel to the image.
Which brings us to Rule No. 2.
Rule No. 2. Eliminate distracting background or foreground stuff.
Again, no fancy compositional theories. Remember the guy who put the “V” sign with his fingers above your head in the class portrait? Same idea here only there is no guy and everything has the potential to be that distracting “V”. What is distracting? Anything that does not contribute to the picture is distracting. Ask yourself, is this contributing to the success of my picture? If not eliminate it. Some stuff is obvious: tree branches in the background bisecting your buddy’s head, a tree limb or rock or foliage in the foreground that blocks the heart of your center of interest or just dangles somewhere at the edge of your picture and begs the question “what am I supposed to be and why am I here?” (Often properly placed foreground stuff can lead the viewer right to the center of interest.)
When in doubt eliminate it out.
Take time to make it right. Golfer too centered. Camera just placed to photographer’s eye without thought about moving up or down. Bag is more a distraction than a helpful element which could lead the viewer into the picture. Guy on left and piece of guy at the edge are not helping. They’re just body blobs drawing attention away from the alleged center of interest. I know, I know, he’s swinging- you can’t move. So either ask the players to move their bags and their bodies and/or you move and get ready for the next guy to tee off.
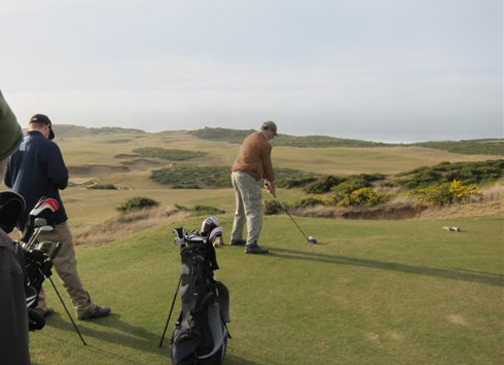
Almost Clear sailing. Same tee 30 seconds later. You’re starting to get it. You eliminated the distracting elements, you took advantage of the beautiful side light and you’re starting to place the golfer off center. What could make this better? Two things come to mind: Move your body and the camera down a bit so that my head rises above the landscape and isn’t compositionally buried into it. Either move to the right so I move to the left in the composition—or stay there and move (“pan”) your camera right to achieve the same position. Either move will change what you see in the background. Here we see the entire hole. Panning the camera right (to move me left in the composition) or physically moving the camera to the right (to move me left in the composition) will produce different backgrounds. It’s your choice.
Rule No. 3. Don’t take pictures with the sun directly behind you.
That sun angle will not create any shadow definition in the landscape and the scene will appear very two dimensional, or “flat”. You always need to create the illusion of three dimensions and light coming in from a side or backlit angle will do just fine. We’re not even talking about people squinting to see you with the sun blasting their faces or you squinting to see the viewfinder with the sun blasting it.
Don’t do this at home. Don’t even do this on the course unless these guys are your opponents.
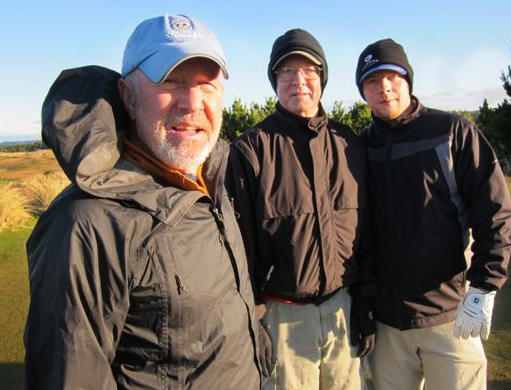
Well, almost. Same place 3 seconds later. I moved around so the sun helps our composition, moved closer and tried not to center anyone. Moved one guy forward a bit to add more of a three dimensional feel. If only I could get these guys to actually look alive and smile but we’ll talk about that later.
Taking good pictures is as much a function of eliminating distractions as it is actively creating a composition. Once you have a center of interest placed off center, eliminated distracting background or foreground stuff and kept the sun almost anywhere except right behind you, you will have produced an image worth looking at.
By Rick Rappaport, www.rickrappaport.com
- LIKE10
- LEGIT0
- WOW0
- LOL0
- IDHT0
- FLOP2
- OB0
- SHANK0
Instruction
The Wedge Guy: The easiest-to-learn golf basic
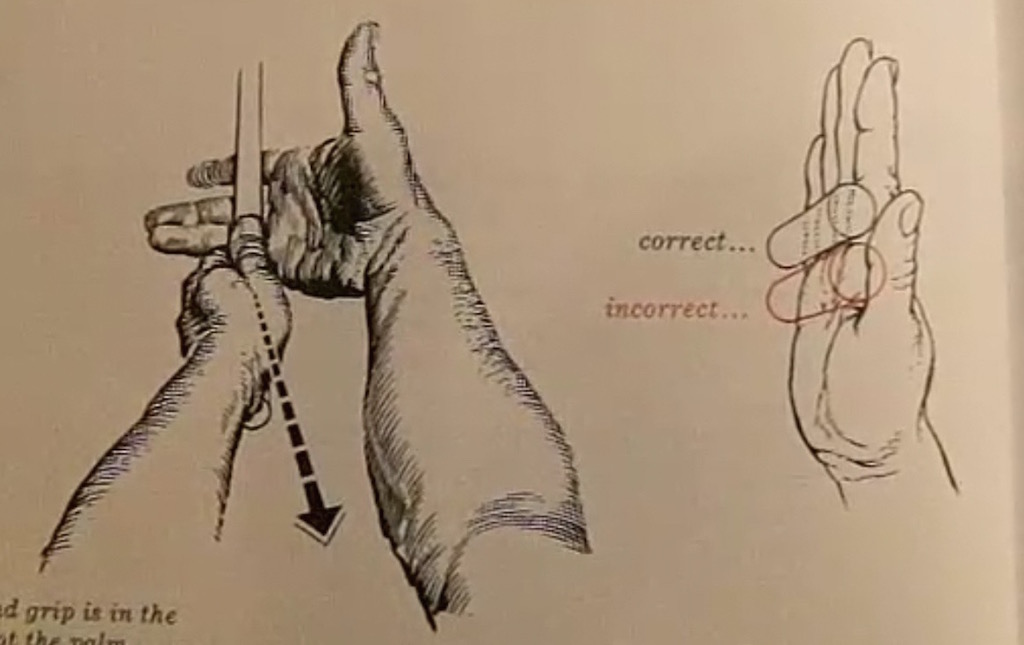
My golf learning began with this simple fact – if you don’t have a fundamentally sound hold on the golf club, it is practically impossible for your body to execute a fundamentally sound golf swing. I’m still a big believer that the golf swing is much easier to execute if you begin with the proper hold on the club.
As you might imagine, I come into contact with hundreds of golfers of all skill levels. And it is very rare to see a good player with a bad hold on the golf club. There are some exceptions, for sure, but they are very few and very far between, and they typically have beat so many balls with their poor grip that they’ve found a way to work around it.
The reality of biophysics is that the body moves only in certain ways – and the particulars of the way you hold the golf club can totally prevent a sound swing motion that allows the club to release properly through the impact zone. The wonderful thing is that anyone can learn how to put a fundamentally sound hold on the golf club, and you can practice it anywhere your hands are not otherwise engaged, like watching TV or just sitting and relaxing.
Whether you prefer an overlap, interlock or full-finger (not baseball!) grip on the club, the same fundamentals apply. Here are the major grip faults I see most often, in the order of the frequency:
Mis-aligned hands
By this I mean that the palms of the two hands are not parallel to each other. Too many golfers have a weak left hand and strong right, or vice versa. The easiest way to learn how to hold the club with your palms aligned properly is to grip a plain wooden ruler or yardstick. It forces the hands to align properly and shows you how that feels. If you grip and re-grip a yardstick several times, then grip a club, you’ll see that the learning curve is almost immediate.
The position of the grip in the upper/left hand
I also observe many golfers who have the butt of the grip too far into the heel pad of the upper hand (the left hand for right-handed players). It’s amazing how much easier it is to release the club through the ball if even 1/4-1/2″ of the butt is beyond the left heel pad. Try this yourself to see what I mean. Swing the club freely with just your left hand and notice the difference in its release from when you hold it at the end of the grip, versus gripping down even a half inch.
To help you really understand how this works, go to the range and hit shots with your five-iron gripped down a full inch to make the club the same length as your seven-iron. You will probably see an amazing shot shape difference, and likely not see as much distance loss as you would expect.
Too much lower (right) hand on the club
It seems like almost all golfers of 8-10 handicap or higher have the club too far into the palm of the lower hand, because that feels “good” if you are trying to control the path of the clubhead to the ball. But the golf swing is not an effort to hit at the ball – it is a swing of the club. The proper hold on the club has the grip underneath the pad at the base of the fingers. This will likely feel “weak” to you — like you cannot control the club like that. EXACTLY. You should not be trying to control the club with your lower/master hand.
Gripping too tightly
Nearly all golfers hold the club too tightly, which tenses up the forearms and prevents a proper release of the club through impact. In order for the club to move back and through properly, you must feel that the club is controlled by the last three fingers of the upper hand, and the middle two fingers of the lower hand. If you engage your thumbs and forefingers in “holding” the club, the result will almost always be a grip that is too tight. Try this for yourself. Hold the club in your upper hand only, and squeeze firmly with just the last three fingers, with the forefinger and thumb off the club entirely. You have good control, but your forearms are not tense. Then begin to squeeze down with your thumb and forefinger and observe the tensing of the entire forearm. This is the way we are made, so the key to preventing tenseness in the arms is to hold the club very lightly with the “pinchers” — the thumbs and forefingers.
So, those are what I believe are the four fundamentals of a good grip. Anyone can learn them in their home or office very quickly. There is no easier way to improve your ball striking consistency and add distance than giving more attention to the way you hold the golf club.
More from the Wedge Guy
- The Wedge Guy: Golf mastery begins with your wedge game
- The Wedge Guy: Why golf is 20 times harder than brain surgery
- The Wedge Guy: Musings on the golf ball rollback
- LIKE82
- LEGIT13
- WOW4
- LOL1
- IDHT0
- FLOP4
- OB1
- SHANK8
Instruction
Clement: Stop ripping off your swing with this drill!

Not the dreaded headcover under the armpit drill! As if your body is defective and can’t function by itself! Have you seen how incredible the human machine is with all the incredible feats of agility all kinds of athletes are accomplishing? You think your body is so defective (the good Lord is laughing his head off at you) that it needs a headcover tucked under the armpit so you can swing like T-Rex?
- LIKE0
- LEGIT1
- WOW2
- LOL0
- IDHT0
- FLOP0
- OB0
- SHANK2
Instruction
How a towel can fix your golf swing
This is a classic drill that has been used for decades. However, the world of marketed training aids has grown so much during that time that this simple practice has been virtually forgotten. Because why teach people how to play golf using everyday items when you can create and sell a product that reinforces the same thing? Nevertheless, I am here to give you helpful advice without running to the nearest Edwin Watts or adding something to your Amazon cart.
For the “scoring clubs,” having a solid connection between the arms and body during the swing, especially through impact, is paramount to creating long-lasting consistency. And keeping that connection throughout the swing helps rotate the shoulders more to generate more power to help you hit it farther. So, how does this drill work, and what will your game benefit from it? Well, let’s get into it.
Setup
You can use this for basic chip shots up to complete swings. I use this with every club in my bag, up to a 9 or 8-iron. It’s natural to create incrementally more separation between the arms and body as you progress up the set. So doing this with a high iron or a wood is not recommended.
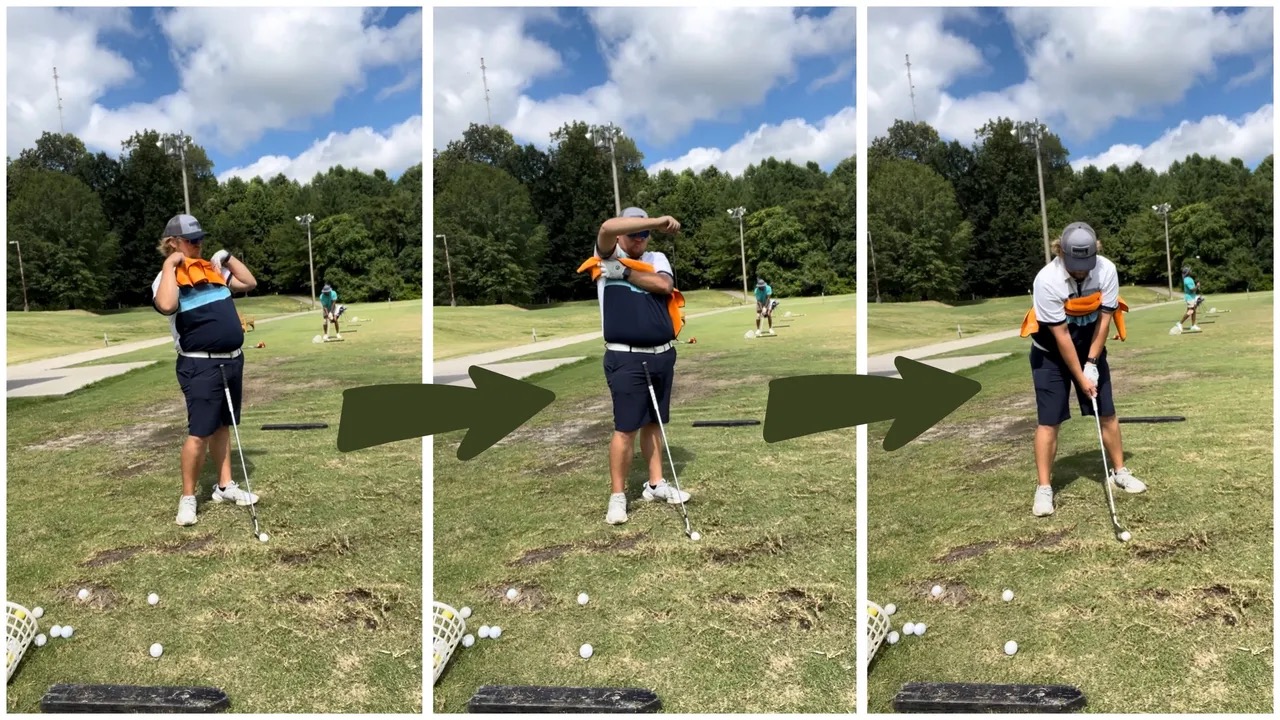
While you set up to hit a ball, simply tuck the towel underneath both armpits. The length of the towel will determine how tight it will be across your chest but don’t make it so loose that it gets in the way of your vision. After both sides are tucked, make some focused swings, keeping both arms firmly connected to the body during the backswing and follow through. (Note: It’s normal to lose connection on your lead arm during your finishing pose.) When you’re ready, put a ball in the way of those swings and get to work.
Get a Better Shoulder Turn
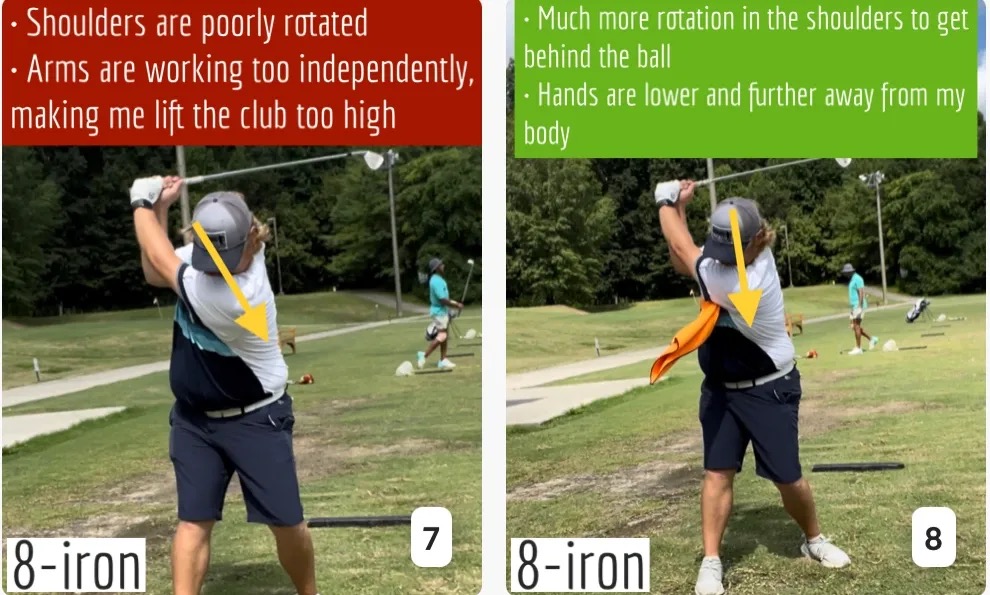
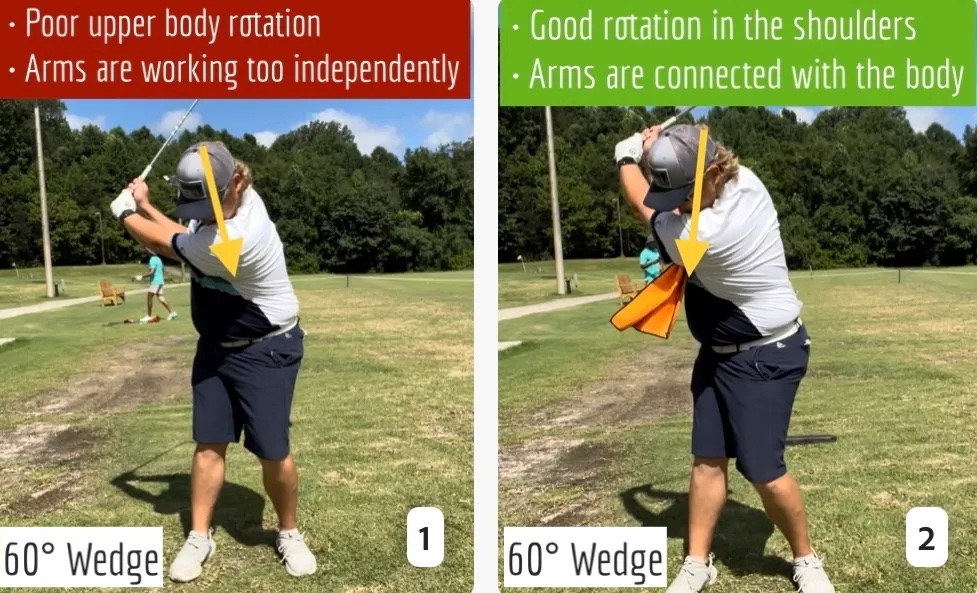
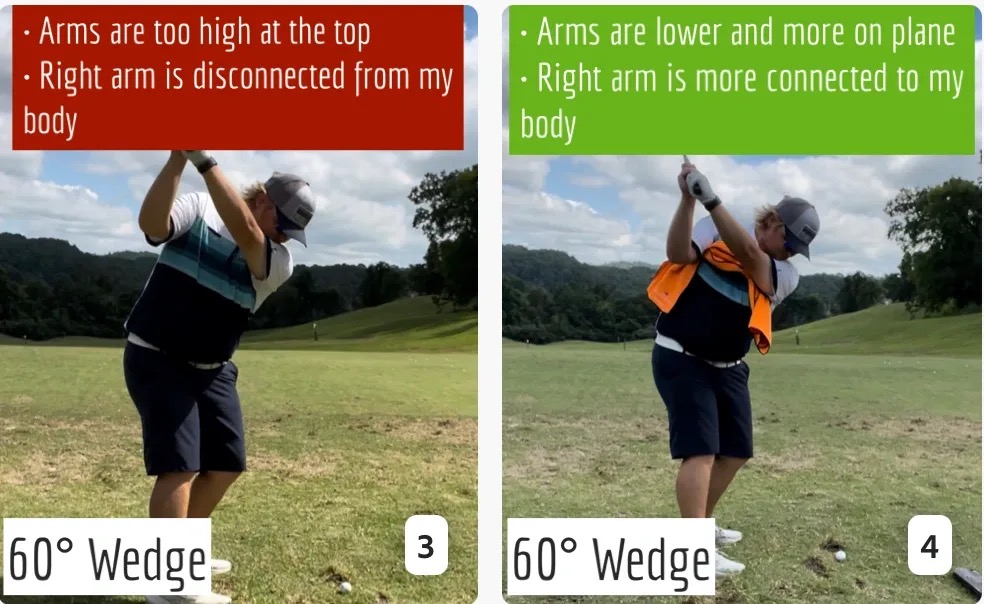
Many of us struggle to have proper shoulder rotation in our golf swing, especially during long layoffs. Making a swing that is all arms and no shoulders is a surefire way to have less control with wedges and less distance with full swings. Notice how I can get in a similar-looking position in both 60° wedge photos. However, one is weak and uncontrollable, while the other is strong and connected. One allows me to use my larger muscles to create my swing, and one doesn’t. The follow-through is another critical point where having a good connection, as well as solid shoulder rotation, is a must. This drill is great for those who tend to have a “chicken wing” form in their lead arm, which happens when it becomes separated from the body through impact.
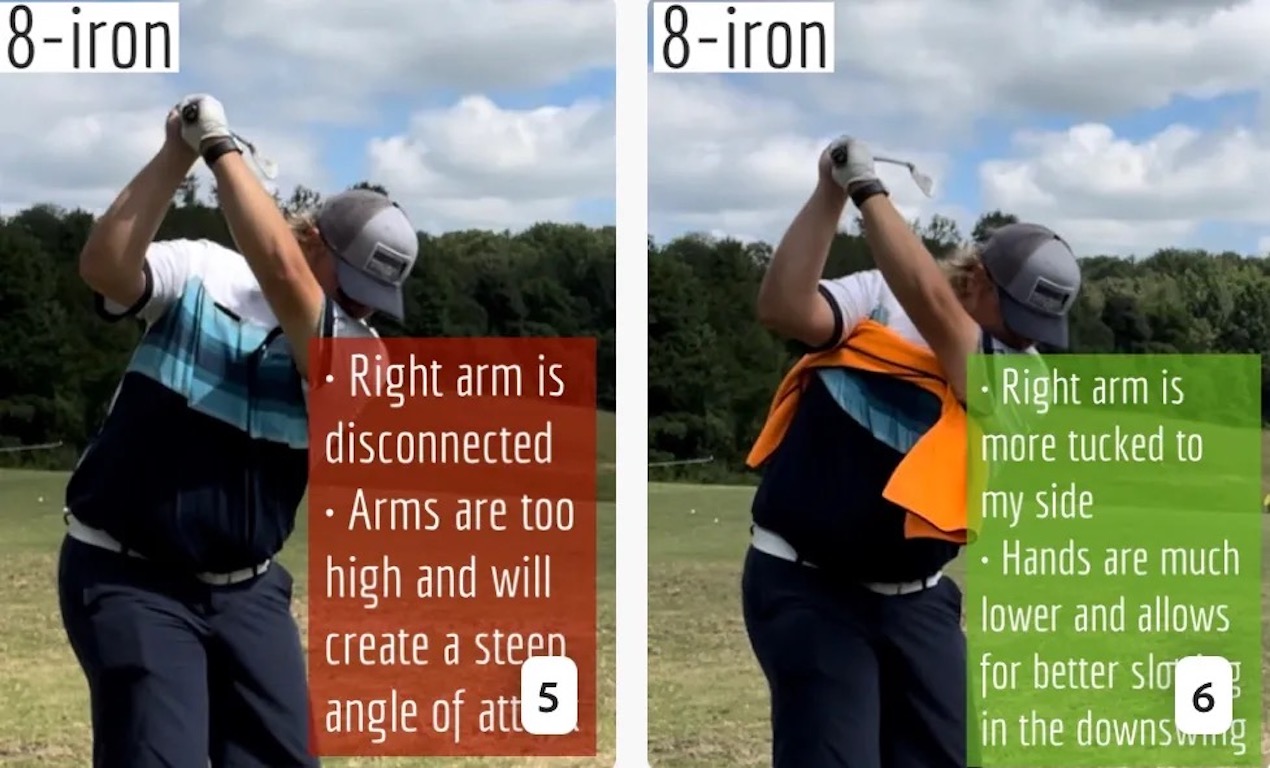
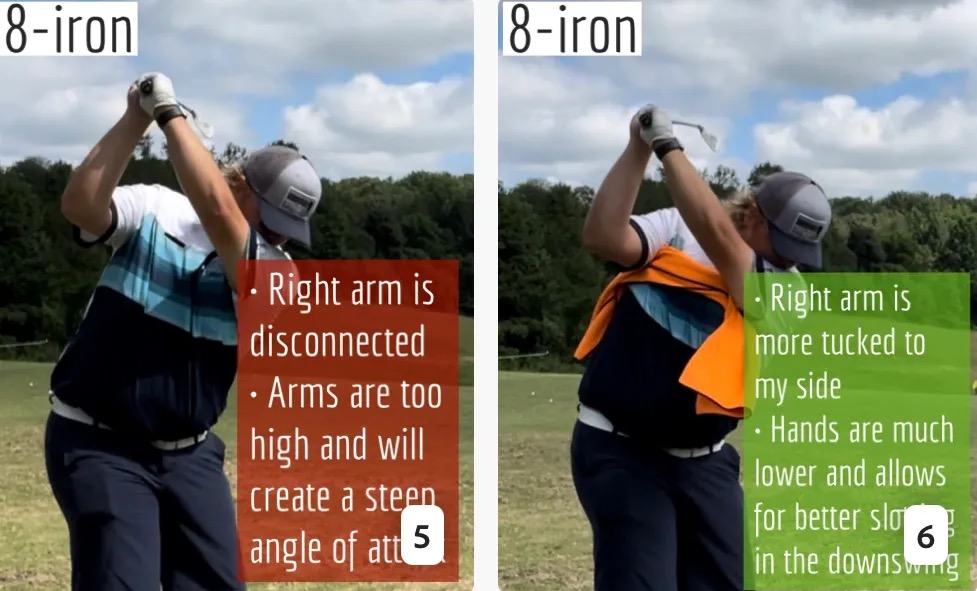
In full swings, getting your shoulders to rotate in your golf swing is a great way to reinforce proper weight distribution. If your swing is all arms, it’s much harder to get your weight to naturally shift to the inside part of your trail foot in the backswing. Sure, you could make the mistake of “sliding” to get weight on your back foot, but that doesn’t fix the issue. You must turn into your trial leg to generate power. Additionally, look at the difference in separation between my hands and my head in the 8-iron examples. The green picture has more separation and has my hands lower. This will help me lessen my angle of attack and make it easier to hit the inside part of the golf ball, rather than the over-the-top move that the other picture produces.
Stay Better Connected in the Backswing
When you don’t keep everything in your upper body working as one, getting to a good spot at the top of your swing is very hard to do. It would take impeccable timing along with great hand-eye coordination to hit quality shots with any sort of regularity if the arms are working separately from the body.
Notice in the red pictures of both my 60-degree wedge and 8-iron how high my hands are and the fact you can clearly see my shoulder through the gap in my arms. That has happened because the right arm, just above my elbow, has become totally disconnected from my body. That separation causes me to lift my hands as well as lose some of the extension in my left arm. This has been corrected in the green pictures by using this drill to reinforce that connection. It will also make you focus on keeping the lead arm close to your body as well. Because the moment either one loses that relationship, the towel falls.
Conclusion
I have been diligent this year in finding a few drills that target some of the issues that plague my golf game; either by simply forgetting fundamental things or by coming to terms with the faults that have bitten me my whole career. I have found that having a few drills to fall back on to reinforce certain feelings helps me find my game a little easier, and the “towel drill” is most definitely one of them.
- LIKE12
- LEGIT1
- WOW2
- LOL0
- IDHT0
- FLOP2
- OB0
- SHANK8
-
 19th Hole1 week ago
John Daly stuns fans into silence with brutal opening tee shot on PGA Tour Champions
-
 19th Hole3 days ago
Things got heated at the Houston Open between Tony Finau and Alejandro Tosti. Here’s why
-

 19th Hole2 weeks ago
2-time major champ announces shock retirement from the sport at age of 33
-

 19th Hole1 week ago
Charlie Woods finds it tough going on American Junior Golf Association debut
-

 19th Hole2 weeks ago
Edoardo Molinari reveals the latest PGA Tour golfer to turn down ‘good offer’ from LIV Golf
-
 19th Hole2 weeks ago
Scottie Scheffler had an interesting response when asked how he ‘quiets the noise’ following Players victory
-
 19th Hole2 weeks ago
Jon Rahm dealt fresh blow to hopes of qualifying for 2025 Ryder Cup
-
 19th Hole2 days ago
Addiction, spinal fusion, and scam artists – Everything Anthony Kim revealed in candid interview with David Feherty










len
Mar 27, 2013 at 2:11 pm
and all in between
len
Mar 27, 2013 at 2:09 pm
i have a pic of the masters winners gloves,go fr;1935/Gene Sarazen/to;1985/1993 Barnhard Langer looking to sall it
Dan Adams
May 15, 2012 at 3:25 pm
Rick,
I have been looking for awhile for an article like yours. I love Golf, and I like taking pictures, especially Concerts and Golf pictures. I have a Nikon D40 with the normal 2 lenses (18-55 and 70-200). I went to the Memorial tournament last year and it was a very hot day (kinda hazy). Anyways i took a ton of pictures, and although after running them through photoshop, i ended up with maybe 20 0r 30 shots i thought were impressive. Anyways, i like some of the other, can never get the deep colors or the depth of the picture that you see when you are there. Somebody had suggested warming or coolking filters as well. Next time i will shoot in RAW mode.
Any other suggestions?
Dan
Mitch
Apr 11, 2012 at 6:35 pm
Wow!
rick rappaport
Mar 12, 2012 at 11:52 am
Gregg,
The beauty of this instruction article, unlike your golf swing instruction, is the immediate results in the quality of your pictures. Can’t say the same for the usual slump after a quality golf lesson…
As for being a hacker in photography, it’s much easier to understand what not to do than what to do. You can rotely eliminate the three primary picture killers: subject too centered, no center of interest and distracting elements, and end up with a good picture by default.
Cannot say the same thing about the golf swing.
Thanks for responding, Rick
Gregg G
Feb 9, 2012 at 11:54 am
Thank you for this valuable information Rick. Not only am I a hacker on the course but also behind the lens. I am guilty of breaking the rules (only admitting to the photography rules here). Your suggestions will undoubtedly improve my photographic skills. Now what lets talk about my grip…..
rick rappaport
Feb 3, 2012 at 1:51 am
Thanks for the compliments Mark! The Ireland photo illustrates the point that you just can’t aim the point and shoot at beauty and expect to see it in the digital capture.
The eerie and spectacular sunset storm is not enough of a picture without paying attention to the three principles I set out in the article: center of interest not centered, sunlight somewhere other than behind you and the elimination of any foreground or background object clutter–retaining only foreground or background which leads the viewer to the center of interest.
Mark Garvey
Feb 3, 2012 at 12:40 am
A really good article. Teaching by example is very effective. Although explained in the context of a golf outing the principles set forth in this article offer great insight into how to compose photographs in general which can easily be applied to other contexts. After reading this I am confident that my abilities to take better photographs will generally improve. The photo of the golf course in Ireland is especially well composed, beautifully capturing a special moment; an inspiration.
rick rappaport
Feb 2, 2012 at 7:45 pm
Thanks Charlie, doesn’t hurt to have a little home cooking.
Charlie
Feb 2, 2012 at 10:46 am
Great article, Rick! It’s a real treat to have you as a member of Columbia Edgewater!
Rick Rappaport
Feb 1, 2012 at 1:02 pm
Thank you for the kind words Spencer. Like you I think most things sound more complicated than they really are. The overwhelming instructional manuals accompanying most point and shoots continues that same theme. If you aren’t creating an image worth viewing it doesn’t matter how many pixels your camera has sacrificed for that picture. It doesn’t matter how many cool and/or incomprehensible settings there are on your camera. The less you are concerned about the camera, the more likely you’ll make a better picture. So when in doubt just set it on automatic and spend your time following the three rules I described.
Spencer Heinz
Feb 1, 2012 at 12:26 pm
I really enjoyed your photos and tips. Concise, conversational, vivid, practical. I am not a golfer, but I do know that some people sometimes make some things — golf and photography, for example — sound more complicated than they already are. Not you. Thanks for the wise words and photos of ways to get better while still having fun.
rick rappaport
Feb 1, 2012 at 1:53 am
Thank you for the compliments on my article Steve. Of course you’re right about the
3 rules I discuss; they’re applicable to anyone using a camera anywhere.
Steve Holwerda
Jan 31, 2012 at 8:06 pm
Great article for the avid golfer who is an amateur photographer. You have captured a few simple techniques or suggestions that make a world of difference. The contrasting photos that you show really points out how we can all take better pictures, not just on the golf course but anywhere. Thanks.
Rick Rappaport
Jan 31, 2012 at 7:59 pm
Thanks for the compliments Dwight. That’s a good question since many people are relying upon their phone’s camera more than ever.
Always keep in mind that composition usually trumps color as an influence on whether a picture is a good one or not. Sort of deciding whether or not you liked a certain movie. Without a good story the good acting, great set design, and cool cinematography aren’t enough.
My article gives you enough information to make a good image even if the iphone4 colors are a bit lacking compared to a higher end point and shoot. Not sure they lack anyway, but it’s composition, background/foreground distractions and angle of the light that will make or break your photograph.
As for making one’s golf game as good as a picture, oh it were easily so because I’d be beating Tiger…
Dwight Nickerson
Jan 31, 2012 at 5:49 pm
Rick…Excellent suggestions on how one can enhance their visual reminders of a golfing experience. Do you think that a smart phone’s camera, like an iPhone 4’s, can capture color, light, etc. or would the photo have to be manipulated on one’s computer in order to shine? Any tips on making one’s game as beautiful as a picture?
Rick Rappaport
Jan 30, 2012 at 9:33 pm
Thanks for the compliments Dan. All the images in the article were shot with a Canon s90, except the Carne image which was shot with a film point and shoot, a Pentax IQ90 or something like that.
No HDR processing, no vivid setting. I use the camera RAW setting and there is no camera filtration affecting the image capture. The Carne image was underexposed with film and I used a Velvia film stock which can have very saturated colors. Still, you can achieve the same effects with any number of image adjustment softwares like Photoshop. Just a matter of adjusting contrast and the hue/saturation/lightness tools.
Long before digital photography photographers were doing their level best to enhance images in camera with filters and exposure and film stock, or in the darkroom with any tools they could get their hands on. There is no true color of an object that has to be worshipped digitally unless perhaps you must reproduce the object’s color faithfully—like a commercial photo shoot of a clothing for a catalogue.
The color saturation of an object is related to the quality of light reflected off that object. Texture of an object becomes more apparent to the camera when that object reflects lighting from the side, and generally the color becomes more saturated too. So look for that kind of light as well as backlight like the Bandon Dunes flag shot.
Look down a fairway into the setting sunlight and you’ll see that the fairway is not saturated at all because the fairway is reflecting the actual source of the light (the sun) as though it were a mirror. So you’re not seeing the color of the fairway, you’re seeing the sun reflected off millions of blades of grass and that is obscuring the green color.
The big idea is this: your camera does not see the objects in its sight. It sees only the light reflected off of objects in its sight. Whatever shapes the objects reflect, that’s what your camera sees.
If the object is shiny that object will reflect the light source that is illuminating it, and wherever that light source is “reflected” in the object there will be little or no color saturation. That’s why professional photographers will create large very very soft lighting sources when photographing shiny objects. Same idea looking outside at leaves on a wet day in the Fall. Direct sunlight will enhance color saturation of some of the leaves but the wet spots will likely reflect the sunlight itself and there will be little color saturation in those spots. In that case it might be that overcast light, the absence of any direct sunlight, would provide the best color saturation.
Dan
Jan 30, 2012 at 3:54 pm
Nice article!
I look forward using these tips on a up coming Bandon outing.
What advice can you give to help improve color saturation?
The Carne image is so rich and the Bandon flag photo has nice color as well. Are those HDR images, post processed or just using the camera’s “vivid” setting.
To often my golf photos appear washed out. I have a new Canon s95 but have yet to work out all the details.