Instruction
Tom Stickney: How your feet influence the way you move
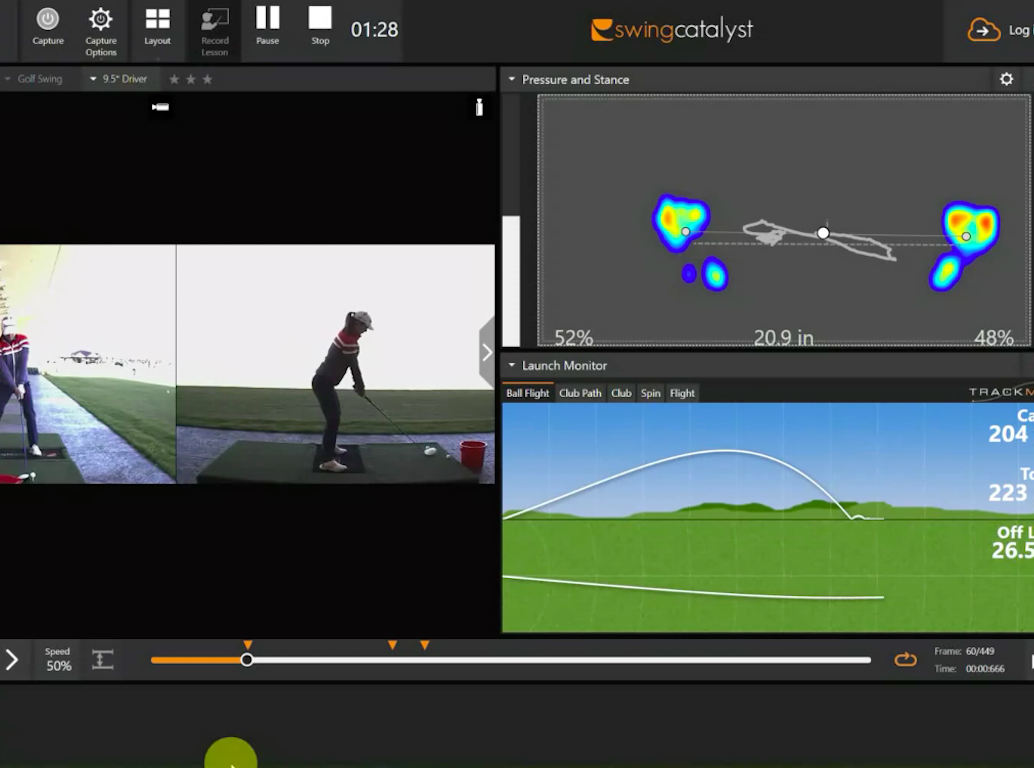
One of the coolest things about instructional technology is the way it continues to evolve and how simple basic graphics can help the teacher and the student understand and solve problems during a lesson. When I first started using force plates back in the early 2000s all I could see was the amount of pressure moving into the lead and trail foot. I thought it was magic when they made an upgrade and I could begin to see the “trace” of the center of pressure during the swing! Now companies can measure things like horizontal, vertical, rotational forces, as well as, the actual peaks and valleys as to when and where these occur during the swing. It’s amazing…
I want to start by taking a few steps back to the time when we only had the option to see the pressure in the feet, the CoP, and the CoP “trace” or move back and forth. As stated earlier this is one of the easiest visuals for you and your student to focus on and one that makes some of the quickest improvements. Don’t make things harder — golf instruction is not about showing the student how much you know, but how simple you can make it!
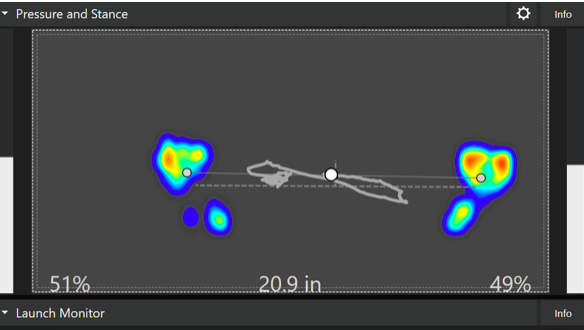
First let’s identify everything you see in this Pressure and Stance Graphic by Swing Catalyst. Remember, everything you see in this window is perfectly timed up with the swing of the golfer (we’ll show this in the video that will accompany this article.)
- You can see the numbers in grey that represent the amount of pressure on each foot (the number in the middle shows the stance width)
- The “hotter” colors show where the pressure is located on the feet from front to back and side to side
- The grey dot that you see on each foot represents where the CoP is on that particular foot
- The white dot is the combined CoP of each foot and denotes where it would be positioned on the ground between the feet if “averaged out”
- The dark grey squiggly line attached to the white dot is the CoP “trace” which shows the actions of the CoP during the swing and in what direction it is moving from frame to frame
The bottom line is that if you only used this graphic with your students, you would receive an amazing amount of information about the how and why of their current motion! Often this Pressure and Stance box is overlooked during lessons because teachers are focusing on the more detailed aspects of the data in other areas which might or might not be the best idea.
Now, let’s dive in to the swing of Beatriz Recari, a wonderfully talented LPGA Touring Professional whom is regarded for her swing as well as her worth ethic. You will see that the Pressure and Stance Graph shows everything that she does so well and why she has been so successful over her LPGA career!
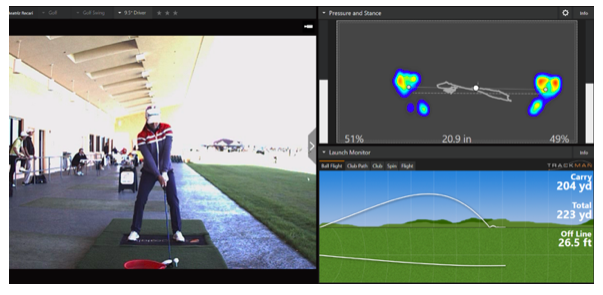
- In her address position, you can see that she is basically balanced from side to side 51-49%
- Her weight is favoring her toes rather than her heels (note the hotter colors in the toes and the small grey dot on each of her individual feet)
- And her stance is 20.9 inches…over time as we understand more about how she moves we can determine just how wide her feet should be- we’ve never been able to clarify this before!
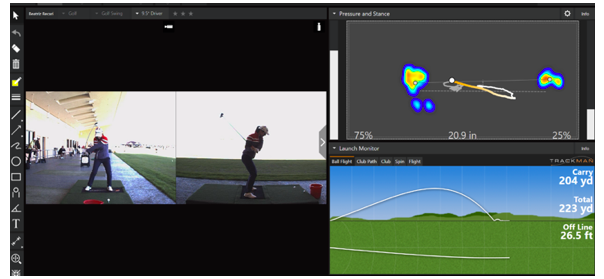
- This is just past the lateral rebalance stage of her downswing (where the CoP would return to 50/50 between the feet) and you can see that the club has shallowed out as we all would like
- Note the direction of her CoP trace…it’s moved in a straight line from her trail foot to her lead toe! This is usually seen in players who possess a big “bump” into right field during the transition coupled with a distinct plane shift to the inside on the way down which fits Beatriz to a “T”
- The lead foot has all the pressure centered on the toe portion currently, and it will begin shifting towards the heel very soon as the forward knee begins to “post up” or straighten
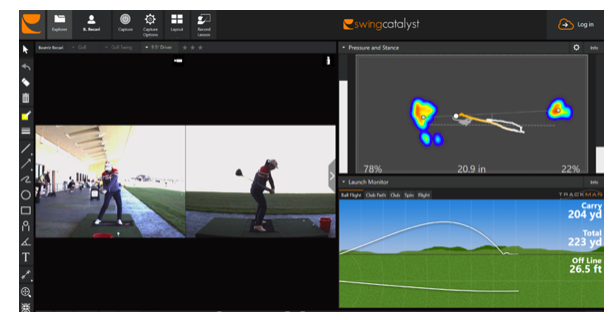
- Just prior to delivery is the peak of her target-side pressure at 78% on her lead foot now just beginning its journey moving towards the heel
- If you look closer at the CoP trace graphic you can see that this is the point when the CoP is heading towards the heel…this is beginning the “deceleration” phase of her body in the downswing
- As the forward knee continues to straighten the weight will continue to move back into the heel and as the body slows it will send power up the kinematic chain to power the clubhead from the ground as all good players do
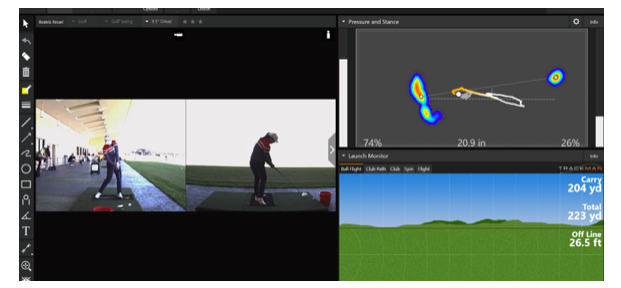
- Finally, we have reached impact and she shows a 74/26% pressure shift between the feet
- Remember that the as forward knee posts up the body decelerates and the body falls “backwards” through impact slightly as the club flings past reducing the amount of pressure on the lead foot for a bit
- The only thing we see here is that Beatriz never fully moved her pressure early enough into her lead heel and at impact she is still a touch toe heavy on her lead foot. This could be a power leak within her swing, but we’d have to audit her other graphs
- I do love the fact of where the pressure is on each of her individual feet from side to side- her forward foot is firmly planted on the ground and the pressure is not on the outside of her lead foot which could cause slippage or imbalance through impact while her rear toe is the only thing connected on the trail side
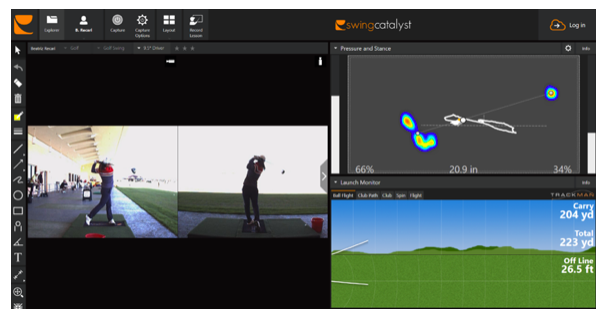
- Look at her beautiful balanced finish in the video, it’s a thing of beauty and poise…
- Still notice the balance between her foot pressure at 66/34% and where the weight is positioned (hot color distribution) on the lead foot…it’s from the mid-foot to the heel and on the middle-outward portion of her foot.
- This gives a solid platform to finish on and from here it’s the least vulnerable position for injury due to slipping or excessive pressure on the outside portion of her foot
So hopefully by now you have seen the wonderful golf swing of Beatriz as well as how much information can be garnered from the Pressure and Stance graphic from Swing Catalyst. If you have balance issues and poor footwork, I would suggest you find a teaching professional with force plates in their academy, and I bet your issues will become a thing of the past!
Questions or Comments?: [email protected]
- LIKE12
- LEGIT0
- WOW0
- LOL1
- IDHT0
- FLOP0
- OB0
- SHANK0
Instruction
Clement: Laid-off or perfect fade? Across-the-line or perfect draw?

Some call the image on the left laid off, but if you are hitting a fade, this could be a perfect backswing for it! Same for across the line for a draw! Stop racking your brain with perceived mistakes and simply match backswing to shot shape!
- LIKE0
- LEGIT0
- WOW0
- LOL0
- IDHT0
- FLOP0
- OB0
- SHANK1
Instruction
The Wedge Guy: The easiest-to-learn golf basic
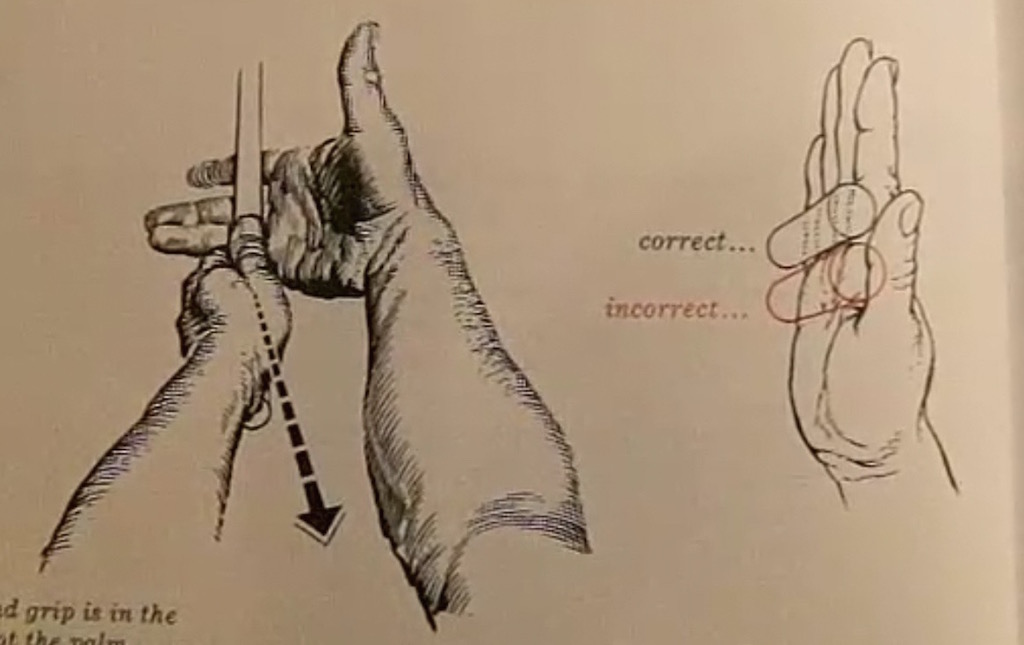
My golf learning began with this simple fact – if you don’t have a fundamentally sound hold on the golf club, it is practically impossible for your body to execute a fundamentally sound golf swing. I’m still a big believer that the golf swing is much easier to execute if you begin with the proper hold on the club.
As you might imagine, I come into contact with hundreds of golfers of all skill levels. And it is very rare to see a good player with a bad hold on the golf club. There are some exceptions, for sure, but they are very few and very far between, and they typically have beat so many balls with their poor grip that they’ve found a way to work around it.
The reality of biophysics is that the body moves only in certain ways – and the particulars of the way you hold the golf club can totally prevent a sound swing motion that allows the club to release properly through the impact zone. The wonderful thing is that anyone can learn how to put a fundamentally sound hold on the golf club, and you can practice it anywhere your hands are not otherwise engaged, like watching TV or just sitting and relaxing.
Whether you prefer an overlap, interlock or full-finger (not baseball!) grip on the club, the same fundamentals apply. Here are the major grip faults I see most often, in the order of the frequency:
Mis-aligned hands
By this I mean that the palms of the two hands are not parallel to each other. Too many golfers have a weak left hand and strong right, or vice versa. The easiest way to learn how to hold the club with your palms aligned properly is to grip a plain wooden ruler or yardstick. It forces the hands to align properly and shows you how that feels. If you grip and re-grip a yardstick several times, then grip a club, you’ll see that the learning curve is almost immediate.
The position of the grip in the upper/left hand
I also observe many golfers who have the butt of the grip too far into the heel pad of the upper hand (the left hand for right-handed players). It’s amazing how much easier it is to release the club through the ball if even 1/4-1/2″ of the butt is beyond the left heel pad. Try this yourself to see what I mean. Swing the club freely with just your left hand and notice the difference in its release from when you hold it at the end of the grip, versus gripping down even a half inch.
To help you really understand how this works, go to the range and hit shots with your five-iron gripped down a full inch to make the club the same length as your seven-iron. You will probably see an amazing shot shape difference, and likely not see as much distance loss as you would expect.
Too much lower (right) hand on the club
It seems like almost all golfers of 8-10 handicap or higher have the club too far into the palm of the lower hand, because that feels “good” if you are trying to control the path of the clubhead to the ball. But the golf swing is not an effort to hit at the ball – it is a swing of the club. The proper hold on the club has the grip underneath the pad at the base of the fingers. This will likely feel “weak” to you — like you cannot control the club like that. EXACTLY. You should not be trying to control the club with your lower/master hand.
Gripping too tightly
Nearly all golfers hold the club too tightly, which tenses up the forearms and prevents a proper release of the club through impact. In order for the club to move back and through properly, you must feel that the club is controlled by the last three fingers of the upper hand, and the middle two fingers of the lower hand. If you engage your thumbs and forefingers in “holding” the club, the result will almost always be a grip that is too tight. Try this for yourself. Hold the club in your upper hand only, and squeeze firmly with just the last three fingers, with the forefinger and thumb off the club entirely. You have good control, but your forearms are not tense. Then begin to squeeze down with your thumb and forefinger and observe the tensing of the entire forearm. This is the way we are made, so the key to preventing tenseness in the arms is to hold the club very lightly with the “pinchers” — the thumbs and forefingers.
So, those are what I believe are the four fundamentals of a good grip. Anyone can learn them in their home or office very quickly. There is no easier way to improve your ball striking consistency and add distance than giving more attention to the way you hold the golf club.
More from the Wedge Guy
- The Wedge Guy: Golf mastery begins with your wedge game
- The Wedge Guy: Why golf is 20 times harder than brain surgery
- The Wedge Guy: Musings on the golf ball rollback
- LIKE88
- LEGIT15
- WOW6
- LOL1
- IDHT0
- FLOP4
- OB1
- SHANK8
Instruction
Clement: Stop ripping off your swing with this drill!

Not the dreaded headcover under the armpit drill! As if your body is defective and can’t function by itself! Have you seen how incredible the human machine is with all the incredible feats of agility all kinds of athletes are accomplishing? You think your body is so defective (the good Lord is laughing his head off at you) that it needs a headcover tucked under the armpit so you can swing like T-Rex?
- LIKE0
- LEGIT3
- WOW2
- LOL0
- IDHT0
- FLOP0
- OB0
- SHANK2
-
 19th Hole2 weeks ago
Justin Thomas on the equipment choice of Scottie Scheffler that he thinks is ‘weird’
-

 19th Hole2 weeks ago
‘Absolutely crazy’ – Major champ lays into Patrick Cantlay over his decision on final hole of RBC Heritage
-

 19th Hole3 weeks ago
Brandel Chamblee has ‘no doubt’ who started the McIlroy/LIV rumor and why
-

 19th Hole2 weeks ago
LET pro gives detailed financial breakdown of first week on tour…and the net result may shock you
-

 Equipment3 weeks ago
Jason Day on his recent switch into Srixon ZX5 and ZX7 Mk II irons
-
 19th Hole6 days ago
Gary Player claims this is what ‘completely ruined’ Tiger Woods’ career
-

 Whats in the Bag1 week ago
Team McIlowry (Rory McIlroy, Shane Lowry) winning WITBs: 2024 Zurich Classic
-
 19th Hole1 week ago
LIV star splits with swing coach after working together for 14 years




SV
Jan 31, 2022 at 3:26 pm
This is way too complicated. Just tell me what I’m doing wrong and then tell me/show me how to fix it. Then make sure I’m following directions by the time the lesson is done.