Instruction
5 drills to keep the rust off this winter

Contrary to popular belief, the winter season has been proven to be the best time to train for many golfers. Training indoors can speed up the learning process and allow for lasting swing improvements that may not come as easily during the warmer months. Remember, every sport has an offseason when athletes train harder to prepare themselves for the upcoming season. So why wait until the weather breaks to grab your clubs out of the garage? Wouldn’t you rather invest the time and effort in your game and be ready to play once the season hits?
I put together a short list of exercises that you can do in your home throughout the winter to train better golf motions without having to hit any balls. The misconception is that you need to hit balls and see ball flight to improve, but that isn’t always true. It all goes back to my mentor Jim McLean’s Elimination Theory. When you train specific motions, you want to eliminate certain elements so that you can focus on the task at hand. In this case it would be eliminating the ball so that golfers can improve awareness of the club and body motion. If you can improve your motions and awareness, then the ball will react differently when hit.
Try these five simple drills throughout the winter, each of which I recommend golfers perform for 5 minutes per day. I think everyone can spare between 5-25 minutes a day if they’re truly serious about improving their golf games.
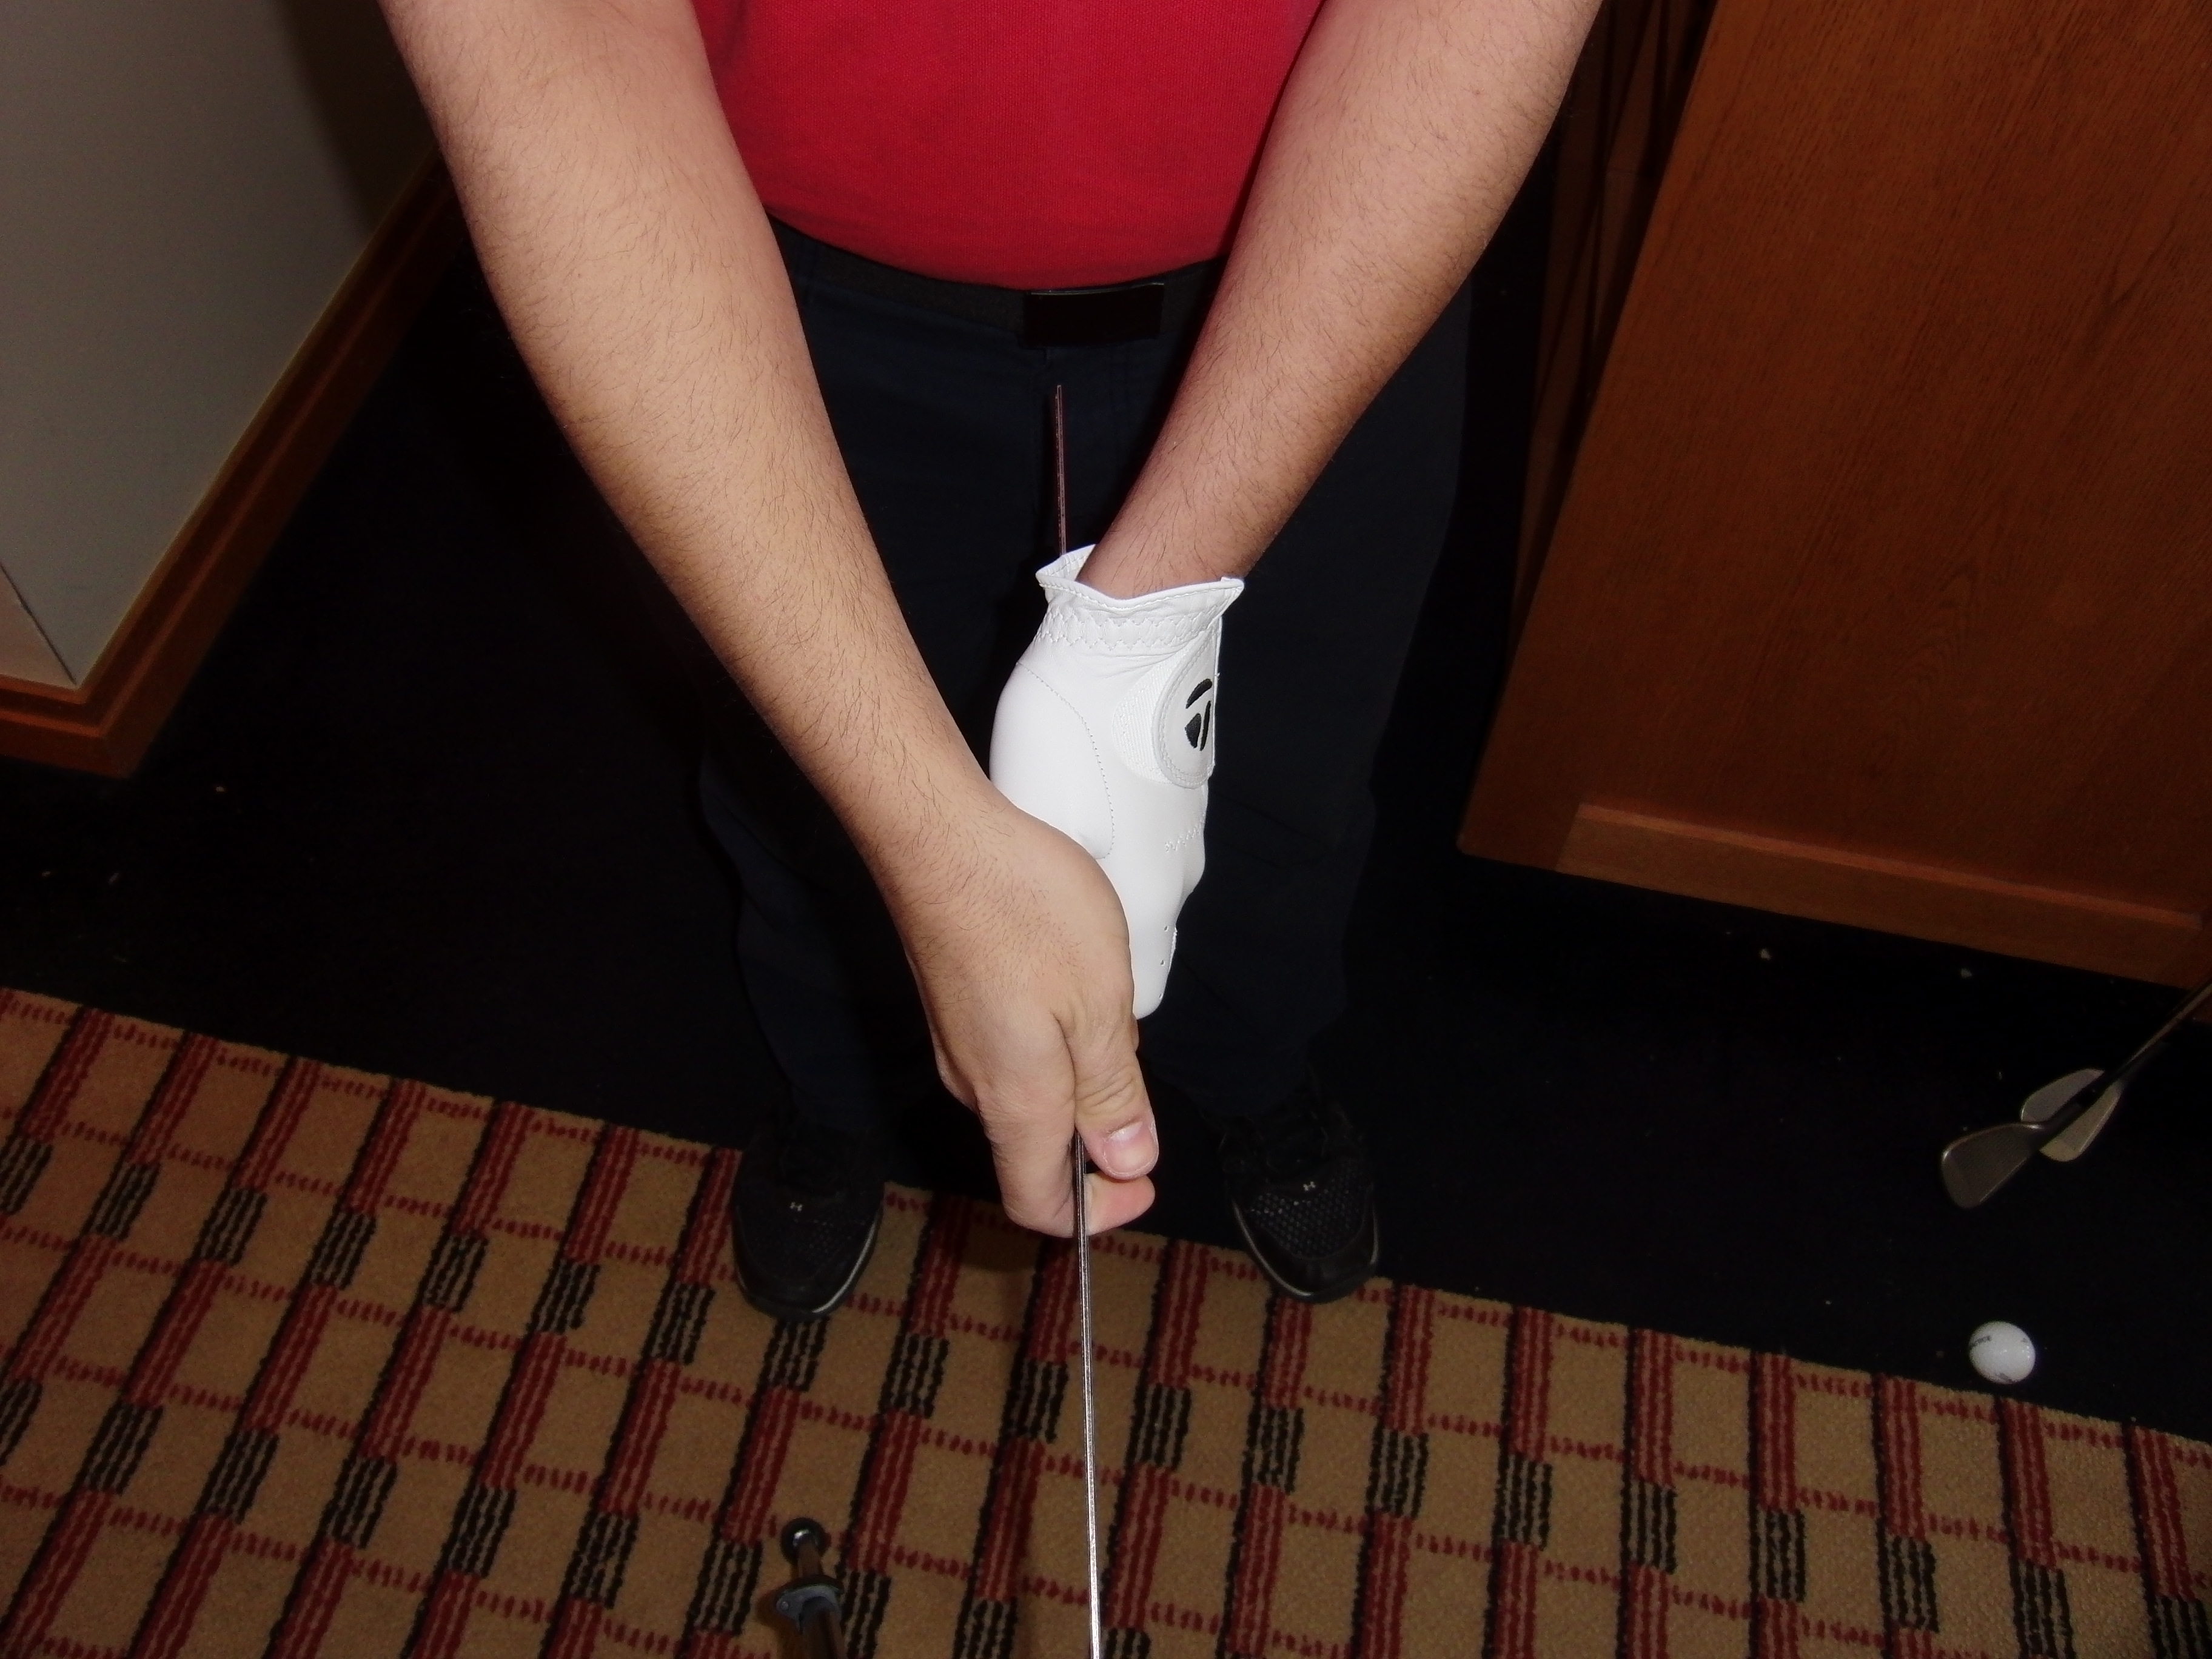
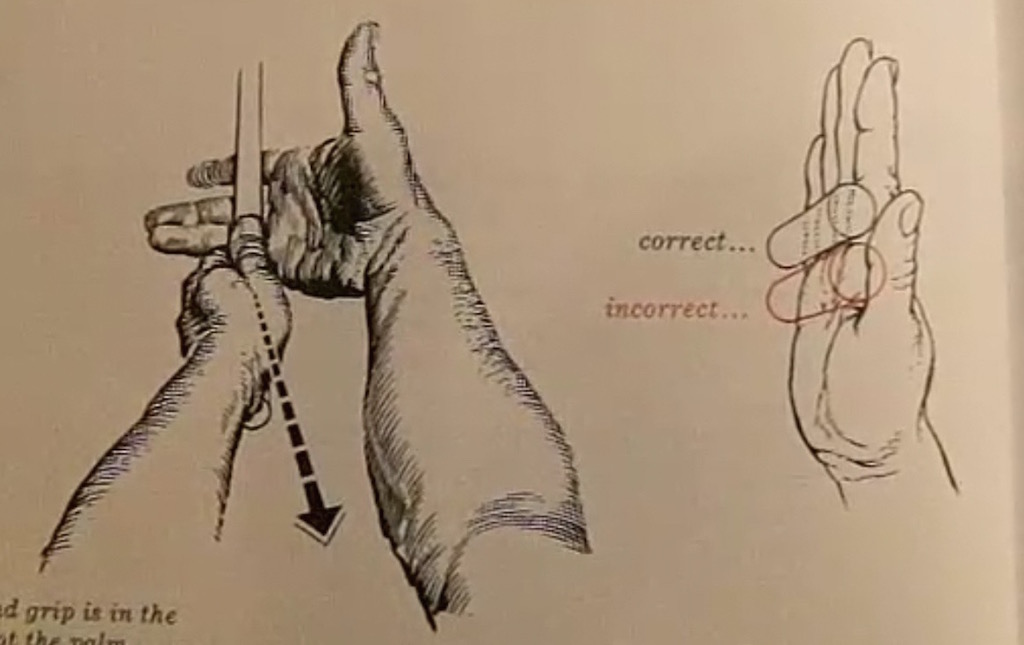
1. Grip the Ruler
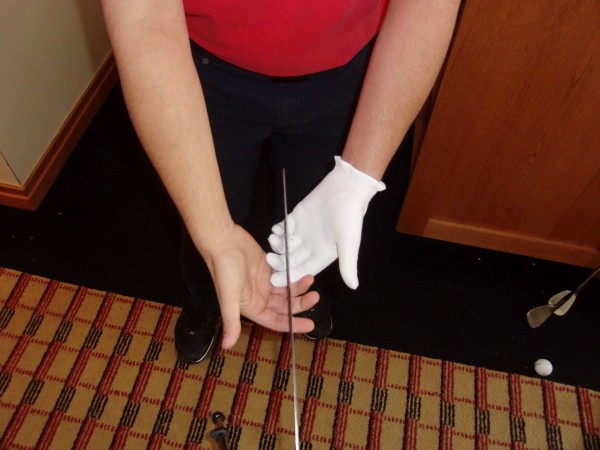
- All you need is your hands and a 12-inch ruler.
- Start with the edges of the ruler facing up.
- Place your hands on the ruler in the same fashion you would to grip the golf club.
- The edges of the ruler should run through the base of your fingers in each hand. You will notice that it is extremely difficult to place the edges in the palm, and therefore the ruler should fit naturally through the base of your fingers.
- Now grab one of your golf clubs and see if your can replicate the placement and feeling on the handle of the golf club.
You can perform this exercise on your couch while watching TV. Make sure to repeat the processes a few times. This will allow you to switch back and forth from the ruler to the club and gain an understanding of the placement of your hands.
2. Chipping Runway
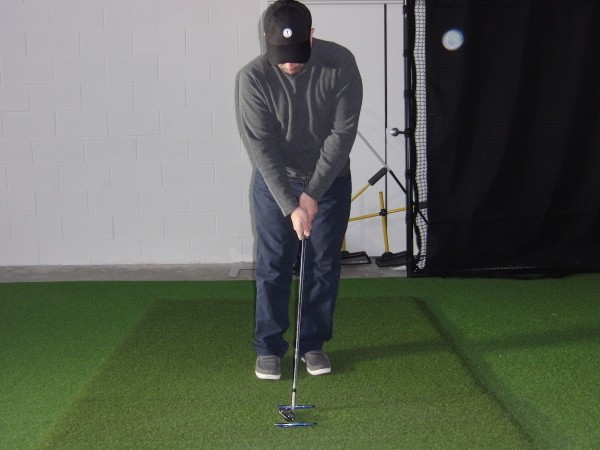
- Find a spacious carpeted area or a floor mat in an open area.
- Place either two pens or pencils on the carpet like a “runway,” a little wider than the width of the clubhead.
- Take your normal chipping set up with weight slightly forward of center and place the clubhead in the runway between the pens.
- Swing the club back and through to about knee height brushing the carpet between the pens.
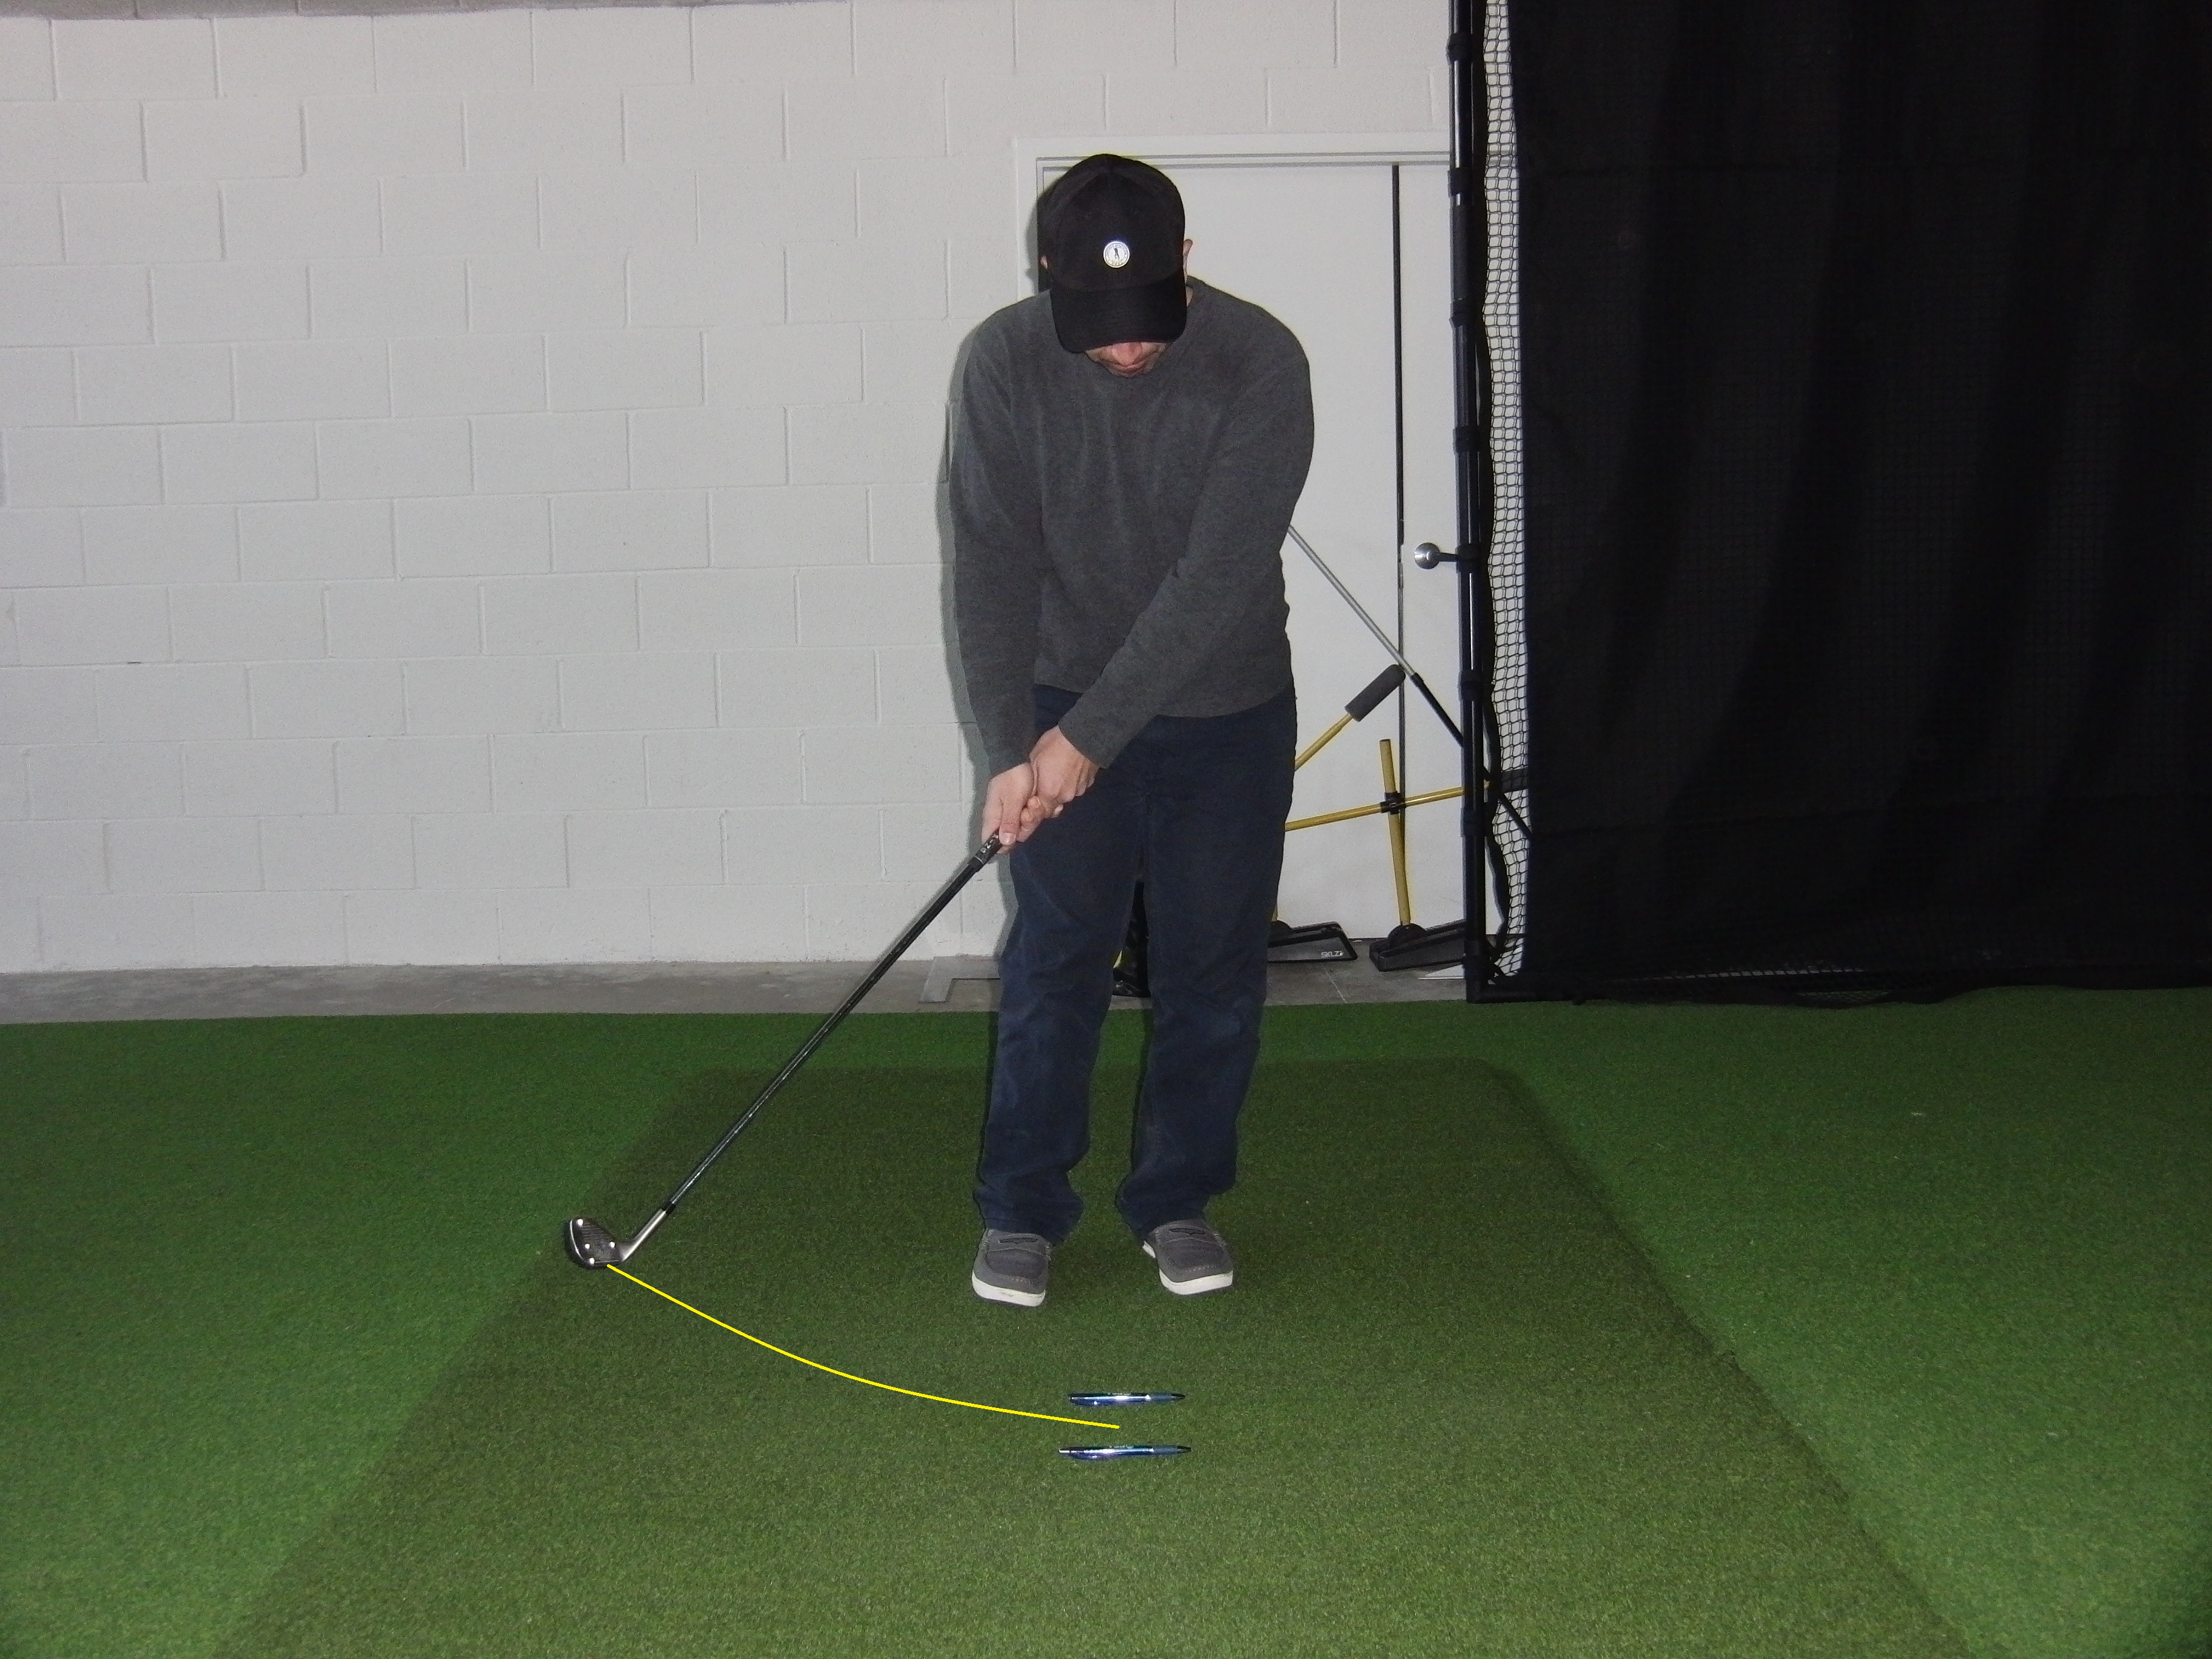

The goal is to control where club bottoms out and hits the carpet. You want to hit the carpet in the center of the “runway” without disturbing the arrangement of the pens. The nice part about practicing on a carpet is that you can see the mark of where the club struck the ground.
After each swing check to see where the mark is. Be sure that it is directly in the center of the runway (front-to-back and side-to-side). Start off swinging slowly so you can gain awareness of where the clubhead is throughout the entire swing. Gradually increase your speed, but remember these are chip shots — you are not practicing 250-yard drives.
3. Swing Plane Wall Drill
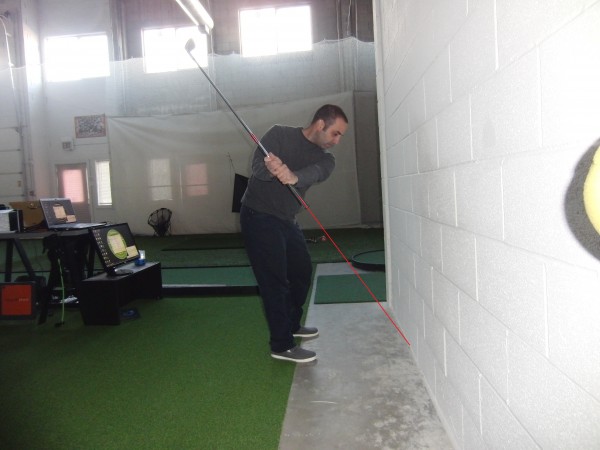
- Take your normal address position with a 7-8 iron and place your clubhead at the edge where the floor and wall meet (the edge will serve as your target line).
- Now choke down to the bottom of the grip where the steel or graphite is exposed. The excess of the grip club should be under your left forearm. The clubhead should be hovering above the floor about the length that you choked down.
- Swing the club back to the three-quarter position and have the grip end of the club point to the edge of the wall (your left arm and club shaft should form an “L”). Hold the position for a few seconds and check to make sure the position is correct and not pointing to the middle of the wall or at your toes.
- Then slowly swing down through impact to a three-quarter follow through. Again, the grip end of the club should point to the edge of the wall (right arm and club shaft should form another “L”). Hold this position for a few seconds, and again, check to make sure the position is correct, not pointing to the middle of the wall or at your toes.

I’m using an alignment rod, which is stuck in the butt of the grip to illustrate the proper positioning in this photo.
It’s important to make sure you are going through these motions slowly to create awareness of what your body and arms should be doing. Going faster will not speed up the learning process. It will only hinder your ability to understand where your golf club is in relation to your body.
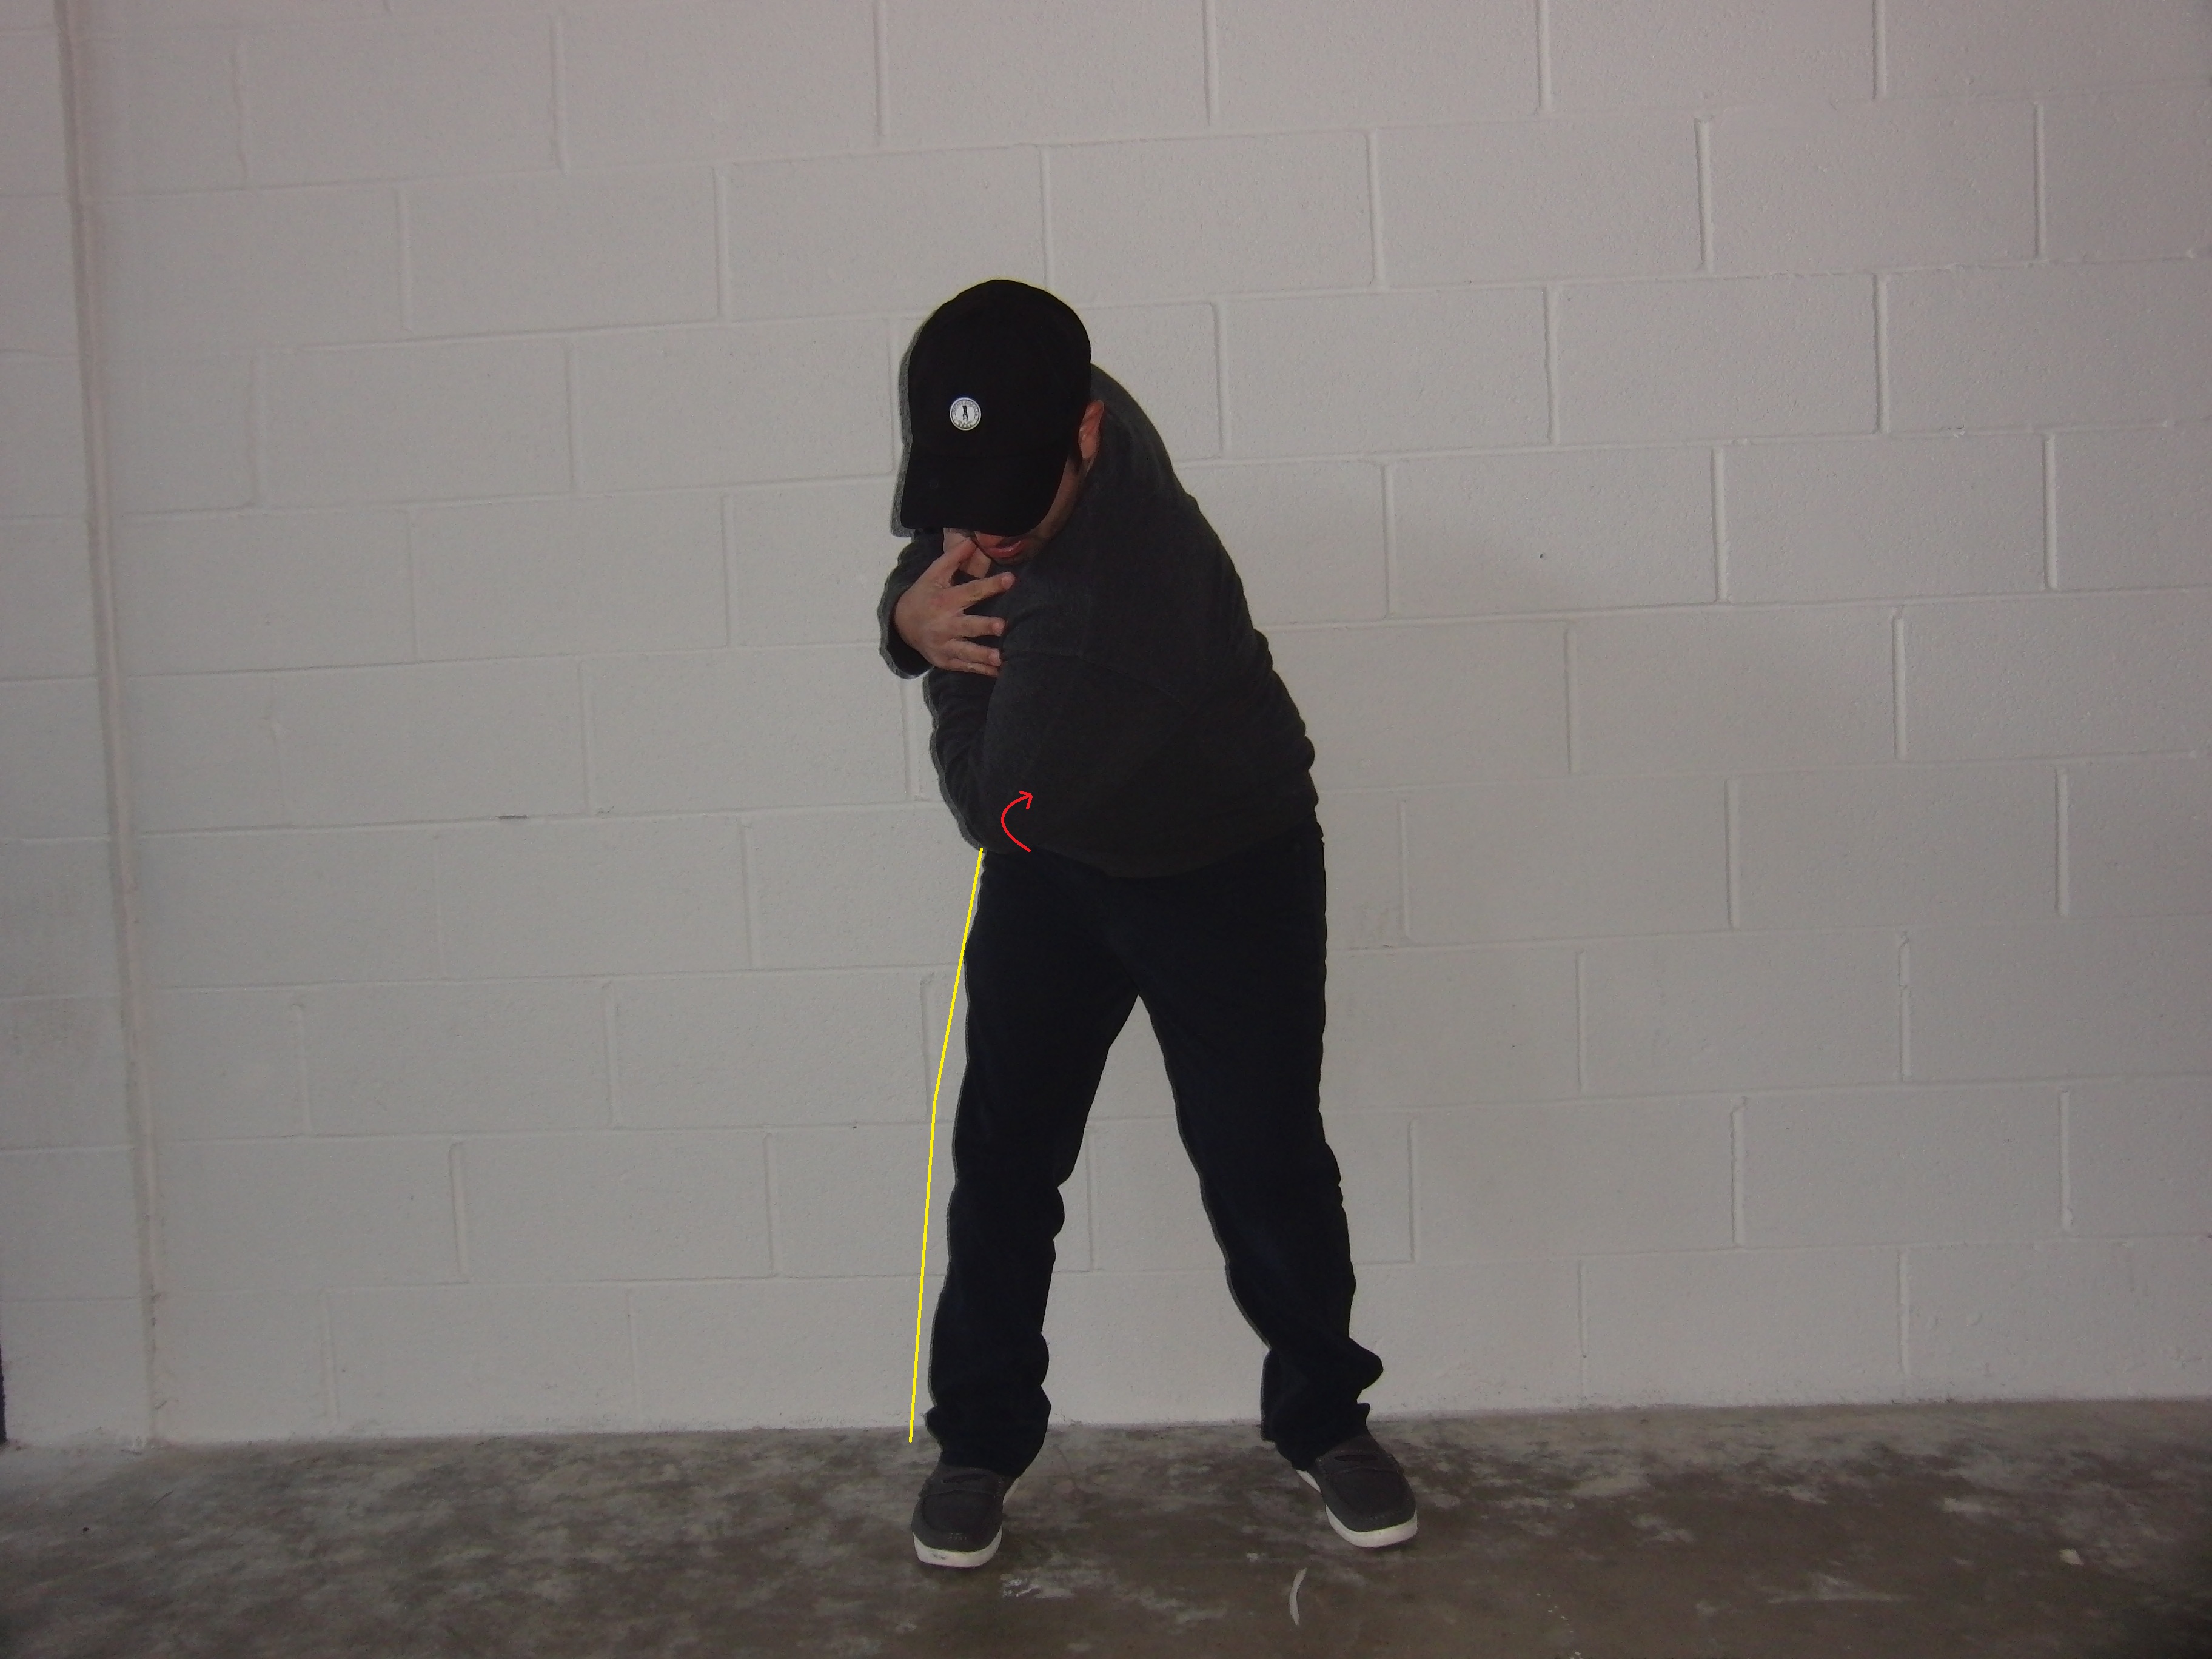
4. Body Motion Wall Drill

- Assume a balanced set-up position with your backside against the wall and your arms across your chest.
- As you begin to make your backswing motion, feel your right back pocket rotate slightly toward the target (not slide away from target) and your chest and shoulders turn down and away from target. You should feel your weight on the inside of a braced back leg, your left shoulder underneath your chin and your back pointed to the target. This creates resistance between the upper and lower body; therefore, creating an explosive position for power.
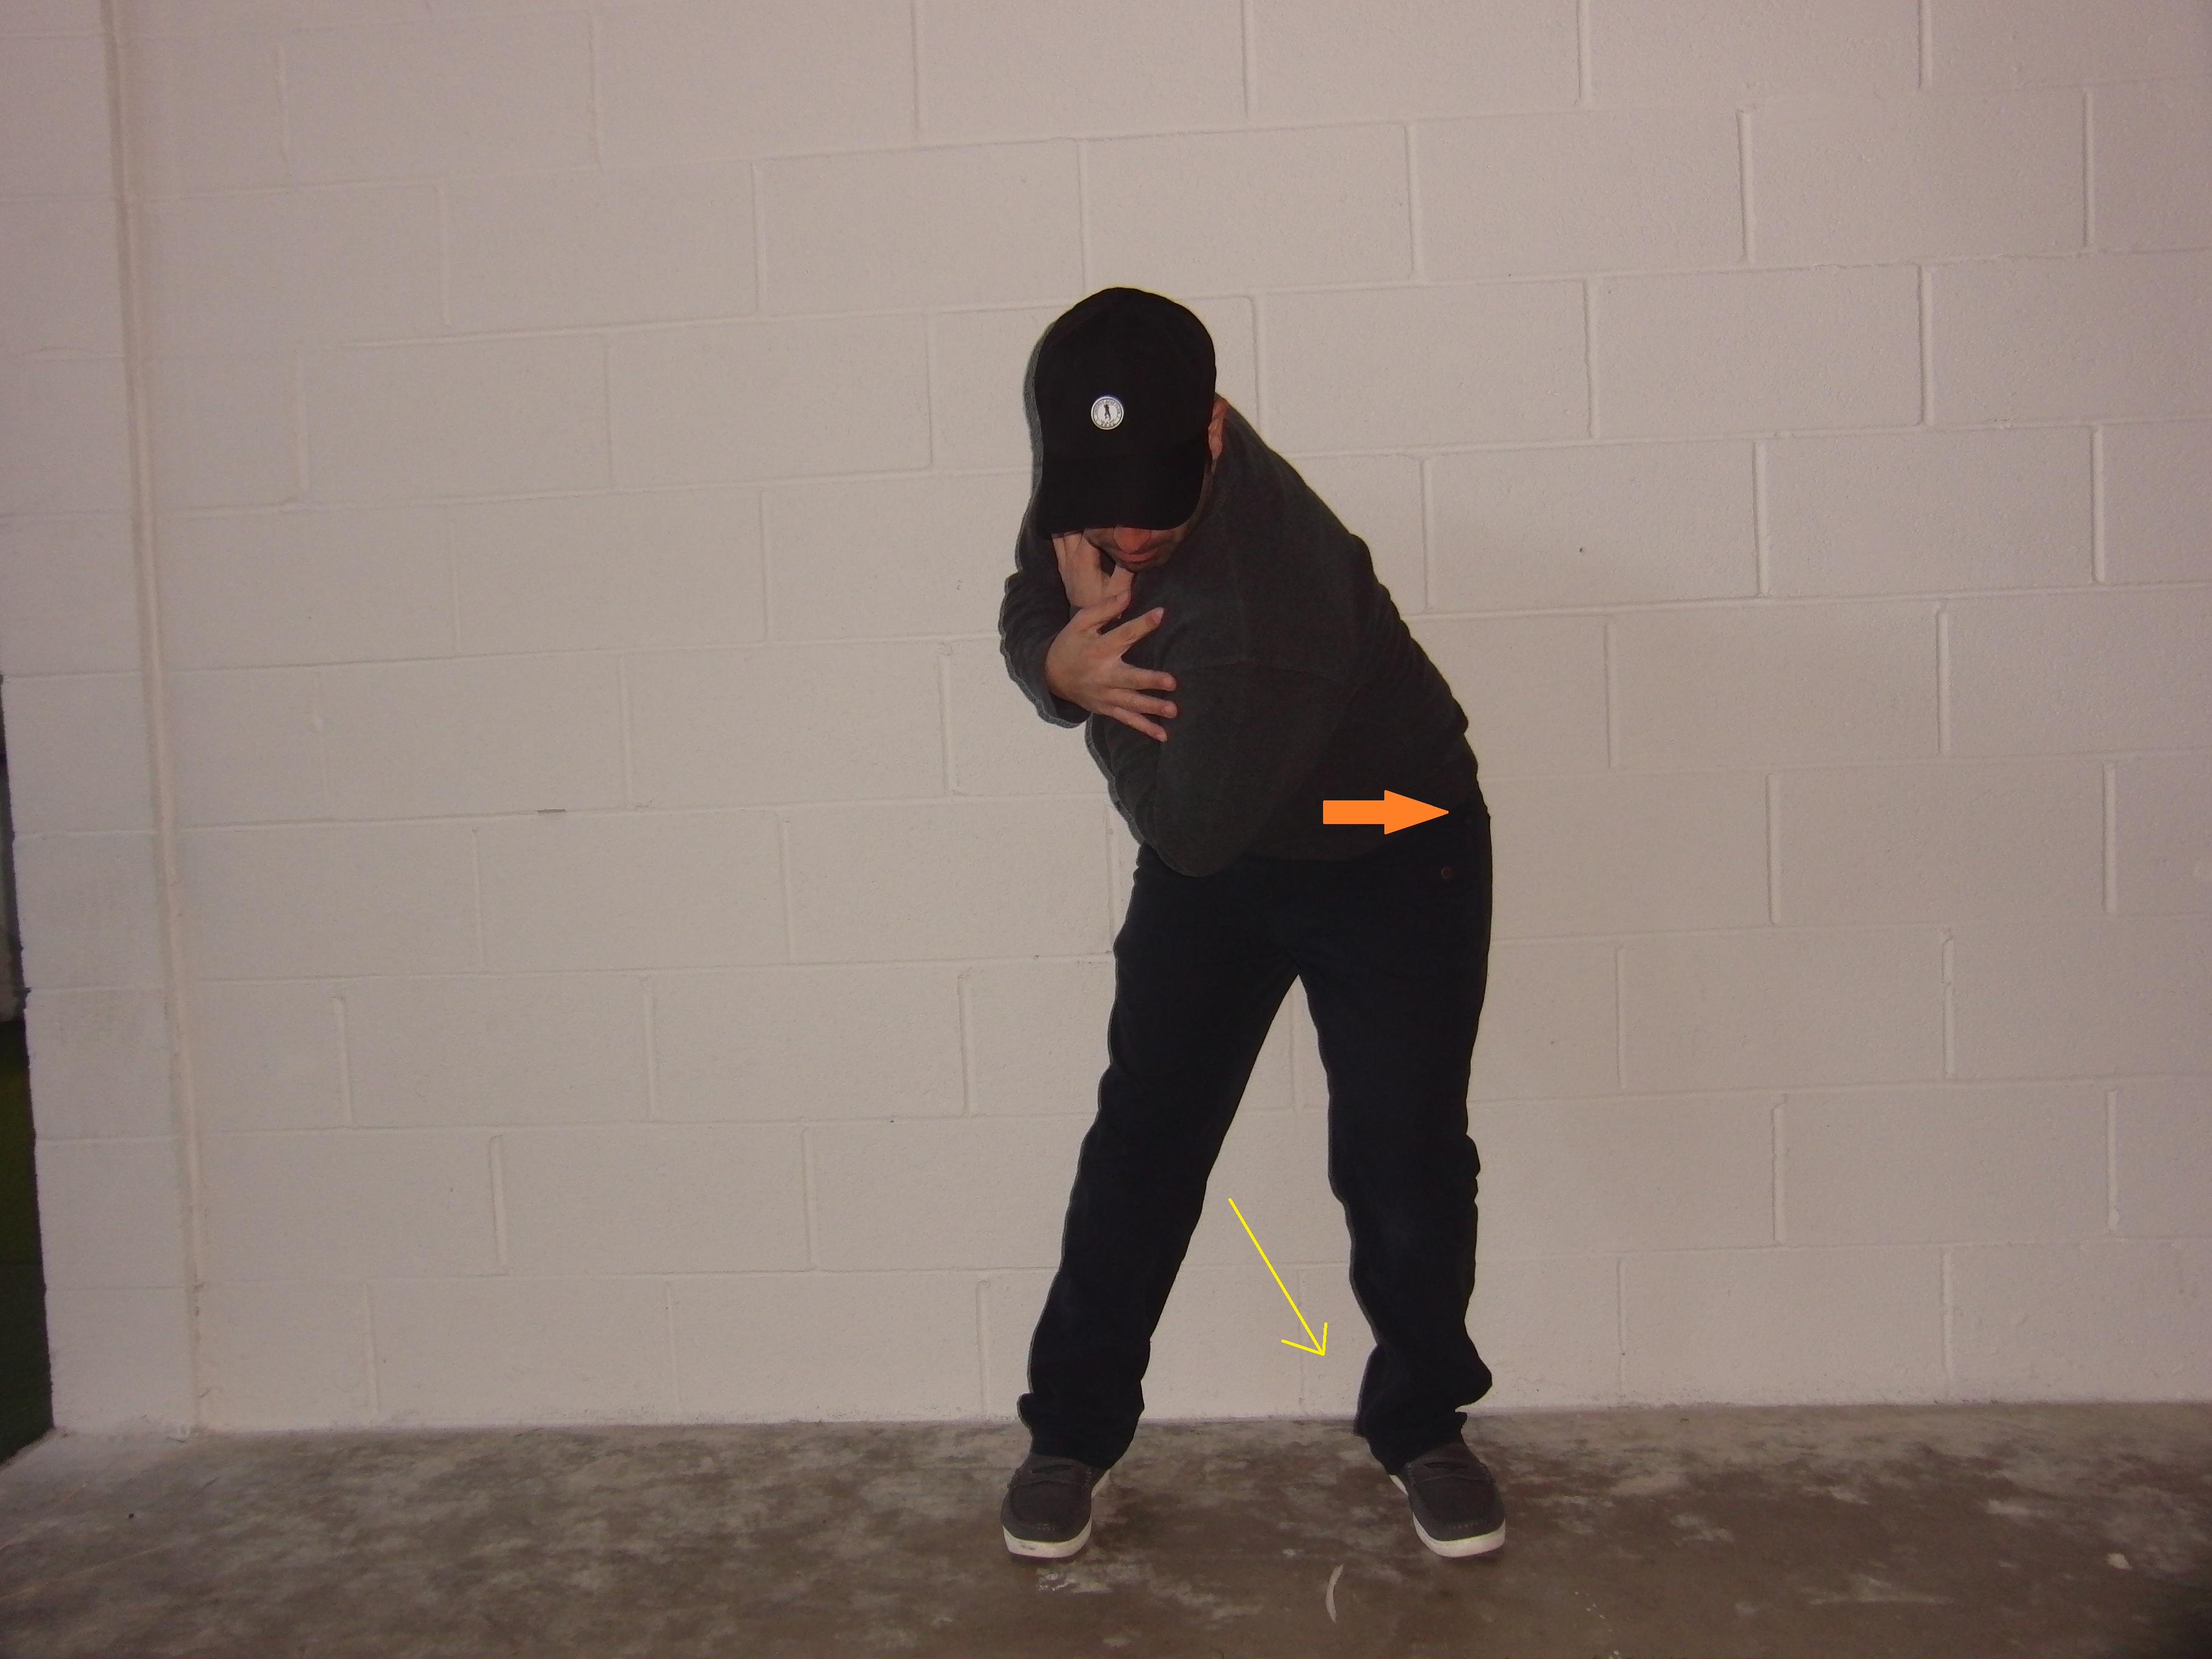
- As you begin the downswing motion, keep your back to the target and allow your left back pocket to shift toward the target. During this transition from backswing to downswing, your backside will remain on the wall, but slide toward the target. Do not allow either pocket to come off wall at this point. You will feel the pressure/weight shift into your front leg.
- Once you feel the pressure shift into the front side, you can begin to rotate. Push your back left pocket into the wall and allow your right back pocket to come off the wall as your left leg begins to straighten. Once you complete your rotation/pivot, you should feel 90 percent of the weight and pressure on your front foot. You also want to have a slight spine tilt away from the wall. This shows that you remained in your posture.
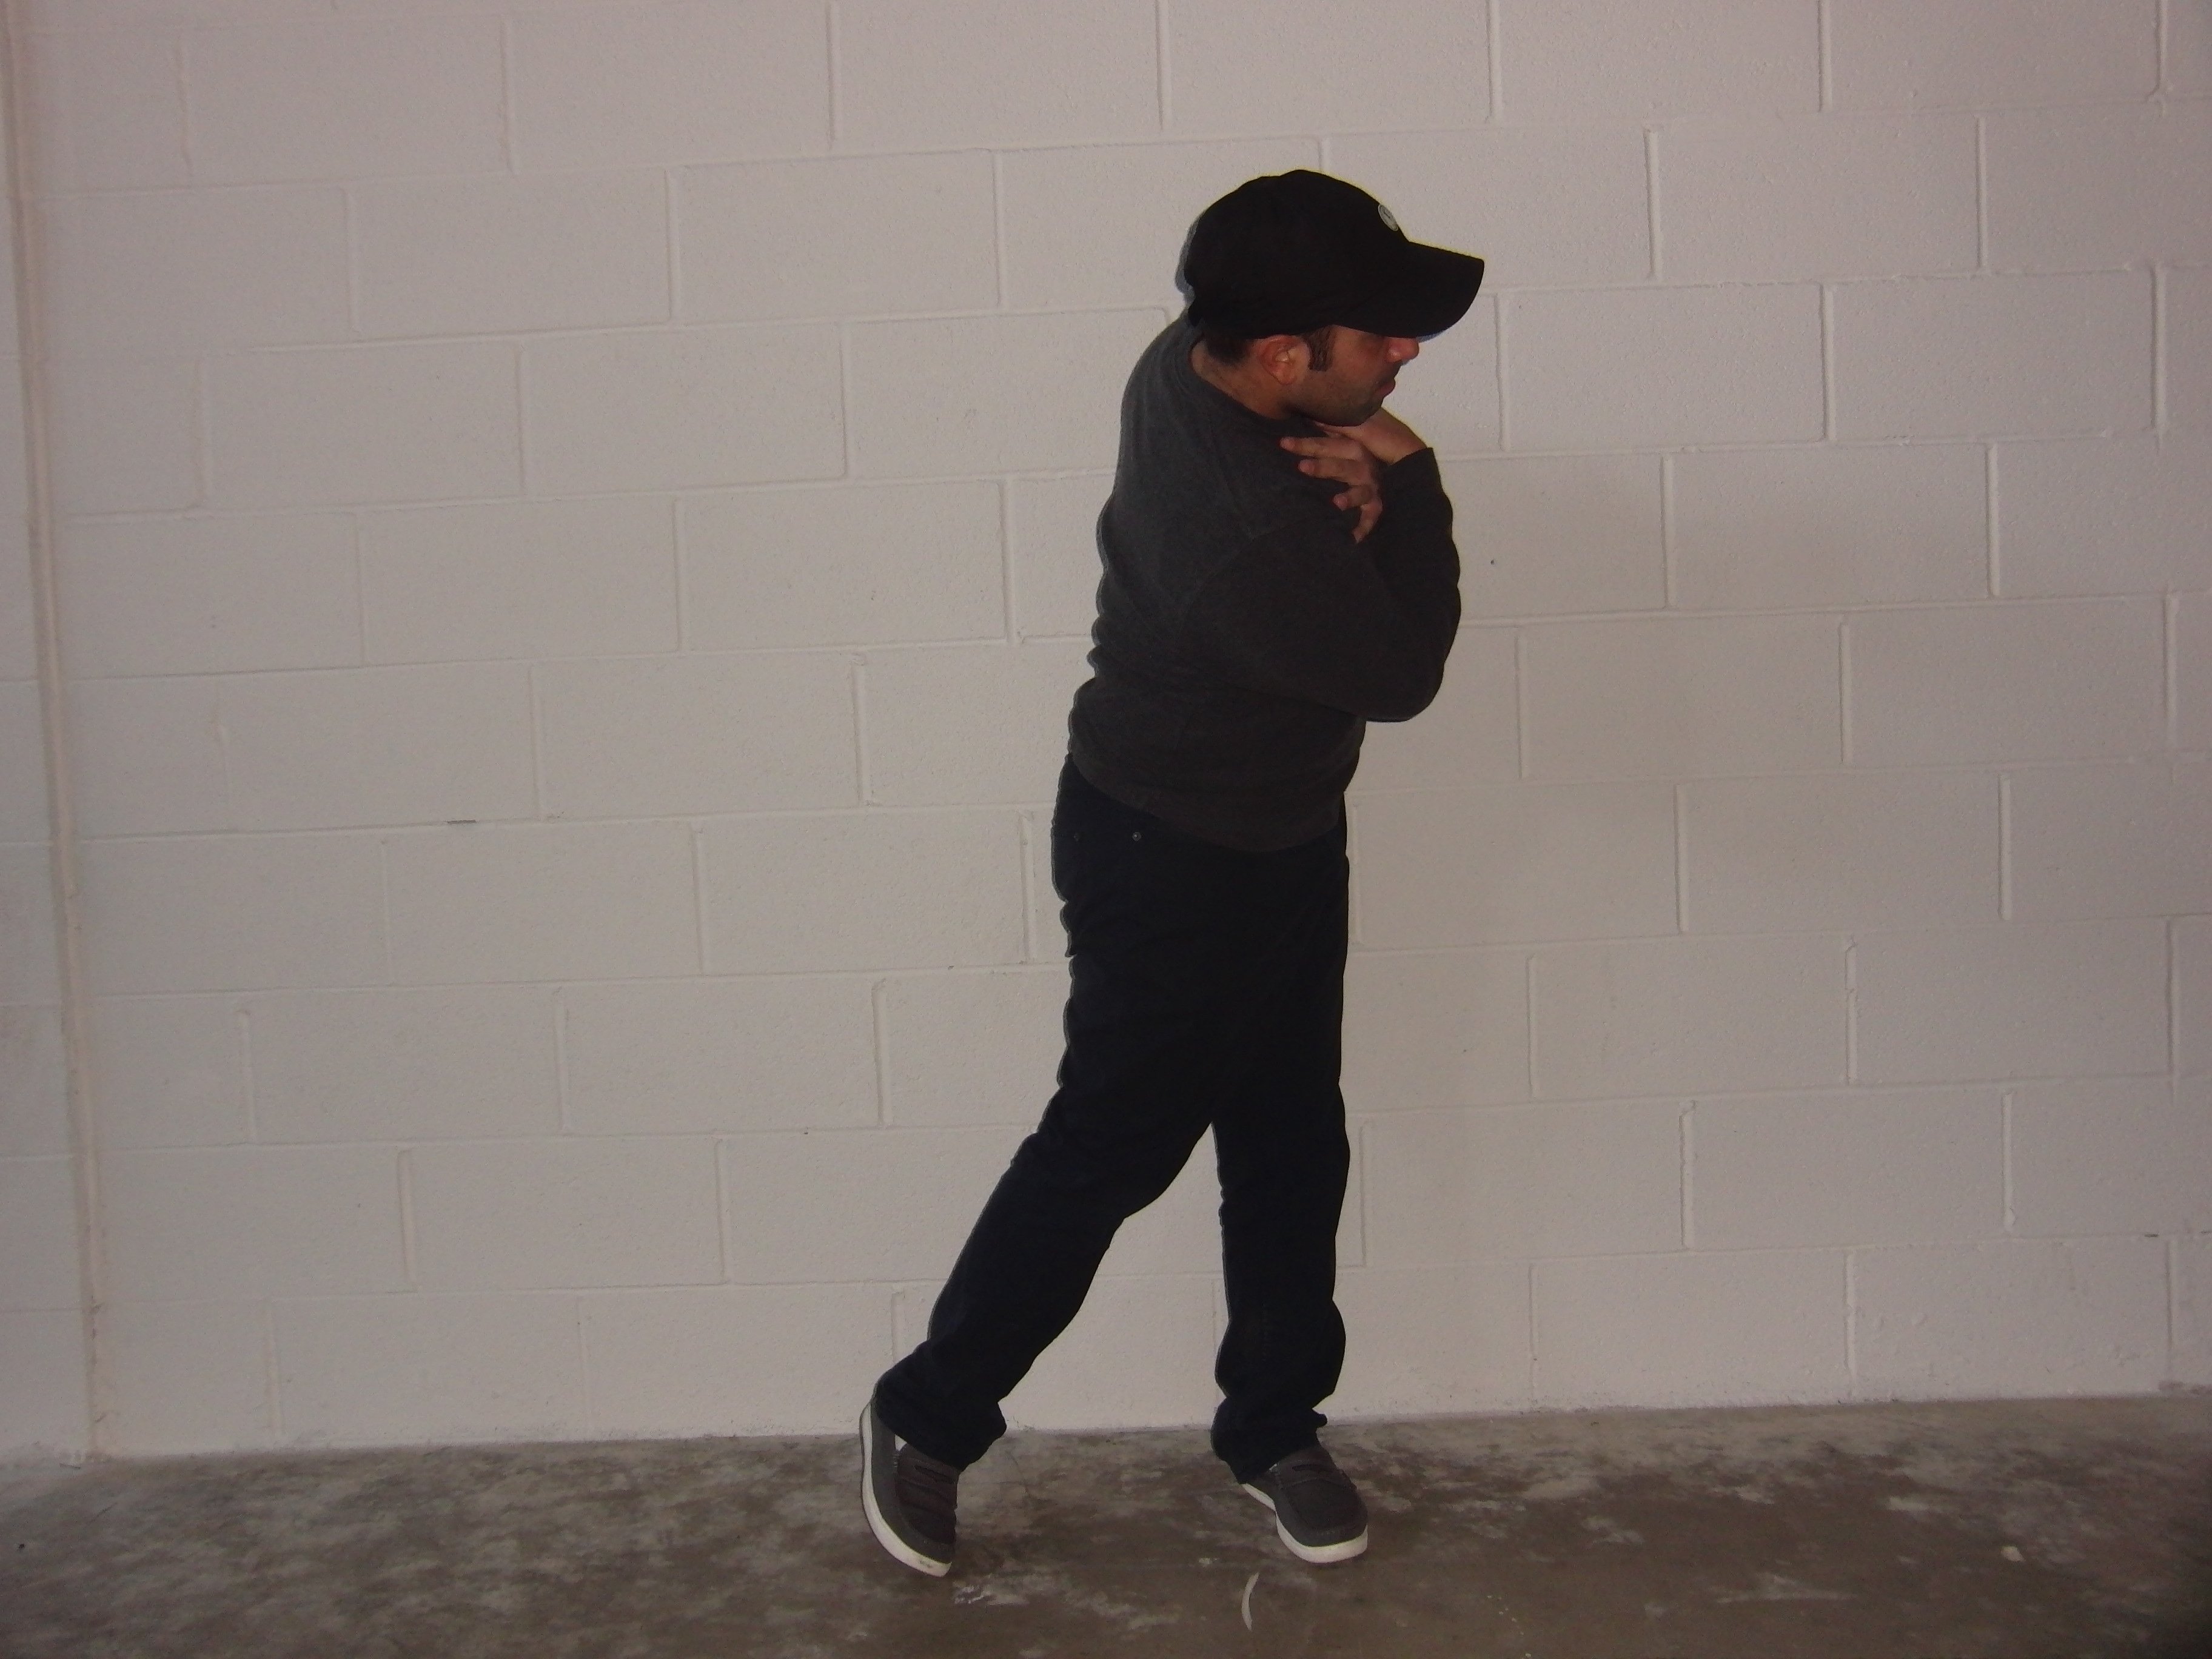
At first, break this exercise down into segments: backswing, shift/transition and follow through. Perform each a few times as separate motions. This will allow you to learn each motion correctly. Then when you feel that you understand each movement, you can piece them together into one fluid motion.
5. Floor Mat Putting
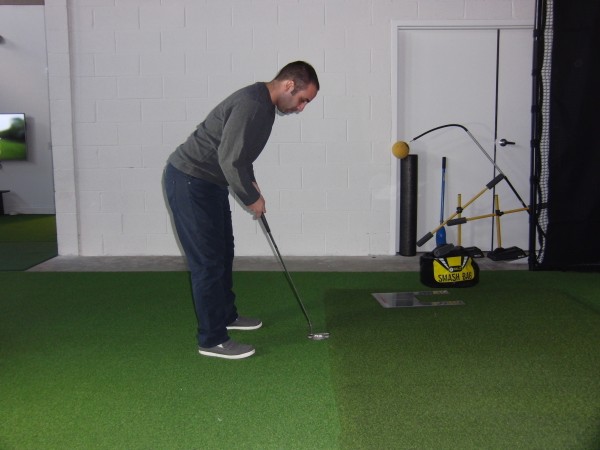
- Establish a balanced putting setup and place the toe of your putter against the edge of a floor mat.
- Swing the putter back and allow the head to arc inward and away from the edge of the mat.
- Then swing it forward and allow it to brush the mat as it passes through the impact area (where the ball would be).
- After it passes through impact, allow it to arc back inward and away from mat again.
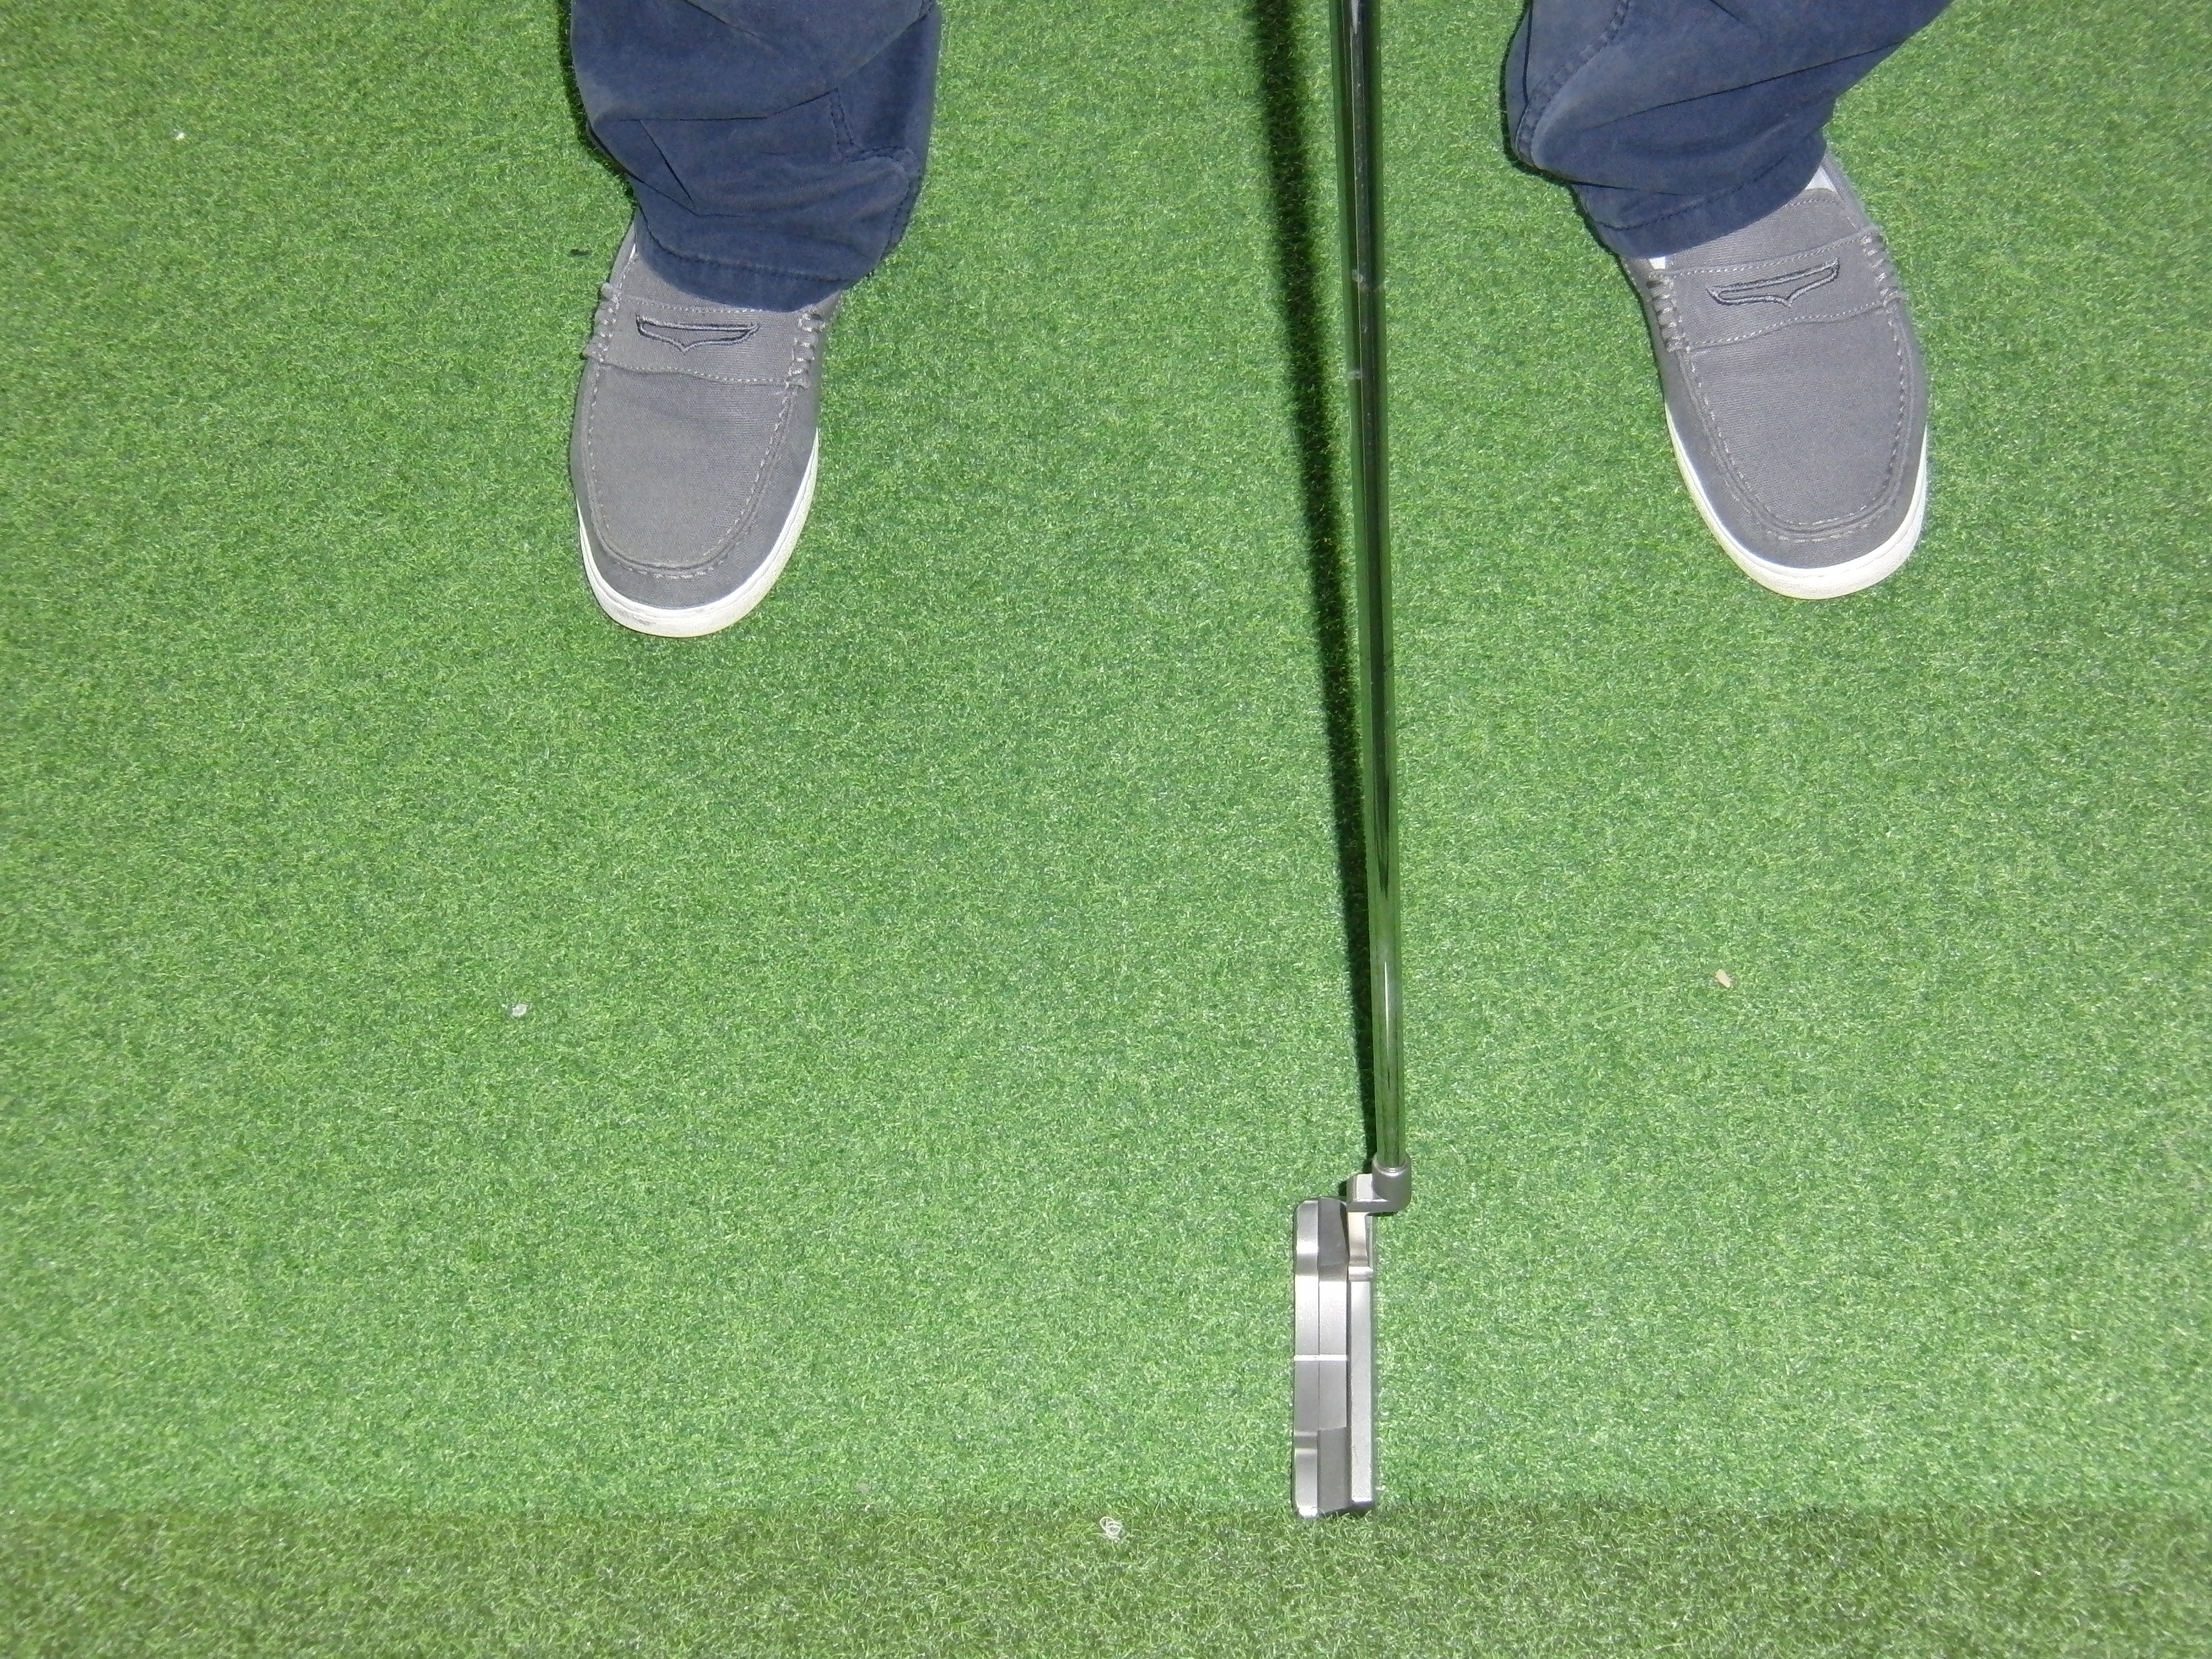
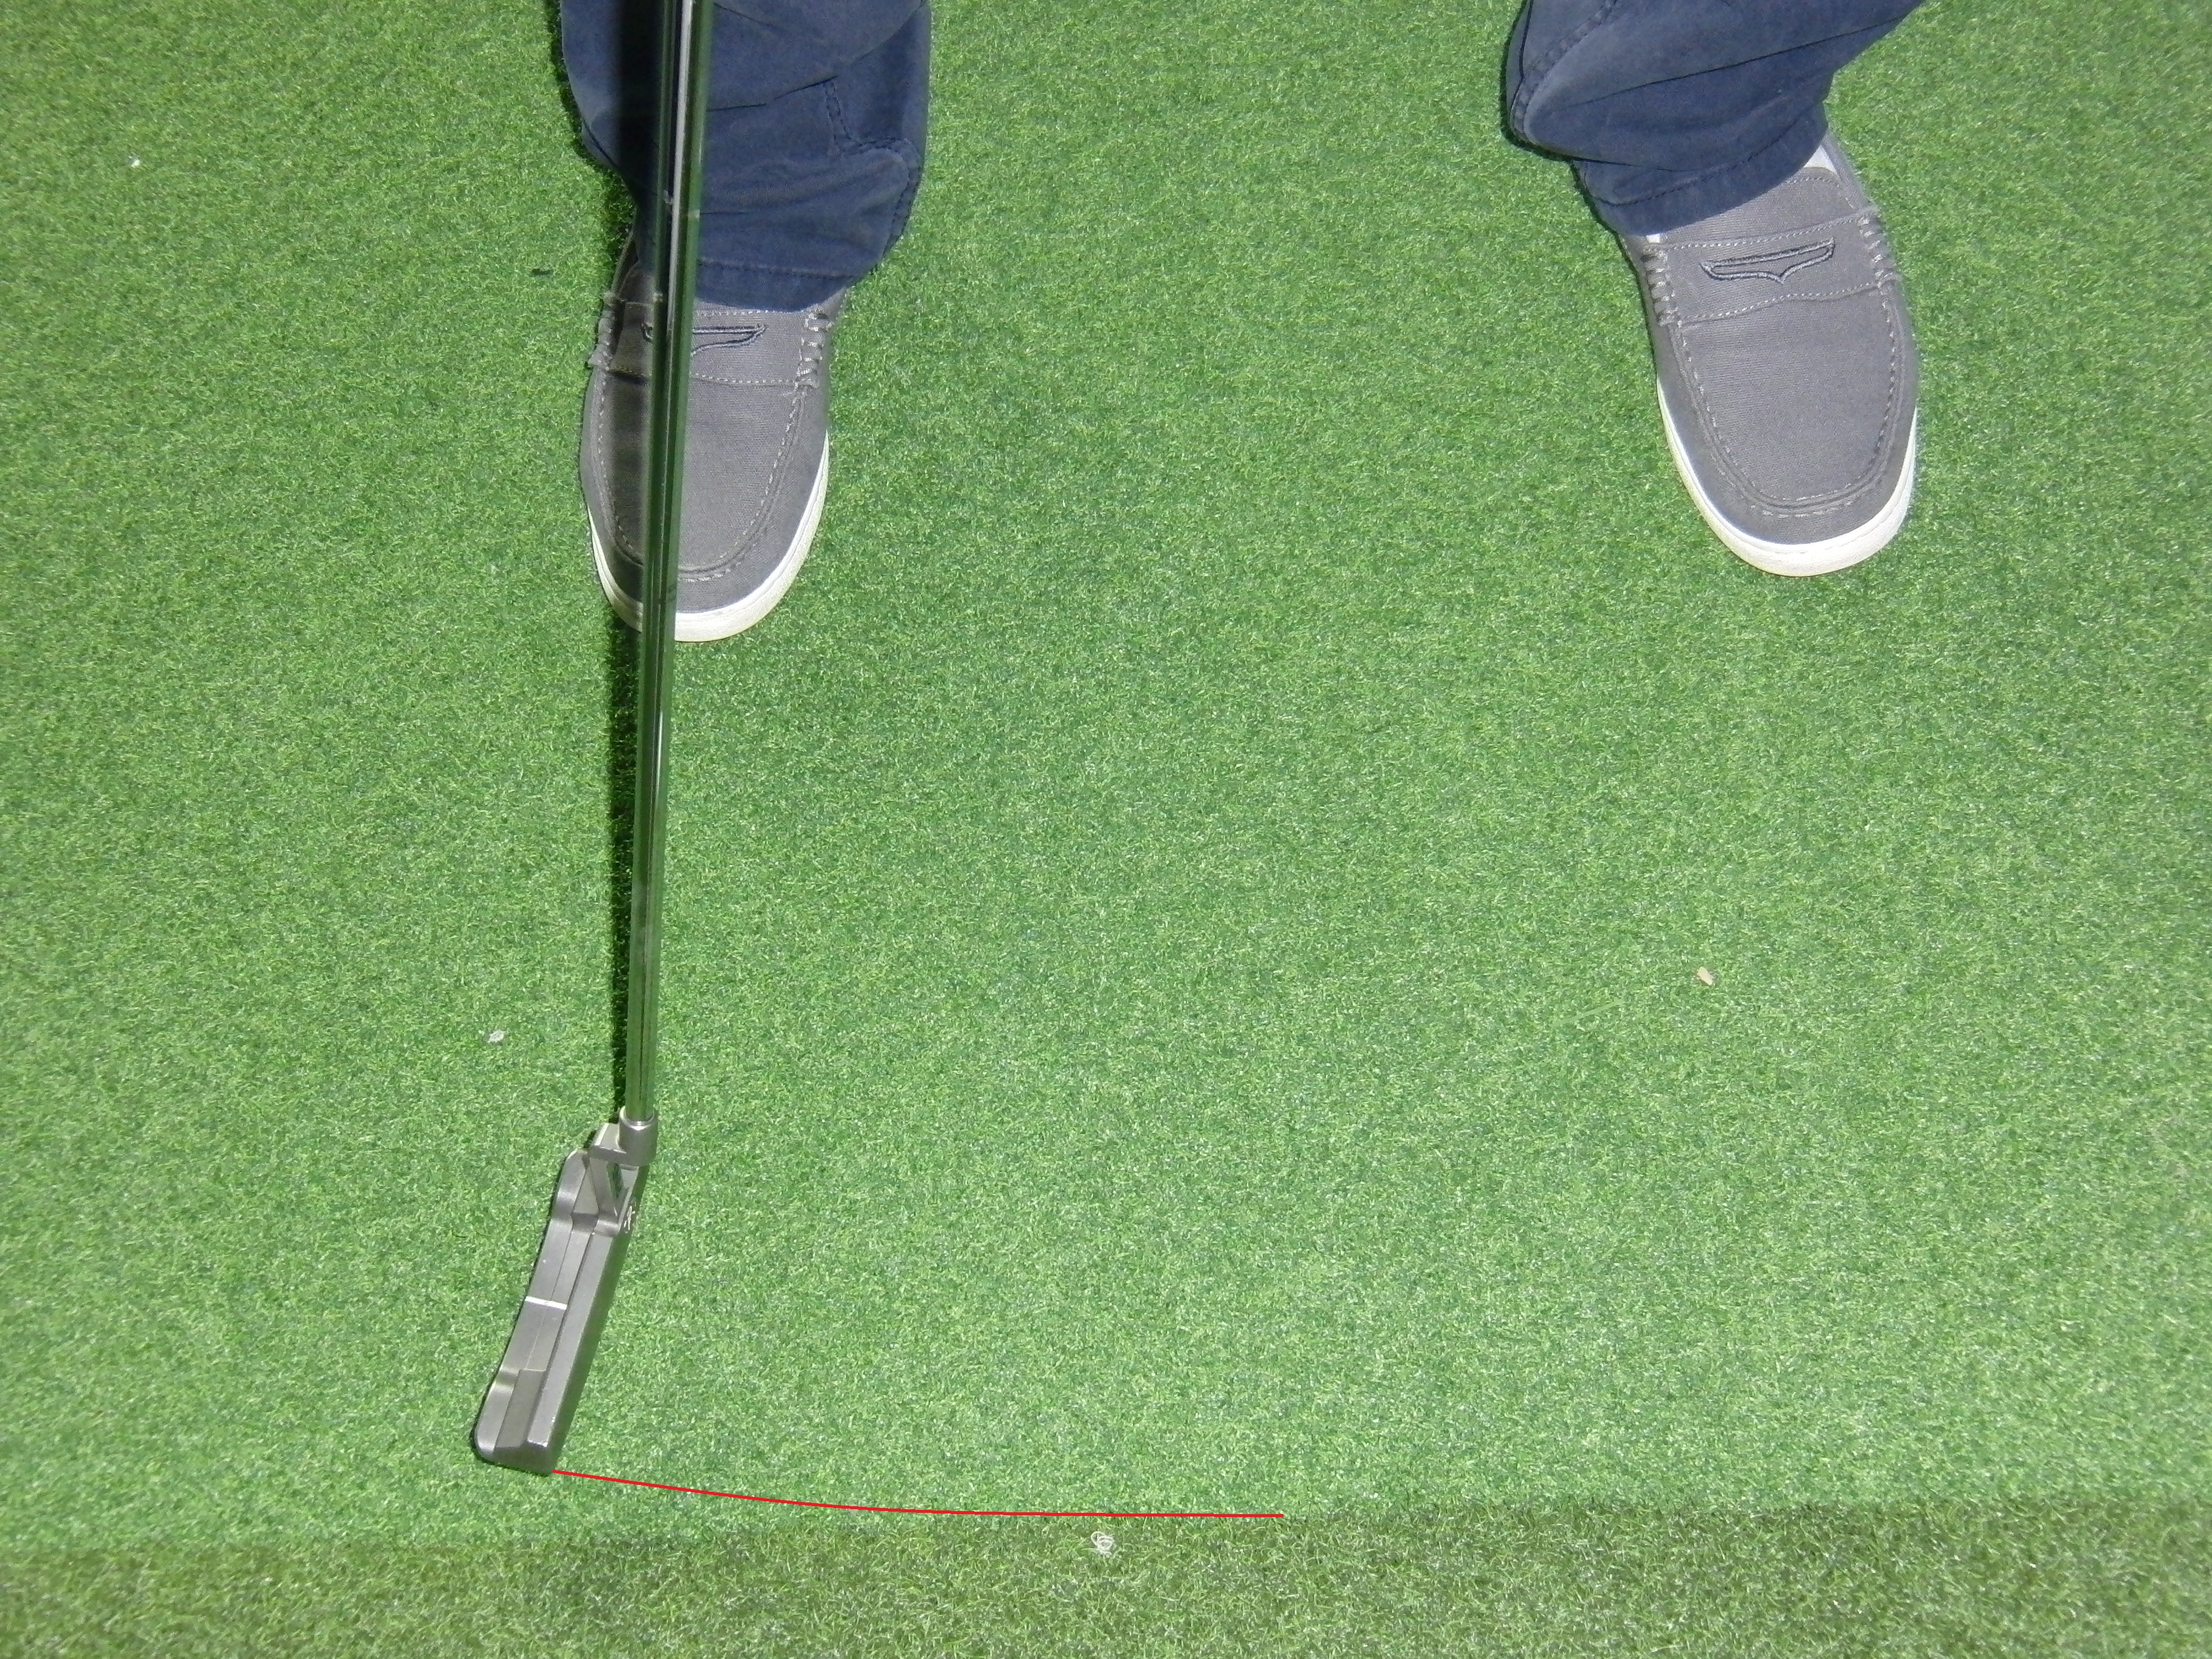
Do your best to make the stroke an even length on the back and forward swing. You can use your feet as a guide for stroke length. Swing back to the right foot and through to the left. Also, be sure to keep the tempo of the stroke consistent back and through. You don’t want to go back slow and through fast, or vice versa. Keeping the tempo the same back and through will encourage consistent speed control, which is the key to eliminate three-putts.
- LIKE147
- LEGIT26
- WOW4
- LOL3
- IDHT4
- FLOP4
- OB2
- SHANK27

Some call the image on the left laid off, but if you are hitting a fade, this could be a perfect backswing for it! Same for across the line for a draw! Stop racking your brain with perceived mistakes and simply match backswing to shot shape!
- LIKE0
- LEGIT0
- WOW0
- LOL0
- IDHT0
- FLOP0
- OB0
- SHANK1
My golf learning began with this simple fact – if you don’t have a fundamentally sound hold on the golf club, it is practically impossible for your body to execute a fundamentally sound golf swing. I’m still a big believer that the golf swing is much easier to execute if you begin with the proper hold on the club.
As you might imagine, I come into contact with hundreds of golfers of all skill levels. And it is very rare to see a good player with a bad hold on the golf club. There are some exceptions, for sure, but they are very few and very far between, and they typically have beat so many balls with their poor grip that they’ve found a way to work around it.
The reality of biophysics is that the body moves only in certain ways – and the particulars of the way you hold the golf club can totally prevent a sound swing motion that allows the club to release properly through the impact zone. The wonderful thing is that anyone can learn how to put a fundamentally sound hold on the golf club, and you can practice it anywhere your hands are not otherwise engaged, like watching TV or just sitting and relaxing.
Whether you prefer an overlap, interlock or full-finger (not baseball!) grip on the club, the same fundamentals apply. Here are the major grip faults I see most often, in the order of the frequency:
Mis-aligned hands
By this I mean that the palms of the two hands are not parallel to each other. Too many golfers have a weak left hand and strong right, or vice versa. The easiest way to learn how to hold the club with your palms aligned properly is to grip a plain wooden ruler or yardstick. It forces the hands to align properly and shows you how that feels. If you grip and re-grip a yardstick several times, then grip a club, you’ll see that the learning curve is almost immediate.
The position of the grip in the upper/left hand
I also observe many golfers who have the butt of the grip too far into the heel pad of the upper hand (the left hand for right-handed players). It’s amazing how much easier it is to release the club through the ball if even 1/4-1/2″ of the butt is beyond the left heel pad. Try this yourself to see what I mean. Swing the club freely with just your left hand and notice the difference in its release from when you hold it at the end of the grip, versus gripping down even a half inch.
To help you really understand how this works, go to the range and hit shots with your five-iron gripped down a full inch to make the club the same length as your seven-iron. You will probably see an amazing shot shape difference, and likely not see as much distance loss as you would expect.
Too much lower (right) hand on the club
It seems like almost all golfers of 8-10 handicap or higher have the club too far into the palm of the lower hand, because that feels “good” if you are trying to control the path of the clubhead to the ball. But the golf swing is not an effort to hit at the ball – it is a swing of the club. The proper hold on the club has the grip underneath the pad at the base of the fingers. This will likely feel “weak” to you — like you cannot control the club like that. EXACTLY. You should not be trying to control the club with your lower/master hand.
Gripping too tightly
Nearly all golfers hold the club too tightly, which tenses up the forearms and prevents a proper release of the club through impact. In order for the club to move back and through properly, you must feel that the club is controlled by the last three fingers of the upper hand, and the middle two fingers of the lower hand. If you engage your thumbs and forefingers in “holding” the club, the result will almost always be a grip that is too tight. Try this for yourself. Hold the club in your upper hand only, and squeeze firmly with just the last three fingers, with the forefinger and thumb off the club entirely. You have good control, but your forearms are not tense. Then begin to squeeze down with your thumb and forefinger and observe the tensing of the entire forearm. This is the way we are made, so the key to preventing tenseness in the arms is to hold the club very lightly with the “pinchers” — the thumbs and forefingers.
So, those are what I believe are the four fundamentals of a good grip. Anyone can learn them in their home or office very quickly. There is no easier way to improve your ball striking consistency and add distance than giving more attention to the way you hold the golf club.
More from the Wedge Guy
- The Wedge Guy: Golf mastery begins with your wedge game
- The Wedge Guy: Why golf is 20 times harder than brain surgery
- The Wedge Guy: Musings on the golf ball rollback
- LIKE86
- LEGIT13
- WOW6
- LOL1
- IDHT0
- FLOP4
- OB1
- SHANK8

Not the dreaded headcover under the armpit drill! As if your body is defective and can’t function by itself! Have you seen how incredible the human machine is with all the incredible feats of agility all kinds of athletes are accomplishing? You think your body is so defective (the good Lord is laughing his head off at you) that it needs a headcover tucked under the armpit so you can swing like T-Rex?
- LIKE0
- LEGIT2
- WOW2
- LOL0
- IDHT0
- FLOP0
- OB0
- SHANK2


Dave Portnoy places monstrous outright bet for the 2024 Masters

John Daly stuns fans into silence with brutal opening tee shot on PGA Tour Champions

Things got heated at the Houston Open between Tony Finau and Alejandro Tosti. Here’s why

Justin Thomas on the equipment choice of Scottie Scheffler that he thinks is ‘weird’

Tiger Woods arrives at 2024 Masters equipped with a putter that may surprise you

‘Absolutely crazy’ – Major champ lays into Patrick Cantlay over his decision on final hole of RBC Heritage

Report: Tiger Woods has ‘eliminated sex’ in preparation for the 2024 Masters

Two star names reportedly blanked Jon Rahm all week at the Masters

2-time major champ announces shock retirement from the sport at age of 33

Report: LIV Golf identifies latest star name they hope to sign to breakaway tour


Daniel Berger WITB 2024 (April)
Daniel Berger what’s in the bag accurate as of the Farmers Insurance Open. More photos from the event here. Driver:...


Rasmus Højgaard WITB 2024 (April)
Rasmus Højgaard what’s in the bag accurate as of the Zurich Classic. Driver: Callaway Ai Smoke Triple Diamond (10.5 degrees)...


Rory McIlroy WITB 2024 (April)
Rory McIlroy what’s in the bag accurate as of the Zurich Classic. Driver: TaylorMade Qi10 (9 degrees) Shaft: Fujikura Ventus...


Sam Burns WITB 2024 (April)
Sam Burns’ what’s in the bag accurate as of the RBC Heritage. Driver: Callaway Paradym Triple Diamond S (9 degrees...
-
 19th Hole2 weeks ago
Dave Portnoy places monstrous outright bet for the 2024 Masters
-
 19th Hole3 days ago
Justin Thomas on the equipment choice of Scottie Scheffler that he thinks is ‘weird’
-
 19th Hole2 weeks ago
Tiger Woods arrives at 2024 Masters equipped with a putter that may surprise you
-
 19th Hole3 days ago
‘Absolutely crazy’ – Major champ lays into Patrick Cantlay over his decision on final hole of RBC Heritage
-
 19th Hole2 weeks ago
Two star names reportedly blanked Jon Rahm all week at the Masters
-
 19th Hole1 week ago
Report: LIV Golf identifies latest star name they hope to sign to breakaway tour
-

 19th Hole1 week ago
Neal Shipley presser ends in awkward fashion after reporter claims Tiger handed him note on 8th fairway
-

 19th Hole1 week ago
Brandel Chamblee has ‘no doubt’ who started the McIlroy/LIV rumor and why
Steve Thomas
Feb 17, 2016 at 2:45 pm
I swing a weighted club (about 4 pounds) everyday so I don’t get that stiff feeling when I get to the first tee. I swing the weighted club at normal speed and then swing it as slow as I can swing it to help with rhythm. I’m almost 62 years old and it’s the best thing I do for flexibility.
Chris Ardolina
Feb 18, 2016 at 4:18 pm
Steve,
That is a great way to warm up. Its always important to loosen up your joints and muscle fibers before hitting any balls. You should try adding some other dynamic warm up exercises to your pre-round routine. Thanks for reading!
-Chris
Sean
Feb 12, 2016 at 5:58 pm
You forgot the sixth one: go south. 🙂
Chris Ardolina
Feb 18, 2016 at 4:05 pm
Good one Sean!
Hudson
Feb 12, 2016 at 5:41 pm
Chris Ardolina,
As emb and Other Paul are saying above, the lower back would suffer.
I see the left foot is planted on the ground.
Powerful and long driver of the ball use another technique, the lift the heel up.
We heard about Chamblee talking about this and he is right.
Look at the long drive champion Jamie Sadlowski: very powerful and he lifts the left heel.
Same for Miller, Nicklaus, Bubba, Mickelson, etc…
It gives:
1) power
2) a god transition as the weight shift is triggered by the lifted heel going done to be planted at the end of the sequence
3) less lower back injuries for sure
I tested the two methods on a club speed radar and was gaining 5 mph with the left heel lifted…
What are your thoughts?
Chris Ardolina
Feb 18, 2016 at 4:54 pm
Hudson,
Lifting the heel is not something I teach, but allowing the left heel a to rise a little in the backswing is ok for those who aren’t as flexible or have joint mobility issues. However, you still have to be very careful when replanting the heel in the downswing. Majority of amateur golfers have poor downswing sequences and usually replant the left heel in the incorrect spot. This leads to an over spinning of the lower body causing inconsistent contact and limited ball control.
Yes lifting the heel can give you more range of motion therefore increasing your club head speed, but it comes with a price. More inconsistency! If you swing it faster, everything else better be in place or else it means the ball will travel further off line. You used the long drivers as an example. They swing it very fast, but how many balls do they get in the grid during competition? Not many!
Remember this coiling exercise is an example and not everyone can fit into this exact mold. If you do have some previous back issues and have limited mobility you may fit into a different swing model. However if performed correctly with a properly warmed/loosened up body, these movements shouldn’t cause any discomfort.
Hope that answers your question.
Thanks for your feedback.
-Chris
emb
Feb 11, 2016 at 1:15 pm
make sure to work on #4 if you want back problems
Other Paul
Feb 11, 2016 at 9:09 pm
Amen to that. I stopped that and the back pain quit. Rotate in the center instead of sliding first. The slide is there to encourage an in to out swing and move the low point forward. Both things can be done better ways with better results.