Instruction
Shoulder golf stretches for fluid power and consistency
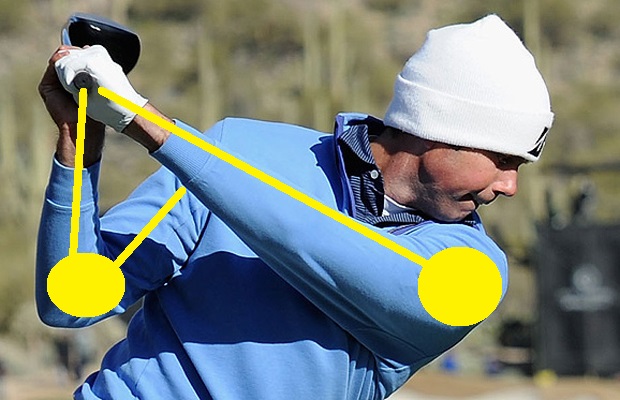
Shoulder flexibility in golf is an essential aspect of a fluid golf swing. The shoulder joint itself is a classic ball and socket joint. It’s similar to the hip, but with a lot less stabilization. This design allows the joint a lot of motion in all planes of movement, but puts it at a greater risk of injury.
Even as mobile as the shoulder joint is made to be, if not moved through its full range of motion on a regular basis, you will begin to lose the motion needed for a consistent golf swing.
So lets’ get technical and define the motions that we want to target in the shoulder. The motions most commonly limited that restrict the golf swing include the motions of abduction, horizontal adduction and external rotation.
The Shoulder in the Golf Backswing
- Lead Shoulder (left shoulder for right-handers)
Assuming you are right-handed, the left arm needs to reach across the body during the backswing. The upper half of your left arm should be touching your left chest muscle (called horizontal adduction).
- Trail Shoulder/Arm (right shoulder for right-handers)
Your back shoulder needs to have good range in two different motions: abduction plus external rotation.
- Shoulder External Rotation
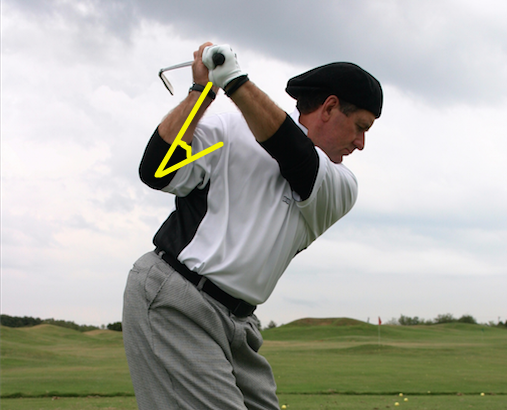
We find a lot of golfers older than 50 lacking the shoulder external rotation needed to get the golf swing on plane. This will cause your elbow to “fly out” or “chicken wing” in your backswing.
To check yourself, have a friend watch you. Take a full backswing and stop at the top of the backswing. Check to make sure the point of your trail elbow is pointing straight down to the ground. If it is angled and pointing behind you, that can be a problem.
There are two different ways that you can and should stretch the shoulder. Stretches involving static holding and stretches that are more dynamic with shorter hold times and more motion.
Dynamic Golf Stretches
Dynamic stretches address both muscle/tendon length and the mobility of the shoulder joint itself. Generally, you don’t want to hold a specific position for more than five seconds with dynamic stretching. Below is a great dynamic stretch to improve shoulder mobility for a fuller, more fluid backswing.
1. Alternating Arm Cross Golf Stretch

Begin with arms in front of you. Reach across your body with one arm and use the other arm to increase the stretch while rotating your head the opposite direction. Hold for three seconds and repeat to the opposite side. Do 10-plus repetitions.
2. Wall Angels Golf Stretch
Wall angels address both shoulder abduction and external rotation. This is a great stretch for the shoulders and is also great for improving posture and avoiding the “hunchback” appearance (for a greater stretch, perform the wall angles exercise while lying vertically on a foam roller).
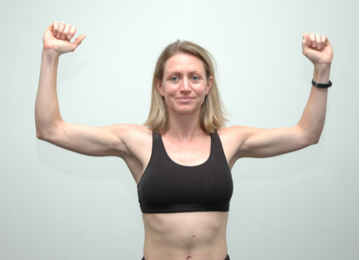
Back flat against the wall. Make an L shape with your arms trying to keep arms flush against the wall (do the best you can). Keeping your elbow bend consistent, move your arms up and down on the wall trying to keep your arms flush. Perform for 5 minutes moving slowly.
Static Golf Stretches
Static stretches should be held for 20-to-30 seconds and performed three times daily to be effective. If your shoulder motion is very limited and you really want to take care of business, gradually increase to 10 or more repetitions a day.
1. The Knot Golf Stretch

You can do this stretch on your stomach or standing against a wall. Cross your arms as shown in the picture and lean into the mat. Hold for 30 seconds then switch arm positions so that the arm that was on top is not below the other arm.
2. Shoulder External Rotation Golf Stretch

Sit next to a table/counter and place your forearm on the surface PARALLEL TO YOUR BODY. Bend forward at the hips until you feel a strong stretch in your shoulder. Hold for 30 seconds and repeat often.
3. Left Shoulder Backswing Golf Stretch

Get into your golf stance with something to grab onto next to your right shoulder. Reach across with your left hand at shoulder height.
- Stretch option No. 1: Rotate your neck and hips as far as you can to the left and hold for 30 seconds.
- Stretch option No. 2: Keeping your left hand stable, squat down by bending your knees until stretch is felt in the shoulder. Hold for 30 seconds.
4. Right Shoulder Backswing Golf Stretch

Stand with something to grab onto on your right side at shoulder height and arm length away. Reach out and hold with your right hand as pictured.
- Option No. 1: Rotate your body away from your right hand until stretch is felt and hold for 30 seconds.
- Option No. 2: Keeping your right hand in place, squat down by bending your knees until stretch is felt in right shoulder, chest and arms and hold for 30 seconds.
Special Note : If you experience a sharp, pinching pain at the top point of your shoulder, you should decrease how far you stretch until the pain is completely gone.
If you are unable to perform the stretch at all without this pain, you may have a shoulder impingement where a nerve or blood vessel is being physically pinched by the bones in your shoulder. If this is the case, you should not perform these stretches and should be evaluated by a medical professional. Most of the time this can be corrected in the clinic by a physical therapist.
This is not a pain to ignore because if left untreated, can progress to a serious impingement requiring major surgery. So get it looked at today! If you have any questions regarding the shoulder, I am happy to answer them for you. Please leave your question in the comments section below.
- LIKE40
- LEGIT8
- WOW2
- LOL5
- IDHT1
- FLOP2
- OB1
- SHANK6
Instruction
Clement: Laid-off or perfect fade? Across-the-line or perfect draw?

Some call the image on the left laid off, but if you are hitting a fade, this could be a perfect backswing for it! Same for across the line for a draw! Stop racking your brain with perceived mistakes and simply match backswing to shot shape!
- LIKE0
- LEGIT0
- WOW0
- LOL0
- IDHT0
- FLOP0
- OB0
- SHANK1
Instruction
The Wedge Guy: The easiest-to-learn golf basic
My golf learning began with this simple fact – if you don’t have a fundamentally sound hold on the golf club, it is practically impossible for your body to execute a fundamentally sound golf swing. I’m still a big believer that the golf swing is much easier to execute if you begin with the proper hold on the club.
As you might imagine, I come into contact with hundreds of golfers of all skill levels. And it is very rare to see a good player with a bad hold on the golf club. There are some exceptions, for sure, but they are very few and very far between, and they typically have beat so many balls with their poor grip that they’ve found a way to work around it.
The reality of biophysics is that the body moves only in certain ways – and the particulars of the way you hold the golf club can totally prevent a sound swing motion that allows the club to release properly through the impact zone. The wonderful thing is that anyone can learn how to put a fundamentally sound hold on the golf club, and you can practice it anywhere your hands are not otherwise engaged, like watching TV or just sitting and relaxing.
Whether you prefer an overlap, interlock or full-finger (not baseball!) grip on the club, the same fundamentals apply. Here are the major grip faults I see most often, in the order of the frequency:
Mis-aligned hands
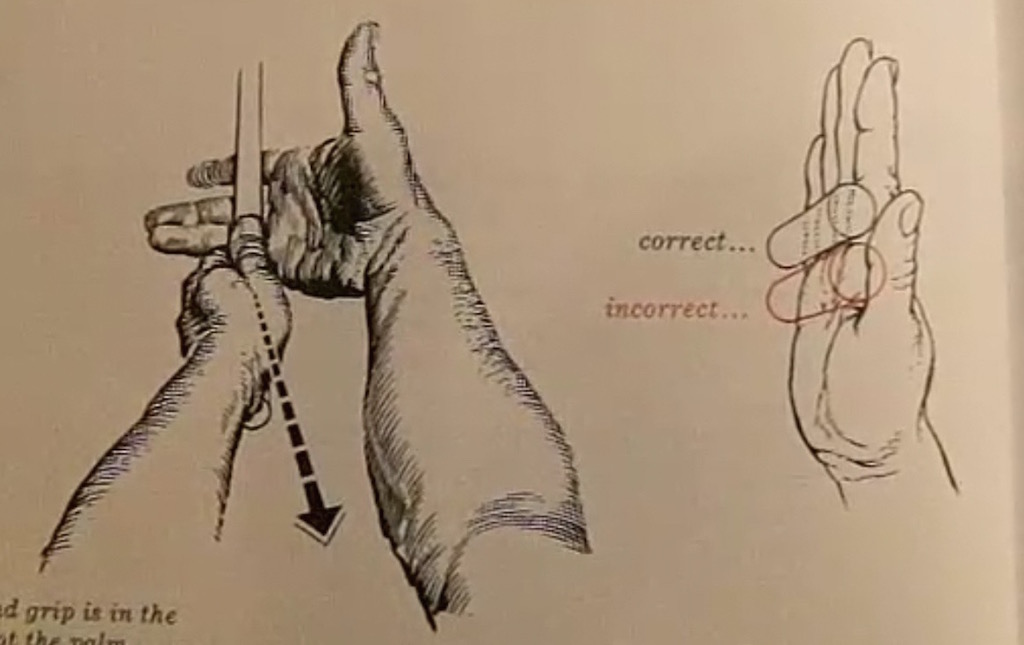
By this I mean that the palms of the two hands are not parallel to each other. Too many golfers have a weak left hand and strong right, or vice versa. The easiest way to learn how to hold the club with your palms aligned properly is to grip a plain wooden ruler or yardstick. It forces the hands to align properly and shows you how that feels. If you grip and re-grip a yardstick several times, then grip a club, you’ll see that the learning curve is almost immediate.
The position of the grip in the upper/left hand
I also observe many golfers who have the butt of the grip too far into the heel pad of the upper hand (the left hand for right-handed players). It’s amazing how much easier it is to release the club through the ball if even 1/4-1/2″ of the butt is beyond the left heel pad. Try this yourself to see what I mean. Swing the club freely with just your left hand and notice the difference in its release from when you hold it at the end of the grip, versus gripping down even a half inch.
To help you really understand how this works, go to the range and hit shots with your five-iron gripped down a full inch to make the club the same length as your seven-iron. You will probably see an amazing shot shape difference, and likely not see as much distance loss as you would expect.
Too much lower (right) hand on the club
It seems like almost all golfers of 8-10 handicap or higher have the club too far into the palm of the lower hand, because that feels “good” if you are trying to control the path of the clubhead to the ball. But the golf swing is not an effort to hit at the ball – it is a swing of the club. The proper hold on the club has the grip underneath the pad at the base of the fingers. This will likely feel “weak” to you — like you cannot control the club like that. EXACTLY. You should not be trying to control the club with your lower/master hand.
Gripping too tightly
Nearly all golfers hold the club too tightly, which tenses up the forearms and prevents a proper release of the club through impact. In order for the club to move back and through properly, you must feel that the club is controlled by the last three fingers of the upper hand, and the middle two fingers of the lower hand. If you engage your thumbs and forefingers in “holding” the club, the result will almost always be a grip that is too tight. Try this for yourself. Hold the club in your upper hand only, and squeeze firmly with just the last three fingers, with the forefinger and thumb off the club entirely. You have good control, but your forearms are not tense. Then begin to squeeze down with your thumb and forefinger and observe the tensing of the entire forearm. This is the way we are made, so the key to preventing tenseness in the arms is to hold the club very lightly with the “pinchers” — the thumbs and forefingers.
So, those are what I believe are the four fundamentals of a good grip. Anyone can learn them in their home or office very quickly. There is no easier way to improve your ball striking consistency and add distance than giving more attention to the way you hold the golf club.
More from the Wedge Guy
- The Wedge Guy: Golf mastery begins with your wedge game
- The Wedge Guy: Why golf is 20 times harder than brain surgery
- The Wedge Guy: Musings on the golf ball rollback
- LIKE88
- LEGIT14
- WOW6
- LOL1
- IDHT0
- FLOP4
- OB1
- SHANK8
Instruction
Clement: Stop ripping off your swing with this drill!

Not the dreaded headcover under the armpit drill! As if your body is defective and can’t function by itself! Have you seen how incredible the human machine is with all the incredible feats of agility all kinds of athletes are accomplishing? You think your body is so defective (the good Lord is laughing his head off at you) that it needs a headcover tucked under the armpit so you can swing like T-Rex?
- LIKE0
- LEGIT3
- WOW2
- LOL0
- IDHT0
- FLOP0
- OB0
- SHANK2
-

 19th Hole1 week ago
Justin Thomas on the equipment choice of Scottie Scheffler that he thinks is ‘weird’
-

 19th Hole1 week ago
‘Absolutely crazy’ – Major champ lays into Patrick Cantlay over his decision on final hole of RBC Heritage
-

 19th Hole3 weeks ago
Two star names reportedly blanked Jon Rahm all week at the Masters
-

 19th Hole2 weeks ago
Report: LIV Golf identifies latest star name they hope to sign to breakaway tour
-

 19th Hole2 weeks ago
Neal Shipley presser ends in awkward fashion after reporter claims Tiger handed him note on 8th fairway
-

 19th Hole2 weeks ago
Brandel Chamblee has ‘no doubt’ who started the McIlroy/LIV rumor and why
-

 Equipment3 weeks ago
What we know about Bryson DeChambeau’s 3D-printed Avoda irons
-

 19th Hole6 days ago
LET pro gives detailed financial breakdown of first week on tour…and the net result may shock you






Minh
Apr 18, 2014 at 12:22 am
Good Article. I always stretch my shoulder before hitting the range or the course.
Steve
Apr 17, 2014 at 5:09 pm
I have limited external rotation in my right shoulder due to an open bankart repair with anterior capsular shift in 1990. Stretching it seems to help somewhat, but never where I can get my right forearm vertical while in golf posture. Any advice on how much I should continue stretching it and what I might expect? My rotators are good and strong. Thank you.
Ryan
Apr 19, 2014 at 1:42 am
Steve,
Sorry to hear about your shoulder limitations. Continuing with standard shoulder stretches will help you maintain your current ROM but, this far removed from your surgery, will not likely help you regain more motion. You do have a couple options but they are not easy and not guaranteed. Option #1) I have had some success with shoulder like yours using a technique called TERT (total end range time). I could not find any online resources except scholarly articles and their isn’t a directory of physical therapists who do this technique. You would just have to call and ask if they do a “total end range time” treatment for shoulder mobility. The technique works but you have to endure 15-20 minutes of pretty good pain. Option
#2) Not as painful, you can find a physical therapist that performs either “ASTYM” or “The Graston Technique” These techniques are used to break up old scar tissue and work pretty well on old injuries to improve range of motion. Luckily, there are directories of therapists that you can look up. You can follow this link for ASTYM, or this link for the Graston Technique . I prefer ASTYM but there is essentially no difference between the two. Treatment like this runs about 6-8 visits. If it is working you can keep going until you reach your goal. If it is not working by then, it probably will not work. Sorry! I wish there were easier answers. It just depends on how bad you want that motion.
Ryan
Steve
Apr 20, 2014 at 7:41 am
Thanks Ryan. I think I will probably just have to work around this limitation. It is not bad (about 80-85 degrees ER at abducted position), but my swing instruction will have to account for this.
Joe
Apr 17, 2014 at 1:18 pm
Images are totally retro. Couldn’t find any images from this century? Nice article, though.
Ryan
Apr 19, 2014 at 1:44 am
I’m kind of a retro guy!