Instruction
Palozola: The 5 Principles of Putting
So, your putting is pretty good. What? Really? Is that what you actually tell people? Well, that means that you must be averaging in the high 20’s for putts per round, because that’s what the leaders on tour are doing. At the time of this writing the leader on the PGA Tour is averaging 27.36 putts per round and the worst putter on tour is averaging 30.88 putts per round. Now that’s “good” putting!
Having taught players of all skill levels for 20 years I have come to two conclusions about putting:
- Way more people come to the lesson tee and say that they are good putters than say they are bad putters.
- Just about zero of them are actually “good.”
The perception of what it means to be a good putter is strongly skewed. I believe that’s because even skilled players feel if they avoid three putting and average less than two putts per hole they must be doing pretty well. This logic, however, would make a tour player vomit.
So when I was asked to write a script for our putting video (read till the end of the article to get your free copy) on MyGolfInstructor.com I encountered a huge challenge. First of all, the script needed to apply to all players of all skill levels. Second of all, the truth of the matter is there is no one way to putt well. So if there is no one way, then how do you write a script that applies to everyone?
The answer was simple really. Stick to the basics and teach only sound fundamentals. The short game as most of you know is approximately 65 percent of a golfer’s score. Within that, putting is generally 40 percent or more! Just like with the full swing, in putting, there really aren’t “groundbreaking new” methods that pop up from time to time. Rather, it is someone different saying the same thing that someone else said long ago, but in a unique way. It is important therefore, that you stop looking for the miracle fix because there never is a “one size fits all” approach that works.
Whether you find yourself a scratch golfer or a beginner, there are simply a handful of things that you must do to putt well. I broke these items down and titled them “The 5 Principles of Putting.” This article breaks down the five principles for you in five easy steps. While it might seem like a lot of information for one article, I have bullet pointed most of it for easy reading. Hopefully, you will join me on all five principles, pick up some tips, refresh some old ones and systematically improve your putting this year one simple step after the other.
When it comes to putting there are things that you can control and things that you cannot. What type of putter you use, the type of path or stroke you make, how hard you hit the putt and how you address the ball are all things within your control. Bumps in the green, spike marks and wind are examples of things that are out of your control. In other words, making good decisions, having a well fit putter and establishing solid, simple mechanics are what you need to focus on to be a better and more consistent player because these are things you can change. Putting is the easiest part of the game for someone with less talent to be able to perform close to the level of a tour player. It doesn’t require pure talent on your part, it just requires that you do the same thing every time.
Principle 1: Having a Solid Set Up
A solid setup includes a good grip, posture and ball position, each of which is covered in detail in the sections below.
The Grip
A Neutral Grip Never Hurt Anybody.
You have heard over and over that the grip is your only connection with the club. How you hold the club influences and controls everything about your stroke including:
- Face position
- Speed
- Path
- Tempo
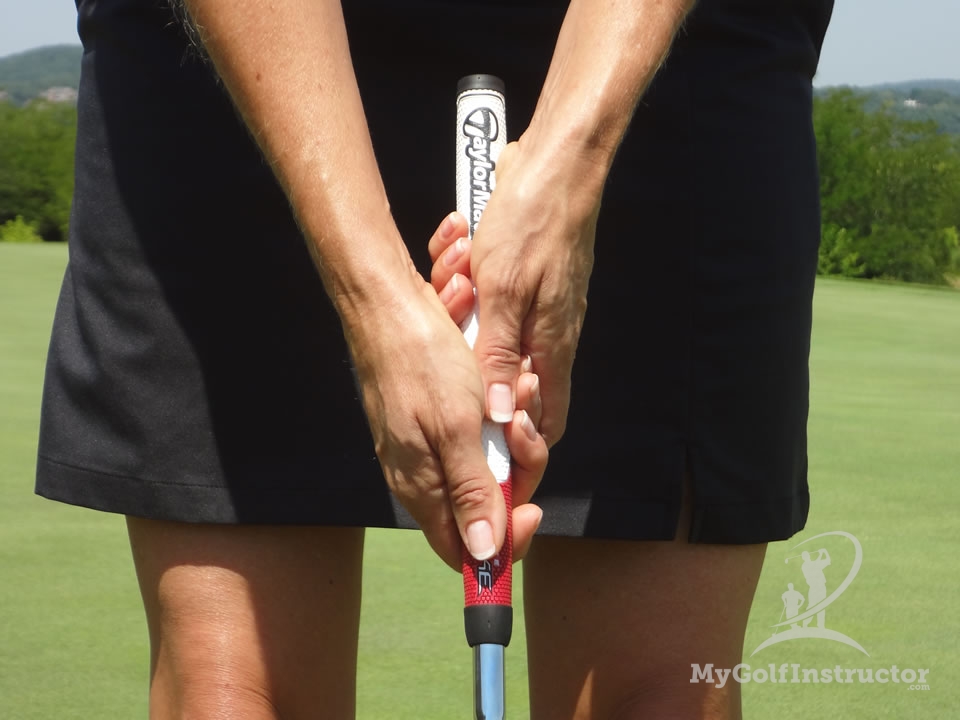
I always say, to be a fantastic putter you absolutely must have great touch, so pay close attention to how you touch your club. Characteristics of a solid grip include:
- Holding the handle in the palms of your hands.
- Holding it with your palms facing each other.
- Having your thumbs pointing down the grip.
- Holding with a light pressure.
This palm hold allows for a higher wrist position. Having the wrists set higher keeps them quiet and less active during the stroke. Holding it in the palms will also align the shaft with your forearms, helping to eliminate a lot of small muscles and activate the larger muscles of your back, shoulders and abdominals for a one-piece stroke.
The list of putting grip styles is endless. The most common grip is the reverse overlap where you overlap the index finger of your left hand over the space between your pinky finger and ring finger of your right hand. As long as the placement of the hands is consistent and in the palms with the palms facing each other, you will be fine. Pick a grip that feels comfortable to you and gives YOU success.
Posture

Posture: The Blueprint For A Solid Stroke.
Paying particular attention to your set up is so important because your set up helps to:
- Get your eyes and arms in the right position.
- Get comfortable.
- Get in balance.
- Establish stability.
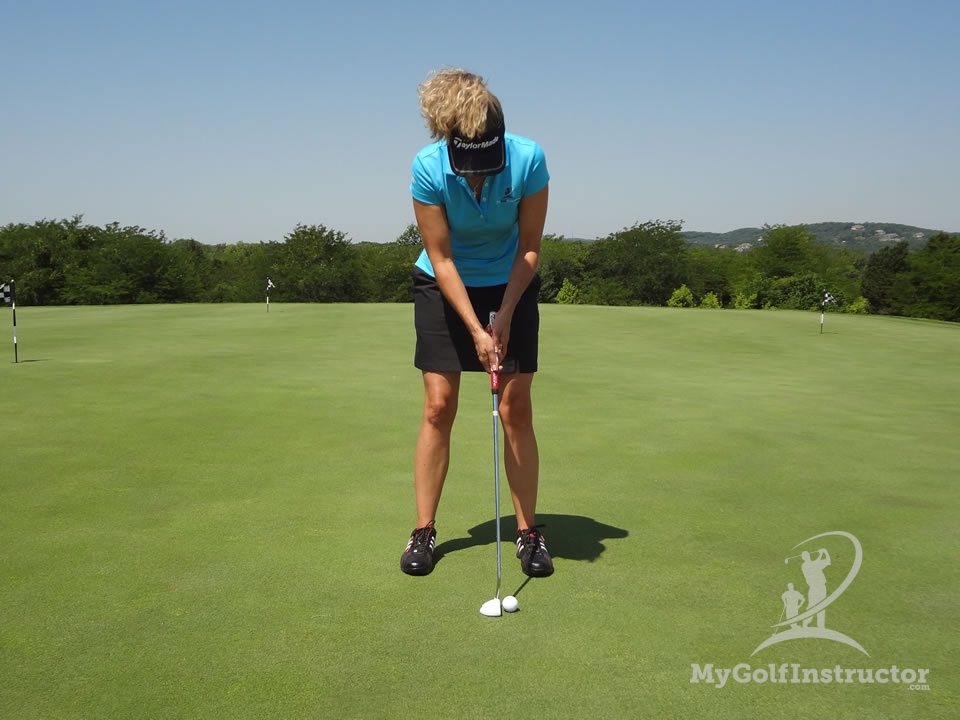
The first thing I teach my students when it comes to posture is the acronym “BFD.” Bend from the hips, then flex the knees, then drop the arms. I feel this order is crucial because too many players squat from the knees first and then slump from the waist with poor posture instead of keeping their spine straight. Once we get into a good posture, other checkpoints to follow are:
- Stand a comfortable width for stability.
- Keep your weight centered between your left and right foot so that you don’t have to use your hands to add or decrease loft during the stroke.
- Align your forearms with the shaft to help make a one-piece pendulum stroke with minimal wrist action.
- Keep your feet, hips, knees, forearms and shoulders square to the target line.
- Let your arms hang relaxed from your shoulders with your elbows relatively close to your body.
- Align your eyes over and just behind the ball if you move the putter on a straight path. If you move the putter on an arc, align them over the inside of the ball and just behind the ball.
- Keep the ball in the same position every time so that you strike it consistently in the same point in the arc.
- Align your eyes parallel to target line and even with the ground. If they set up high and you are looking down your nose, you will tend to look to the right of your target. If they are tucked too much, you will lose your peripheral vision.
Make sure to get yourself in a relaxed and comfortable position. Don’t contort your body into something that isn’t comfortable. I often see the mistake of golfers tensing their shoulders up around their ears. Take a deep breath and relax if this describes you. Keep your shoulders low and soft.
Ball Position
Ball Position Affects Launch and Spin.
Ball position isn’t just about hitting the ball high or low as most golfer suspect. Ball position influences among other things:
- The launch.
- The spin.
- The roll.
- Your weight shift (on a full swing).
- The direction of your path at impact.
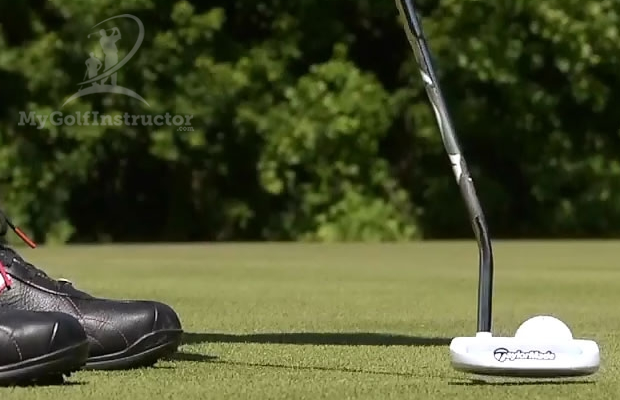
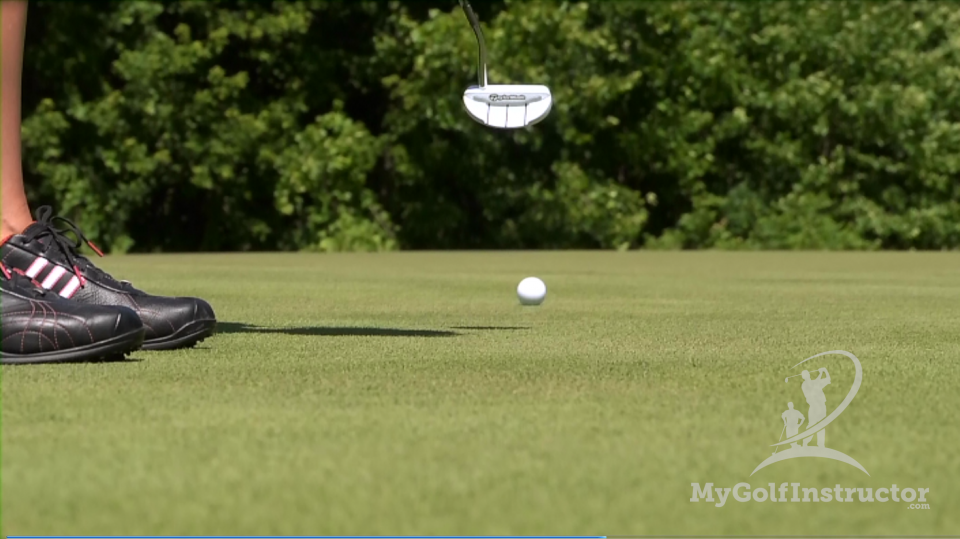
For putting, I recommend that you play the ball just forward of the center of your stance. This will help ensure that you strike the ball just below the equator of the putter face and with an ascending blow. The result is a good, true, smooth, top spin roll. If you have ever noticed someone playing the ball in the center or back of their stance, you can see the ball sometimes pop up off the putting surface. What’s difficult to see though is when someone puts too much back spin on the ball by hitting down and the ball skids initially coming off the putter face. The initial velocity is seriously compromised when this happens, throwing off the intended speed.
Again, I hope this provides a solid review of your set up positions. Maybe you picked up some new ideas, or maybe you just assured yourself you are doing all you can to set up for success on the greens. Either way, like I said, there is no one way, but having solid set up positions gives you the blueprint for being a skilled putter.
Principle 2: Aiming the Putter Correctly
In order to aim your putter accurately you need to be able to do three things:
- Use a putter that is properly fitted to your stroke and eyes.
- Actually align the face of the putter at your intended target.
- Obtain an accurate read on the green.
Get a Properly Fitted Putter
Before you do anything else, you must get a putter that fits properly and that you can aim properly with your eyes. Different head shapes and different hosel shapes have a huge effect on where you think you are aiming.
Align Face Exactly at Target

90 Percent of Golfers Can’t Aim.
Face alignment at impact above and beyond all is the most important factor in determining the direction your ball will go. SAM Putt Lab stats show that face angle at impact accounts for 82 percent of ball direction. On top of that, statistics show that only 3 percent of all amateur golfers are able to aim their putter correctly. David Edel, one of the foremost putter fitters in the world, states that 90 percent of players that he tests can’t aim straight even on a short putt.
“How do people hole putts then?” you ask.
The answer is simple. There are millions of putts holed every year worldwide by accident. SAM Putt Lab stats show that you need a 4-degree compensation in swing path direction to offset a 1-degree face error. You can imagine how difficult it is to make these kind of swing compensations consistently.
Again, my theme here is that there is no one way. When it comes to aiming golfers see their line in different ways. More left brained golfers who like things in order tend to see straight lines. Right brained players who rely more on feel tend to see the ball curving all the way to the hole. Putting instructor Mike Shannon calls these linear or non-linear players.
When lining up you can aim:
- To a spot halfway to the hole along your target line.
- To a spot that is equidistant with the hole, but along your starting line.
- To a spot that lies right in front of your ball, but along your starting line.
Whatever style you choose, the only real way to know if you are aimed correctly or not is to purchase a laser and practice with it routinely. I prefer my students to aim at a spot equidistant with the hole so they won’t throw off their speed, but you can choose whichever way works best for you.
Get an Accurate Read
To get an accurate read on a putt you have to be able to do three things:
- Assess the severity of slope on the green.
- Figure the speed the ball will roll.
- Determine how or if the grain on the green will affect the putt.
Note that controlling the speed is so important that I’ve made it Principle 5 and will cover it there.
To determine the slope (the most difficult step):
- Look at the green’s surrounding terrain as you approach your putt, not just the green itself. Look for low points like creeks and lakes and high points like hills and mountains, which will give you clues as to how the ball will roll.
- Imagine dumping a bucket of water out and watching the direction the water runs.
- Walk around the cup and back to your ball using your feet to feel the slope as you walk.
To determine the grain:
- Look to see if it is shiny or dull. If the grain is growing away from you it will appear shiny.
- Know that grain on Bermuda grass has more of an effect than Bent grass, which some players don’t even bother considering.
- Know that grain grows toward the setting sun and water sources.
- Know that as the ball loses speed, the grain will have more of an effect.
Principle 3: Making a Pure Path
When it comes to path, you can choose to move the putter on an arc or move it on a straight line. This has been the biggest debate in golf instruction for about the last 15 years or so. Trying to figure out what way is best for you can be a challenge, because the players you look up to (tour players) are constantly changing their strokes, putters, grip styles, etc. Jack Nicklaus said, “I’ll change my setup or stroke, not only from day to day but from green to green-even from putt to putt.”

Is an Arc Right For You?
To help you determine what is best ask yourself the following questions:
- Do you naturally rock your shoulders and move the putter on a straighter path? This is very difficult to do and you can test it by placing the toe of your putter along the baseboard of your floor. Try keeping the toe attached to the wall as you move the putter back and forth.
- Do you naturally see a curve to the hole or do you see a straight line out to your aiming point?
- Is your putter designed for an arc stroke or for more of a straight line stroke?
Putter path accounts for 18 percent of the direction of the ball according to SAM Putt Lab stats, so you can see how important it is to develop a consistent path. Make sure to stick with whatever style you choose and don’t switch around. There are many great training aids out there for both an arc path and a straight path to help you keep your stroke in a groove.
Principle 4: Hitting It in the Center

A Center Strike is the Bomb.
Missing the center of the face affects the direction your putts roll and throws off the intended speed. SAM Putt Lab stats show that missing the sweet spot accounts for 5 percent of the direction the ball goes. For instance, contacting the ball on the toe causes weaker strikes as well as an open face, which pushes the ball to the right. Contacting the ball on the heel also makes for a weaker strike, but it makes the putter face swing closed, causing putts to be missed left. Stats show that you lose up to 15 percent of your energy when you miss the sweet spot. Many great teachers feel that learning to hit the ball in the center is the most important factor in all of putting.
Principle No. 5: Control Your Speed
Many Factors Control the Speed
Every good instructor will tell you that working on speed control is under practiced by their students and that the importance of speed control is grossly underestimated. Students come to lessons complaining about missing to the right, to the left or possibly miss reading, but I’ve hardly ever and I mean ever had a student come out for a lesson and say they need help controlling their distance. It never crosses their minds that the reason they are missing to the right or left is because they are hitting the putt too soft or too hard, which causes it to drop off the break line or run right through it.
Tour players, however, practice their touch incessantly. Every tour player knows about the magic 3-foot circle from which tour players will make 97 percent of their putts. At 6 feet, the make percentage drops down to only 55 percent! That means that if the average player would spend more time on distance control, especially with their first putt, three putts would be scarce.
Four important variables control your speed:
- The length of your backstroke.
- The amount of effort you put on the putt.
- How you read the putt.
- Ball position.
Monitor Your Length and Effort
To control the length of your backswing you need visual markers. Some players have a lot of success using their feet as a gauge. I like to practice with a taped yardstick. Color code it every 2 inches (2 inches forward of center and 2 inches back would be red, at 4 inches put blue, etc.) With this tool, you can simply swing back and forth finishing even and on the same color.
For most players, their forward swing will be longer than their backswing. It’s important to let this happen and that you don’t try to forcefully stop your stroke. It will help you prevent deceleration and will also help prevent you from stopping short and flipping your hands through the putt, which causes over acceleration. A consistent tempo is mandatory for good speed control. For tempo, I have all of my students practice continuously with a metronome. The average tempo on the PGA Tour is 84 bpm, so you can start with that and work faster or slower to find your tempo. Remember a 3 foot putt has the same tempo as a 30 foot putt.
SAM Puttlab stats show that for tour players the backswing time is 600-to-700 ms and the forward swing time is 700-to-900 ms. This is important because it shows the forward swing does in fact take a bit longer than the backswing because it is longer overall.
Get a Good Read
The line you decide to play will have a significant affect on the speed of the putt. It’s really your decision whether you go more straight at a hole and play it aggressively with less break or lag it up and let it die into the hole with more break.
Play a Correct and Consistent Ball Position
Playing the ball forward of the center of your stance and in the same spot every time helps control the spin on the ball. A forward position will help the ball roll out by giving you a better chance to apply top spin. SAM Putt Lab stats show you should have a 3-to-4 degree rise at impact for optimum roll. If you have only a little rise, but a lot of loft, you will impart backspin. Playing it back lessens your rise and in turn puts more backspin on the putt and will tend to slow the speed down.
Thanks for joining me on the 5 Principles of Putting. As I said earlier, if you are a skilled player hopefully you picked up some tips or refreshed some old ones. For those of you needing serious improvement, you can now use this guide to systematically improve your putting this year one simple step after the other.
Get online access to my putting video now for FREE! PGA Tour veteran Jay Delsing and myself teach these five principles of putting and much more in our video Putting Principles. We typically sell the online access plus DVD version of this video for $39.99, but as a special offer, if you join MyGolfInstructor.com now and email me at [email protected] stating you read this article, I will grant you online access to this video for absolutely free.
- LIKE46
- LEGIT5
- WOW2
- LOL0
- IDHT3
- FLOP1
- OB0
- SHANK2


Like Jordan Spieth, trying to go to a bowed wrist at the top or in the downswing to square the club is placing you in a dangerous position for your lead wrist; you are one tree root or deep rough situation away from a nasty injury that could easily require surgery. Don’t let this be you.
- LIKE1
- LEGIT0
- WOW0
- LOL0
- IDHT1
- FLOP2
- OB0
- SHANK3

Some call the image on the left laid off, but if you are hitting a fade, this could be a perfect backswing for it! Same for across the line for a draw! Stop racking your brain with perceived mistakes and simply match backswing to shot shape!
- LIKE2
- LEGIT0
- WOW0
- LOL0
- IDHT0
- FLOP0
- OB0
- SHANK1
My golf learning began with this simple fact – if you don’t have a fundamentally sound hold on the golf club, it is practically impossible for your body to execute a fundamentally sound golf swing. I’m still a big believer that the golf swing is much easier to execute if you begin with the proper hold on the club.
As you might imagine, I come into contact with hundreds of golfers of all skill levels. And it is very rare to see a good player with a bad hold on the golf club. There are some exceptions, for sure, but they are very few and very far between, and they typically have beat so many balls with their poor grip that they’ve found a way to work around it.
The reality of biophysics is that the body moves only in certain ways – and the particulars of the way you hold the golf club can totally prevent a sound swing motion that allows the club to release properly through the impact zone. The wonderful thing is that anyone can learn how to put a fundamentally sound hold on the golf club, and you can practice it anywhere your hands are not otherwise engaged, like watching TV or just sitting and relaxing.
Whether you prefer an overlap, interlock or full-finger (not baseball!) grip on the club, the same fundamentals apply. Here are the major grip faults I see most often, in the order of the frequency:
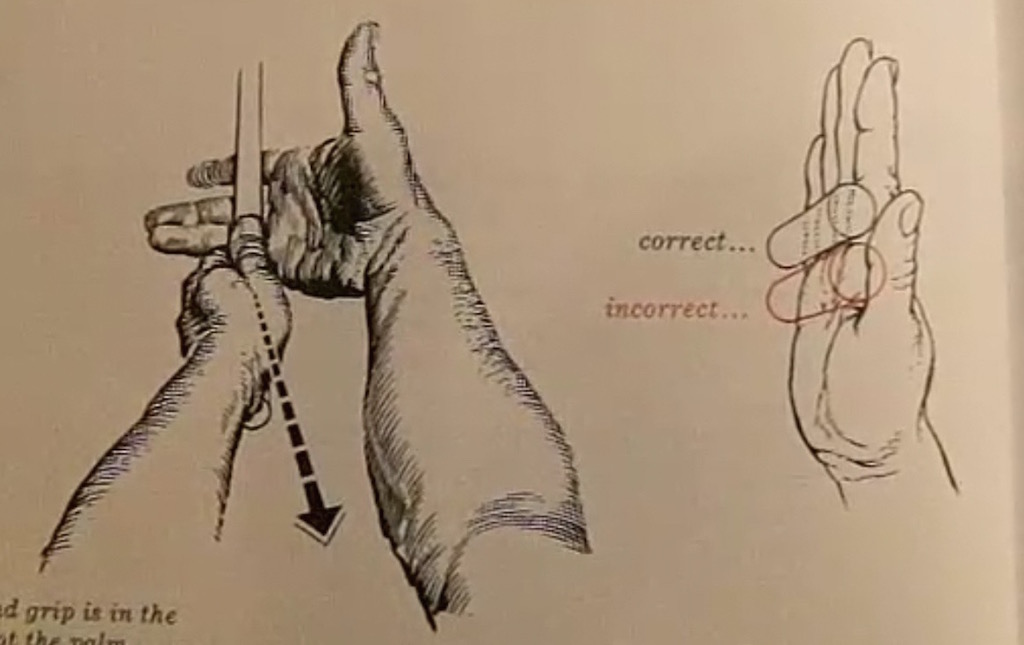
Mis-aligned hands
By this I mean that the palms of the two hands are not parallel to each other. Too many golfers have a weak left hand and strong right, or vice versa. The easiest way to learn how to hold the club with your palms aligned properly is to grip a plain wooden ruler or yardstick. It forces the hands to align properly and shows you how that feels. If you grip and re-grip a yardstick several times, then grip a club, you’ll see that the learning curve is almost immediate.
The position of the grip in the upper/left hand
I also observe many golfers who have the butt of the grip too far into the heel pad of the upper hand (the left hand for right-handed players). It’s amazing how much easier it is to release the club through the ball if even 1/4-1/2″ of the butt is beyond the left heel pad. Try this yourself to see what I mean. Swing the club freely with just your left hand and notice the difference in its release from when you hold it at the end of the grip, versus gripping down even a half inch.
To help you really understand how this works, go to the range and hit shots with your five-iron gripped down a full inch to make the club the same length as your seven-iron. You will probably see an amazing shot shape difference, and likely not see as much distance loss as you would expect.
Too much lower (right) hand on the club
It seems like almost all golfers of 8-10 handicap or higher have the club too far into the palm of the lower hand, because that feels “good” if you are trying to control the path of the clubhead to the ball. But the golf swing is not an effort to hit at the ball – it is a swing of the club. The proper hold on the club has the grip underneath the pad at the base of the fingers. This will likely feel “weak” to you — like you cannot control the club like that. EXACTLY. You should not be trying to control the club with your lower/master hand.
Gripping too tightly
Nearly all golfers hold the club too tightly, which tenses up the forearms and prevents a proper release of the club through impact. In order for the club to move back and through properly, you must feel that the club is controlled by the last three fingers of the upper hand, and the middle two fingers of the lower hand. If you engage your thumbs and forefingers in “holding” the club, the result will almost always be a grip that is too tight. Try this for yourself. Hold the club in your upper hand only, and squeeze firmly with just the last three fingers, with the forefinger and thumb off the club entirely. You have good control, but your forearms are not tense. Then begin to squeeze down with your thumb and forefinger and observe the tensing of the entire forearm. This is the way we are made, so the key to preventing tenseness in the arms is to hold the club very lightly with the “pinchers” — the thumbs and forefingers.
So, those are what I believe are the four fundamentals of a good grip. Anyone can learn them in their home or office very quickly. There is no easier way to improve your ball striking consistency and add distance than giving more attention to the way you hold the golf club.
More from the Wedge Guy
- The Wedge Guy: Golf mastery begins with your wedge game
- The Wedge Guy: Why golf is 20 times harder than brain surgery
- The Wedge Guy: Musings on the golf ball rollback
- LIKE93
- LEGIT16
- WOW6
- LOL1
- IDHT0
- FLOP4
- OB1
- SHANK9


Experts on understanding ground force and how shoes can impact your golf game

Brooks Koepka rules incident comes under scrutiny at LIV Golf Houston

Three Swing Challenge: Testing the Edel Array F-2 putter

‘Most overrated course in the world!’ – Major champ rips ‘awful’ Pinehurst No. 2

Pros weigh in on Titleist’s new GT drivers at the Memorial

Miura launches new forged wedge series

AimPoint under attack again as footage from U.S. Open enrages golf fans

What clubs do equipment free agents choose to use on tour? We found out

‘You’re right, we’re always wrong!’ – Sergio Garcia receives warning during Open qualifier

Rory McIlroy releases statement following crushing U.S. Open loss

Xander Schauffele’s winning WITB: 2024 Open Championship
Driver: Callaway Paradym Ai Smoke Triple Diamond (10.5 degrees) Buy here. Shaft: Mitsubishi Diamana PD 70 TX (45.5 inches) 3-wood:...


Daniel Brown WITB 2024 (July)
Daniel Brown WITB accurate as of The Open Championship. Driver: Ping G430 LST (9 degrees) Shaft: Fujikura Ventus Blue 6...

C.T. Pan WITB 2024 (July)
C.T. Pan what’s in the bag accurate as of the John Deere Classic. More photos from the event here. Driver:...

Justin Thomas WITB 2024 (July)
Justin Thomas’ what’s in the bag accurate as of the Scottish Open. We will make any updates if JT has...
-
 Product Reviews1 week ago
Three Swing Challenge: Testing the Edel Array F-2 putter
-
 Equipment1 week ago
What clubs do equipment free agents choose to use on tour? We found out
-
 19th Hole3 weeks ago
‘You’re right, we’re always wrong!’ – Sergio Garcia receives warning during Open qualifier
-

 News2 weeks ago
Highlights from the Wilson Golf Product Testing and Fitting Experience at Pinehurst
-
 News2 weeks ago
Davis Thompson’s winning WITB: 2024 John Deere Classic
-

 Equipment3 weeks ago
Q&A: The truth behind Bryson DeChambeau’s new Avoda irons from company founder Thomas Bailey
-

 19th Hole2 weeks ago
Major champ ‘disappointed’ not to be chosen as U.S. Ryder Cup captain
-

 19th Hole2 weeks ago
LIV pro explains how he believes players are ‘cheating’ on DP World Tour
daveo
Mar 22, 2014 at 11:42 pm
Brian great article. I call myself a world class 2 putter which is not a compliment. I think the most severe of my problems is I dont expect to make anything!!
8thehardway
Mar 20, 2014 at 7:00 pm
Your article is a perfect blend of fundamentals, refinement and clarity.
One nugget – ‘aligning your eyes… even with the ground’ – is something that took a LOT of practice to discover, but your article offers and documents so many observations I think anyone who isn’t comfortable with putting, and many who are, will find something of great value in it. Oh, and while I’m aware of the limitations of the metric I average under 28 putts per round and think I’m a pretty good putter for a recreational golfer.
Maria Palozola
Mar 20, 2014 at 9:31 pm
Thanks for reading. It does sound like you are a very good putter indeed. To get your eyes parallel to the ground simply put the back of your hand over your eyes and bend down until your palm is flat with the ground. Hope that helps!
Homerd
Mar 20, 2014 at 2:16 pm
That was a great article! Too bad I read Brian’s reply. Maybe he should be reminded of who writes articles and who doesn’t. It is clear who should!!!
Brian
Mar 20, 2014 at 5:03 pm
Thanks Homerd for your insightful comment. Would love to hear more details about what you mean.
Joe
Mar 20, 2014 at 8:07 pm
Almost too easy to bag on someone anonymously on a message post huh?
Maria Palozola
Mar 20, 2014 at 9:32 pm
Thanks for the compliment. I hope it helps.
Brian
Mar 20, 2014 at 11:58 am
A wonderful comprehensive article!
I been reading a lot about putting fundamentals and principles recently and your analysis is one of the best I’ve read so far and very timely.
I would suggest that your article tries to identify ‘Principles’ but, because it’s so comprehensive, different notions of ‘Preferences’ are understandably incorporated that are perhaps not really ‘Principles’ in the sense that every golfer MUST do them.
For example, If you look at the different elements of ‘Set up,’ the only element that I would classify as a ‘principle’ is ball position. The grip, posture, stance etc. are as varied as there are golfers, but all great putters do have the ball just slightly forward to center to impart the right roll.
Eyes directly over the ball, ‘preference.’ Take the wrists out of your stroke, ‘preference’ Palms facing each other, ‘preference’ (What about long putters, claw grips, left hand low, etc?) Weight distribution, ‘preference’ Open vs. square stance, ‘preference.’ Your advice for is outstanding to someone new to the game, or really having a tough time on the greens. For low to mid handicappers, however, I think we can find examples of many good putters who have found their own set of preferences from the body mechanics list of elements of putting.
Aiming Correctly is absolutely a ‘Principle’ and everything you say in this section is right on. Most importantly is the core principle having the putter face square at impact. This goes back to before Ben Hogan famously stated this principle in his 5 lessons.
“Making a Pure Path’ is more of a consistent set of ‘Preferences’ rather than a ‘principle’ doing everything in golf consistently is a ‘principle’ not just for putting. Whatever path gets the face square at impact is in reality fine. We might note that ‘pendulum’ (Straight Back Straight Through) might be better for short putts, and some arc is inevitable all putts, but more evident on longer ones.
‘Hit in the Center of the clubface’ seems like a definite ‘principle’ or, another way to look at it, it is a RESULT of ‘Hitting the ball square at impact with a pure path and correct ball position and properly fitted putter’ This must result in a center hit that imparts the correct roll.
“Controlling your distance’ is a goal not a ‘principle.’ To achieve good distance control you mention tempo, but you also mention the amount of effort. Great players use the same relative amount of energy for every putt That is their tempo and rhythm remain contant, and use the length of backswing and follow-through to determine distance. The backstroke to follow through ratio (i.e. 50:50 – 8″ back and 8″ through or 40:60 – 8″ back and 12” through) remains constant.
Using your feet or other means of measuring to calibrate the resulting distances on different surfaces for different backswing-to-follow-through-pairs is how to control your speed, as you rightly point out, but again your tempo, rhythm and therefore energy should remain constant. The ‘Principle then is to ‘have a balanced stroke with consistent tempo and rhythm.’
4 Principles of Putting
Direction:
1) Ball slightly forward of center
2) Square the Face at Impact
Distance:
3) Balanced Stroke
4) Consistent Tempo and Rhythm controls Pace
You state near the beginning that the ‘correct path’ has been the most debatable point in putting for about 15 years. Perhaps your article will shift the debate to where it belongs: “What are the true principles of Putting?”
Maria Palozola
Mar 20, 2014 at 9:42 pm
Hi Brian. Thanks for all the compliments and for taking the time to read the article. And wow!!! You really did pay attention. I have to agree that if you are talking about a principle in terms of the Laws, Principles and Preferences of Golf , you are correct, these aren’t necessarily principles in that respect. It’s semantics really. You could rather say these are fundamentals or truths or necessities, at least in my opinion. So we could call these Maria’s Principles as they seem to be the fundamentals that best help my students improve their game on the greens. With that being said there is mechanics and then there is style. You are correct in that some of the greatest players in the game have had their own unique style that might not be considered fundamentally correct or the best way to putt, but it certainly works for them. Happy putting and I hope you picked up something that may click with you this summer!
Brian
Mar 21, 2014 at 11:20 am
Thanks Maria,
I did for sure find a few nuggets of putting gold I will be taking to the course this season.