Instruction
Keep control of your shoulders to turn it over
Hitting a draw is the most coveted shot for most beginning and high handicap golfers and with good reason. Draws tend to go farther than fades, and everyone wants more distance. But they’re tough to produce unless you know what creates them.
If a golfer is going to draw the golf ball, we must create a swing path that is to the right of the club face or inside to out. For example, if the club face is pointing straight at the target at impact, the club path must be anywhere out to the right of the target (for a right-handed player) to produce the draw spin. Thanks to launch monitor data, these are facts a lot of us already know.
However, people that struggle to draw the golf ball don’t know how to put this information into action. Most golfers who struggle with drawing the golf ball have no control over their shoulders in their golf swing. From the top of the swing, the shoulders will be the first thing to open followed by the hips when in reality it should be exactly the opposite.
To help illustrate this idea, let’s look at how the shoulders look at different points of the swing:
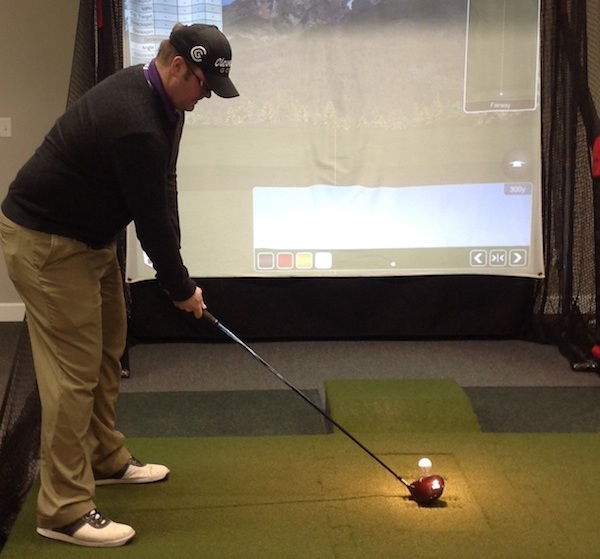
Address: The shoulders should be pointing to the right of the target line (for a right handed golfer) at address if a golfer wishes to hit a draw. From your point of view, the left shoulder should appear inside of the lead hip.
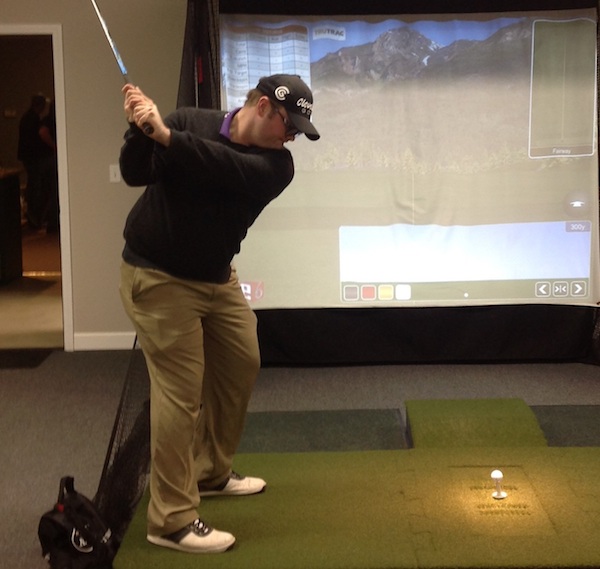
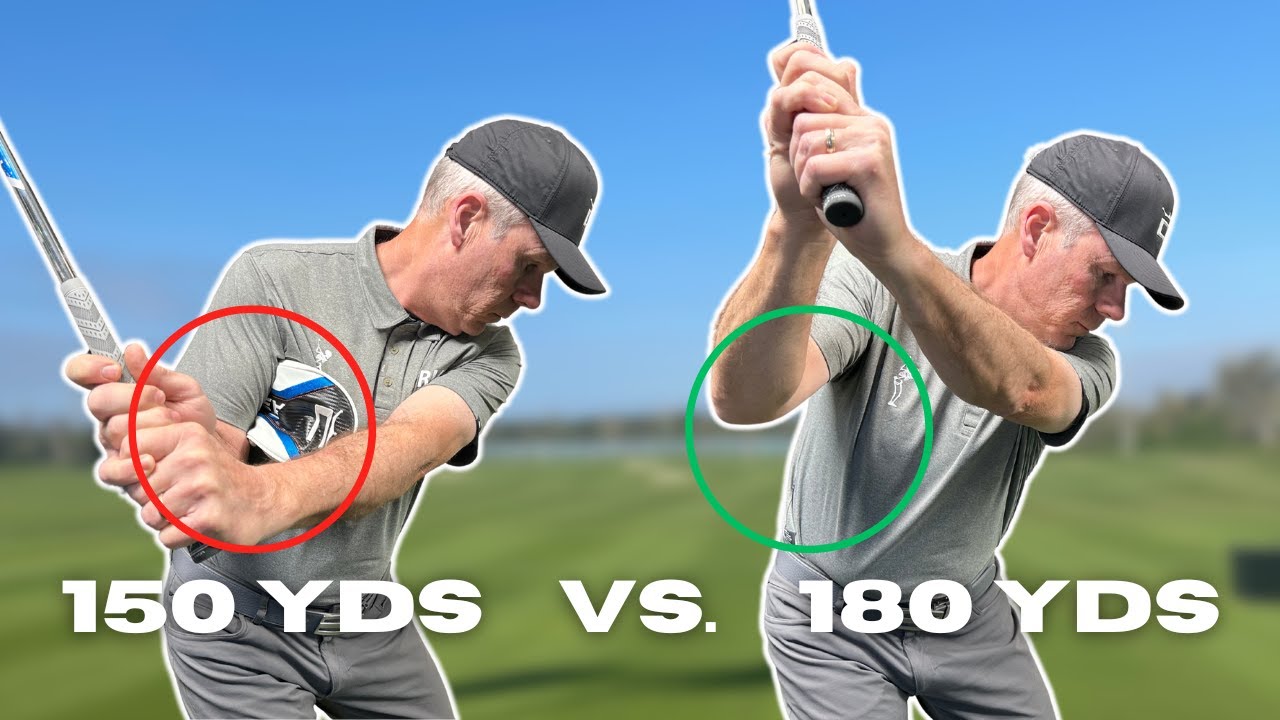
Top of the Swing: The shoulders have turned about twice as much as the hips. This should be one of the easier points to see the lead shoulder inside of the lead hip.
Downswing: The hips are going to move first through the ball, which means the lead shoulder must stay inside of it. This helps develop the inside to out path that is required to turn the golf ball over.

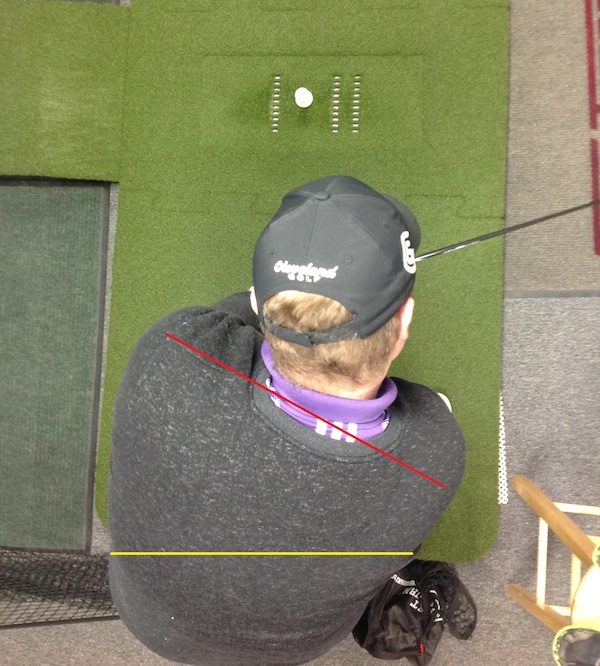
Here is a view from a above to illustrate what you should be looking for with your shoulders in relation to the hips:
Above: The hips (yellow line) have started the downswing before the shoulders (red line) which means the lead shoulder will stay inside the lead hip. This gets us our inside to out path that is required to hit a draw.
If you are someone who finds the draw to be an elusive shot, pay attention to what your shoulders are doing. You should have an easier time swinging from inside to out and turning the golf ball over.
- LIKE8
- LEGIT3
- WOW0
- LOL0
- IDHT1
- FLOP0
- OB0
- SHANK1

Some call the image on the left laid off, but if you are hitting a fade, this could be a perfect backswing for it! Same for across the line for a draw! Stop racking your brain with perceived mistakes and simply match backswing to shot shape!
- LIKE0
- LEGIT0
- WOW0
- LOL0
- IDHT0
- FLOP0
- OB0
- SHANK1
My golf learning began with this simple fact – if you don’t have a fundamentally sound hold on the golf club, it is practically impossible for your body to execute a fundamentally sound golf swing. I’m still a big believer that the golf swing is much easier to execute if you begin with the proper hold on the club.
As you might imagine, I come into contact with hundreds of golfers of all skill levels. And it is very rare to see a good player with a bad hold on the golf club. There are some exceptions, for sure, but they are very few and very far between, and they typically have beat so many balls with their poor grip that they’ve found a way to work around it.
The reality of biophysics is that the body moves only in certain ways – and the particulars of the way you hold the golf club can totally prevent a sound swing motion that allows the club to release properly through the impact zone. The wonderful thing is that anyone can learn how to put a fundamentally sound hold on the golf club, and you can practice it anywhere your hands are not otherwise engaged, like watching TV or just sitting and relaxing.
Whether you prefer an overlap, interlock or full-finger (not baseball!) grip on the club, the same fundamentals apply. Here are the major grip faults I see most often, in the order of the frequency:
Mis-aligned hands
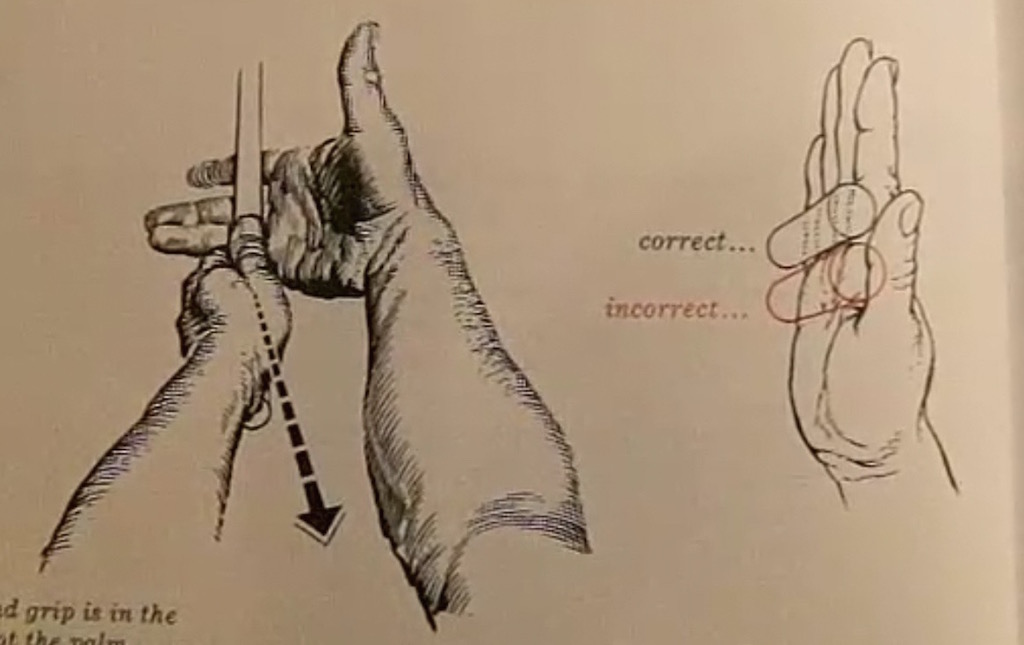
By this I mean that the palms of the two hands are not parallel to each other. Too many golfers have a weak left hand and strong right, or vice versa. The easiest way to learn how to hold the club with your palms aligned properly is to grip a plain wooden ruler or yardstick. It forces the hands to align properly and shows you how that feels. If you grip and re-grip a yardstick several times, then grip a club, you’ll see that the learning curve is almost immediate.
The position of the grip in the upper/left hand
I also observe many golfers who have the butt of the grip too far into the heel pad of the upper hand (the left hand for right-handed players). It’s amazing how much easier it is to release the club through the ball if even 1/4-1/2″ of the butt is beyond the left heel pad. Try this yourself to see what I mean. Swing the club freely with just your left hand and notice the difference in its release from when you hold it at the end of the grip, versus gripping down even a half inch.
To help you really understand how this works, go to the range and hit shots with your five-iron gripped down a full inch to make the club the same length as your seven-iron. You will probably see an amazing shot shape difference, and likely not see as much distance loss as you would expect.
Too much lower (right) hand on the club
It seems like almost all golfers of 8-10 handicap or higher have the club too far into the palm of the lower hand, because that feels “good” if you are trying to control the path of the clubhead to the ball. But the golf swing is not an effort to hit at the ball – it is a swing of the club. The proper hold on the club has the grip underneath the pad at the base of the fingers. This will likely feel “weak” to you — like you cannot control the club like that. EXACTLY. You should not be trying to control the club with your lower/master hand.
Gripping too tightly
Nearly all golfers hold the club too tightly, which tenses up the forearms and prevents a proper release of the club through impact. In order for the club to move back and through properly, you must feel that the club is controlled by the last three fingers of the upper hand, and the middle two fingers of the lower hand. If you engage your thumbs and forefingers in “holding” the club, the result will almost always be a grip that is too tight. Try this for yourself. Hold the club in your upper hand only, and squeeze firmly with just the last three fingers, with the forefinger and thumb off the club entirely. You have good control, but your forearms are not tense. Then begin to squeeze down with your thumb and forefinger and observe the tensing of the entire forearm. This is the way we are made, so the key to preventing tenseness in the arms is to hold the club very lightly with the “pinchers” — the thumbs and forefingers.
So, those are what I believe are the four fundamentals of a good grip. Anyone can learn them in their home or office very quickly. There is no easier way to improve your ball striking consistency and add distance than giving more attention to the way you hold the golf club.
More from the Wedge Guy
- The Wedge Guy: Golf mastery begins with your wedge game
- The Wedge Guy: Why golf is 20 times harder than brain surgery
- The Wedge Guy: Musings on the golf ball rollback
- LIKE87
- LEGIT13
- WOW6
- LOL1
- IDHT0
- FLOP4
- OB1
- SHANK8
Not the dreaded headcover under the armpit drill! As if your body is defective and can’t function by itself! Have you seen how incredible the human machine is with all the incredible feats of agility all kinds of athletes are accomplishing? You think your body is so defective (the good Lord is laughing his head off at you) that it needs a headcover tucked under the armpit so you can swing like T-Rex?
- LIKE0
- LEGIT2
- WOW2
- LOL0
- IDHT0
- FLOP0
- OB0
- SHANK2


Dave Portnoy places monstrous outright bet for the 2024 Masters

John Daly stuns fans into silence with brutal opening tee shot on PGA Tour Champions

Things got heated at the Houston Open between Tony Finau and Alejandro Tosti. Here’s why

Justin Thomas on the equipment choice of Scottie Scheffler that he thinks is ‘weird’

Tiger Woods arrives at 2024 Masters equipped with a putter that may surprise you

‘Absolutely crazy’ – Major champ lays into Patrick Cantlay over his decision on final hole of RBC Heritage

Report: Tiger Woods has ‘eliminated sex’ in preparation for the 2024 Masters

Two star names reportedly blanked Jon Rahm all week at the Masters

2-time major champ announces shock retirement from the sport at age of 33

Report: LIV Golf identifies latest star name they hope to sign to breakaway tour

Steve Stricker WITB 2024 (April)
Steve Stricker WITB accurate as of the Zurich Classic. More photos from the event here. Driver: Titleist TSR3 (9 degrees, C4...


Alex Fitzpatrick WITB 2024 (April)
Alex Fitzpatrick what’s in the bag accurate as of the Zurich Classic. Driver: Ping G430 LST (10.5 degrees) Shaft: Fujikura...


Alejandro Tosti WITB 2024 (April)
Alejandro Tosti what’s in the bag accurate as of the Zurich Classic. Driver: Srixon ZX5 Mk II LS (9.5 degrees...


Drew Brees WITB 2024 (April)
View this post on Instagram A post shared by GolfWRX (@golfwrx) Driver: TaylorMade Stealth 2 Plus (10.5 degrees)...
-
 19th Hole2 weeks ago
Dave Portnoy places monstrous outright bet for the 2024 Masters
-
 19th Hole4 days ago
Justin Thomas on the equipment choice of Scottie Scheffler that he thinks is ‘weird’
-
 19th Hole2 weeks ago
Tiger Woods arrives at 2024 Masters equipped with a putter that may surprise you
-
 19th Hole4 days ago
‘Absolutely crazy’ – Major champ lays into Patrick Cantlay over his decision on final hole of RBC Heritage
-
 19th Hole2 weeks ago
Two star names reportedly blanked Jon Rahm all week at the Masters
-
 19th Hole1 week ago
Report: LIV Golf identifies latest star name they hope to sign to breakaway tour
-

 19th Hole2 weeks ago
Neal Shipley presser ends in awkward fashion after reporter claims Tiger handed him note on 8th fairway
-

 19th Hole1 week ago
Brandel Chamblee has ‘no doubt’ who started the McIlroy/LIV rumor and why
Will
Mar 20, 2014 at 8:06 pm
Any help in this area would greatly be appreciated. I struggle hitting a steady draw, I fully understand the ball flight laws and the ball starts where the face is and curves away from the path. But every time I setup to hit a draw I either hit a push, then to fix it if I try to get the path closed to the path, the path changes with the face and I pull it or hit it down the line with no movement. Im’ very frustrated…I know I don’t come too far inside causing a push nor do I come over the top to pull it.
I can find no help on the web about making the face ACT SEPARATELY from the path any help before I quit this game????
Alvin
Mar 4, 2014 at 11:36 am
Nice article. The shoulders dictate swing path exclusively. Too many beginners are told to align feet and hips and it just confuses things. Once I learned this, I started hitting draws on command. Just make sure the club face is closed to the path. You can experiment with path and face angle to widen or tighten the action of the ball. Also works for fades, just open the shoulders a bit, open face to the path, and follow that path.
Ronald Montesano
Mar 2, 2014 at 6:11 am
Hello, Scott.
In pictures 1 and 5, the shaft line and shoulder line intersect, while picture 4 shows them as nearly parallel. Is this an optical illusion or is it a discrepancy? I’m a life-long “which I could draw with regularity” guy and hope to still figure that part out.
RM
Scott Hogan
Mar 9, 2014 at 9:02 pm
Optical illusion, it can be tough to see how closed the shoulders are from “down the line”
Joe M
Feb 27, 2014 at 9:33 pm
Thanks Scott. I meant are your feet and hips also slightly closed at address? I seem to hit the ball well when I set up with the feet and hips square to the target line but close my shoulders in relation to them.
Scott Hogan
Feb 28, 2014 at 2:42 pm
Joe, definitely the preferred and simpler way to do it.
Bob V
Feb 27, 2014 at 5:52 pm
Are you related to Ben?
Scott Hogan
Feb 28, 2014 at 2:04 pm
Man I wish!
Deano
Feb 27, 2014 at 6:45 am
Same technique I try to use when hitting straight shots as well.
Starting with my hips for the downswing keeping me on plane or I end up going over the top!
Joe M
Feb 26, 2014 at 11:37 pm
It looks like the feet and hips are closed also, but less so in relation to the shoulders?
Scott Hogan
Feb 27, 2014 at 10:33 am
Joe, in this instance they do appear closed, but when looking at 3D motion, I do see the hips read “open” at impact and the shoulders are “less open” or “closed to the hips.”
mike carbray
Feb 26, 2014 at 4:13 pm
Nice article!