Instruction
The eight swing flaws holding older golfers back
Golf power and distance is affected by several factors including the brand of driver you are using, the settings and shaft of the driver and how they affect your ball flight/launch angle, your height/arm length, strength and most importantly, your golf mechanics.
Most of the time, your mechanics can be corrected with a golf lesson and some drills. However, for golfers over 50, physical limitations can also determine whether or not you can fix your mechanics at all! We will take a quick look at eight issues that we consistently address in our programs. We call these the “power points.”
The power points are specific golf mechanics that deal with the various influencers of golf power including golf physics, purity and consistency of ball-centered contact and swing plane. In other words, understanding the power affectors will give you all the information you will ever need to maximize your golf power potential.
The Power Points
- Swing Center Movement Factor: Is your spine angle consistent throughout your swing?
- Weight Distribution at Impact
- Primary Spine Angle (down the line view)
- Secondary Spine Angle (frontal view)
- Right foot position in the backswing
- The X Factor
- Left wrist position at impact
- Does the pelvis rotate in place or shift toward the ball during the swing?
Here is a brief description of each factor:
1. Swing Center Movement Factor
We use an evaluation tool that was developed by William Breland that gives us a tangle score to compare against. We found a direct correlation between this score and the consistency of hitting the golf ball squarely in the sweet spot. The lower the score, the better.
For evaluation, we measure the changes in your spine angle and the changes in the curves of the back/neck to determine if you are moving too much to be hit the ball consistently. Your spine motion should largely be rotational. However, if you have excessive movements in other directions, your accuracy and ball contact will be inconsistent.
The quick and dirty method is to videotape your golf swing and determine if your head is moving up and down during your swing.
2. Weight Distribution at the Point of Impact with the Ball
Weight distribution is important in all aspects of the golf swing, but we found that weight distribution specifically at the point of impact dramatically affects golf power. Having little to no weight on your back heel is an indication of weight transfer forward, which is a big power factor.

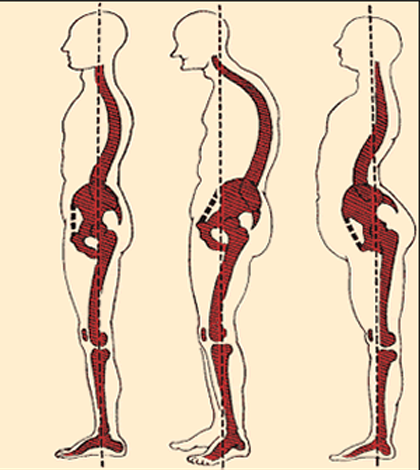
3. Spine Angle from the Down the Line View
This spine angle is essentially your golf posture. Do you have the desired flattish back posture? If you are a golfer over 50, you will have a greater chance of having a “C”-shaped posture characterized by slumped shoulders and a more pronounced mid-back hump. Take a look:

(When we are looking at this spine angle, we are looking at the lower back to the mid back. The upper back and neck should be inclined forward moderately).
Women golfers are more at risk of having an “S” shaped posture, which is characterized as excessive spinal curves. This is an indication of abdominal and core weakness.
These postures will cost you golf distance and rhythm because they limit your back’s capacity to turn. If your back cannot rotate, you are essentially swinging with just your arms and have lost the potential power from your torso and hips.
4. Spine Angle from the Face On
This is the angle of the spine that indicates how well you are loading your back leg in the backswing. Most golfers will see an immediate increase in swing speed by 5 mph with this change. That could add up to 10 yards to your drives.

The black line is parallel. The yellow line mirrors the angle of the spine. 10 to 20 degrees is optimum for golf power.
5. Right Foot Position in the Backswing
The key measure here is if you are able to keep your body weight on the INSIDE of your back foot. If your weight rotates to the outside of your foot, or worse, if your foot visibly rotates outward, you are going to lose all the power your back leg can offer. This mistake affects both swing speed and consistency of hitting the sweet spot of the golf club.
6. The X-Factor
The X-factor, coined by Jim Mclean, is the difference between how much more your shoulders can rotate compared to your hips. The greater the difference, the greater the potential swing speed. For the golfer over 50, this is primarily an issue of golf flexibility.
However, the real key to the X-Factor is how much separation you have at the point of impacting the ball. In addition to flexibility, you also need to have good timing and make sure your hips begin the downswing before the shoulder and arms to maximize your X-Factor at impact.

You can tell if a golfer has a good X-Factor at impact if they achieve the “two cheeks” position. In the picture above (left side), you can only see one butt cheek at impact, which indicates a lack of hip turn. Compare that to the picture of Tiger Woods on the right, who achieves the full two-cheek position that indicates full hip turn.
7. Left Wrist Position at Impact
Basically, the left wrist needs to be flat (instead of cupped) at impact. Many golfers release the wrists too early in the downswing and this can result in the loss of swing speed and consistency of hitting the sweet spot on the golf club.

8. Does the Pelvis Rotate in Place or Shift Toward the Ball?
Of the eight points identified here, this is the most difficult to change. But it is worth it. The difference is similar to the difference in power between a person who “shot puts” a baseball vs. someone who throws it using their arm as a whip.
If you can do this correctly, you are using your body like a whip which is infinitely more powerful.

To test yourself, place a golf shaft in the ground with the end 1 to 2 inches in front of your belly button. The goal of the drill is to swing without your body touching the shaft. If your body translates forward, touching the shaft, you losing the “whip” aspect of a powerful swing.

The LPGA Tour is kicking off its 2026 season this week at Lake Nona Golf and Country Club in Orlando, and the pros are dealing with something most Florida golfers rarely face: freezing temperatures.
“It’s colder here than in the UK at the minute, which is a first,” said England’s Charley Hull during Wednesday’s media day at the Hilton Grand Vacations Tournament of Champions.
Even Lydia Ko, who lives at Lake Nona, seemed surprised by the cold snap. “We’re pretty much getting to below zero in celsius here, which maybe in other parts of the country they would be thankful, but when you’re in Florida it is a little bit of a surprise,” she said.
If the world’s best players are adjusting their games for cold weather, recreational golfers should, too. Here’s how to play smart when the mercury drops.
Understand What Cold Does to Your Game
Before you change anything, you need to know what you’re fighting against. Cold air is denser than warm air, which means your ball won’t fly as far. Period.
Hull noticed this immediately during practice rounds at Lake Nona. She mentioned hitting a gap wedge into the 18th hole during a previous win but needing a 4-iron during Tuesday’s practice round. That’s a difference of four or five clubs for the same shot.
Action item: Expect to lose 5-10 yards on every club in your bag when temperatures dip below 50 degrees. Plan accordingly and don’t be stubborn about club selection.
Layer Up Without Restricting Your Swing
Hull admitted she wore three pairs of pants during practice. While that might be extreme for most of us, staying warm is critical to playing well in cold conditions.
Your muscles need warmth to function properly. When you’re cold, your body tightens up and your swing gets shorter and faster. Neither of those things help you hit good golf shots.
Action item: Wear multiple thin layers instead of one bulky jacket. Look for golf-specific cold weather gear that stretches with your swing. Keep hand warmers in your pockets between shots. And don’t forget a good hat because you lose significant body heat through your head.
Take More Club Than You Think You Need
This is where ego gets in the way of good scores. When it’s cold, the ball doesn’t compress as well off the clubface. Combined with denser air, you’re looking at serious distance loss.
The pros at Lake Nona are dealing with a course that measures 6,642 yards but plays much longer this week. If they’re adjusting, you should too.
Action item: Take at least one extra club on every approach shot. In temperatures below 40 degrees, consider taking two extra clubs. It’s better to fly the ball to the back of the green than to come up short in a bunker.
Adjust Your Expectations on the Greens
Cold weather affects putting in ways most golfers don’t consider. The ball is harder and doesn’t roll as smoothly. Your hands are cold, making it harder to feel the putter. And if there’s any moisture on the greens, they’ll be slower than normal.
Ko mentioned that she still sometimes reads the greens wrong at Lake Nona despite being a member for years. Cold weather makes that challenge even tougher.
Action item: Hit putts more firmly than usual. The ball needs extra speed to hold its line on cold greens. Take a few extra practice strokes to get a feel for the speed before you putt.
Embrace the Mental Challenge
Hull said something interesting about cold weather golf: “I like the mental toughness of it.”
That’s the right attitude. Everyone on the course is dealing with the same conditions. The player who stays patient and doesn’t get frustrated by the extra difficulty will come out ahead.
Action item: Lower your expectations by a few strokes. If you normally shoot 85, accept that 90 might be a good score in 40-degree weather. Focus on solid contact and smart decisions rather than perfect shots.
Warm Up Longer and Smarter
This might be the most important tip of all. Cold muscles are tight muscles, and tight muscles get injured easily.
World No. 1 Jeeno Thitikul revealed she’s been protecting a wrist injury that bothered her late last season. Cold weather makes those kinds of injuries more likely if you don’t prepare properly.
Action item: Spend at least 20 minutes warming up before your round. Start with stretching, then hit easy wedge shots before working up to your driver. Keep moving between shots on the course to maintain body heat and flexibility.
The pros at Lake Nona this week will adapt and compete at the highest level despite the cold. You can do the same at your local course by following these tips and keeping a positive attitude.
PGA Professional Brendon Elliott is an award-winning coach and golf writer. You can check out his writing work and learn more about him by visiting BEAGOLFER.golf and OneMoreRollGolf.com. Also, check out “Playing Through” now on R.org, RG.org’s partner site, each Monday.
Editor’s note: Brendon shares his nearly 30 years of experience in the game with GolfWRX readers through his ongoing tip series. He looks forward to providing valuable insights and advice to help golfers improve their game. Stay tuned for more tips!

Brooks Koepka is back on the PGA Tour, and whether you love him or hate him, the guy knows how to win when it matters. After his LIV Golf stint, the five-time major champion returns this week at the Farmers Insurance Open.
What makes Koepka fascinating? He doesn’t fit the mold. His swing isn’t textbook. He doesn’t obsess over mechanics. Yet he’s won three PGA Championships and two U.S. Opens, regularly making it look easier than guys with prettier swings.
So, what can average golfers learn from someone who treats the game so differently? Quite a bit.
Stop Overthinking Every Shot
Koepka describes his approach as “reactionary” rather than mechanical. While most tour pros grind over swing thoughts, Brooks sees the target and hits it. No mental checklist.
This might be the most valuable lesson for weekend golfers who’ve watched too many YouTube swing videos.
How to actually do this:
On the range, hit five balls where you stare at the target for three seconds prior to addressing the ball. Don’t think about grip or stance. Just burn that target into your brain. You’ll be shocked at how pure you hit it when your brain focuses on where the ball is going instead of how you’re swinging.
Next time you play, give yourself a rule: Once you pull the club, you’ve got 15 seconds to hit. Koepka is one of the fastest players on tour because he doesn’t give his brain time to sabotage him.
If you feel tension in your hands at address, you’re trying to control too much. Koepka’s grip pressure is famously light. Loosen up until the club almost feels like it might slip, then add just enough pressure to hold on. That’s your swing thought: soft hands, see the target.
This approach works better under pressure. When you’re standing over that shot with water left and OB right, the last thing you need is a mental checklist. See it, feel it, hit it.
Play to Your Strengths (Even If They’re Not Pretty)
Koepka uses a strong grip that wouldn’t pass muster in some teaching circles. But he’s built his game around what works for him, elite driving distance and recovery skills. He doesn’t try to be someone he’s not.
Here’s how to build your game like Brooks:
Look at your last five rounds and figure out where you’re actually gaining strokes. Bombing it off the tee, but can’t hit greens? Lean into it. Play courses where distance matters more than precision. On tight holes, grip down on your 3-wood instead of trying to thread a driver through a keyhole you’ll miss seven times out of ten.
Koepka knows he can scramble, so he’s not afraid to miss greens. If you’re deadly from 50 to 75 yards, start leaving yourself those distances on the par 5’s instead of going for them in two every time.
Know when to take your medicine. Koepka in the trees at the PGA? He’s punching out to 100 yards, not trying to bend a 6-iron around three oaks. You’re in the rough with a flyer lie and water short? Hit your 8-iron to the middle and move on. That’s not playing scared, that’s playing smart.
Save Your Best for When It Counts
Here’s a wild stat: Koepka’s putting average in majors is often more than a full stroke better per round than in regular events. He elevates when pressure is highest.
How does an amateur tap into that gear? It’s not about trying harder, it’s about caring differently.
Here’s what actually works:
Decide which rounds matter to you. Club championship? Member-guest? That annual trip with college buddies? Circle those dates and treat them differently. Koepka doesn’t care much about regular tour events, but majors? That’s when he locks in.
Two weeks before your big round, change your practice. Stop beating balls mindlessly. Play nine holes in which every shot has consequences. Miss the fairway? Hit from the rough on the next hole too. Three-putt? Twenty push-ups. Koepka’s practice intensity ramps up before majors because he’s rehearsing pressure, not just swings.
Develop a between-shot routine that resets your brain. Koepka is famous for his blank expression after bad shots. Try this: After any shot, take three deep breaths while walking, then find something specific to notice, a tree, a cloud, someone’s shirt. That’s your reset button. By the time you reach your ball, the last shot is gone.
The Bottom Line
Brooks Koepka’s return reminds us there’s no single path to success in golf. His “substance over style” approach proves that results matter more than looking good.
You don’t need a perfect swing; you need a reliable one that holds up under pressure. You don’t need to hit every shot in the book; you need the shots you can count on. And you don’t need to play great every time; you need to play great when it matters.
Welcome back, Brooks. Thanks for the reminder that golf is ultimately about getting the ball in the hole, not winning style points.
PGA Professional Brendon Elliott is an award-winning coach and golf writer. You can check out his writing work and learn more about him by visiting BEAGOLFER.golf and OneMoreRollGolf.com. Also, check out “Playing Through” now on R.org, RG.org’s partner site, each Monday.
Editor’s note: Brendon shares his nearly 30 years of experience in the game with GolfWRX readers through his ongoing tip series. He looks forward to providing valuable insights and advice to help golfers improve their game. Stay tuned for more tips!

Blades Brown made a big impression last week in the California desert, and not just because he’s only 18. He put up numbers that would catch any weekend golfer’s attention. Most of us won’t hit 317-yard drives or find 86% of our greens in regulation, but there’s a lot to learn from how Brown managed his game at The American Express.
Here are three practical lessons from his performance that you can use on your own course this weekend.
Step 1: Give Priority to Accuracy Over Distance Off The Tee
Brown’s driving stats are impressive. He averaged almost 318 yards off the tee, ranking 12th in the field. More importantly, he hit 76.79% of his fairways, tying for fourth place in the tournament.
Think about that ratio for a second. Brown could have swung harder, chased more distance and tried to overpower the course. Instead, he played smart golf and kept his ball in play.
Your Action Item: Next time you’re on the tee box, ask yourself a simple question before pulling the driver. Do you need maximum distance here, or do you need to be in the fairway? If there’s trouble lurking or the hole doesn’t demand every yard you can muster, take something off your swing. Grip down an inch. Make a three-quarter swing. Do whatever it takes to find the short grass. Brown’s approach illustrates that fairways lead to greens, and greens lead to birdies. He made 22 of them last week, along with an eagle.
The math is simple. When you’re hitting three out of every four fairways like Brown did, you’re giving yourself legitimate looks at the green with your approach shots. That’s when scoring happens.
Step 2: Commit To Hitting More Greens
This is where Brown really separated himself. He hit 62 of 72 greens in regulation, an 86.11% clip that tied for first in the entire field. Read that again. An 18-year-old kid tied for the lead in one of the most important ball-striking statistics in professional golf.
How did he do it? By keeping his ball in the fairway (see Step 1) and giving himself clean looks with mid-irons and wedges.
Your Action Item: Start tracking your greens in regulation. You don’t need a fancy app or a statistics degree. Just mark down whether you hit the green in the regulation number of strokes. Par 3s in one shot. Par 4s in two shots. Par 5s in three shots.
Once you know your baseline, set a goal to improve it by 10%. If you’re currently hitting five greens per round, aim for six. The beauty of this approach is that it forces you to think strategically about club selection and shot shape. Brown’s strokes gained approach number was positive (0.179), meaning he was better than the field average. You don’t need to be perfect. You just need to be on the dance floor more often.
When you hit more greens, you eliminate the need for heroic short game shots. Brown only had to scramble 10 times all week, and he got up and down 70% of the time. That’s solid, but the real story is that he rarely put himself in scrambling situations to begin with.
Step 3: Minimize Mistakes And Stay Patient
Here’s the stat that jumps off the page: Brown made only three bogeys all week. Three. In four rounds of professional golf against the best players in the world.
He also made just one double bogey. That kind of clean card doesn’t happen by accident. It happens when you play within yourself, avoid the big miss and trust that pars are never bad scores.
Your Action Item: Before your next round, decide that you’re going to play boring golf. No hero shots over water. No driver on tight holes just because you can. No aggressive pins when there’s a safe side of the green.
Brown’s performance shows us that consistency beats flash every single time. He didn’t lead the field in any single strokes gained category, but he was solid across the board. That’s how you post numbers and cash checks.
Give these three steps a try. Your scorecard will thank you.
PGA Professional Brendon Elliott is an award-winning coach and golf writer. You can check out his writing work and learn more about him by visiting BEAGOLFER.golf and OneMoreRollGolf.com. Also, check out “The Starter” now on R.org, RG.org’s partner site, each Monday.
Editor’s note: Brendon shares his nearly 30 years of experience in the game with GolfWRX readers through his ongoing tip series. He looks forward to providing valuable insights and advice to help golfers improve their game. Stay tuned for more tips!

Justin Rose WITB 2026 (April): Full WITB breakdown with new McLaren irons

What’s the story behind Webb Simpson’s custom-stamped irons?

Cadillac Championship Tour Report: Spieth’s sizable changes, McLaren Golf launches, and more

Kristoffer Reitan’s winning WITB: 2026 Truist Championship

Russell Henley’s winning WITB: 2026 Charles Schwab Challenge

Cameron Young’s winning WITB: 2026 Cadillac Championship

Aaron Rai’s winning WITB: 2026 PGA Championship

Nelly Korda WITB 2026 (April)

Justin Rose on the switch to McLaren Golf, learnings from previous equipment moves

Photos from the 2026 CJ Cup Byron Nelson


Nastasia Nadaud WITB 2026 (June)
Driver: Titleist TSR4 (9 Degrees) Shaft: Project X EvenFlow Riptide CB 6.0 S 3-wood: Titleist GTS2 (15 degrees) Shaft: Graphite Design Tour AD DI...


Keith Mitchell WITB 2026 (June)
Driver: TaylorMade Qi4D LS Shaft: Project X Titan Yellow 6 X 3-wood: TaylorMade Qi10 (16.5 degrees) Shaft: Mitsubishi Tensei 1K Blue 90...


Matt Kuchar WITB 2026 (June)
Driver: Titleist GTS3 (9 degrees) Shaft: Fujikura Ventus TR Blue 6 X 3-wood: Callaway Quantum Max HL (16.5 degrees) Shaft:...


Maria Torres WITB 2026 (June)
Driver: Ping G440 LST (9 degrees) Shaft: Accra TourZ Green 5-M4 3-wood: Ping G440 Max (15 degrees) Shaft: Accra TourZ Green 6-M4 5-wood: Ping G440...
-
 News3 days ago
Russell Henley’s winning WITB: 2026 Charles Schwab Challenge
-
 Whats in the Bag2 weeks ago
Aaron Rai’s winning WITB: 2026 PGA Championship
-
 Tour Photo Galleries2 weeks ago
Photos from the 2026 CJ Cup Byron Nelson
-

 Equipment2 weeks ago
CJ Cup Byron Nelson Tour Report: Koepka and Kim’s newest putters finally get hot
-
 News5 days ago
Charles Schwab Challenge Tour Report: MacIntyre, Åberg and Spaun all switch putters, TaylorMade launches new Spider
-
 Equipment7 days ago
Details on J.J. Spaun’s surprise putter switch
-

 Popular Photo Galleries1 week ago
Photos from the 2026 Charles Schwab Challenge
-

 Equipment3 weeks ago
PGA Championship Tour Report: Fitzpatrick, Koepka among big-name putter switches for Aronimink
Ryan York
Aug 24, 2013 at 4:08 pm
Thanks for the questions on the pelvic shifting. This is a tough concept to explain without video but I will give it a shot.
The pelvis motion I address, is whether it shifts towards the ball, not addressing whether it moves laterally or towards the target.
In other words, if someone was shifting the pelvis forward and kept shifting forwards, they would fall on the ball.
The pelvis does and should shift towards the target.
I hope this helps, I know its not a great explanation. Sorry about that
Dr. Ryan York, DPT CGS
Age Defying Golf
Bob
Aug 23, 2013 at 12:48 pm
I don’t get the idea about the pelvis shifting or rotating. The question is asked but not answered. Should it shift toward the ball or rotate. I also don’t get the test. It seems to be set up to detect rotation, which would cause the body to turn into the shaft, rather than a lateral shift, which would allow the body to slide past the shaft. Is that really what is intended. I have always thought that the hips should move slightly toward the target and then turn, leaving the shoulders to follow and creating the “x-factor” separation. If that is right, how does the test work?
Nick
Aug 23, 2013 at 11:37 am
I see lateral hip movement in all kinds of pro swings. Obviously a swing that slides without adequate hip turn will underperform, but is 1-2 inches of lateral hip movement really a swing flaw that demands urgent attention if the hips are turning freely? This image of Hogan and Tiger shows considerable hip slide in their swings. http://www.google.com/imgres?imgurl=http://iacas.org/asm/fimgs/tiger_hogan_hip_slide.jpg&imgrefurl=http://thesandtrap.com/t/29616/the-biggest-secret-slide-your-hips&h=590&w=600&sz=50&tbnid=MgSxsA8TZ1Lq9M:&tbnh=90&tbnw=92&zoom=1&usg=__J7SaLeh5CVit8j8L0LjqCr_JZ_s=&docid=e9GmXbpsKRdP9M&sa=X&ei=YIEXUrHvDOXh4AOu4YGYDA&ved=0CDMQ9QEwAQ&dur=2030
The Real James
Aug 21, 2013 at 6:30 pm
isn’t the X factor debunked by that one guy who writes for wrx that was a long drive champ?
Ryan York
Aug 22, 2013 at 12:13 am
The Real James, thanks for the comment, and that is an issue that needs to be addressed. The reason for the confusion is between the “old” x-factor and the “new” x-factor. The “old” xfactor was defined as the difference between shoulder turn and hip turn at the top of the backswing. This x-factor has been debunked.
However, the “new” x factor is valid. The “new” x factor is the difference between the hip turn and the shoulder turn at the point of impact, as shown the picture and explained in the “2 cheek” position. The bigger the difference at impact, the more power.
Thanks for pointing that out, I wasn’t sure if I should include that or if it was too technical.
Dr. Ryan York, DPT CGS
Age Defying Golf