Instruction
How to “Read” Your Ball Flight
On driving ranges and golf courses all over the land, each day, struggling golfers are attempting to diagnose and correct their swings.
Since we can’t see ourselves, we primarily use the ball’s flight to determine how efficient any given swing was. After all, it is a satisfactory ball flight which we desire, right? But when I quiz my students on the physical basics of impact and ball flight, it becomes clear that most players do not have a sufficient education in this area to draw the correct conclusions about their swing.
This article will lay out the procedure to “read” your ball flight so that that you can accurately determine how your swing is delivering the club to the ball. This is a crucial first step before you should attempt to implement the correct adjustments, with the help of a pro or on your own.
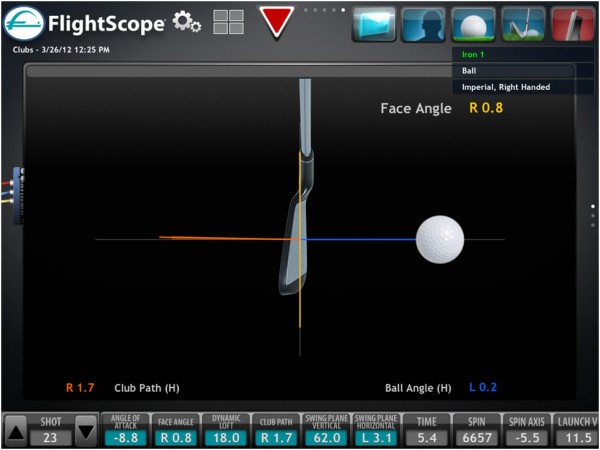
First, let’s look at how the ball flight is created. Although the time that the ball is actually on the club face lasts only one half of a millisecond (1/2000 of a second!), it is shortly after contact is first made with the ball, at the point of maximum compression of the ball against the club face, that the ball flight is “programmed” into the ball. Of the handful of user-controlled conditions between club face and ball at maximum compression, we shall look at three. They are:
- The impact point on the club face.
- The direction of the swing.
- The direction of the club face.
You need look no further than these three to understand both why the ball starts off in the direction that it does and why it curves sideways or not.
IMPACT LOCATION
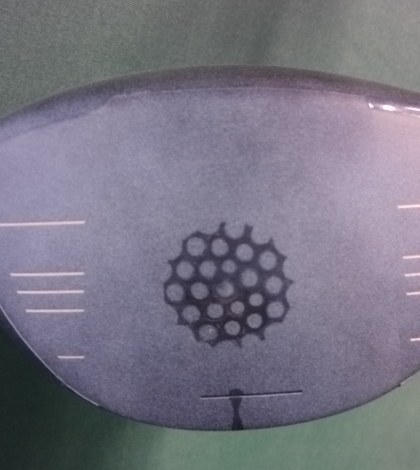
Most people understand well that the ball should be struck on the sweet spot or center of gravity (CG) of the club face, which is typically located on the lower center of the club face. But I find that people do not fully appreciate what happens when the ball is not impacted on the sweet spot.
Not only distance is lost, but also accuracy. This is because the club face twists during the collision, causing a loss of energy and distance, but also a change to the direction that the club face is pointing from first contact. This re-direction of the club face affects not only the starting direction of the ball flight (horizontal launch direction), but also the resulting curve, courtesy of a phenomenon known as the “gear effect,” which we shall not get into here. Just know that in order to make an accurate determination of how you are truly “presenting” the club to the ball at impact, you’ll want to read for “centered” impacts only.
It is worth noting that the club face twisting which occurs from off-center impacts is quite significant, even for the most “forgiving” club head designs. I use Dr. Scholl’s powder spray for the club face in my teaching and club-fitting to determine the impact point. This is preferable to plastic decals since these alter the launch and spin characteristics of the ball flight. Impacting the sweet spot takes precedence over any other impact condition. If you are not able to impact on or very close to the center of the club face better than half of the time, then you should be working on this aspect of your swing before anything else.
Now, assuming that you have impacted on or very close to the sweet spot, you are now ready to make relative determinations of the direction of the swing, and the direction of the club face by “reading” your ball flight.
CLUBFACE DIRECTION
The direction that the club face is pointing is alternatively referenced to either the target or the swing direction by teaching pros. This is confusing. The most important reference for the club face is the swing direction, since it is responsible for the curvature or lack thereof in the ball flight.
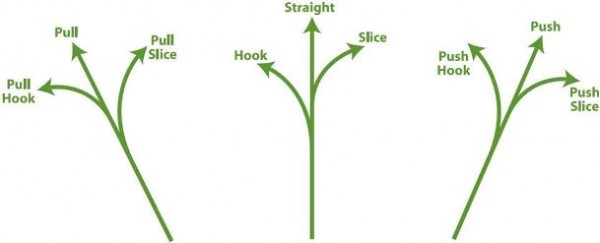
I have a saying, which is that “The ball doesn’t know where the target is.” For sweet-spot impacts, the ball will curve from left-to-right when the club face is facing rightward (open for right-handed players) of the swing direction, right-to-left when the club face is leftward of the swing direction (closed), and no sideways curve when the club face is square. Period. This is physical law. Observe the curve in your ball flight and diagnose this aspect of the swing correctly.
SWING DIRECTION
Although the direction of the swing’s plane and the direction that the club head is travelling parallel each other only at the low point of the club head’s arc, let us, for the sake of simplicity, assume here that they will be the same. Traditionally called the path, the swing direction, in conjunction with the club face direction, determines the starting direction and resulting curve in ball flight. When the ball does not curve sideways, then the swing direction and club face direction are the same, and the ball will also start-off in this direction. This is fairly easy for most players to follow.
For example, let’s say that your ball starts off at the target and does not curve sideways (no wind influence). This means that both the swing direction and club face direction are in-line with the target. This is the ball flight that most of my students tell me that they desire. If you have made a sweet spot impact and achieve this ball flight, then congratulations! You have achieved perfection in all three of our impact conditions! It is when we come to the task of determining swing direction for sideways-curving ball flights that things get trickier.
Curvature results when there is a differential between swing and club face directions. Here’s the key to determining relative swing direction for curving ball flights; relative to the starting direction of the ball flight, the swing direction is OPPOSITE to the curve direction. Take a moment to really digest that statement because this is where I find that too few players draw the correct conclusions regarding swing direction. So for example, if your ball starts off at the target, and then curves to the right, then your swing direction is leftward of the target. Your swing direction is not on-target. This is because the direction that the ball starts off is much closer to the direction of the club face than the swing.
The seminal golf research book, “Search for the Perfect Swing,” published in 1968, clearly presented this science to the public, but that didn’t stop many players, pros included, from incorrectly assuming that the starting direction was the same as the swing direction. This is a BIG difference. So, an example for all you “slicers” is the following; if your ball starts off at the target and then curves to the right, then not only do you have an open club face, but also a swing direction which is leftward of on-target. “Hookers” would do well to realize also that when your ball starts at the target and then darts quickly left, then your swing direction is well rightward of the target.
When you understand what has been presented here, you can determine whether it is the direction of your swing, or your club face, or both, which require adjustment, and more importantly, in which direction to adjust.
- LIKE7
- LEGIT1
- WOW0
- LOL0
- IDHT0
- FLOP0
- OB0
- SHANK1
Instruction
Clement: Laid-off or perfect fade? Across-the-line or perfect draw?

Some call the image on the left laid off, but if you are hitting a fade, this could be a perfect backswing for it! Same for across the line for a draw! Stop racking your brain with perceived mistakes and simply match backswing to shot shape!
- LIKE0
- LEGIT0
- WOW0
- LOL0
- IDHT0
- FLOP0
- OB0
- SHANK1
Instruction
The Wedge Guy: The easiest-to-learn golf basic
My golf learning began with this simple fact – if you don’t have a fundamentally sound hold on the golf club, it is practically impossible for your body to execute a fundamentally sound golf swing. I’m still a big believer that the golf swing is much easier to execute if you begin with the proper hold on the club.
As you might imagine, I come into contact with hundreds of golfers of all skill levels. And it is very rare to see a good player with a bad hold on the golf club. There are some exceptions, for sure, but they are very few and very far between, and they typically have beat so many balls with their poor grip that they’ve found a way to work around it.
The reality of biophysics is that the body moves only in certain ways – and the particulars of the way you hold the golf club can totally prevent a sound swing motion that allows the club to release properly through the impact zone. The wonderful thing is that anyone can learn how to put a fundamentally sound hold on the golf club, and you can practice it anywhere your hands are not otherwise engaged, like watching TV or just sitting and relaxing.
Whether you prefer an overlap, interlock or full-finger (not baseball!) grip on the club, the same fundamentals apply. Here are the major grip faults I see most often, in the order of the frequency:
Mis-aligned hands
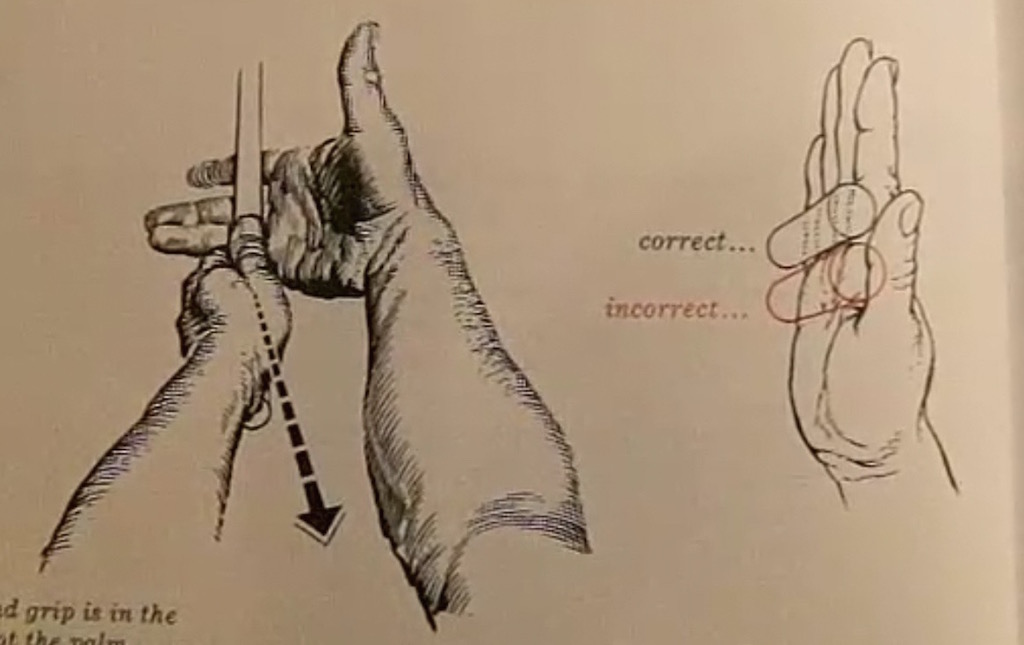
By this I mean that the palms of the two hands are not parallel to each other. Too many golfers have a weak left hand and strong right, or vice versa. The easiest way to learn how to hold the club with your palms aligned properly is to grip a plain wooden ruler or yardstick. It forces the hands to align properly and shows you how that feels. If you grip and re-grip a yardstick several times, then grip a club, you’ll see that the learning curve is almost immediate.
The position of the grip in the upper/left hand
I also observe many golfers who have the butt of the grip too far into the heel pad of the upper hand (the left hand for right-handed players). It’s amazing how much easier it is to release the club through the ball if even 1/4-1/2″ of the butt is beyond the left heel pad. Try this yourself to see what I mean. Swing the club freely with just your left hand and notice the difference in its release from when you hold it at the end of the grip, versus gripping down even a half inch.
To help you really understand how this works, go to the range and hit shots with your five-iron gripped down a full inch to make the club the same length as your seven-iron. You will probably see an amazing shot shape difference, and likely not see as much distance loss as you would expect.
Too much lower (right) hand on the club
It seems like almost all golfers of 8-10 handicap or higher have the club too far into the palm of the lower hand, because that feels “good” if you are trying to control the path of the clubhead to the ball. But the golf swing is not an effort to hit at the ball – it is a swing of the club. The proper hold on the club has the grip underneath the pad at the base of the fingers. This will likely feel “weak” to you — like you cannot control the club like that. EXACTLY. You should not be trying to control the club with your lower/master hand.
Gripping too tightly
Nearly all golfers hold the club too tightly, which tenses up the forearms and prevents a proper release of the club through impact. In order for the club to move back and through properly, you must feel that the club is controlled by the last three fingers of the upper hand, and the middle two fingers of the lower hand. If you engage your thumbs and forefingers in “holding” the club, the result will almost always be a grip that is too tight. Try this for yourself. Hold the club in your upper hand only, and squeeze firmly with just the last three fingers, with the forefinger and thumb off the club entirely. You have good control, but your forearms are not tense. Then begin to squeeze down with your thumb and forefinger and observe the tensing of the entire forearm. This is the way we are made, so the key to preventing tenseness in the arms is to hold the club very lightly with the “pinchers” — the thumbs and forefingers.
So, those are what I believe are the four fundamentals of a good grip. Anyone can learn them in their home or office very quickly. There is no easier way to improve your ball striking consistency and add distance than giving more attention to the way you hold the golf club.
More from the Wedge Guy
- The Wedge Guy: Golf mastery begins with your wedge game
- The Wedge Guy: Why golf is 20 times harder than brain surgery
- The Wedge Guy: Musings on the golf ball rollback
- LIKE88
- LEGIT15
- WOW6
- LOL1
- IDHT0
- FLOP4
- OB1
- SHANK8
Instruction
Clement: Stop ripping off your swing with this drill!

Not the dreaded headcover under the armpit drill! As if your body is defective and can’t function by itself! Have you seen how incredible the human machine is with all the incredible feats of agility all kinds of athletes are accomplishing? You think your body is so defective (the good Lord is laughing his head off at you) that it needs a headcover tucked under the armpit so you can swing like T-Rex?
- LIKE0
- LEGIT3
- WOW2
- LOL0
- IDHT0
- FLOP0
- OB0
- SHANK2
-
 19th Hole3 weeks ago
Justin Thomas on the equipment choice of Scottie Scheffler that he thinks is ‘weird’
-

 19th Hole3 weeks ago
‘Absolutely crazy’ – Major champ lays into Patrick Cantlay over his decision on final hole of RBC Heritage
-

 19th Hole2 weeks ago
LET pro gives detailed financial breakdown of first week on tour…and the net result may shock you
-
 19th Hole3 days ago
Report: LIV star turns down PGA Championship invite due to ‘personal commitments’
-
 19th Hole1 week ago
Gary Player claims this is what ‘completely ruined’ Tiger Woods’ career
-

 Whats in the Bag2 weeks ago
Team McIlowry (Rory McIlroy, Shane Lowry) winning WITBs: 2024 Zurich Classic
-

 19th Hole3 weeks ago
TaylorMade signs 15-year-old AJGA Rolex Junior Player of the Year to an NIL contract
-

 Equipment1 week ago
Golf fans left surprised by LIV’s choice of course for its 2024 individual championship event











Dinh
Jun 15, 2013 at 3:37 am
Todd,
I like your article very much. Well illustrated, detailed and practical, easy to follow. Thanks.
Todd Dugan
Jul 14, 2013 at 10:30 pm
Thanks, Dinh!
yo!
Jun 6, 2013 at 3:40 pm
you forgot the worm burners.
WPK
Jun 6, 2013 at 8:38 pm
Great article Todd. I’ll have to pick your brain next time I’m at your store in Northborough
Todd Dugan
Jun 6, 2013 at 9:10 pm
Thanks! I’m always glad to help, WPK.