Instruction
Apply pressure to the ground for a powerful draw
We all know the ultimate relationship of club face and path are the two primary components that produce a draw ball flight. But our foot work, which affects our body motion, can also affect how the golf club is moved throughout the swinging motion.
Be open minded and try this sequence of applying pressure to the ground. I think you’ll find proper foot work is an important component to execute the draw ball flight you’ve always wanted.
How do you use the ground to have the proper body motion? Let’s start with some basics.
Assume a standing position, with your weight evenly distributed. If you want to move to your right, the most efficient way to do so is to apply pressure to the ground with your left foot, in the opposing direction of where you would like to go. This is a very important component to understand. Whichever direction you wish to move your body toward, your feet need to apply pressure to the ground in the opposite direction.
Now that we’ve got an understanding of the basics, let’s discuss the draw foot work pattern for a right-handed golfer.
I like to encourage my students to start most of their golf swings in a balanced position. There should be no favoring of heels or toes, nor the right or left foot. Because the golf swing is a combination of lateral and rotational lower body movements, not just one or the other, the golf swing should have the following pressure movement patterns.
- The golfer starts to apply more pressure to the ground with the front part of the left foot, with a slight counter-clockwise movement. This pressure helps the golfer start the process of transferring his/her weight to the right heel.
Why does this work? Let’s break down the counter clockwise pressure into two components.
The pressure is creating both a lateral movement (weight moving towards the right foot) and a rotational movement (weight moving diagonally) to transfer the weight toward the right heel.

The yellow line in the photo on the left represents the pressure applied by the left foot to move laterally (blue line) away from the target. The photo on the right adds a diagonal yellow line to represent the counter-clockwise pressure needed to add the rotational direction toward the right heel (blue line).
The body is always striving to stay in balance — it is the third most unconscious condition of the body, behind your heart beating and your lungs breathing. So when we are applying pressure to the ground with lateral and rotational pressure, an immediate balance effect should take place and the golfer should start to feel his weight move towards his right heel.
To simplify, and perhaps an easy swing thought for the golf course, think Left Foot to Right Heel on the backswing.
During the transition from backswing to downswing, the golfer must start to apply pressure to the ground with the right foot. The first move is primarily an application of lateral pressure away from the target, followed by a clockwise motion. The timing of this event should have the following parameters.
Let’s assume the amount of pressure (for those traditionalists who prefer weight distribution) for the right foot is approximately 80 percent and the left foot is approximately 20 percent at the top part of the backswing. The lateral pressure should be applied by the right foot until the pressure for both feet is close to 50/50 when striking a ball on the ground, less when hitting a ball off of a tee.
At this moment, the clockwise pressure of the right foot should be applied to encourage the rotational characteristics toward the left heel.
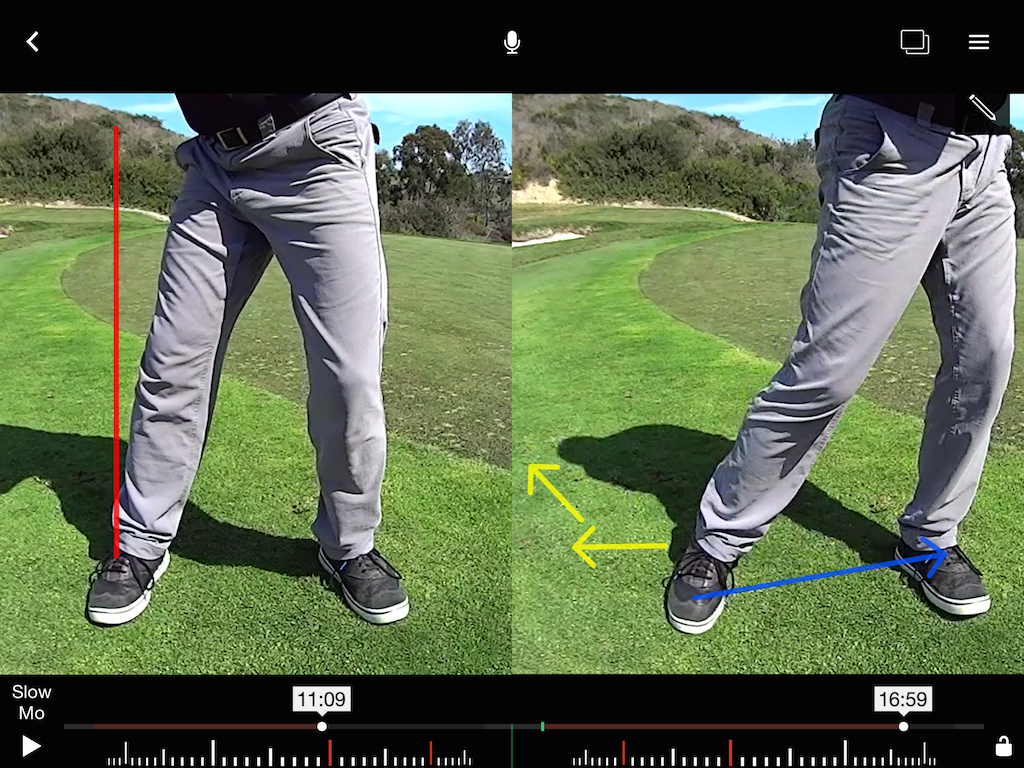
The photo on the left represents the golfer when he has achieved equal pressure between his two feet. The photo on the right represents the lateral and rotational pressure away from the target (Y line) to encourage the body to move toward the left heel (B line).
I want to stress this sequence for two reasons. First of all, when a golfer presses off the ground with this pattern, the golfer’s backswing hip tends to do two things.
- The later unwind of the right hip encourages the right shoulder to unwind later, which encourages a more in-to-out swing direction, one of the most important characteristics needed for a draw ball flight.
- We are in better balance turning around our left heel and therefore can create more speed and power!
Again, the balance effect of this sequence should encourage the golfer’s weight to move toward the left heel. To simplify, for the downswing sequence, think Right Foot to Left Heel.
Every change you make to your technique has balancing effects throughout the other components of your golf swing. If you haven’t achieved the draw ball flight that you want through other means, give this technique a go, and build your draw golf swing from the ground up!
- LIKE67
- LEGIT12
- WOW8
- LOL8
- IDHT5
- FLOP6
- OB5
- SHANK176

Some call the image on the left laid off, but if you are hitting a fade, this could be a perfect backswing for it! Same for across the line for a draw! Stop racking your brain with perceived mistakes and simply match backswing to shot shape!
- LIKE0
- LEGIT0
- WOW0
- LOL0
- IDHT0
- FLOP0
- OB0
- SHANK0
My golf learning began with this simple fact – if you don’t have a fundamentally sound hold on the golf club, it is practically impossible for your body to execute a fundamentally sound golf swing. I’m still a big believer that the golf swing is much easier to execute if you begin with the proper hold on the club.
As you might imagine, I come into contact with hundreds of golfers of all skill levels. And it is very rare to see a good player with a bad hold on the golf club. There are some exceptions, for sure, but they are very few and very far between, and they typically have beat so many balls with their poor grip that they’ve found a way to work around it.
The reality of biophysics is that the body moves only in certain ways – and the particulars of the way you hold the golf club can totally prevent a sound swing motion that allows the club to release properly through the impact zone. The wonderful thing is that anyone can learn how to put a fundamentally sound hold on the golf club, and you can practice it anywhere your hands are not otherwise engaged, like watching TV or just sitting and relaxing.
Whether you prefer an overlap, interlock or full-finger (not baseball!) grip on the club, the same fundamentals apply. Here are the major grip faults I see most often, in the order of the frequency:
Mis-aligned hands
By this I mean that the palms of the two hands are not parallel to each other. Too many golfers have a weak left hand and strong right, or vice versa. The easiest way to learn how to hold the club with your palms aligned properly is to grip a plain wooden ruler or yardstick. It forces the hands to align properly and shows you how that feels. If you grip and re-grip a yardstick several times, then grip a club, you’ll see that the learning curve is almost immediate.
The position of the grip in the upper/left hand
I also observe many golfers who have the butt of the grip too far into the heel pad of the upper hand (the left hand for right-handed players). It’s amazing how much easier it is to release the club through the ball if even 1/4-1/2″ of the butt is beyond the left heel pad. Try this yourself to see what I mean. Swing the club freely with just your left hand and notice the difference in its release from when you hold it at the end of the grip, versus gripping down even a half inch.
To help you really understand how this works, go to the range and hit shots with your five-iron gripped down a full inch to make the club the same length as your seven-iron. You will probably see an amazing shot shape difference, and likely not see as much distance loss as you would expect.
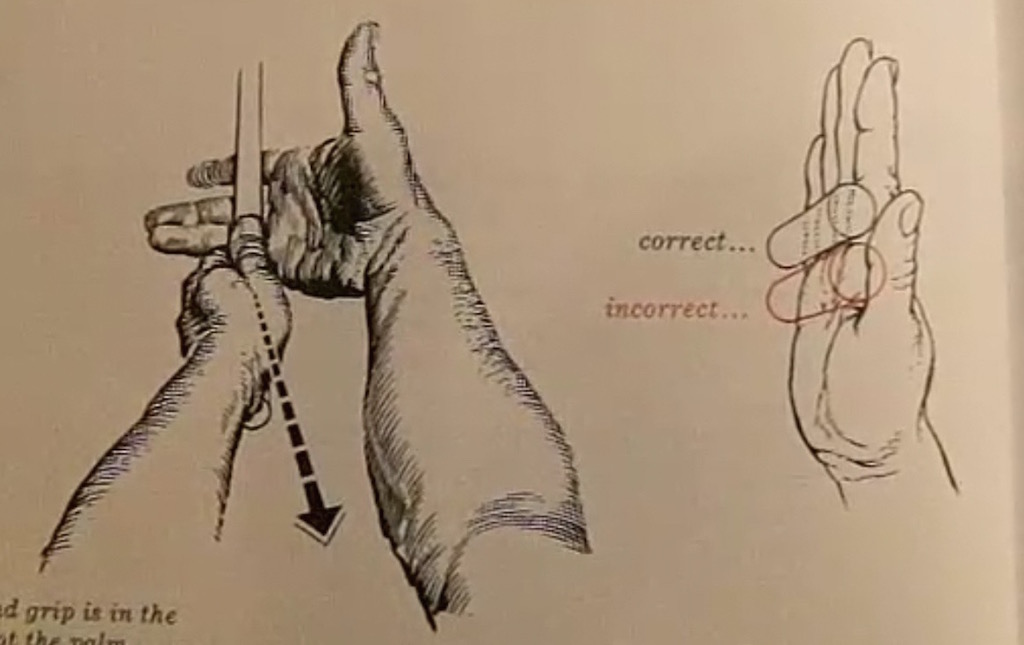
Too much lower (right) hand on the club
It seems like almost all golfers of 8-10 handicap or higher have the club too far into the palm of the lower hand, because that feels “good” if you are trying to control the path of the clubhead to the ball. But the golf swing is not an effort to hit at the ball – it is a swing of the club. The proper hold on the club has the grip underneath the pad at the base of the fingers. This will likely feel “weak” to you — like you cannot control the club like that. EXACTLY. You should not be trying to control the club with your lower/master hand.
Gripping too tightly
Nearly all golfers hold the club too tightly, which tenses up the forearms and prevents a proper release of the club through impact. In order for the club to move back and through properly, you must feel that the club is controlled by the last three fingers of the upper hand, and the middle two fingers of the lower hand. If you engage your thumbs and forefingers in “holding” the club, the result will almost always be a grip that is too tight. Try this for yourself. Hold the club in your upper hand only, and squeeze firmly with just the last three fingers, with the forefinger and thumb off the club entirely. You have good control, but your forearms are not tense. Then begin to squeeze down with your thumb and forefinger and observe the tensing of the entire forearm. This is the way we are made, so the key to preventing tenseness in the arms is to hold the club very lightly with the “pinchers” — the thumbs and forefingers.
So, those are what I believe are the four fundamentals of a good grip. Anyone can learn them in their home or office very quickly. There is no easier way to improve your ball striking consistency and add distance than giving more attention to the way you hold the golf club.
More from the Wedge Guy
- The Wedge Guy: Golf mastery begins with your wedge game
- The Wedge Guy: Why golf is 20 times harder than brain surgery
- The Wedge Guy: Musings on the golf ball rollback
- LIKE86
- LEGIT13
- WOW6
- LOL1
- IDHT0
- FLOP4
- OB1
- SHANK8

Not the dreaded headcover under the armpit drill! As if your body is defective and can’t function by itself! Have you seen how incredible the human machine is with all the incredible feats of agility all kinds of athletes are accomplishing? You think your body is so defective (the good Lord is laughing his head off at you) that it needs a headcover tucked under the armpit so you can swing like T-Rex?
- LIKE0
- LEGIT2
- WOW2
- LOL0
- IDHT0
- FLOP0
- OB0
- SHANK2


Dave Portnoy places monstrous outright bet for the 2024 Masters

John Daly stuns fans into silence with brutal opening tee shot on PGA Tour Champions

Things got heated at the Houston Open between Tony Finau and Alejandro Tosti. Here’s why

Justin Thomas on the equipment choice of Scottie Scheffler that he thinks is ‘weird’

Tiger Woods arrives at 2024 Masters equipped with a putter that may surprise you

‘Absolutely crazy’ – Major champ lays into Patrick Cantlay over his decision on final hole of RBC Heritage

Report: Tiger Woods has ‘eliminated sex’ in preparation for the 2024 Masters

Two star names reportedly blanked Jon Rahm all week at the Masters

2-time major champ announces shock retirement from the sport at age of 33

Report: LIV Golf identifies latest star name they hope to sign to breakaway tour


Daniel Berger WITB 2024 (April)
Daniel Berger what’s in the bag accurate as of the Farmers Insurance Open. More photos from the event here. Driver:...


Rasmus Højgaard WITB 2024 (April)
Rasmus Højgaard what’s in the bag accurate as of the Zurich Classic. Driver: Callaway Ai Smoke Triple Diamond (10.5 degrees)...


Rory McIlroy WITB 2024 (April)
Rory McIlroy what’s in the bag accurate as of the Zurich Classic. Driver: TaylorMade Qi10 (9 degrees) Shaft: Fujikura Ventus...


Sam Burns WITB 2024 (April)
Sam Burns’ what’s in the bag accurate as of the RBC Heritage. Driver: Callaway Paradym Triple Diamond S (9 degrees...
-
 19th Hole2 weeks ago
Dave Portnoy places monstrous outright bet for the 2024 Masters
-
 19th Hole3 days ago
Justin Thomas on the equipment choice of Scottie Scheffler that he thinks is ‘weird’
-
 19th Hole2 weeks ago
Tiger Woods arrives at 2024 Masters equipped with a putter that may surprise you
-
 19th Hole3 days ago
‘Absolutely crazy’ – Major champ lays into Patrick Cantlay over his decision on final hole of RBC Heritage
-
 19th Hole3 weeks ago
Report: Tiger Woods has ‘eliminated sex’ in preparation for the 2024 Masters
-
 19th Hole1 week ago
Two star names reportedly blanked Jon Rahm all week at the Masters
-
 19th Hole1 week ago
Report: LIV Golf identifies latest star name they hope to sign to breakaway tour
-

 19th Hole1 week ago
Neal Shipley presser ends in awkward fashion after reporter claims Tiger handed him note on 8th fairway
Pingback: New Body Therapy Evolved 8 Speed 110V Turbo Pearl Power Full Body Massage Hand Held Massager + 4 oz Anti-Bacterial Universal Wand Cleaner - Insomnia Help 2015
Pingback: Acupressure Massage Rings-Chinese Medicine (10pcs) - Insomnia Help 2015
marcel
Apr 6, 2015 at 10:19 pm
after my coach told me not to read articles as they are confusing and not helpful at all – i dont read.
best advise to play draw is to get a AAA+ golf coach. Golf is one of the most technical games out there and I love it so much. please respect the game and learn how to play… then you start hitting fairways and greens and you gonna have so much fun with the game.
TMO
Mar 31, 2015 at 5:32 pm
Skip, obviously it is the swing path and face angle that create the draw (or any shot shape), but a multitude of things affect swing path and face angle. As the author states (see point #1, below the last photo), this footwork just helps many get the swing path part to happen. For what it’s worth, my natural shot shape is a draw and my footwork is pretty much just like this.
Chris Bunting
Mar 27, 2015 at 2:38 pm
I really liked this piece. Its exactly what I think about when practicing. Not so much when playing, hoping the practice time just builds it in to do when swinging.
Skip
Mar 27, 2015 at 12:41 pm
hmmm…so I guess stack-and-tilters can’t hit draws.
Tim Mitchell
Mar 27, 2015 at 6:39 pm
Skip…thanks for the comment. Of course Stack and Tilters can hit draws! Because their technique is different, their application of foot pressure also needs to be different. To keep this article shorter and more precise, the foot pressure for a more traditional swing was the only model discussed. Feel free to email me if you’re interested in discussing other models. Thanks.
Reply
Joe Duffer
Mar 27, 2015 at 10:12 pm
Tim, why not spell it out for Skip right here?
I’m interested in your take on this as well.
Thx,
JD
Skip
Mar 31, 2015 at 3:25 pm
Thanks for the response, would also love to hear how their technique is different. I’m more inclined to believe that a draw is more a product of the relationship of face angle and swing path rather than the actual footwork, so I don’t see how that differs between swing styles.
Thanks.