Instruction
Three Common Swing Faults: Early Extension
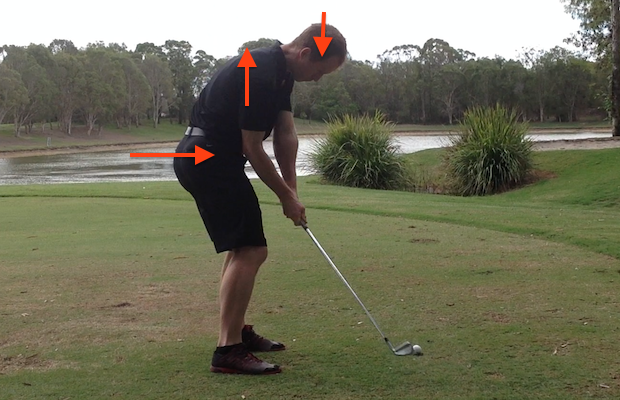
In this second instalment of three articles I am going to look at early extension, a common swing fault that we see in many of the students that come to our academy, often regardless of scoring ability and body shape.
Click here to read the first installment: The Hunched Setup Posture.
The Issue: Early Extension
By early extension, I mean the loss of flexion at the hip on the downswing. In simple terms, pushing the hips forward and standing upright too early long before impact has been made. This often leads to compensatory movements from the upper back, shoulders, wrists and hands to manipulate the club into a decent position for the moment of truth.
Early extension can be caused by a number of different things, but the two most common are over rotation in the wrong direction in the back swing (see upcoming article on reverse spine angle) and/or a weak posterior chain (glutes, hamstrings and lumbar erector spinae.)
The Fix: Takeaway Drills and Strengthening Exercises
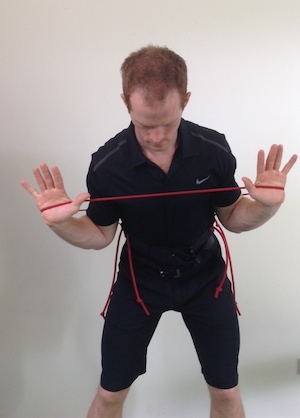
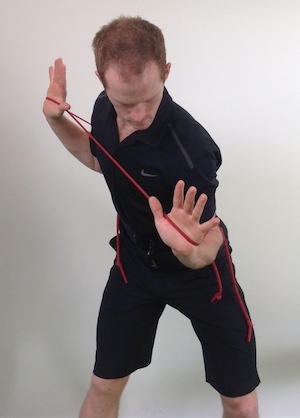
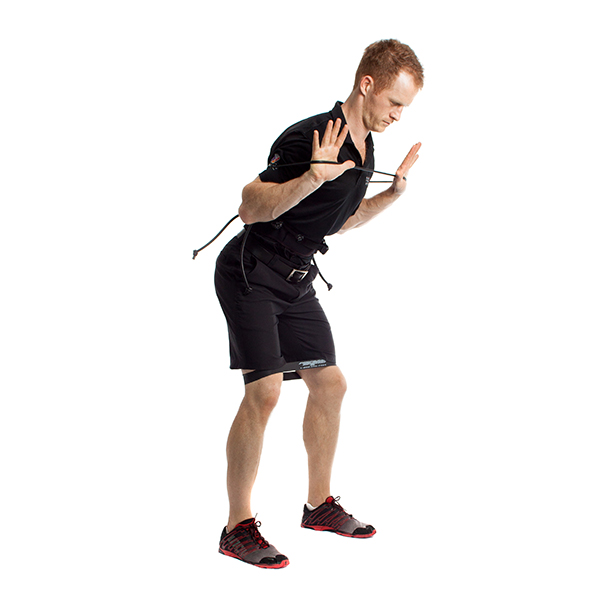
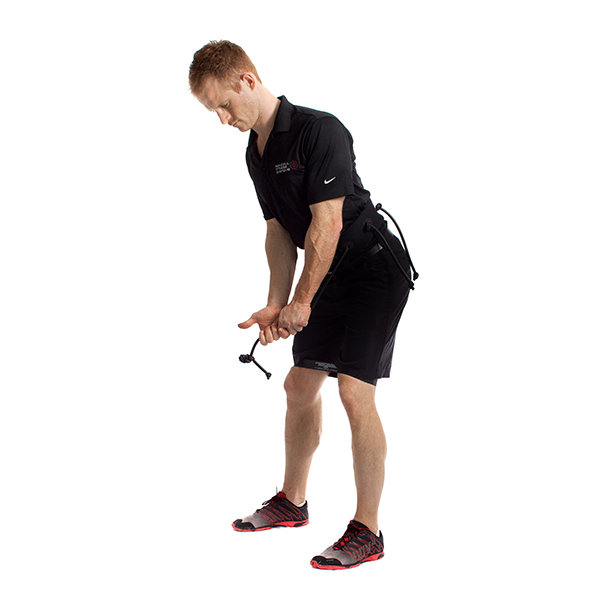
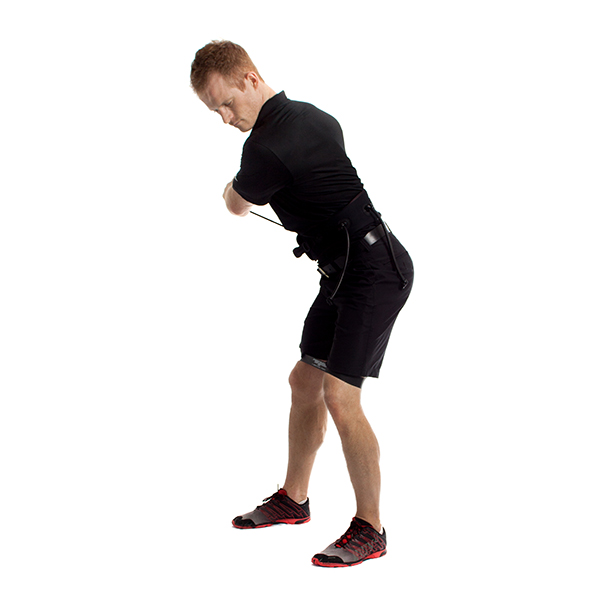
My remedy for over rotation (in the wrong direction) is to first of all create a bit more of an angle at address (see photo), thereby reducing the potential for over rotation in the wrong direction. After that has been ingrained, we use the tubing on the Ramsay Posture Belt to simulate gripping a club and literally practice taking a backswing but letting the tubing restrict how far we can turn without losing shape.
With regards to the weakness of low back, glute and hamstring, I first get clearance for musculoskeletal issues and then assess basic movement skills and prescribe an appropriate program of strength exercises for the posterior chain. It usually consists of, but is not limited to squats, lunges, deadlifts, back extensions, hamstrings curls and their respective variations at loads and volume that are appropriate for the client. This is more often than not built in with a program that addresses the player’s overall strength needs.
Gaining strength is a slow burner; it takes time and a lot of work. Learning a new movement can often be done relatively quickly, but a strength program should not be undertaken unless the player is willing to commit time and effort. However, a stronger posterior chain and body in general will help overall health and wellbeing by developing a stronger musculoskeletal system and speeding up your metabolism amongst a host of other benefits. So it’s well worth undertaking if you have had clearance from your doctor and can get access to a high quality, individually tailored golf fitness program.
Below is a mini program of setup posture drills and strength exercises to help you with your backswing and posterior chain strength.
For many of the exercises we prescribe we use the Ramsay Posture Belt (above), a great bit of kit that allows us to get into good posture and then make small but very rapid muscle activations and reopen that neural pathway back to the brain. That makes us more aware of those key postural muscles and more likely to use them during setup and swing.
Equipment Needed
- Ramsay Posture Belt: The ultimate tool for training golf posture and movement patterns.
- Spikey Ball: Versatile self massage and release tool.
- Knee Band: Can be used around the knee, ankle or foot to activate and strengthen glute muscles.
Note: All product are available to purchase, simply contact [email protected].
Here are some alternatives you might find lying around at home that you can substitute for the recommended products. They are not as effective, but adequate for lower-level exercises.
- For the Ramsay Posture Belt, golfers can substitute a resistance band or theraband tubing.
- For the Spiky Ball, golfers can substitute a tennis ball, cricket ball or golf ball.
- For the knee Band, golfers can substitute a resistance band tied in a loop
The Program
Perform as a circuit – three rounds with 20 seconds of rest between exercises.
- Set Up Posture Drill: 30 seconds
- Restricted Left Arm Takeaway: 12 reps
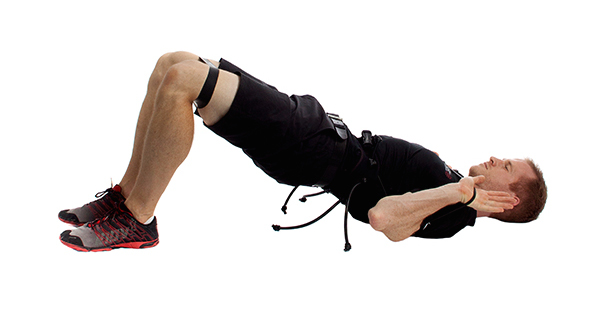
- Lying Glute Bridge: 45 secs
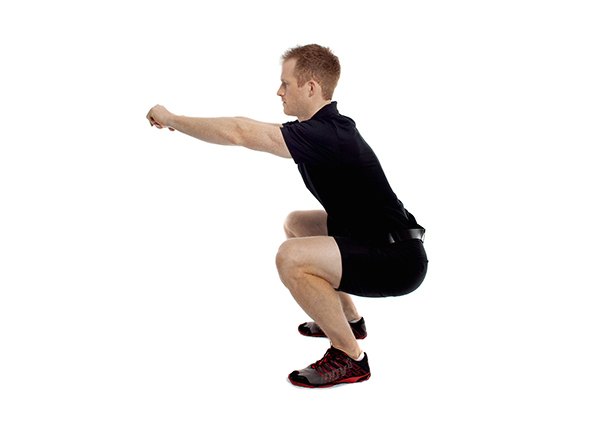
- Body Weight Squat: 15 reps
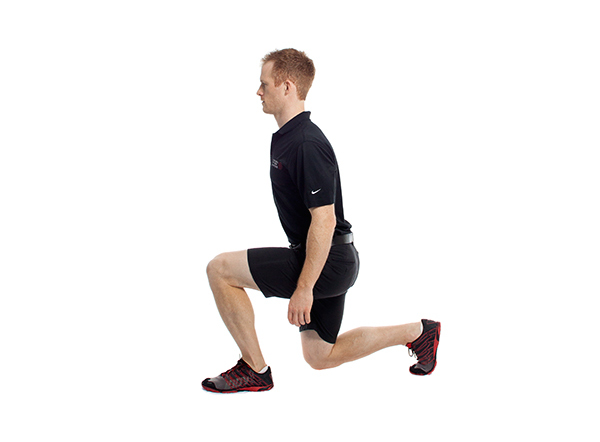
- Body Weight Forward Lunge: 12 reps each side
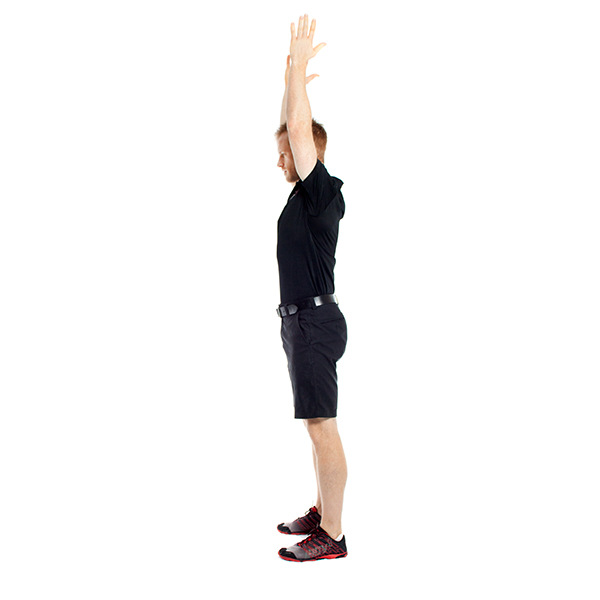
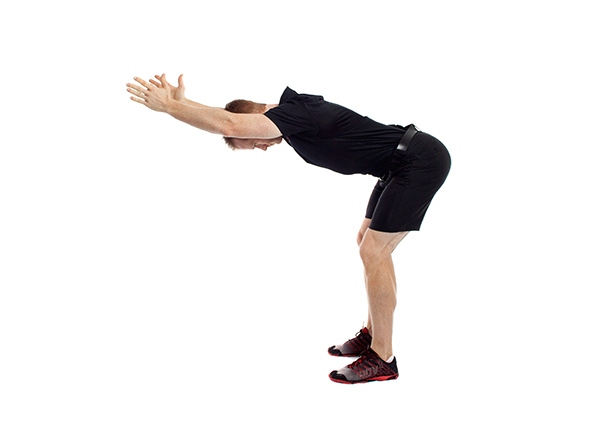
- Body Weight Overhead Good Morning: 12 reps
No. 1: Setup Posture Drill
Purpose
- Initial stage of exercises for development of postural awareness.
Positioning
- Posture belt, knee band.
- In setup position.
- Hands and arms in front loop.
Form
- Stomp and pulse working through three speeds (33, 66, 99).
- Maintain posture.
Tips
- Watch head position, retract chin.
- Check form in mirror.
No. 2: Restricted Left Arm Takeaway
Purpose
- Train connection of left shoulder in takeaway.
Positioning
- Posture belt, in set up position, left arm holding left middle in band at setup.
Form
- Perform short takeaway.
- Keep left shoulder low.
- Keep scapular muscles engaged and shoulder connected.
Tips
- Watch head position, retract chin
- Check form in mirror
No. 3: Lying Glute Bridge
Purpose
- Activates glute muscles.
Positioning
- Lie face up with feet on floor.
- Knees bent at 90 degrees.
Form
- Lift hips off ground so body is in a straight line.
- Squeeze glute muscles.
No. 4: Body Weight Squat
Purpose
- Basic introduction to lower body exercise, strengthens glutes and quads.
Positioning
- Athletic stance, feet hip width apart.
Form
- Sit down on an imaginary chair behind you.
- Use your arms as a counterbalance by extending them in front of you. “Sit and reach.”
- Stand back up to start position.
- Take form deeper as you get stronger.
Tips
- Watch head position, retract chin.
- Check form in mirror.
No. 5: Body Weight Forward Lunge
Purpose
- Strengthen glutes, quads and hamstrings.
Positioning
- Athletic standing stance.
Form
- Step forward into lunge position.
- Drop back knee to almost touching the floor.
- Return to start position and repeat on other side.
Tips
- Try to keep knee tracking over toes.
No. 6: Body Weight Overhead Good Morning
Purpose
- Strengthen hamstrings and back.
Positioning
- Semi-wide stance with chest above hips.
- Slight bend in knees.
- Arms raised above head.
Form
- Engage core and upper back.
- Slowly lower upper body down keeping slight bend in knees and back straight.
- Keep hands above head throughout entire range.
- When you reach end range, return back to start position keeping back straight.
Tips
- Focus on keeping connection in upper back.
- Do not round lower back.
- LIKE5
- LEGIT0
- WOW0
- LOL0
- IDHT0
- FLOP0
- OB0
- SHANK0
Instruction
Clement: Laid-off or perfect fade? Across-the-line or perfect draw?

Some call the image on the left laid off, but if you are hitting a fade, this could be a perfect backswing for it! Same for across the line for a draw! Stop racking your brain with perceived mistakes and simply match backswing to shot shape!
- LIKE0
- LEGIT0
- WOW0
- LOL0
- IDHT0
- FLOP0
- OB0
- SHANK1
Instruction
The Wedge Guy: The easiest-to-learn golf basic
My golf learning began with this simple fact – if you don’t have a fundamentally sound hold on the golf club, it is practically impossible for your body to execute a fundamentally sound golf swing. I’m still a big believer that the golf swing is much easier to execute if you begin with the proper hold on the club.
As you might imagine, I come into contact with hundreds of golfers of all skill levels. And it is very rare to see a good player with a bad hold on the golf club. There are some exceptions, for sure, but they are very few and very far between, and they typically have beat so many balls with their poor grip that they’ve found a way to work around it.
The reality of biophysics is that the body moves only in certain ways – and the particulars of the way you hold the golf club can totally prevent a sound swing motion that allows the club to release properly through the impact zone. The wonderful thing is that anyone can learn how to put a fundamentally sound hold on the golf club, and you can practice it anywhere your hands are not otherwise engaged, like watching TV or just sitting and relaxing.
Whether you prefer an overlap, interlock or full-finger (not baseball!) grip on the club, the same fundamentals apply. Here are the major grip faults I see most often, in the order of the frequency:
Mis-aligned hands
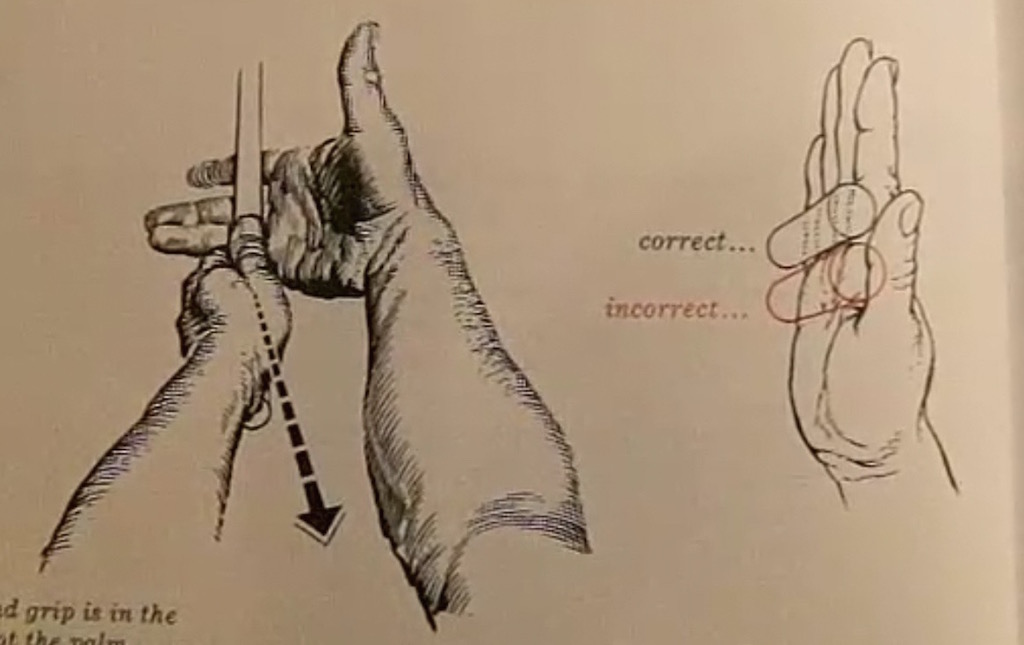
By this I mean that the palms of the two hands are not parallel to each other. Too many golfers have a weak left hand and strong right, or vice versa. The easiest way to learn how to hold the club with your palms aligned properly is to grip a plain wooden ruler or yardstick. It forces the hands to align properly and shows you how that feels. If you grip and re-grip a yardstick several times, then grip a club, you’ll see that the learning curve is almost immediate.
The position of the grip in the upper/left hand
I also observe many golfers who have the butt of the grip too far into the heel pad of the upper hand (the left hand for right-handed players). It’s amazing how much easier it is to release the club through the ball if even 1/4-1/2″ of the butt is beyond the left heel pad. Try this yourself to see what I mean. Swing the club freely with just your left hand and notice the difference in its release from when you hold it at the end of the grip, versus gripping down even a half inch.
To help you really understand how this works, go to the range and hit shots with your five-iron gripped down a full inch to make the club the same length as your seven-iron. You will probably see an amazing shot shape difference, and likely not see as much distance loss as you would expect.
Too much lower (right) hand on the club
It seems like almost all golfers of 8-10 handicap or higher have the club too far into the palm of the lower hand, because that feels “good” if you are trying to control the path of the clubhead to the ball. But the golf swing is not an effort to hit at the ball – it is a swing of the club. The proper hold on the club has the grip underneath the pad at the base of the fingers. This will likely feel “weak” to you — like you cannot control the club like that. EXACTLY. You should not be trying to control the club with your lower/master hand.
Gripping too tightly
Nearly all golfers hold the club too tightly, which tenses up the forearms and prevents a proper release of the club through impact. In order for the club to move back and through properly, you must feel that the club is controlled by the last three fingers of the upper hand, and the middle two fingers of the lower hand. If you engage your thumbs and forefingers in “holding” the club, the result will almost always be a grip that is too tight. Try this for yourself. Hold the club in your upper hand only, and squeeze firmly with just the last three fingers, with the forefinger and thumb off the club entirely. You have good control, but your forearms are not tense. Then begin to squeeze down with your thumb and forefinger and observe the tensing of the entire forearm. This is the way we are made, so the key to preventing tenseness in the arms is to hold the club very lightly with the “pinchers” — the thumbs and forefingers.
So, those are what I believe are the four fundamentals of a good grip. Anyone can learn them in their home or office very quickly. There is no easier way to improve your ball striking consistency and add distance than giving more attention to the way you hold the golf club.
More from the Wedge Guy
- The Wedge Guy: Golf mastery begins with your wedge game
- The Wedge Guy: Why golf is 20 times harder than brain surgery
- The Wedge Guy: Musings on the golf ball rollback
- LIKE88
- LEGIT14
- WOW6
- LOL1
- IDHT0
- FLOP4
- OB1
- SHANK8
Instruction
Clement: Stop ripping off your swing with this drill!

Not the dreaded headcover under the armpit drill! As if your body is defective and can’t function by itself! Have you seen how incredible the human machine is with all the incredible feats of agility all kinds of athletes are accomplishing? You think your body is so defective (the good Lord is laughing his head off at you) that it needs a headcover tucked under the armpit so you can swing like T-Rex?
- LIKE0
- LEGIT3
- WOW2
- LOL0
- IDHT0
- FLOP0
- OB0
- SHANK2
-
 19th Hole2 weeks ago
Justin Thomas on the equipment choice of Scottie Scheffler that he thinks is ‘weird’
-

 19th Hole2 weeks ago
‘Absolutely crazy’ – Major champ lays into Patrick Cantlay over his decision on final hole of RBC Heritage
-
 19th Hole3 weeks ago
Two star names reportedly blanked Jon Rahm all week at the Masters
-
 19th Hole2 weeks ago
Report: LIV Golf identifies latest star name they hope to sign to breakaway tour
-

 19th Hole3 weeks ago
Neal Shipley presser ends in awkward fashion after reporter claims Tiger handed him note on 8th fairway
-

 19th Hole2 weeks ago
Brandel Chamblee has ‘no doubt’ who started the McIlroy/LIV rumor and why
-

 19th Hole7 days ago
LET pro gives detailed financial breakdown of first week on tour…and the net result may shock you
-
 Equipment2 weeks ago
Jason Day on his recent switch into Srixon ZX5 and ZX7 Mk II irons

