Instruction
Stickney: Balance in golf — the forgotten fundamental
Dr. James Spencer, Lance Gill, and Jason Baile (with Tom Stickney)

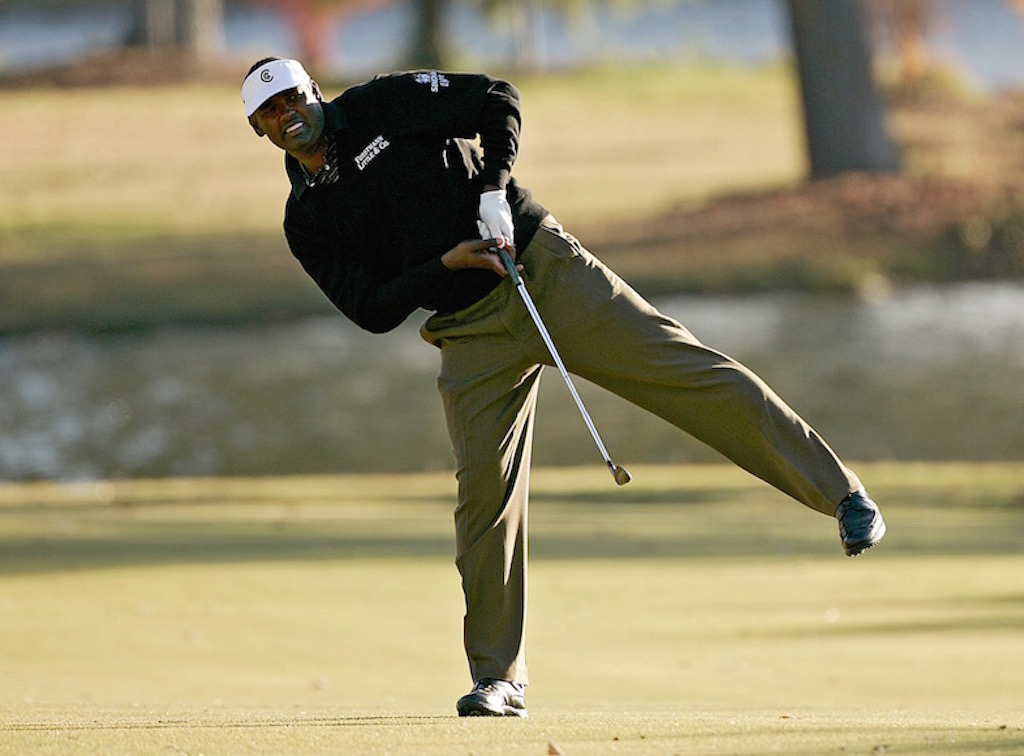
Can you imagine placing almost total disregard on a particular function of the body that can halt, hamper, or disrupt your golf swing instantly? If you knew of such a thing in your swing, wouldn’t you run to your local professional and make sure it was handled and “in-check?” I know I would, but sadly 95 percent of the teachers/players in the world hardly even think about their balance outside of their set up or you finish position.
Balance is literally the most overlooked physical characteristic known to golfers and is something that our bodies rely on in order to walk, move, or do any type of sports activity. Do you remember “homeostasis” from junior high science — the ability to keep your body upright and from falling down? Yes, this is an aspect of balance and it, like your golf swing, can be improved through practice.
Balance is defined by Webster as, “the ability to move or to remain in a position without losing control or falling.”
Balance is controlled by 3 factors of the human body. The 3 factors are vision, vestibular and proprioception.
• Vision – our eyes play an integral role into the world of balancing. The eyes are constantly supplying the brain with feedback on where our body is, within the space surrounding us. Moreover, vision is the main operator for balance and takes over when all other balance systems fail.
• Vestibular – there are three canals filled with fluid inside your inner-ear, and each canal is oriented in a different direction. When you move your head, the fluid in the ear shifts inside of these canals and it flows over receptors that send message to your brain. “You are tilting to the RIGHT, you are tilting BACKWARDS…etc.” The vestibular system is our main motion sensor, specifically linear movement, and rotational acceleration. It helps the brain orient positional information.
• Proprioception – this is probably the most mis-understood and overlooked of all three of the BALANCE centers. Basically stated, this is the internal GPS built into your body that helps you understand where you are in space. Think about how you reach for a glass of water, your body knows where to go and how much to extend your arm as you are walking forward etc.
So, what happens if you don’t have one, two, or all three of these systems working correctly? What factors can it control, hamper, or disrupt? Think of balance like the governor on a car for the nervous system. The nervous system will not allow maximum output for any of the described movements below; thus, balance is the glue that holds the entire body system together:
- Mobility – tends to be reduced when you lack balance
- Stability – tends to be lower with lack of balance
- Strength – will be lower when balance is challenged
- Power – definitely lower when balance is not functioning
- Speed – markedly lower with lower balance ratings
- Endurance – will be limited due to balance restrictions
Now that we can see what factors can be altered within our motion what would be the baseline of balance that we could audit to see where we fall? The average human balance time based on a research study conducted by Walter Reed – Dept of Orthopedics and Rehab, Springer & Gill et al. states that average human balance times with eyes closed on a single leg balance test) is 10.3 seconds.
The average of our golfers over the past 20+ years of doing the same test is the following;
- Professional Golfers – 15+ seconds bilaterally (each leg)
- Amateur Golfers – between 2 to 3 seconds bilaterally (each leg)
And this can be broken down further by age groups as well. Sadly our balance gets worse as we get older.
- Ages 18-39 = 13.3 seconds eyes closed average
- Ages 40-49 = 12.9 seconds eyes close average
- Ages 50-59 = 8.4 seconds eyes close average
- Ages 60-69 = 5.1 seconds eyes closed average
- Ages 70-79 = 4.5 seconds eyes closed average
- Ages 80-89 = 1.0 seconds eyes closed average
Now that we can see what the norms are for professionals and by age as well, let’s dive into how to test your own balance in front of a mirror so you can see where YOU fit into this balance equation.
To test your balance we are going to perform a simple test on both your right leg and left leg- the SINGLE LEG BALANCE TEST-
- Begin test with shoes on or shoes off, standing on a firm surface. Raise one leg/thigh to parallel (or as close as you can get it), and simply hold for up to 20 seconds with eyes open. This is phase 1 of the test. Can you balance on one leg with your EYES OPEN. We didn’t include the eyes open data to this point but the human average for Eyes Open is 17 seconds – which by the way is approximately PGA/LPGA tour average for Eyes Closed). Repeat the same process on opposite side in same format. Note your numbers for both legs.
- The clock starts when your raised leg is in place. Your arms will remain at your side during the entire exam and are not to be outstretched to the front or side. The clock stops when any of the following happens:
- Arms raise
- Leg lowers
- Shoulders tilt out of vertical column
- Hips kick forward backward or laterally to either side
- Foot loses contact with the floor (hopping or rolling)
- Raised leg touches stance leg
Phase 2 of the test is with your eyes closed.
This is the official form of the test BUT ONLY IS TO BE PEFORMED IF YOU ARE SAFE IN YOUR ABILITY TO BALANCE WITH EYES CLOSED.
To test your balance with eyes closed, you will follow the same protocol as above with the following additions.
Perform the eyes open component to gain “bearings” and then simply close your eyes for 1-second as a test run. If nothing majorly uncomfortable occurs in that 1-seconds test run you may proceed to the actual test.
Begin test with shoes on, standing on a firm surface. Raise one leg/thigh to parallel (or as close as you can get it), and simply hold for up to 20 seconds with eyes closed. This is phase 2 of the test. Can you balance on one leg with your EYES CLOSED? Average tour time on this test is approximately 15-20 seconds and average human times is averaging 10 seconds. The clock starts when your raised leg is in place, and your eyes CLOSE. Your arms will remain at your side during the entire exam and are not to be outstretched to the front or side.
The clock stops when any of the following happen
- Arms raise
- Leg lowers
- Shoulders tilt out of vertical column
- Hips kick forward backward or laterally to either side
- Foot loses contact with the floor (hopping or rolling)
- Raised leg touches stance leg
There are three basic categories you can fall into during this stage:
- ELITE – PGA/LPGA level (15+ seconds)
- AVERAGE – human normal via medical science (10 seconds)
- SUB-PAR – into the category we have been watching since before this Millenia
If you happen to fall into this category three (SUB-PAR), do NOT fret. We have recently tested over 250+ members at an elite club in South Florida where golf is a religion and here are our current stats from said members;
- Average eyes closed balance time < than 2 seconds
- Best of entire club – 10 seconds
- Worry level for lance at results – SUPER HIGH
Keep in mind, golf is the religion by which these golfers survive. Now, that is a tongue in cheek comment, but the truth is the following. If something very small goes wrong in their balance and something catastrophic occurs as a result (ie fall or ankle sprain or hip fracture etc.), golf is now a thing of the past. This simple fact of this is enough to drive members into depression. Remember, this problem is solvable and manageable.
Now let’s begin our journey into the solution for your balance woes!
We will break this journey down into 3 simple steps or levels if you will. These levels will be progressing from the easier level all the way up to the hardest level of achieving your pinnacle of balance. Please keep in mind that you are on a journey for yourself and will not be compared against what Dustin Johnson or Jessica Korda can accomplish. This is simply – You vs You.
LEVEL 1 BALANCE OBJECTIVE – you failed the criteria for normal human balance averages after scoring a 2.1 second average on both feet with eyes closed. Where do you start this journey? We would suggest starting with the fundamental concepts of balance. Let’s begin by taking two golf clubs and turning them over so the butt of the grip is into the ground. Try to get two clubs similar in length and my most sincere desire is to AVOID using Autoflex shafts in this process (they sometimes tend to crack when excessive pressure is added to them).
Holding the clubhead in each hand and the butt of the grip into the ground, we would like you to repeat the balance test with eyes open. In this portion of the drill we are determine how much better your balance and proprioception is when you have two object helping support you. We suggest standing on a harder surface to begin with as this will give you the best chance at supporting yourself. During your balance time, please note how much pressure you are exerting through the shafts and the butt of the grips. As you can try to slowly lighten the pressure you are putting through the golf club. This indicates you are using less and less of a support mechanism and relying more and more on your own body parts to obtain optimal balance and this is the safest way to begin your journey into balance retraining.
During this period you may find yourself staring at your feet during the balance training. We want you to understand the following crystal clear, “your feet are not going anywhere and you do not need to give them your ocular (eyes) attention.” Please try and trust us on this, and look at the horizon or the tv or the fine golf tips you have playing on YouTube which are 100% most certainly suited towards your swing and body…… The eyes to the horizon is a major step in this process as it forces your body to rely on the other pathways of vestibular and proprioceptive systems. While these pathways might be a touch sluggish at the start, it will start to awaken and respond the more you require it to do so. Good luck on phase one, have fun with it and enjoy the journey you are on. You wont be perfect but no one truly is. Please try and remember this….(also try to not neglect the other foot/leg)
LEVEL 2 BALANCE OBJECTIVE – we have mastered the art of single leg balance using assisted devices (in a lessening manner of course). It is time to take this balance game to the next level. In this level we will use a majorly overlooked training aid, a 2×4. Yes we said it, a common 2×4 found at any major home goods store such as Lowes or Home Depot. We suggest making sure you get a 2×4 with as smooth of a surface as possible so as to avoid “splinters.” We will often sand my 2×4’s down prior as this gives us piece of mind (or if you are interested in pre-fabricated options we can discuss those also). Why are we worried so much about splinters? Oh did I forget to mention that LEVEL 2 is barefoot. Heck you can do LEVEL 1 barefoot if you wish also. The barefoot premise allows your proprioceptors to fully experience the tactile (touch) of the object of which you are focusing on, and in this case it is your feet.
Next step is; what are we going to do on this 2×4? Lets start with the basics, begin by stepping onto the 1.5” raised piece of lumbar and try to put your opposite foot in front of the down foot. We like the heel to toe concept. Now walk across the 4-6 foot section of board you have purchased. In a heel to toe fashion, can you walk across the board without stepping into the “LAVA” on each side of the board? Oh you are anti-lava rhetoric? Ok then, we hear you…..avoid stepping off the board as there are hungry alligators who are interested in eating your feet once you hit their waters to each side of the board. Is that better? The purpose of our childhood analogies is the following; HAVE FUN with this process. Re-Learn to PLAY during this time of balance training. In fact, maybe we shouldn’t call it training at all. BALANCE PLAY is our new reference term.
During your Level 2 – Balance Playtime, begin to notice which foot is not up to par with the other and give it some extra love during the beam walking. Pay close attention again to where your eyes and head are. If you are looking at the lava or alligators then shame on you. Look towards the horizon and walk tall. The balance beam isn’t going anywhere and it is time you learn to trust your bodies internal GPS system. If you need assisted devices for this portion of the Balance Playtime, you are at a level which is too high for you.
During Level 2 playtime we will create different demands within the structure of walking on the beam:
- Forward walking eyes on horizon
- Backward walking eyes on horizon
- Side walking on beam
- Placing a ball on beam and asking client to bend down (while maintaining heel/toe relationship and mark their ball, come back to standing position and then return to unmark and replace their ball using opposite hand)
- Playing red light/green light game while walking on beam
- Placing beam on a slightly undulated surface outside. We tend to start at <5 degree slopes for training the bodies awareness levels of contours.
LEVEL 3 BALANCE OBJECTIVE – take your balance playtime to a whole new level using the expertise of professionals who train in this arena daily. Fitness is overall too “sexy” of a profession when we look at the social media depictions, as well as the magazine articles written on specific focuses of fitness. Let us state clearly and for the record, Balance is not one of those entities. There is nothing sexy about balance to most people. Yet the last time we checked, bigger pecs and biceps doesn’t tend to reduce death rates…..whereas training your balance does.
NOTE
If you would like to learn more about golf, balance, and how you can improve your game and/or overall performance, please reach out to Lance Gill and Jason Baile at [email protected]. Their facility is located in Jupiter, Florida and they also offer ONLINE consultations/lessons accepting clients of all levels.
You can reach Dr. James Spencer- “the Balance and Movement Doc” directly at [email protected]. His office is located in Wellington, Florida and accepts new patients as well.
Questions or comments? [email protected]
- LIKE8
- LEGIT4
- WOW1
- LOL1
- IDHT0
- FLOP0
- OB0
- SHANK2
My golf learning began with this simple fact – if you don’t have a fundamentally sound hold on the golf club, it is practically impossible for your body to execute a fundamentally sound golf swing. I’m still a big believer that the golf swing is much easier to execute if you begin with the proper hold on the club.
As you might imagine, I come into contact with hundreds of golfers of all skill levels. And it is very rare to see a good player with a bad hold on the golf club. There are some exceptions, for sure, but they are very few and very far between, and they typically have beat so many balls with their poor grip that they’ve found a way to work around it.
The reality of biophysics is that the body moves only in certain ways – and the particulars of the way you hold the golf club can totally prevent a sound swing motion that allows the club to release properly through the impact zone. The wonderful thing is that anyone can learn how to put a fundamentally sound hold on the golf club, and you can practice it anywhere your hands are not otherwise engaged, like watching TV or just sitting and relaxing.
Whether you prefer an overlap, interlock or full-finger (not baseball!) grip on the club, the same fundamentals apply. Here are the major grip faults I see most often, in the order of the frequency:
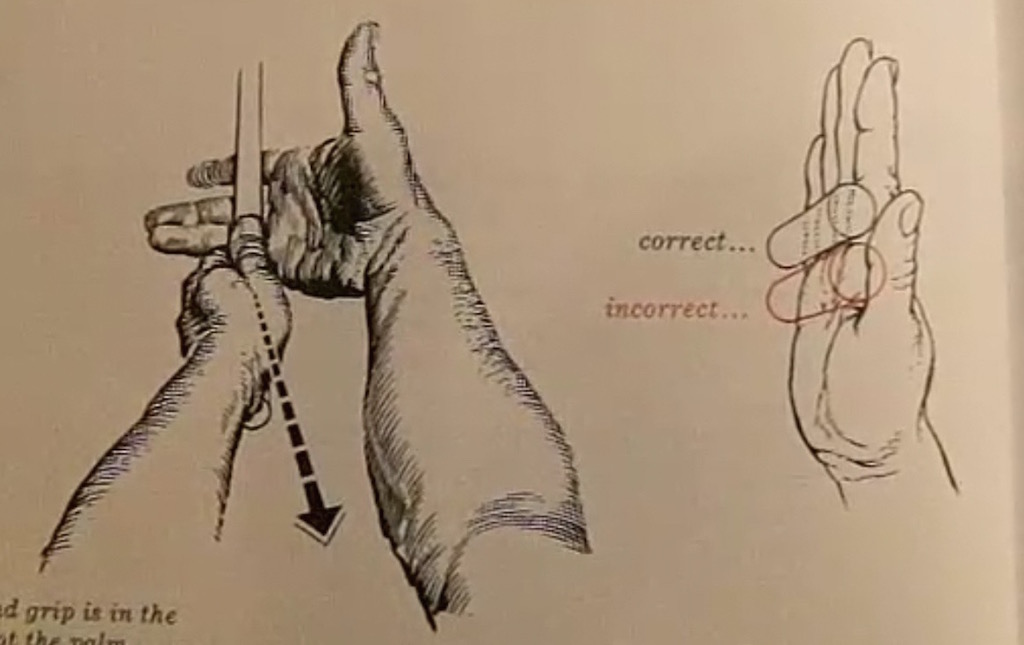
Mis-aligned hands
By this I mean that the palms of the two hands are not parallel to each other. Too many golfers have a weak left hand and strong right, or vice versa. The easiest way to learn how to hold the club with your palms aligned properly is to grip a plain wooden ruler or yardstick. It forces the hands to align properly and shows you how that feels. If you grip and re-grip a yardstick several times, then grip a club, you’ll see that the learning curve is almost immediate.
The position of the grip in the upper/left hand
I also observe many golfers who have the butt of the grip too far into the heel pad of the upper hand (the left hand for right-handed players). It’s amazing how much easier it is to release the club through the ball if even 1/4-1/2″ of the butt is beyond the left heel pad. Try this yourself to see what I mean. Swing the club freely with just your left hand and notice the difference in its release from when you hold it at the end of the grip, versus gripping down even a half inch.
To help you really understand how this works, go to the range and hit shots with your five-iron gripped down a full inch to make the club the same length as your seven-iron. You will probably see an amazing shot shape difference, and likely not see as much distance loss as you would expect.
Too much lower (right) hand on the club
It seems like almost all golfers of 8-10 handicap or higher have the club too far into the palm of the lower hand, because that feels “good” if you are trying to control the path of the clubhead to the ball. But the golf swing is not an effort to hit at the ball – it is a swing of the club. The proper hold on the club has the grip underneath the pad at the base of the fingers. This will likely feel “weak” to you — like you cannot control the club like that. EXACTLY. You should not be trying to control the club with your lower/master hand.
Gripping too tightly
Nearly all golfers hold the club too tightly, which tenses up the forearms and prevents a proper release of the club through impact. In order for the club to move back and through properly, you must feel that the club is controlled by the last three fingers of the upper hand, and the middle two fingers of the lower hand. If you engage your thumbs and forefingers in “holding” the club, the result will almost always be a grip that is too tight. Try this for yourself. Hold the club in your upper hand only, and squeeze firmly with just the last three fingers, with the forefinger and thumb off the club entirely. You have good control, but your forearms are not tense. Then begin to squeeze down with your thumb and forefinger and observe the tensing of the entire forearm. This is the way we are made, so the key to preventing tenseness in the arms is to hold the club very lightly with the “pinchers” — the thumbs and forefingers.
So, those are what I believe are the four fundamentals of a good grip. Anyone can learn them in their home or office very quickly. There is no easier way to improve your ball striking consistency and add distance than giving more attention to the way you hold the golf club.
More from the Wedge Guy
- The Wedge Guy: Golf mastery begins with your wedge game
- The Wedge Guy: Why golf is 20 times harder than brain surgery
- The Wedge Guy: Musings on the golf ball rollback
- LIKE86
- LEGIT13
- WOW6
- LOL1
- IDHT0
- FLOP4
- OB1
- SHANK8
Not the dreaded headcover under the armpit drill! As if your body is defective and can’t function by itself! Have you seen how incredible the human machine is with all the incredible feats of agility all kinds of athletes are accomplishing? You think your body is so defective (the good Lord is laughing his head off at you) that it needs a headcover tucked under the armpit so you can swing like T-Rex?
- LIKE0
- LEGIT2
- WOW2
- LOL0
- IDHT0
- FLOP0
- OB0
- SHANK2

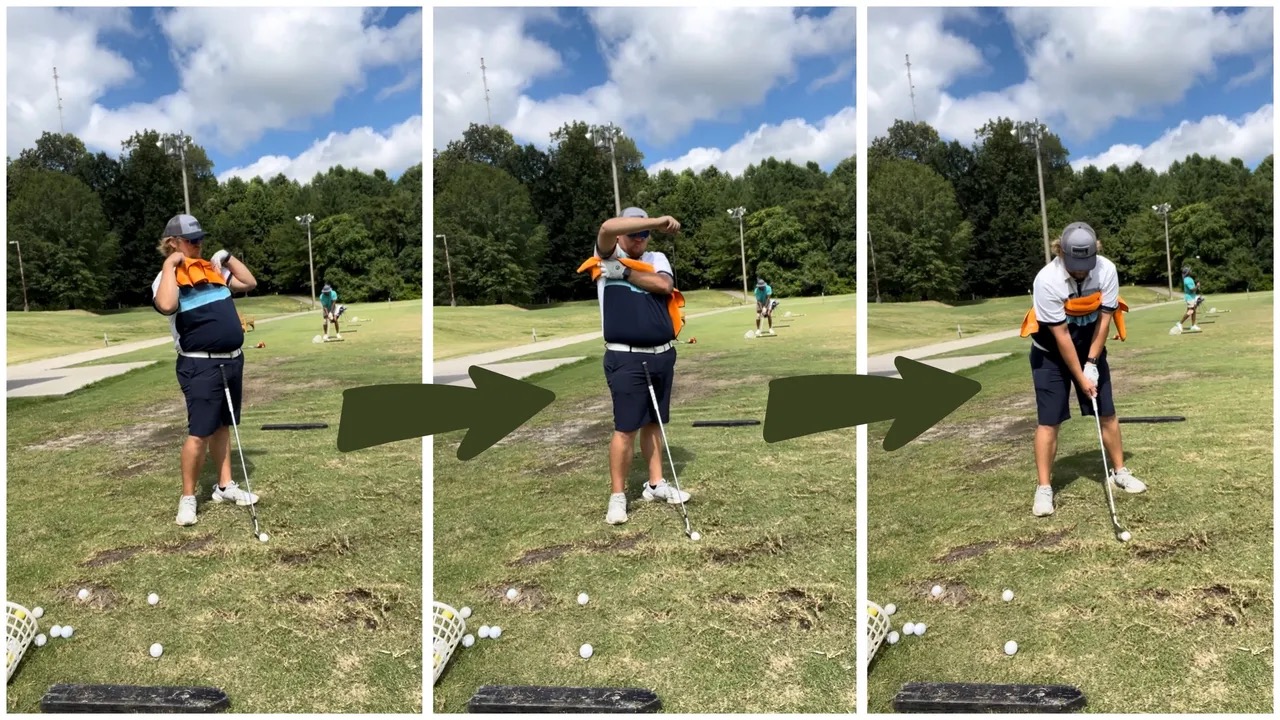
This is a classic drill that has been used for decades. However, the world of marketed training aids has grown so much during that time that this simple practice has been virtually forgotten. Because why teach people how to play golf using everyday items when you can create and sell a product that reinforces the same thing? Nevertheless, I am here to give you helpful advice without running to the nearest Edwin Watts or adding something to your Amazon cart.
For the “scoring clubs,” having a solid connection between the arms and body during the swing, especially through impact, is paramount to creating long-lasting consistency. And keeping that connection throughout the swing helps rotate the shoulders more to generate more power to help you hit it farther. So, how does this drill work, and what will your game benefit from it? Well, let’s get into it.
Setup
You can use this for basic chip shots up to complete swings. I use this with every club in my bag, up to a 9 or 8-iron. It’s natural to create incrementally more separation between the arms and body as you progress up the set. So doing this with a high iron or a wood is not recommended.
While you set up to hit a ball, simply tuck the towel underneath both armpits. The length of the towel will determine how tight it will be across your chest but don’t make it so loose that it gets in the way of your vision. After both sides are tucked, make some focused swings, keeping both arms firmly connected to the body during the backswing and follow through. (Note: It’s normal to lose connection on your lead arm during your finishing pose.) When you’re ready, put a ball in the way of those swings and get to work.
Get a Better Shoulder Turn
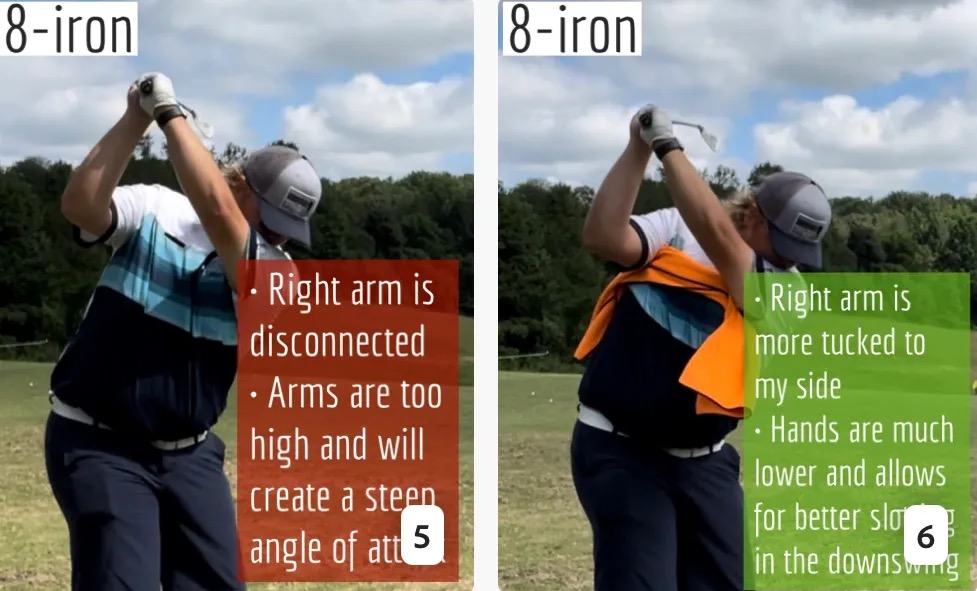
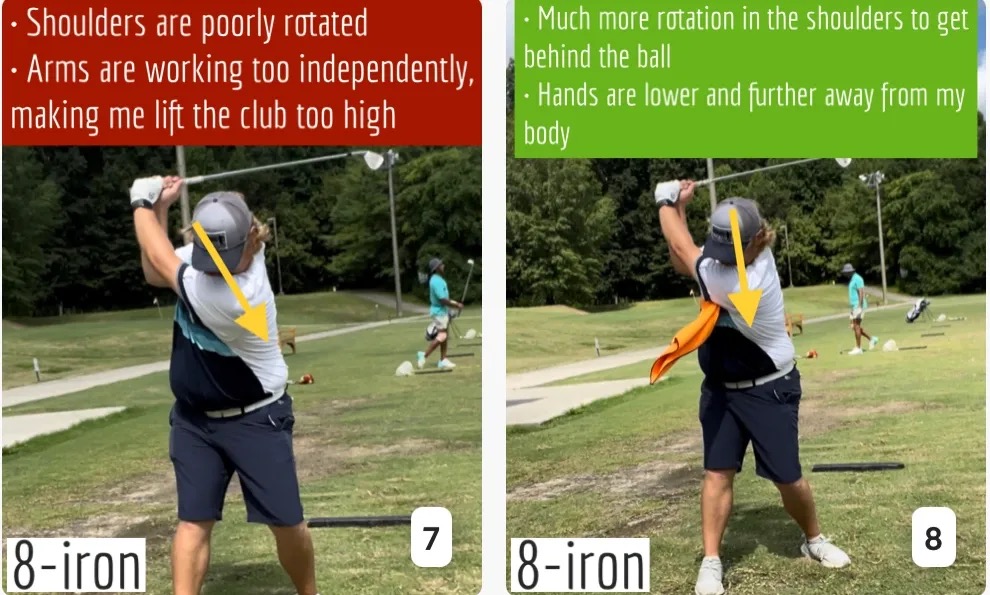
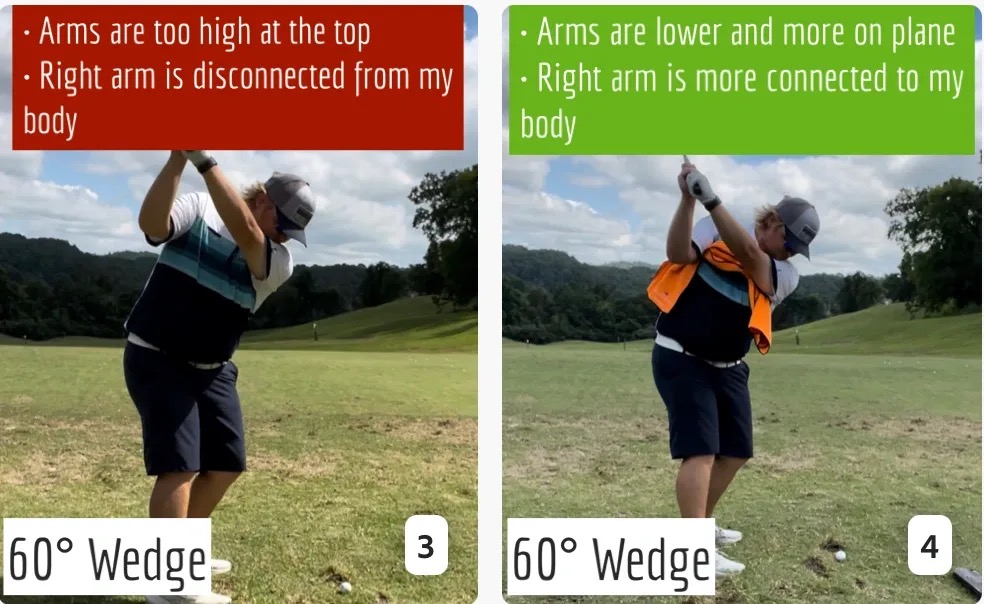
Many of us struggle to have proper shoulder rotation in our golf swing, especially during long layoffs. Making a swing that is all arms and no shoulders is a surefire way to have less control with wedges and less distance with full swings. Notice how I can get in a similar-looking position in both 60° wedge photos. However, one is weak and uncontrollable, while the other is strong and connected. One allows me to use my larger muscles to create my swing, and one doesn’t. The follow-through is another critical point where having a good connection, as well as solid shoulder rotation, is a must. This drill is great for those who tend to have a “chicken wing” form in their lead arm, which happens when it becomes separated from the body through impact.
In full swings, getting your shoulders to rotate in your golf swing is a great way to reinforce proper weight distribution. If your swing is all arms, it’s much harder to get your weight to naturally shift to the inside part of your trail foot in the backswing. Sure, you could make the mistake of “sliding” to get weight on your back foot, but that doesn’t fix the issue. You must turn into your trial leg to generate power. Additionally, look at the difference in separation between my hands and my head in the 8-iron examples. The green picture has more separation and has my hands lower. This will help me lessen my angle of attack and make it easier to hit the inside part of the golf ball, rather than the over-the-top move that the other picture produces.
Stay Better Connected in the Backswing
When you don’t keep everything in your upper body working as one, getting to a good spot at the top of your swing is very hard to do. It would take impeccable timing along with great hand-eye coordination to hit quality shots with any sort of regularity if the arms are working separately from the body.
Notice in the red pictures of both my 60-degree wedge and 8-iron how high my hands are and the fact you can clearly see my shoulder through the gap in my arms. That has happened because the right arm, just above my elbow, has become totally disconnected from my body. That separation causes me to lift my hands as well as lose some of the extension in my left arm. This has been corrected in the green pictures by using this drill to reinforce that connection. It will also make you focus on keeping the lead arm close to your body as well. Because the moment either one loses that relationship, the towel falls.

Conclusion
I have been diligent this year in finding a few drills that target some of the issues that plague my golf game; either by simply forgetting fundamental things or by coming to terms with the faults that have bitten me my whole career. I have found that having a few drills to fall back on to reinforce certain feelings helps me find my game a little easier, and the “towel drill” is most definitely one of them.
- LIKE12
- LEGIT2
- WOW2
- LOL0
- IDHT0
- FLOP2
- OB0
- SHANK8


Dave Portnoy places monstrous outright bet for the 2024 Masters

John Daly stuns fans into silence with brutal opening tee shot on PGA Tour Champions

Things got heated at the Houston Open between Tony Finau and Alejandro Tosti. Here’s why

Tiger Woods arrives at 2024 Masters equipped with a putter that may surprise you

‘Absolutely crazy’ – Major champ lays into Patrick Cantlay over his decision on final hole of RBC Heritage

Justin Thomas on the equipment choice of Scottie Scheffler that he thinks is ‘weird’

Report: Tiger Woods has ‘eliminated sex’ in preparation for the 2024 Masters

Two star names reportedly blanked Jon Rahm all week at the Masters

2-time major champ announces shock retirement from the sport at age of 33

Report: LIV Golf identifies latest star name they hope to sign to breakaway tour


Rasmus Højgaard WITB 2024 (April)
Rasmus Højgaard what’s in the bag accurate as of the Zurich Classic. Driver: Callaway Ai Smoke Triple Diamond (10.5 degrees)...


Rory McIlroy WITB 2024 (April)
Rory McIlroy what’s in the bag accurate as of the Zurich Classic. Driver: TaylorMade Qi10 (9 degrees) Shaft: Fujikura Ventus...


Sam Burns WITB 2024 (April)
Sam Burns’ what’s in the bag accurate as of the RBC Heritage. Driver: Callaway Paradym Triple Diamond S (9 degrees...


Will Zalatoris WITB 2024 (April)
Will Zalatoris’ what’s in the bag accurate as of the RBC Heritage. Driver: Titleist TSR2 (9 degrees, A1 SureFit setting)...
-
 19th Hole2 weeks ago
Dave Portnoy places monstrous outright bet for the 2024 Masters
-
 19th Hole2 weeks ago
Tiger Woods arrives at 2024 Masters equipped with a putter that may surprise you
-
 19th Hole2 days ago
‘Absolutely crazy’ – Major champ lays into Patrick Cantlay over his decision on final hole of RBC Heritage
-
 19th Hole2 days ago
Justin Thomas on the equipment choice of Scottie Scheffler that he thinks is ‘weird’
-
 19th Hole3 weeks ago
Report: Tiger Woods has ‘eliminated sex’ in preparation for the 2024 Masters
-
 19th Hole1 week ago
Two star names reportedly blanked Jon Rahm all week at the Masters
-
 19th Hole1 week ago
Report: LIV Golf identifies latest star name they hope to sign to breakaway tour
-

 19th Hole1 week ago
Neal Shipley presser ends in awkward fashion after reporter claims Tiger handed him note on 8th fairway
geohogan
Mar 30, 2022 at 12:05 pm
Homo sapiens have evolved with an autonomic system of balance to
maintain us on two feet, to protect our head, the cpu (most sophisticated survival apparatus on earth) from injury.
It is in our DNA, not a learned skill.
If and when we introduce something in our golf swing that threatens our balance, the autonomic system overrides the golf swing intent with a balance correction. The key becomes understanding what does and does not cause our balance to go off. Have to understand physiology to understand complex movements like golf swing.
geohogan
Mar 23, 2022 at 7:32 pm
Another exercise with the 2×4. Standing to the right of the 2×4 balance and brace to jump over the 2×4 that is on your left… brace balance ..now jump to the right. Did you do it or did you freeze as if paralized?
Similiar happens when while addressing the ball we concentrate on the through swing…. with little but a notion for the backswing. BS comes first so 100% of attention, at address should be for the BS.. IMO
Woke GWRX Staffer
Mar 17, 2022 at 4:42 pm
The best article I have read in this worthless site in quite some time. Bravo!
Matt
Mar 17, 2022 at 2:13 pm
Do you lift your thigh with your foot hanging down or whole leg straight out?