Instruction
Proof that you can turn a Deaf ear to golf instruction
[quote_box_center]
“You might just go on to prove that the spoken word is useless in golf instruction.”
– Dr. Jim Suttie
[/quote_box_center]
Dr. Suttie made that statement to me in 2004 when I started the most powerful outreach at my golf academy, and one I’m blessed to be a part of every year.
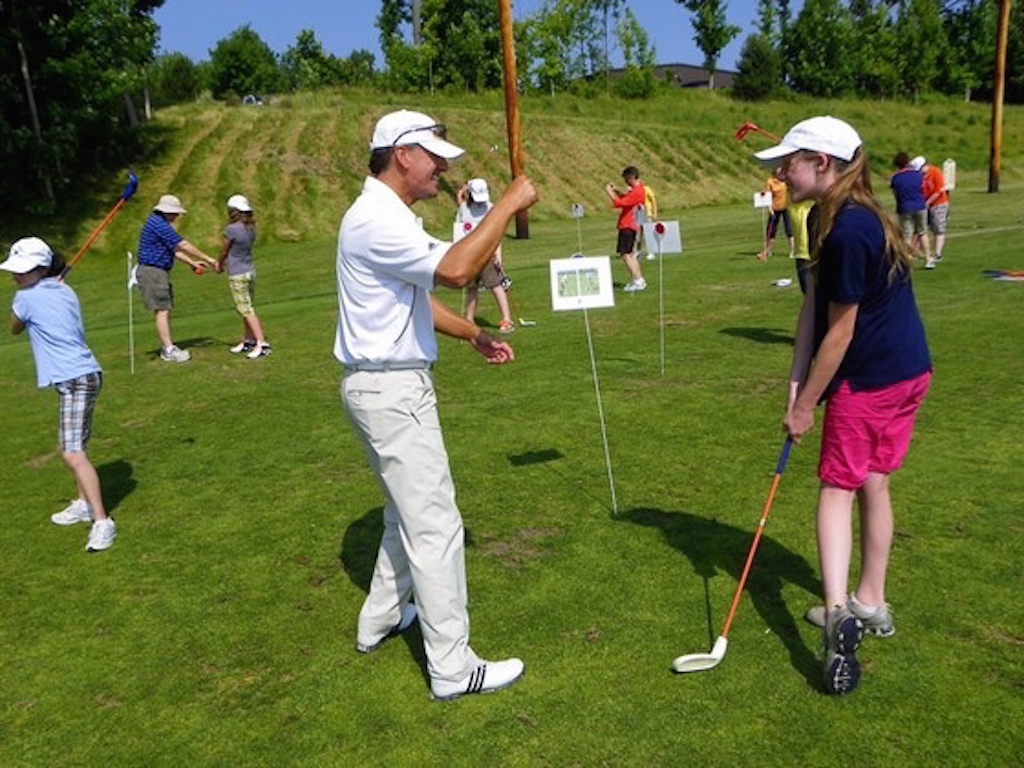
Now in its 11th year, the U.S. Deaf Golf Camps provide instruction to Deaf children all across America. Thousands of Deaf children have learned the game of golf entirely in their own language — American Sign Language — through our golf academy. I’m lucky to be the only professional doing this on such a large scale anywhere in the world, and yes, I learned Sign Language in order to teach Deaf children the game of golf. We have a lot of fun, and I always say that these camps are “the loudest quiet event in golf!”
Deaf children learn in a unique way, and their focus is different than that of non-hearing 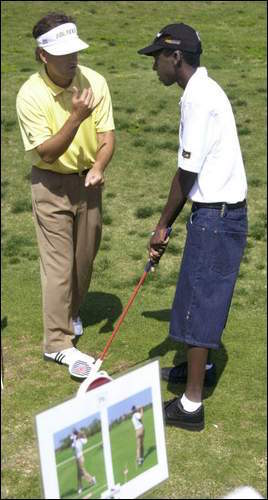 impaired children. Why? Because in Deaf Culture when you sign something, it’s rarely repeated. The eyes of the Deaf student are totally focused on not only what you’re saying, but your body language and expression. They very rarely miss anything you say.
With this in mind, visual learning and any drills or training aids that involve feel are great ways to teach them a golf swing. Because of the limited nature of this instruction, most of the kids that come to the events have zero golf experience swinging a club.
The point that Dr. Suttie made 11 years ago has proven itself in every camp I teach.
Gary Van Sickle of Sports Illustrated said it best. After watching an hour of the camp in Pittsburgh prior to the U.S. Open held in the area that week, he said to me during a break, “You mean to tell me that none of these kids have ever swung a club? This is amazing to see how good these swings are after an hour!”
So how do I make the spoken word useless and how does it help your game?
The main visual way I teach these kids is using what I call the “Circle of Seven.” I have seven poles, and Velcroed onto each pole is a picture of a posed position in the golf swing. Each picture represents a place in the swing that is important for the player to pass through. The kids rotate from picture-to-picture, posing to match the different positions. I go around and approve their poses, or give them some easy cues to pose correctly. When they have all met my standard for the poses, they rotate to the next image and repeat the process.
After doing this for all seven images, I bring the children together and spread them out all around me. We then drill the positions into their memory. On my command, I sign a number that represents a position from the pictures, and they all pose in the position. I say numbers in random order so that they have to think out of order at first. Eventually, I roll it all together sequentially and they move from setup to finish, and a golf swing is the final product.
I have always thought that your swing can only be as good as you can model, or pose, the places the swing passes through. If you struggle to model a certain position, there may be a physical limitation, which we work around.
Here are the pictures that the kids see on the poles:


We can all learn a proper golf swing using this formula.
I suggest that you print a couple of the poses out, or pick one you struggle with. For the summer, spend some time each day with a club and just practice stopping in that position and holding for 10 seconds (you can even flip the image and make it like you are looking in a mirror if that helps). Try to get a feel for it.
This is not muscle memory, because there is no such thing! Muscles cannot remember because they do not have brain cells — but they can feel. What you’re trying to do is recreate feelings, and have those balanced feeling motions ingrained by repetition. I have seen some great swings grow out of this visual mirroring technique. It’s happened time and again in just one morning session with Deaf children all across the U.S. for the last 11 years!
Watch the video below to get a glimpse of what the U.S. Deaf Golf Camps are all about.
- LIKE65
- LEGIT2
- WOW1
- LOL0
- IDHT0
- FLOP0
- OB0
- SHANK0
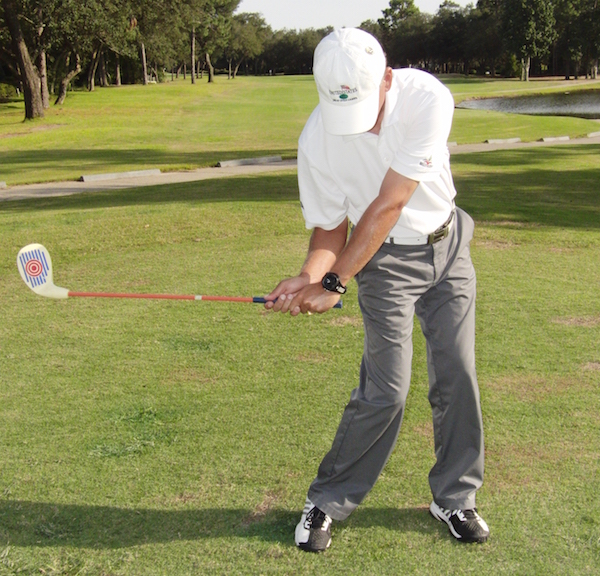
My golf learning began with this simple fact – if you don’t have a fundamentally sound hold on the golf club, it is practically impossible for your body to execute a fundamentally sound golf swing. I’m still a big believer that the golf swing is much easier to execute if you begin with the proper hold on the club.
As you might imagine, I come into contact with hundreds of golfers of all skill levels. And it is very rare to see a good player with a bad hold on the golf club. There are some exceptions, for sure, but they are very few and very far between, and they typically have beat so many balls with their poor grip that they’ve found a way to work around it.
The reality of biophysics is that the body moves only in certain ways – and the particulars of the way you hold the golf club can totally prevent a sound swing motion that allows the club to release properly through the impact zone. The wonderful thing is that anyone can learn how to put a fundamentally sound hold on the golf club, and you can practice it anywhere your hands are not otherwise engaged, like watching TV or just sitting and relaxing.
Whether you prefer an overlap, interlock or full-finger (not baseball!) grip on the club, the same fundamentals apply. Here are the major grip faults I see most often, in the order of the frequency:
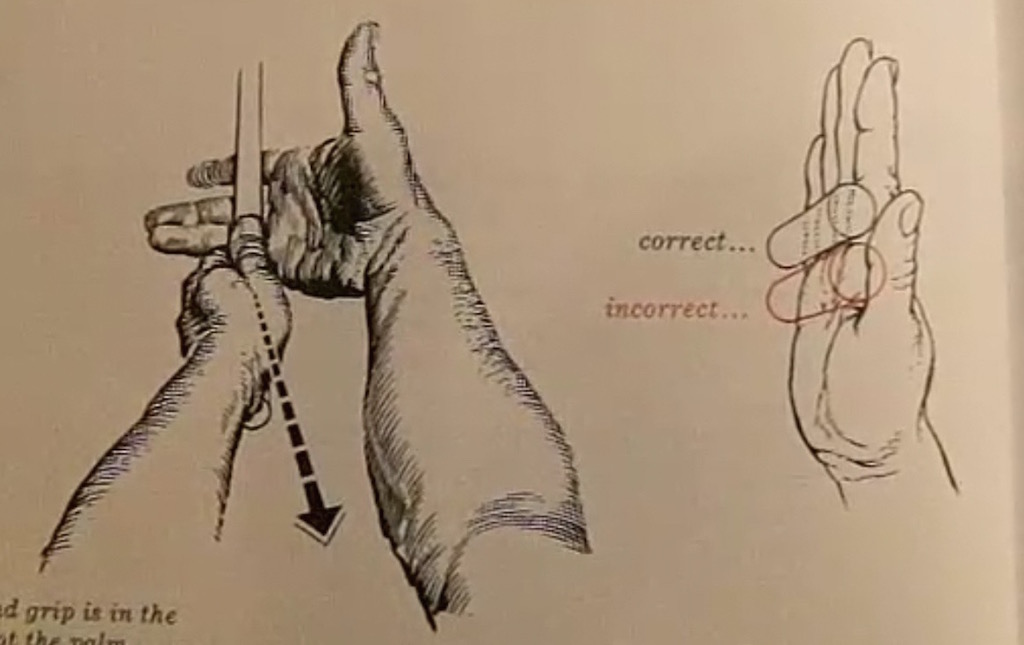
Mis-aligned hands
By this I mean that the palms of the two hands are not parallel to each other. Too many golfers have a weak left hand and strong right, or vice versa. The easiest way to learn how to hold the club with your palms aligned properly is to grip a plain wooden ruler or yardstick. It forces the hands to align properly and shows you how that feels. If you grip and re-grip a yardstick several times, then grip a club, you’ll see that the learning curve is almost immediate.
The position of the grip in the upper/left hand
I also observe many golfers who have the butt of the grip too far into the heel pad of the upper hand (the left hand for right-handed players). It’s amazing how much easier it is to release the club through the ball if even 1/4-1/2″ of the butt is beyond the left heel pad. Try this yourself to see what I mean. Swing the club freely with just your left hand and notice the difference in its release from when you hold it at the end of the grip, versus gripping down even a half inch.
To help you really understand how this works, go to the range and hit shots with your five-iron gripped down a full inch to make the club the same length as your seven-iron. You will probably see an amazing shot shape difference, and likely not see as much distance loss as you would expect.
Too much lower (right) hand on the club
It seems like almost all golfers of 8-10 handicap or higher have the club too far into the palm of the lower hand, because that feels “good” if you are trying to control the path of the clubhead to the ball. But the golf swing is not an effort to hit at the ball – it is a swing of the club. The proper hold on the club has the grip underneath the pad at the base of the fingers. This will likely feel “weak” to you — like you cannot control the club like that. EXACTLY. You should not be trying to control the club with your lower/master hand.
Gripping too tightly
Nearly all golfers hold the club too tightly, which tenses up the forearms and prevents a proper release of the club through impact. In order for the club to move back and through properly, you must feel that the club is controlled by the last three fingers of the upper hand, and the middle two fingers of the lower hand. If you engage your thumbs and forefingers in “holding” the club, the result will almost always be a grip that is too tight. Try this for yourself. Hold the club in your upper hand only, and squeeze firmly with just the last three fingers, with the forefinger and thumb off the club entirely. You have good control, but your forearms are not tense. Then begin to squeeze down with your thumb and forefinger and observe the tensing of the entire forearm. This is the way we are made, so the key to preventing tenseness in the arms is to hold the club very lightly with the “pinchers” — the thumbs and forefingers.
So, those are what I believe are the four fundamentals of a good grip. Anyone can learn them in their home or office very quickly. There is no easier way to improve your ball striking consistency and add distance than giving more attention to the way you hold the golf club.
More from the Wedge Guy
- The Wedge Guy: Golf mastery begins with your wedge game
- The Wedge Guy: Why golf is 20 times harder than brain surgery
- The Wedge Guy: Musings on the golf ball rollback
- LIKE85
- LEGIT13
- WOW6
- LOL1
- IDHT0
- FLOP4
- OB1
- SHANK8
Not the dreaded headcover under the armpit drill! As if your body is defective and can’t function by itself! Have you seen how incredible the human machine is with all the incredible feats of agility all kinds of athletes are accomplishing? You think your body is so defective (the good Lord is laughing his head off at you) that it needs a headcover tucked under the armpit so you can swing like T-Rex?
- LIKE0
- LEGIT2
- WOW2
- LOL0
- IDHT0
- FLOP0
- OB0
- SHANK2

This is a classic drill that has been used for decades. However, the world of marketed training aids has grown so much during that time that this simple practice has been virtually forgotten. Because why teach people how to play golf using everyday items when you can create and sell a product that reinforces the same thing? Nevertheless, I am here to give you helpful advice without running to the nearest Edwin Watts or adding something to your Amazon cart.
For the “scoring clubs,” having a solid connection between the arms and body during the swing, especially through impact, is paramount to creating long-lasting consistency. And keeping that connection throughout the swing helps rotate the shoulders more to generate more power to help you hit it farther. So, how does this drill work, and what will your game benefit from it? Well, let’s get into it.
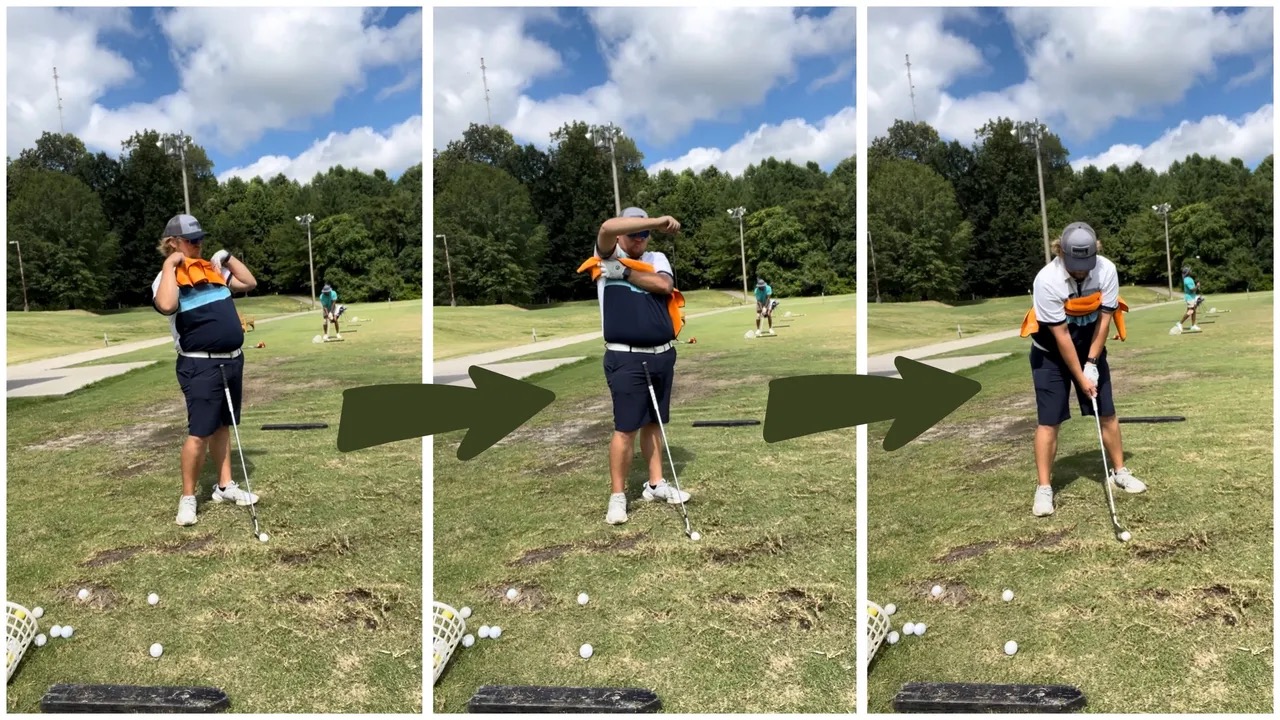
Setup
You can use this for basic chip shots up to complete swings. I use this with every club in my bag, up to a 9 or 8-iron. It’s natural to create incrementally more separation between the arms and body as you progress up the set. So doing this with a high iron or a wood is not recommended.
While you set up to hit a ball, simply tuck the towel underneath both armpits. The length of the towel will determine how tight it will be across your chest but don’t make it so loose that it gets in the way of your vision. After both sides are tucked, make some focused swings, keeping both arms firmly connected to the body during the backswing and follow through. (Note: It’s normal to lose connection on your lead arm during your finishing pose.) When you’re ready, put a ball in the way of those swings and get to work.
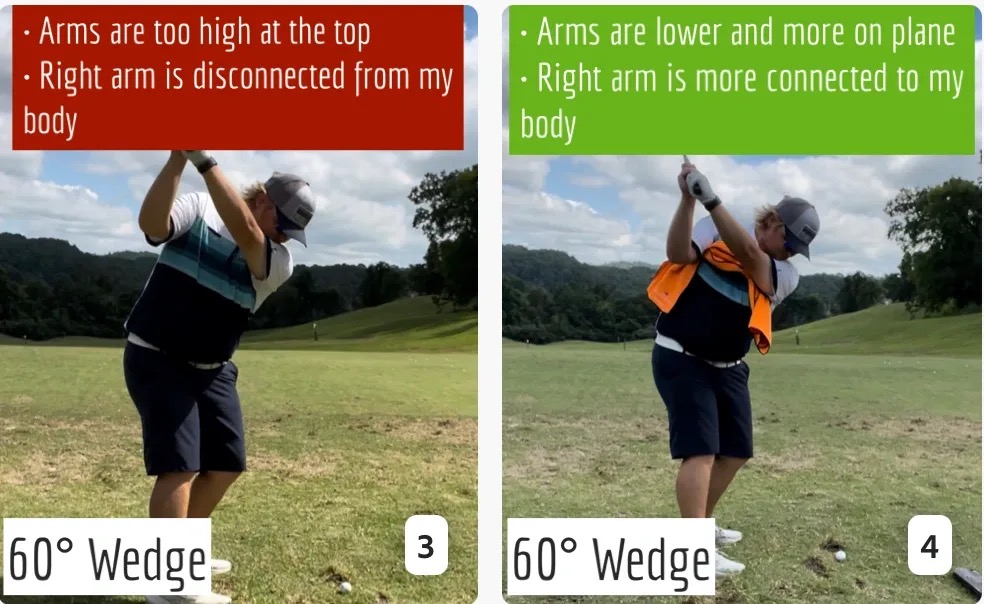
Get a Better Shoulder Turn
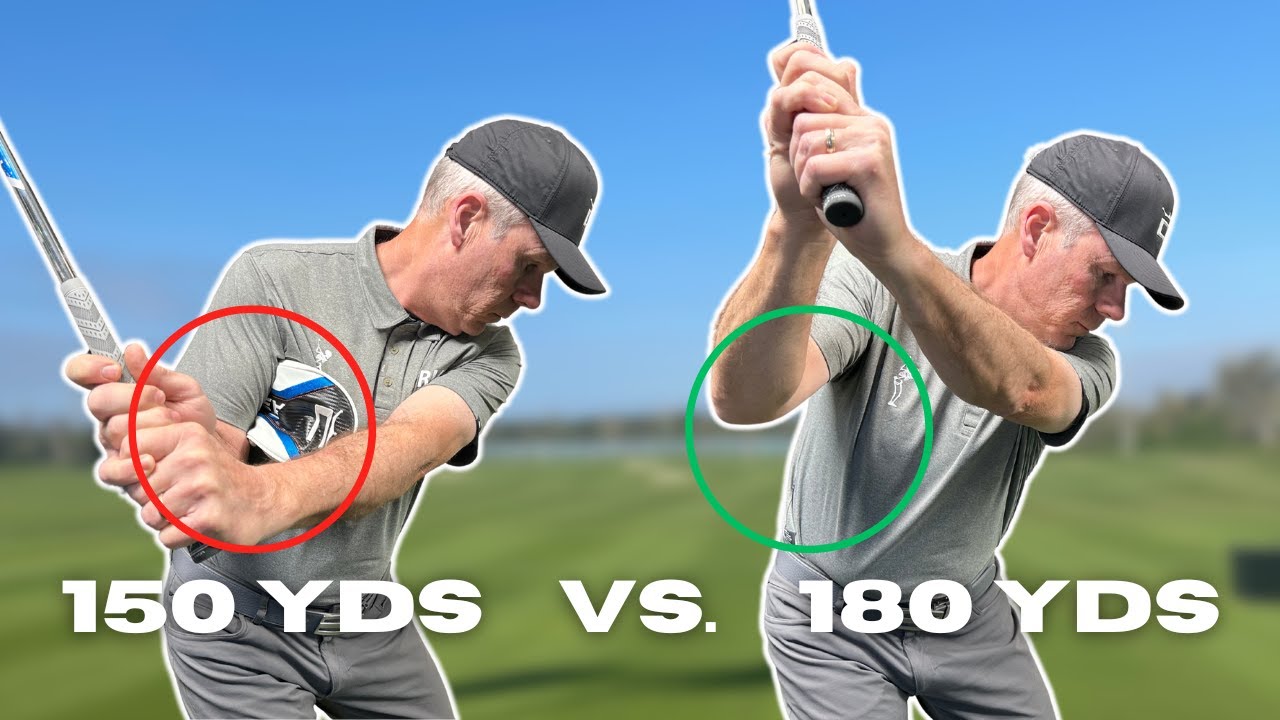
Many of us struggle to have proper shoulder rotation in our golf swing, especially during long layoffs. Making a swing that is all arms and no shoulders is a surefire way to have less control with wedges and less distance with full swings. Notice how I can get in a similar-looking position in both 60° wedge photos. However, one is weak and uncontrollable, while the other is strong and connected. One allows me to use my larger muscles to create my swing, and one doesn’t. The follow-through is another critical point where having a good connection, as well as solid shoulder rotation, is a must. This drill is great for those who tend to have a “chicken wing” form in their lead arm, which happens when it becomes separated from the body through impact.
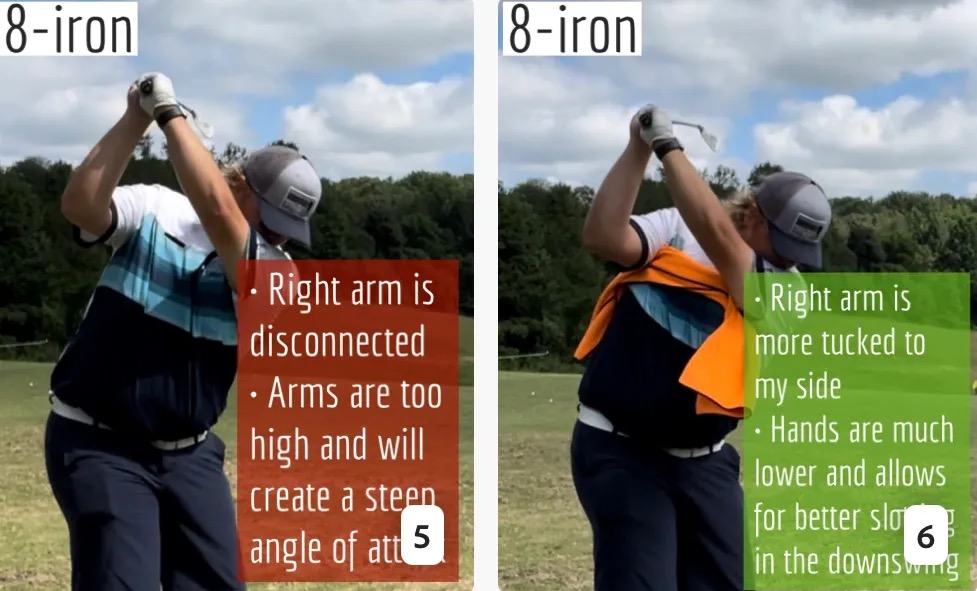
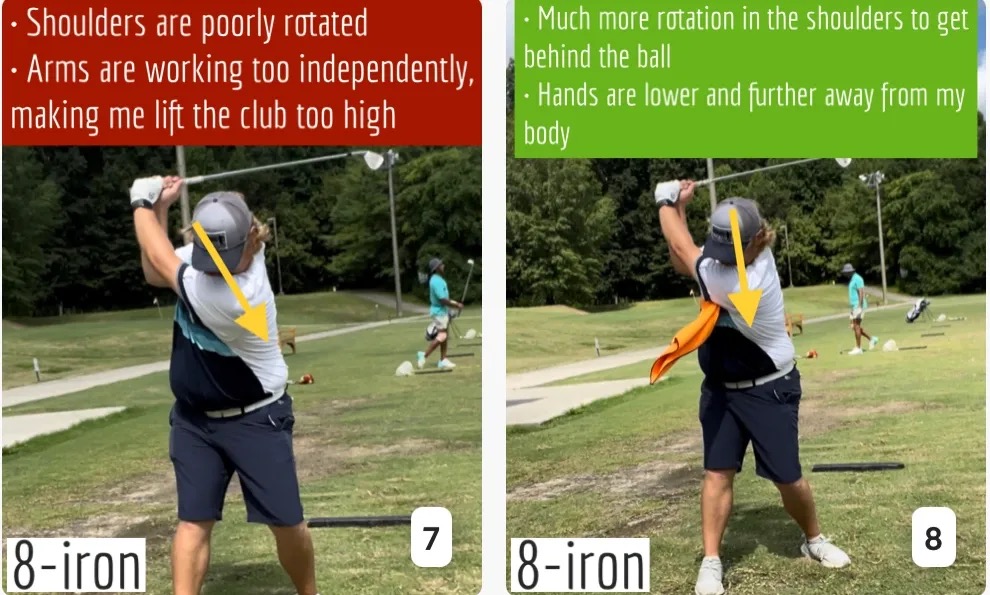
In full swings, getting your shoulders to rotate in your golf swing is a great way to reinforce proper weight distribution. If your swing is all arms, it’s much harder to get your weight to naturally shift to the inside part of your trail foot in the backswing. Sure, you could make the mistake of “sliding” to get weight on your back foot, but that doesn’t fix the issue. You must turn into your trial leg to generate power. Additionally, look at the difference in separation between my hands and my head in the 8-iron examples. The green picture has more separation and has my hands lower. This will help me lessen my angle of attack and make it easier to hit the inside part of the golf ball, rather than the over-the-top move that the other picture produces.
Stay Better Connected in the Backswing
When you don’t keep everything in your upper body working as one, getting to a good spot at the top of your swing is very hard to do. It would take impeccable timing along with great hand-eye coordination to hit quality shots with any sort of regularity if the arms are working separately from the body.
Notice in the red pictures of both my 60-degree wedge and 8-iron how high my hands are and the fact you can clearly see my shoulder through the gap in my arms. That has happened because the right arm, just above my elbow, has become totally disconnected from my body. That separation causes me to lift my hands as well as lose some of the extension in my left arm. This has been corrected in the green pictures by using this drill to reinforce that connection. It will also make you focus on keeping the lead arm close to your body as well. Because the moment either one loses that relationship, the towel falls.

Conclusion
I have been diligent this year in finding a few drills that target some of the issues that plague my golf game; either by simply forgetting fundamental things or by coming to terms with the faults that have bitten me my whole career. I have found that having a few drills to fall back on to reinforce certain feelings helps me find my game a little easier, and the “towel drill” is most definitely one of them.
- LIKE12
- LEGIT2
- WOW2
- LOL0
- IDHT0
- FLOP2
- OB0
- SHANK8


Dave Portnoy places monstrous outright bet for the 2024 Masters

John Daly stuns fans into silence with brutal opening tee shot on PGA Tour Champions

Things got heated at the Houston Open between Tony Finau and Alejandro Tosti. Here’s why

Tiger Woods arrives at 2024 Masters equipped with a putter that may surprise you

Report: Tiger Woods has ‘eliminated sex’ in preparation for the 2024 Masters

Two star names reportedly blanked Jon Rahm all week at the Masters

2-time major champ announces shock retirement from the sport at age of 33

Neal Shipley presser ends in awkward fashion after reporter claims Tiger handed him note on 8th fairway

Paulina Gretzky opens up on receiving death threats following DJ’s move to LIV Golf

Report: LIV Golf identifies latest star name they hope to sign to breakaway tour


Collin Morikawa WITB 2024 (April)
Collin Morikawa what’s in the bag accurate as of the RBC Heritage. More photos from the event here. Driver: TaylorMade...


WITB Time Machine: Jordan Spieth’s winning WITB, 2022 RBC Heritage
At the 2022 RBC Heritage Jordan Spieth defeated Patrick Cantlay on the first playoff hole after nearly holing his greenside...


Jason Day WITB 2024 (April)
Jason Day what’s in the bag accurate as of the RBC Heritage. Driver: Ping G430 LST (9 degrees @10) Shaft: TPT...


Ludvig Åberg WITB 2024 (April)
Ludvig Åberg what’s in the bag accurate as of the RBC Heritage. Driver: Titleist TSR2 (9 degrees, D4 SureFit setting)...
-
 19th Hole1 week ago
Dave Portnoy places monstrous outright bet for the 2024 Masters
-
 19th Hole3 weeks ago
Things got heated at the Houston Open between Tony Finau and Alejandro Tosti. Here’s why
-
 19th Hole1 week ago
Tiger Woods arrives at 2024 Masters equipped with a putter that may surprise you
-
 19th Hole2 weeks ago
Report: Tiger Woods has ‘eliminated sex’ in preparation for the 2024 Masters
-
 19th Hole5 days ago
Two star names reportedly blanked Jon Rahm all week at the Masters
-
 19th Hole4 days ago
Neal Shipley presser ends in awkward fashion after reporter claims Tiger handed him note on 8th fairway
-
 19th Hole3 days ago
Report: LIV Golf identifies latest star name they hope to sign to breakaway tour
-

 19th Hole2 weeks ago
Addiction, spinal fusion, and scam artists – Everything Anthony Kim revealed in candid interview with David Feherty
tbag
May 11, 2015 at 10:53 pm
Being hearing impaired, it is a great gift these kids are receiving. Teaching is returning a gift you received once. What a great statement of love of the game of golf.
Al
May 10, 2015 at 10:33 am
Golf instruction, by spoken or written word, reminds me of learning magic from books. After the move/s are mastered, the instruction makes perfect sense.
RG
May 8, 2015 at 2:06 am
Great article. Deaf children epitomize visual learning. Those of us with hearing could learn a lot from them. What’s that you ask? Be quiet and focus on what your seeing. Realize that you can’t talk yourself into a good shot, you have to visualize it and execute.
Philip
May 7, 2015 at 11:16 pm
Very enlightening, thank you
GDP
May 7, 2015 at 10:14 am
Great read. I’m gonna use your pictures! Thanks.
Greg V
May 7, 2015 at 9:37 am
That was a very interesting article, and food for thought.
Thanks.