Instruction
14 short game shots to chip like a Tour pro

Around the green, tour professionals have ALL the shots in their bag. This gives them options to choose from in a given situation when determining shot-selection and trajectory; picking the right combination then becomes the greatest challenge.
As a handicap-player looking to improve, you must have the ability to hit several different shots of varying height in any one situation so you don’t get “stuck” with only one option. If you have a limited-number of shots around the green, you limit your ability to get up-and-down from various locations. A dependable short game is about having OPTIONS.
In the scoring guide below, I will teach you how to play 14 different shots of varying trajectories with various clubs to help expand your arsenal of short game shots.
- The Texas Wedge
- The Putter Back in Stance
- The Fairway Wood or Rescue Club
- The Bellied Wedge
- The “Y” Chipping Style
- The Bump and Run
- The Three Basic Pitch Shots
- The Toe Down Pitch Shot
- The Toe In Skipper
- The Super High Flop Shot
- The High Bunker Shot
- The Stab in the Bunker
- The Long Running Bunker Shot
- The Severe Downhill Pitch Shot
The Texas Wedge

The Texas Wedge was made popular in the South during the summers when the ground would get hard and baked out, making chipping and pitching risky. This shot will help you nestle the ball close to the flag when you feel uneasy, and it eliminates the risk of a skull or chunk. If all else fails, use the putter!
- Position the ball as you normally would with your putter
- Set 60 percent of your weight forward to ensure a solid strike
- Allow the putter to move and accelerate through the ball
- Use no wrist action in this putt along with a “short-to-long” stroke to keep the putter head moving through the ball
The Putter Back in the Stance

As stated earlier, the putter is the best choice if all else fails. But what happens if you have a bad lie, hardpan, a longer distance to go, or even long grass in front of you? This is when you need a touch more speed to get the ball through the stuff in front of you, but not take off when it hits the green. For this shot, you can position the ball back in your stance and still get all the benefits of using the Texas Wedge.
- Position the ball just in front of your rear toe
- 60 percent of your weight is on your forward foot
- Lean the putter-shaft forward so that the butt of the club points at your front pocket
- Allow the putter head to move “upwards” slightly on the backswing
- Make your forward stroke as you normally would
- This no-wrist stroke will cause the ball to “pop” up in the air slightly and have more overspin than the regular Texas Wedge
The Fairway Wood or Rescue Club

As made popular by Tiger Woods, the fairway wood or rescue club from just off the green allows you an easier way to get up and down from good, bad, or tight lies with pins that are cut close to the edge of the green. As golf course architecture continues to evolve with “collection areas” around the green, you’ll continue to see this shot used more and more on Tour.
- Set up to your fairway wood or rescue club as you normally would
- Choke all the way down to the end of the grip by the shaft
- Assume your normal putting grip
- Use your putting stroke with NO wrist action allowing for the extra mass and length of the wood or rescue club to propel the ball onto the green
- The lower-lofted fairway woods are most often used from farther off the green while the rescue clubs are used very close to the green
- Only use this shot to very tight pin placements next to the edge of the green
- This shot will also work on very steep hills and medium rough when you just need to get the ball moving
The Bellied Wedge

The Bellied Wedge is a great shot for touchy situations from just off the green where a putter or a rescue club won’t work. It’s great from just about any lie, and can even be used from a bunker if the lip is low enough. By using the extra mass of the sand-wedge and the thick flange of the sole, you will find that the ball has a quick burst of overspin and then rolls true while on the green, with little chance of “getting away from you.”
- Position the ball in the middle of your stance just like you are using your putter
- Weight 50-50 between your right and left
- Assume your normal putting grip
Keep your wrists firm and stroke and impact the ball in the “belly” or equator of the ball. This will cause the ball to roll on the top of the grass and hit the green with a true roll.
The “Y” Chipping Style

The normal chipping procedure works wonders for all skill levels and it’s undoubtedly the most popular shot from just off the green. Sadly, this shot is too often used in the incorrect situations causing the ball to run too far past the pin. However, the mastery of this shot will allow you to save more strokes around the green for years to come.
- Place the ball just in front of your rear toe
- All the weight is positioned on your forward foot
- The shaft and hands are pushed forward so that the butt of the club points at your forward pocket
- Notice the lowercase “Y” formed between your arms, hands, and clubshaft
- Lock in your wrists and put weight forward, then make your putting stroke, NOT a hit
- At the finish, you should still see your weight forward and the “Y” intact
- Use the higher-lofted clubs (LW, SW, PW etc.) for close shots and the lower-lofted clubs (9, 8, 7, 6 irons etc.) for your longer shots
- Never change the length or tempo of this shot, just change your club
The Bump and Run

The close cousin of the “Y” Chipping Style is the Bump and Run where you have a closely mown area to hit over/through, yet it is too far for the putter, rescue, or a chip shot. Becoming proficient at this shot will help you to better negotiate the longer shots when you’re in trouble, under the trees and need to “run” the ball onto the green.
- Place the ball back in your stance between your sternum and your rear toe depending on the length of the shot at hand
- All the weight will be positioned on your forward foot
- The clubshaft and hands will be pushed forward so that the butt of the club points almost to your forward pocket
- Notice the lowercase “Y” formed between your arms, hands, and clubshaft
- Lock in your wrists, put your weight forward and make your putting stroke, NOT a hit
- You can use any club for this shot, usually something around a nine to seven-iron is the most popular
- At the finish you should still see your weight forward and the “Y” intact
The Three Basic Pitch Shots

When you have to loft the ball over something, you should use some type of pitching motion. Pitch shots are smaller versions of your full swing.
- The spine is vertical, not tilted to the rear of center and the weight is 60 percent forward
- The butt of the club points at the belt loop, just forward of your belt buckle
- The stance can be square or slightly open depending on your preference
- The stroke is short to long with a slight body pivot
- The weight stays forward all the way to the finish with a flat forward wrist
- Go “down and through” the ball, “thumping” the grass on the way through
The Toe Down Pitch Shot

In this day and age of super-fast greens, it seems like every time you miss the green by only five or 10 feet, you’re faced with a near impossible shot. It’s here when the toe down pitch shot will come out super soft and stop like you have never seen before.
- Set the club down on its toe (the heel is off the ground slightly)
- The clubshaft is perpendicular to the ground
- Use your putting grip with the ball in the middle of your stance
- Make your normal putting motion, with no wrists, allowing the club to go down and through the ball during impact
- You can open the blade, close the blade, and use it in all lies for different results
The Toe-In Skipper

Sometimes you’re faced with an uphill shot, or over a closely mown area; if you hit the ball short it will roll back to your feet and if you go long then the ball will skip right by the hole. This is the shot you see at No. 14 at Augusta when the professionals leave it short of the green and want to make sure the ball does not run away from them past the hole.
- Take your sand wedge or lob wedge for this shot and place the ball back in your stance
- Hood the club head so that the blade is de-lofted at address
- Make an exaggerated in-to-out swing feeling like you are trying to “hook” the ball into the green, landing the ball short like the basic bump and run shot
- This action will cause the ball to come off the face low, skip once or twice, check up and then gently roll out
- This action will cause the ball to have just enough pace to move up the hill or through the mown area, but not too much as to run away from you past the pin
The Super High Flop Shot

There are times when your back is against the wall and the only option you have is to hit the Super High Flop Shot next to the pin. Thankfully, this shot condition doesn’t happen too often, but when it does you’ll be prepared. The only things you need to pull off this shot will be some luck, a little skill, and an accelerated swing through the ball into the finish.
- Place the ball forward in your stance and open the club up, like you are going to balance a wine glass on the face
- Aim your body slightly open to your target
- The hands are even with the belt buckle, or slightly behind the ball at address and the weight is distributed 50-50
- Set the club up quickly with your wrist hinge and allow your swing shape to be more of a “V”
- Accelerate down and through the ball holding the club face open into a full finish; the harder you swing the higher the ball will go
Note: for an even higher shot allow your wrists to release “under” on the way through. This is not advisable, but it will give you slightly more height.
The High Bunker Shot

Every bunker shot nowadays seems like it’s 10 feet deep with a high lip to negotiate, hitting to a green that runs away from you! In this situation, you need a high, soft shot that comes out of the bunker and has no chance of hitting the lip on the way out. This shot involves a few simple set up changes and you must have a good lie and a lob wedge in your bag for sure.
- Place the ball forward in your stance and open the club up, like you are going to balance a wine glass on the face
- Aim your body slightly open to your target
- The hands are even with the belt buckle, or slightly behind the ball at address and the weight is slightly rear of center
- Set the club up quickly with your wrist hinge and allow your swing shape to be more of a “V”
- Accelerate down and through the impact zone holding the club face open into a full finish; the harder you swing the higher the ball will go
Note: For an even higher shot allow your wrists to release “under” on the way through. This is not advisable, but it will give you slightly more height.
The Stab in the Bunker
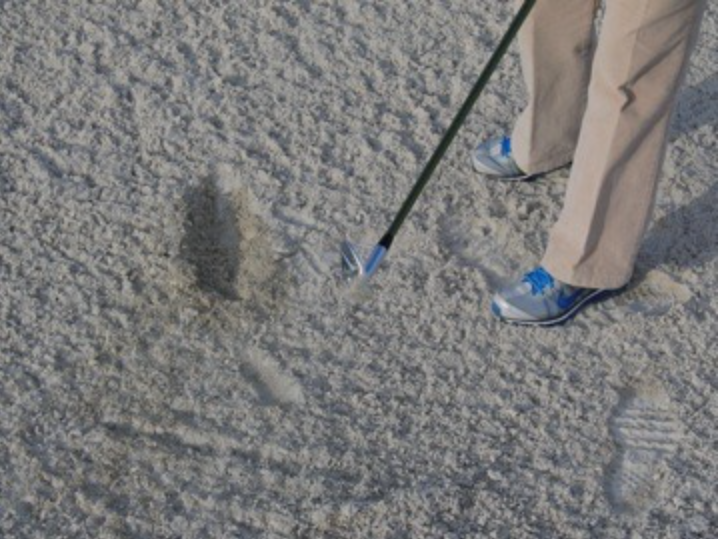
Whenever you try to attack a tucked pin, the ball seems to plug in the bunker. This shot is not very hard when you have green to work with, but when the pin is cut close to the bunker face you need another, softer shot.
- Set up as you would for your normal bunker shot
- Face and body open, hands slightly ahead of the ball, with your weight forward, and the spine leaning slightly forward of center
- Set the club upwards with the wrists in the “V” type of swinging motion and “stab” down behind the ball with NO finish whatsoever
- This action will cause you to dig a huge hole where the ball sat originally
- With no follow-through there won’t be much heat on the ball when it comes out of the bunker
- By varying your follow-through you will find that you can actually begin to control the ball’s release once it hits the green, with some practice
The Long Running Bunker Shot

What do you do when you have a perfect lie in the bunker but a huge uphill slope to negotiate on the green? Do you carry it back to the pin or do you elect to try a long running bunker shot? Whatever you do when you choose the long running bunker shot, you better make sure you get the ball back to the pin, and here’s how to do it.
- Set up as you normally would for a bunker shot
- Face and body open, hands slightly ahead of the ball, with the weight forward slightly, and the spine leaning slightly forward of center
- The simple adjustment to be made here is to take the club back “low and away” making your swing’s shape look more like a “U” than a “V”
- Finally you will release fully through the shot allowing your club face to close through the ball, giving it more hook-spin
- This hooking action through the ball will cause it to hit the green and run like a rabbit
Note: You can also take a lower-lofted club and hit the type of shot described above for the super-long runners like you see in the Open Championship.
The Severe Downhill Pitch Shot

What do you do when you have a severe downhill pitch shot to a green that runs away from you? How do you keep it on the green? My goal here is to put the ball on the green anywhere within 20 feet and get to the next hole without making a big number. Sometimes you have to take your licks and this is definitely one of those times!
- Align your body facing the pin
- Place the ball in line with the outside of your ankles
- Lean down the slope slightly with your shoulders
- Set the club with your wrists and finish LOW
- This will allow the ball to come off the club solid and reduce the roll-out
- LIKE249
- LEGIT19
- WOW10
- LOL9
- IDHT6
- FLOP5
- OB6
- SHANK15
My golf learning began with this simple fact – if you don’t have a fundamentally sound hold on the golf club, it is practically impossible for your body to execute a fundamentally sound golf swing. I’m still a big believer that the golf swing is much easier to execute if you begin with the proper hold on the club.
As you might imagine, I come into contact with hundreds of golfers of all skill levels. And it is very rare to see a good player with a bad hold on the golf club. There are some exceptions, for sure, but they are very few and very far between, and they typically have beat so many balls with their poor grip that they’ve found a way to work around it.
The reality of biophysics is that the body moves only in certain ways – and the particulars of the way you hold the golf club can totally prevent a sound swing motion that allows the club to release properly through the impact zone. The wonderful thing is that anyone can learn how to put a fundamentally sound hold on the golf club, and you can practice it anywhere your hands are not otherwise engaged, like watching TV or just sitting and relaxing.
Whether you prefer an overlap, interlock or full-finger (not baseball!) grip on the club, the same fundamentals apply. Here are the major grip faults I see most often, in the order of the frequency:
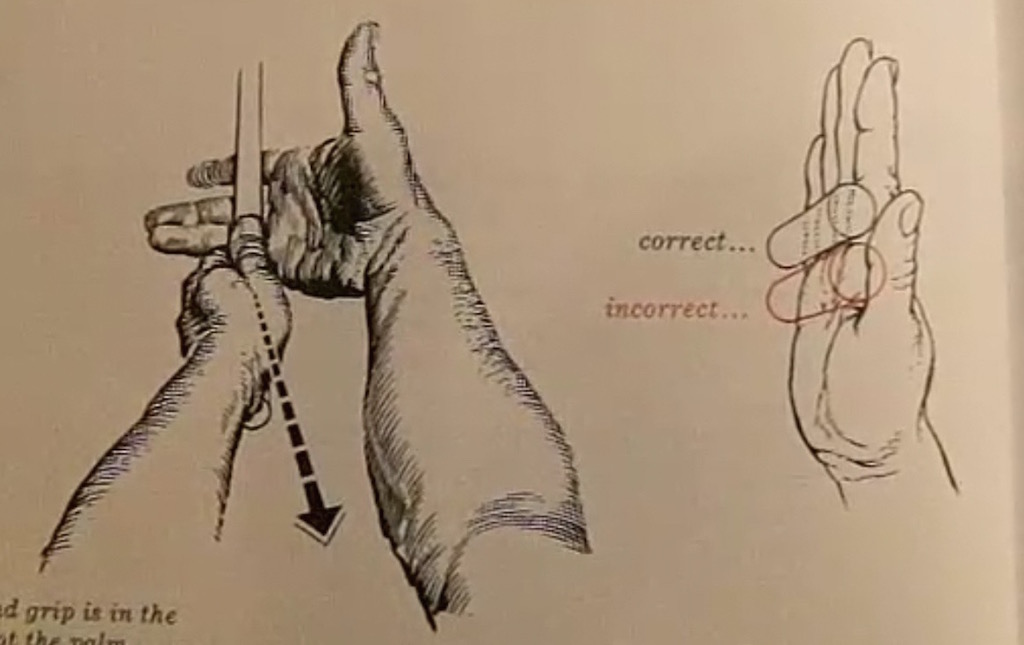
Mis-aligned hands
By this I mean that the palms of the two hands are not parallel to each other. Too many golfers have a weak left hand and strong right, or vice versa. The easiest way to learn how to hold the club with your palms aligned properly is to grip a plain wooden ruler or yardstick. It forces the hands to align properly and shows you how that feels. If you grip and re-grip a yardstick several times, then grip a club, you’ll see that the learning curve is almost immediate.
The position of the grip in the upper/left hand
I also observe many golfers who have the butt of the grip too far into the heel pad of the upper hand (the left hand for right-handed players). It’s amazing how much easier it is to release the club through the ball if even 1/4-1/2″ of the butt is beyond the left heel pad. Try this yourself to see what I mean. Swing the club freely with just your left hand and notice the difference in its release from when you hold it at the end of the grip, versus gripping down even a half inch.
To help you really understand how this works, go to the range and hit shots with your five-iron gripped down a full inch to make the club the same length as your seven-iron. You will probably see an amazing shot shape difference, and likely not see as much distance loss as you would expect.
Too much lower (right) hand on the club
It seems like almost all golfers of 8-10 handicap or higher have the club too far into the palm of the lower hand, because that feels “good” if you are trying to control the path of the clubhead to the ball. But the golf swing is not an effort to hit at the ball – it is a swing of the club. The proper hold on the club has the grip underneath the pad at the base of the fingers. This will likely feel “weak” to you — like you cannot control the club like that. EXACTLY. You should not be trying to control the club with your lower/master hand.
Gripping too tightly
Nearly all golfers hold the club too tightly, which tenses up the forearms and prevents a proper release of the club through impact. In order for the club to move back and through properly, you must feel that the club is controlled by the last three fingers of the upper hand, and the middle two fingers of the lower hand. If you engage your thumbs and forefingers in “holding” the club, the result will almost always be a grip that is too tight. Try this for yourself. Hold the club in your upper hand only, and squeeze firmly with just the last three fingers, with the forefinger and thumb off the club entirely. You have good control, but your forearms are not tense. Then begin to squeeze down with your thumb and forefinger and observe the tensing of the entire forearm. This is the way we are made, so the key to preventing tenseness in the arms is to hold the club very lightly with the “pinchers” — the thumbs and forefingers.
So, those are what I believe are the four fundamentals of a good grip. Anyone can learn them in their home or office very quickly. There is no easier way to improve your ball striking consistency and add distance than giving more attention to the way you hold the golf club.
More from the Wedge Guy
- The Wedge Guy: Golf mastery begins with your wedge game
- The Wedge Guy: Why golf is 20 times harder than brain surgery
- The Wedge Guy: Musings on the golf ball rollback
- LIKE85
- LEGIT13
- WOW6
- LOL1
- IDHT0
- FLOP4
- OB1
- SHANK8

Not the dreaded headcover under the armpit drill! As if your body is defective and can’t function by itself! Have you seen how incredible the human machine is with all the incredible feats of agility all kinds of athletes are accomplishing? You think your body is so defective (the good Lord is laughing his head off at you) that it needs a headcover tucked under the armpit so you can swing like T-Rex?
- LIKE0
- LEGIT2
- WOW2
- LOL0
- IDHT0
- FLOP0
- OB0
- SHANK2

This is a classic drill that has been used for decades. However, the world of marketed training aids has grown so much during that time that this simple practice has been virtually forgotten. Because why teach people how to play golf using everyday items when you can create and sell a product that reinforces the same thing? Nevertheless, I am here to give you helpful advice without running to the nearest Edwin Watts or adding something to your Amazon cart.
For the “scoring clubs,” having a solid connection between the arms and body during the swing, especially through impact, is paramount to creating long-lasting consistency. And keeping that connection throughout the swing helps rotate the shoulders more to generate more power to help you hit it farther. So, how does this drill work, and what will your game benefit from it? Well, let’s get into it.
Setup
You can use this for basic chip shots up to complete swings. I use this with every club in my bag, up to a 9 or 8-iron. It’s natural to create incrementally more separation between the arms and body as you progress up the set. So doing this with a high iron or a wood is not recommended.
While you set up to hit a ball, simply tuck the towel underneath both armpits. The length of the towel will determine how tight it will be across your chest but don’t make it so loose that it gets in the way of your vision. After both sides are tucked, make some focused swings, keeping both arms firmly connected to the body during the backswing and follow through. (Note: It’s normal to lose connection on your lead arm during your finishing pose.) When you’re ready, put a ball in the way of those swings and get to work.

Get a Better Shoulder Turn
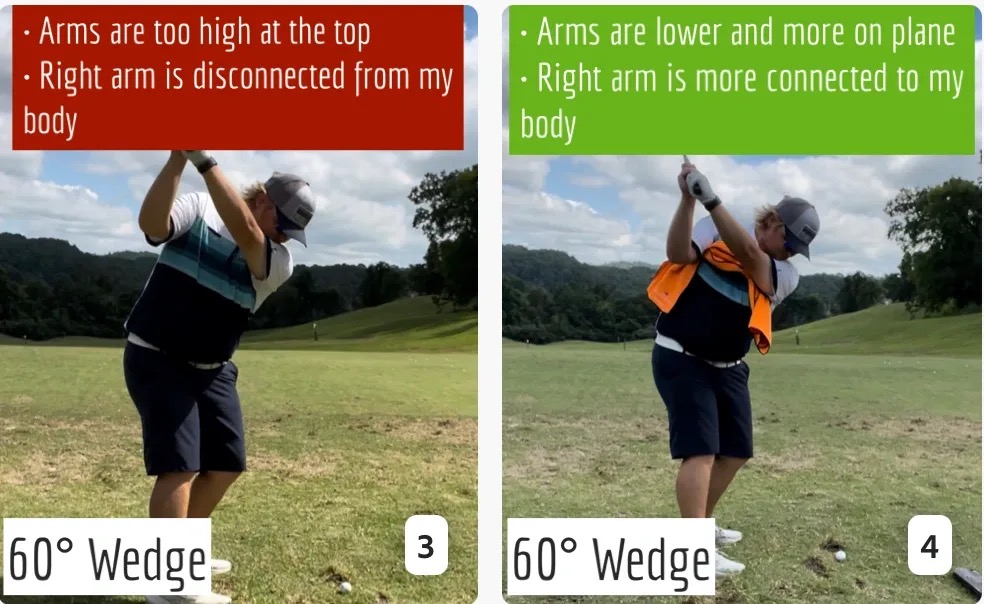
Many of us struggle to have proper shoulder rotation in our golf swing, especially during long layoffs. Making a swing that is all arms and no shoulders is a surefire way to have less control with wedges and less distance with full swings. Notice how I can get in a similar-looking position in both 60° wedge photos. However, one is weak and uncontrollable, while the other is strong and connected. One allows me to use my larger muscles to create my swing, and one doesn’t. The follow-through is another critical point where having a good connection, as well as solid shoulder rotation, is a must. This drill is great for those who tend to have a “chicken wing” form in their lead arm, which happens when it becomes separated from the body through impact.
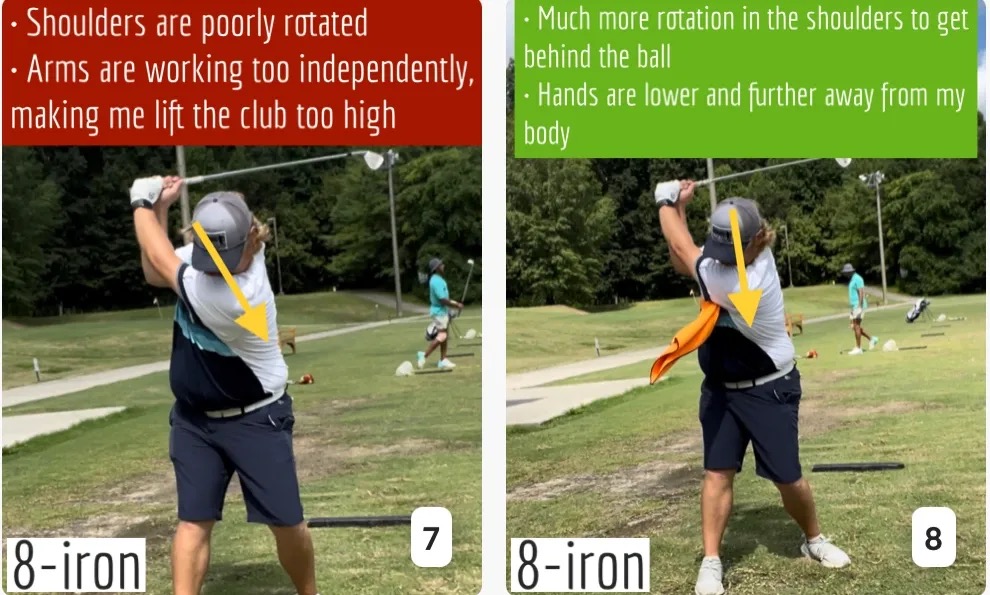
In full swings, getting your shoulders to rotate in your golf swing is a great way to reinforce proper weight distribution. If your swing is all arms, it’s much harder to get your weight to naturally shift to the inside part of your trail foot in the backswing. Sure, you could make the mistake of “sliding” to get weight on your back foot, but that doesn’t fix the issue. You must turn into your trial leg to generate power. Additionally, look at the difference in separation between my hands and my head in the 8-iron examples. The green picture has more separation and has my hands lower. This will help me lessen my angle of attack and make it easier to hit the inside part of the golf ball, rather than the over-the-top move that the other picture produces.
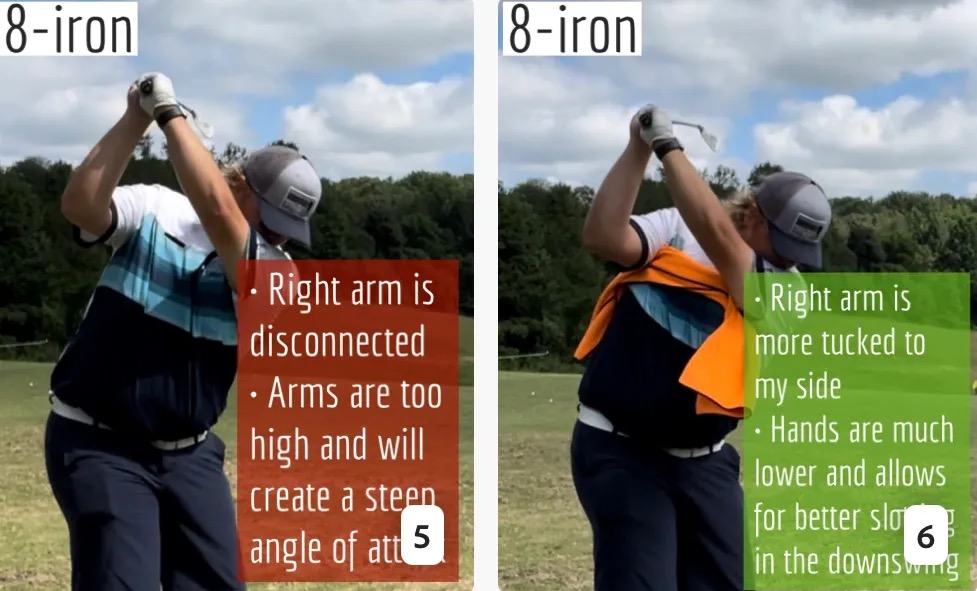
Stay Better Connected in the Backswing
When you don’t keep everything in your upper body working as one, getting to a good spot at the top of your swing is very hard to do. It would take impeccable timing along with great hand-eye coordination to hit quality shots with any sort of regularity if the arms are working separately from the body.
Notice in the red pictures of both my 60-degree wedge and 8-iron how high my hands are and the fact you can clearly see my shoulder through the gap in my arms. That has happened because the right arm, just above my elbow, has become totally disconnected from my body. That separation causes me to lift my hands as well as lose some of the extension in my left arm. This has been corrected in the green pictures by using this drill to reinforce that connection. It will also make you focus on keeping the lead arm close to your body as well. Because the moment either one loses that relationship, the towel falls.

Conclusion
I have been diligent this year in finding a few drills that target some of the issues that plague my golf game; either by simply forgetting fundamental things or by coming to terms with the faults that have bitten me my whole career. I have found that having a few drills to fall back on to reinforce certain feelings helps me find my game a little easier, and the “towel drill” is most definitely one of them.
- LIKE12
- LEGIT2
- WOW2
- LOL0
- IDHT0
- FLOP2
- OB0
- SHANK8


Dave Portnoy places monstrous outright bet for the 2024 Masters

John Daly stuns fans into silence with brutal opening tee shot on PGA Tour Champions

Things got heated at the Houston Open between Tony Finau and Alejandro Tosti. Here’s why

Tiger Woods arrives at 2024 Masters equipped with a putter that may surprise you

Scottie Scheffler WITB 2024 (March)

Photos from the 2024 Arnold Palmer Invitational

Report: Tiger Woods has ‘eliminated sex’ in preparation for the 2024 Masters

Two star names reportedly blanked Jon Rahm all week at the Masters

Joaquin Niemann names 3 PGA Tour events he’d love to play each year ‘in a perfect world’

Spotted: Bettinardi irons at the Arnold Palmer Invitational


Collin Morikawa WITB 2024 (April)
Collin Morikawa what’s in the bag accurate as of the RBC Heritage. More photos from the event here. Driver: TaylorMade...


WITB Time Machine: Jordan Spieth’s winning WITB, 2022 RBC Heritage
At the 2022 RBC Heritage Jordan Spieth defeated Patrick Cantlay on the first playoff hole after nearly holing his greenside...


Jason Day WITB 2024 (April)
Jason Day what’s in the bag accurate as of the RBC Heritage. Driver: Ping G430 LST (9 degrees @10) Shaft: TPT...


Ludvig Åberg WITB 2024 (April)
Ludvig Åberg what’s in the bag accurate as of the RBC Heritage. Driver: Titleist TSR2 (9 degrees, D4 SureFit setting)...
-
 19th Hole1 week ago
Dave Portnoy places monstrous outright bet for the 2024 Masters
-
 19th Hole2 weeks ago
Things got heated at the Houston Open between Tony Finau and Alejandro Tosti. Here’s why
-
 19th Hole1 week ago
Tiger Woods arrives at 2024 Masters equipped with a putter that may surprise you
-
 19th Hole2 weeks ago
Report: Tiger Woods has ‘eliminated sex’ in preparation for the 2024 Masters
-
 19th Hole3 days ago
Two star names reportedly blanked Jon Rahm all week at the Masters
-

 19th Hole3 days ago
Neal Shipley presser ends in awkward fashion after reporter claims Tiger handed him note on 8th fairway
-

 19th Hole2 weeks ago
Addiction, spinal fusion, and scam artists – Everything Anthony Kim revealed in candid interview with David Feherty
-

 19th Hole2 weeks ago
Anthony Kim says doctors told him that he ‘may not have much time left’ ahead of LIV return
Anon A Mouse
Jun 11, 2015 at 9:22 am
Best article on WRX in a while. Well done!
Brutus
Jun 10, 2015 at 2:46 pm
Been using that toe down chip shot a lot the last several years. Great for shot chips especially out of nasty lies as the face kind of knives thru the grass and pops the ball out. Practiced with a variety of iron for different amounts of loft and run. Very effective and reliable. Great article looking at most basic shots “non-standard” chip/pitch shots!
lee
Jun 10, 2015 at 10:32 am
Great list!
Jeez Utz
Jun 9, 2015 at 3:48 pm
I’m not seeing enough knee bend on the super high flop….
And you know I’m right Tom
BustyMagoo
Jun 9, 2015 at 1:14 pm
Good collection of techniques indeed.
Me Nunya
Jun 8, 2015 at 11:15 pm
Good little catalog; not complete though.
That’s the magic of the game. So much to practice and master (or not master).
Tom, question: As a foundation, do you teach hinge and hold or Stricker style and why?
Nolanski
Jun 8, 2015 at 10:27 pm
Good stuff. I just learned the flop shot this year and it’s been a great addition. I’m gonna try a few of these for sure.
Sean
Jun 8, 2015 at 9:05 pm
Nicely done!