Instruction
How to improve your putting arc
Golf is played on an inclined plane, which is established when we bend forward to address the ball. This angled plane dictates the club swing on an arc.
An arcing motion is present in all golf strokes whether you are swinging an iron, a driver or putter. On short putts the arc is smaller, so it may “FEEL” straight back and straight through, but there should still be a slight inward movement of the putter head during the back and forward swings.
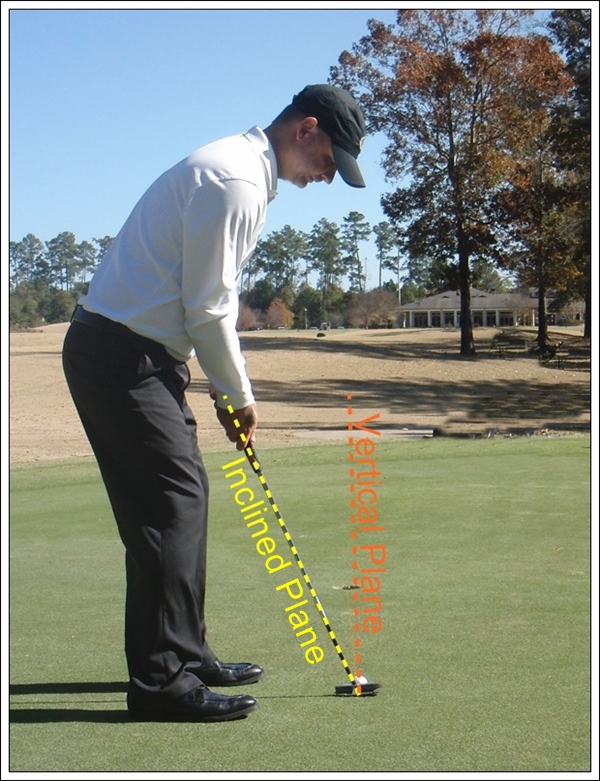
A common mistake that I see is the putter head moving outside the target line on the backstroke, accompanied by a blocking action and no release of the putter face on the through stroke. Most golfers then employ some type of breakdown in the lead wrist in an attempt to square the face, which results in inconsistent loft and off-center strikes at impact. An arcing stroke would see the putter head moving slightly inside the target line on the back stroke, then naturally swinging inside once again on the through stroke — simply a pendulum motion, executed on an inclined plane.
Complementary Angles
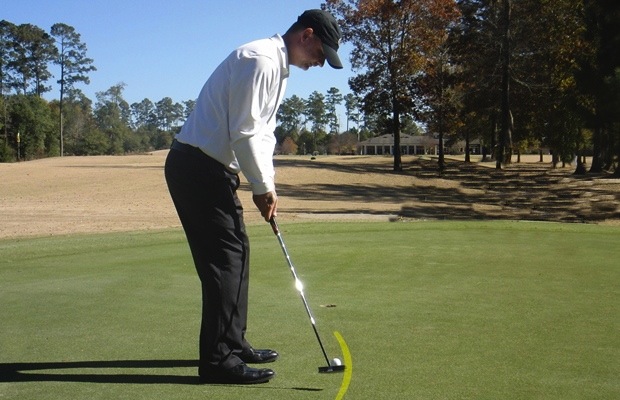
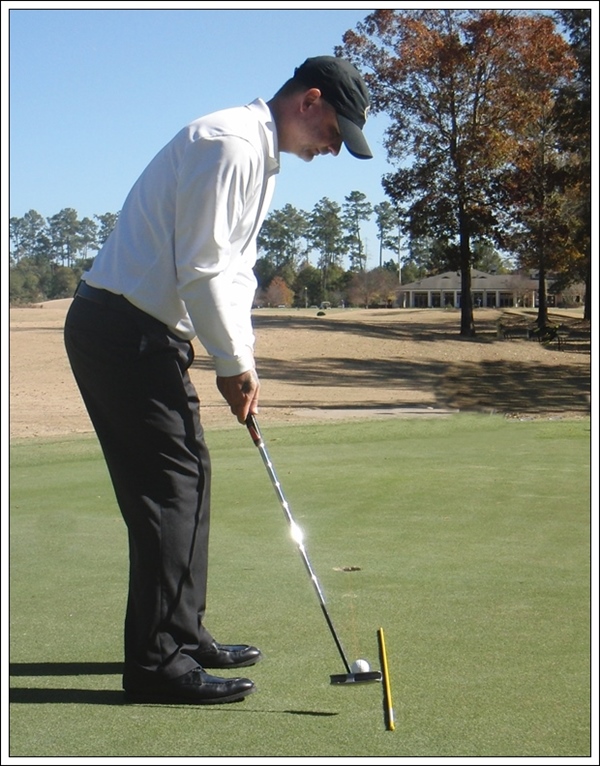
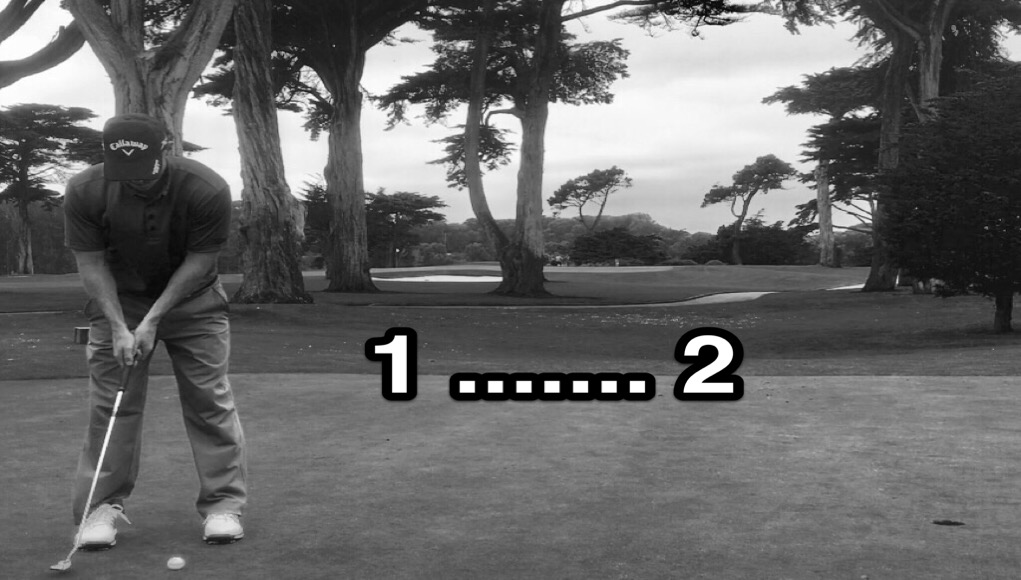
To improve your putting arc, let’s begin with a solid address position. I call this type of setup “Complementary Angles” as it encourages the putter to swing in a way that requires very few compensations.
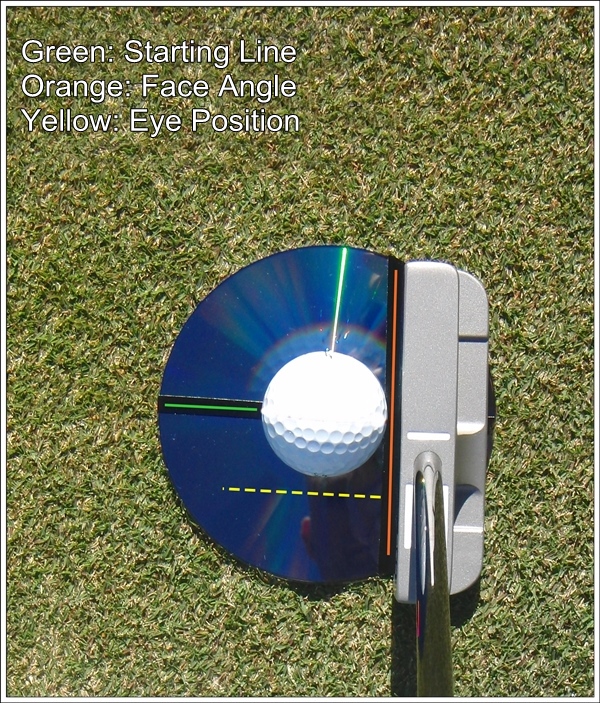
The address position is so crucial because we want to establish clear and accurate relationships between our target line, putter, and body. Complementary Angles means we will be stacking one good position on top of the next. An easy way to practice improving your angles both indoors and out is to draw a few lines on the reflective side of a CD or DVD disc. The first line will traverse the center of the disc and represent our intended starting line. Draw a second line perpendicular to the first line and directly behind the ball. This line will ensure that our putter face is square to our intended starting line. Last, draw a third line parallel to the first line just inside where the ball will be.
When setup properly, you should see your eyes on top of this line in the reflection provided by the disc. Setting up with your eyes slightly inside the target line provides more freedom for your hands and arms to swing while encouraging the forearms to rotate slightly during the stroke, thus transporting the putter on the desired path.
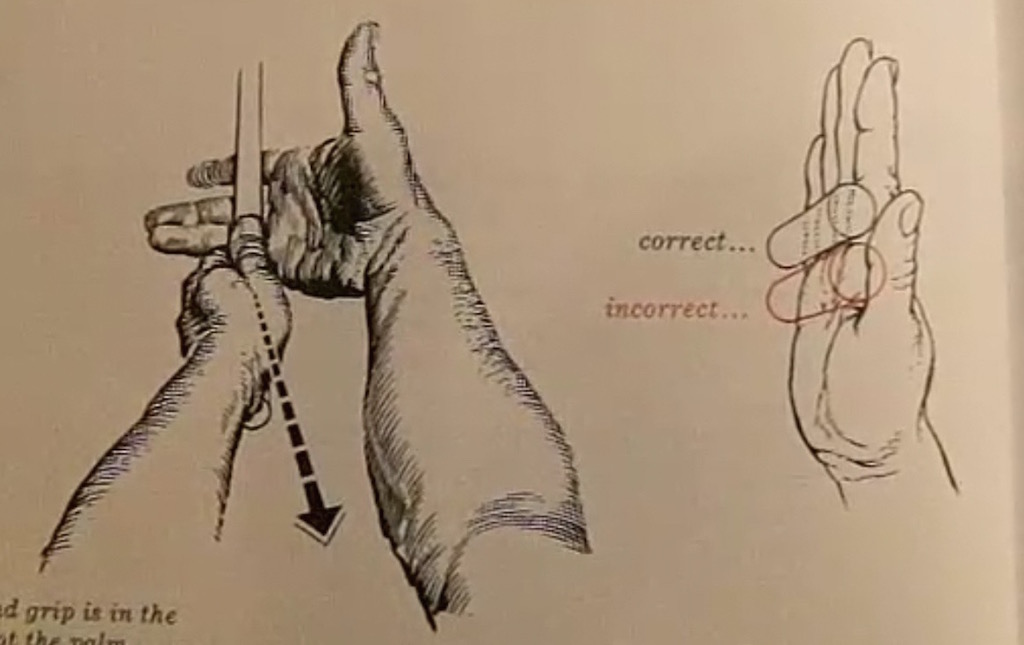
Grip in the fingers, heel pad on top
Next, we want to adopt a grip position that encourages the forearms to track properly during the stroke. Contrary to the “Lifeline” grip that’s commonly taught, we will incorporate a hold with the heel pad of our lead hand on top. As in your full swing, utilizing the heel pad provides leverage and control while removing tension from your thumb which radiates up the forearm.
Finger Grip In Four Steps
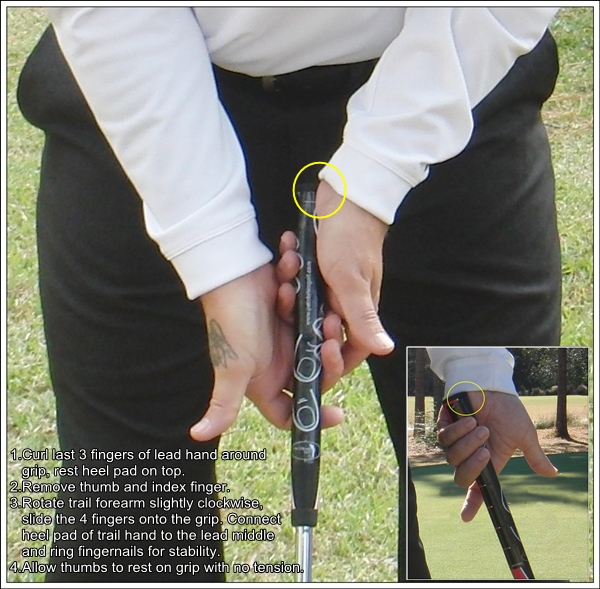
- With your lead arm hanging naturally, curl your last three fingers around the grip and rest your heel pad on top.
- Remove the thumb and index finger.
- Rotate your trail forearm slightly clockwise and slide the four fingers onto the grip. Connect the heel pad of the trail hand to the lead hand’s middle and ring fingernails for stability.
- Allow the thumbs to rest on the grip with no tension.
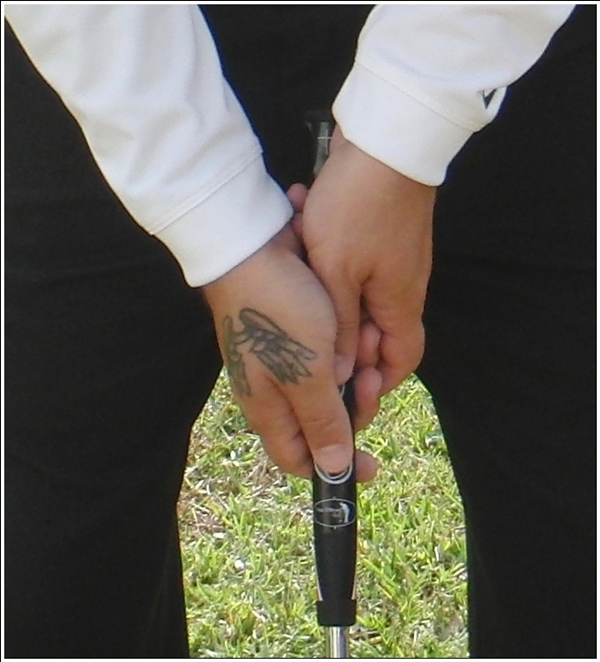
Notice that there is now an air pocket under your lead thumb pad and the putter head feels light. An excellent training aid that I use to quickly identify a proper fingers grip is Master Putting Instructor Pat O’Brien’s “Perfect Putting Grip.” The PPG is a decal that adheres to your existing putter grip, featuring heel pad and finger placement markings.
Backward, Upward and Inward
Now that we have completed a setup and grip comprised of “Complementary Angles,” the forearms can naturally rotate back and through. To rid yourself of any old tendencies such as bringing the putter back “outside,” place an object (alignment stick, tees, sleeve of balls) just outside the toe of your putter to verify that the club is working slightly away from the object as you swing back.
- LIKE13
- LEGIT3
- WOW0
- LOL1
- IDHT0
- FLOP0
- OB0
- SHANK2


Some call the image on the left laid off, but if you are hitting a fade, this could be a perfect backswing for it! Same for across the line for a draw! Stop racking your brain with perceived mistakes and simply match backswing to shot shape!
- LIKE0
- LEGIT0
- WOW0
- LOL0
- IDHT0
- FLOP0
- OB0
- SHANK0
My golf learning began with this simple fact – if you don’t have a fundamentally sound hold on the golf club, it is practically impossible for your body to execute a fundamentally sound golf swing. I’m still a big believer that the golf swing is much easier to execute if you begin with the proper hold on the club.
As you might imagine, I come into contact with hundreds of golfers of all skill levels. And it is very rare to see a good player with a bad hold on the golf club. There are some exceptions, for sure, but they are very few and very far between, and they typically have beat so many balls with their poor grip that they’ve found a way to work around it.
The reality of biophysics is that the body moves only in certain ways – and the particulars of the way you hold the golf club can totally prevent a sound swing motion that allows the club to release properly through the impact zone. The wonderful thing is that anyone can learn how to put a fundamentally sound hold on the golf club, and you can practice it anywhere your hands are not otherwise engaged, like watching TV or just sitting and relaxing.
Whether you prefer an overlap, interlock or full-finger (not baseball!) grip on the club, the same fundamentals apply. Here are the major grip faults I see most often, in the order of the frequency:
Mis-aligned hands
By this I mean that the palms of the two hands are not parallel to each other. Too many golfers have a weak left hand and strong right, or vice versa. The easiest way to learn how to hold the club with your palms aligned properly is to grip a plain wooden ruler or yardstick. It forces the hands to align properly and shows you how that feels. If you grip and re-grip a yardstick several times, then grip a club, you’ll see that the learning curve is almost immediate.
The position of the grip in the upper/left hand
I also observe many golfers who have the butt of the grip too far into the heel pad of the upper hand (the left hand for right-handed players). It’s amazing how much easier it is to release the club through the ball if even 1/4-1/2″ of the butt is beyond the left heel pad. Try this yourself to see what I mean. Swing the club freely with just your left hand and notice the difference in its release from when you hold it at the end of the grip, versus gripping down even a half inch.
To help you really understand how this works, go to the range and hit shots with your five-iron gripped down a full inch to make the club the same length as your seven-iron. You will probably see an amazing shot shape difference, and likely not see as much distance loss as you would expect.
Too much lower (right) hand on the club
It seems like almost all golfers of 8-10 handicap or higher have the club too far into the palm of the lower hand, because that feels “good” if you are trying to control the path of the clubhead to the ball. But the golf swing is not an effort to hit at the ball – it is a swing of the club. The proper hold on the club has the grip underneath the pad at the base of the fingers. This will likely feel “weak” to you — like you cannot control the club like that. EXACTLY. You should not be trying to control the club with your lower/master hand.
Gripping too tightly
Nearly all golfers hold the club too tightly, which tenses up the forearms and prevents a proper release of the club through impact. In order for the club to move back and through properly, you must feel that the club is controlled by the last three fingers of the upper hand, and the middle two fingers of the lower hand. If you engage your thumbs and forefingers in “holding” the club, the result will almost always be a grip that is too tight. Try this for yourself. Hold the club in your upper hand only, and squeeze firmly with just the last three fingers, with the forefinger and thumb off the club entirely. You have good control, but your forearms are not tense. Then begin to squeeze down with your thumb and forefinger and observe the tensing of the entire forearm. This is the way we are made, so the key to preventing tenseness in the arms is to hold the club very lightly with the “pinchers” — the thumbs and forefingers.
So, those are what I believe are the four fundamentals of a good grip. Anyone can learn them in their home or office very quickly. There is no easier way to improve your ball striking consistency and add distance than giving more attention to the way you hold the golf club.
More from the Wedge Guy
- The Wedge Guy: Golf mastery begins with your wedge game
- The Wedge Guy: Why golf is 20 times harder than brain surgery
- The Wedge Guy: Musings on the golf ball rollback
- LIKE86
- LEGIT13
- WOW6
- LOL1
- IDHT0
- FLOP4
- OB1
- SHANK8
Not the dreaded headcover under the armpit drill! As if your body is defective and can’t function by itself! Have you seen how incredible the human machine is with all the incredible feats of agility all kinds of athletes are accomplishing? You think your body is so defective (the good Lord is laughing his head off at you) that it needs a headcover tucked under the armpit so you can swing like T-Rex?
- LIKE0
- LEGIT2
- WOW2
- LOL0
- IDHT0
- FLOP0
- OB0
- SHANK2


Dave Portnoy places monstrous outright bet for the 2024 Masters

John Daly stuns fans into silence with brutal opening tee shot on PGA Tour Champions

Things got heated at the Houston Open between Tony Finau and Alejandro Tosti. Here’s why

Justin Thomas on the equipment choice of Scottie Scheffler that he thinks is ‘weird’

Tiger Woods arrives at 2024 Masters equipped with a putter that may surprise you

‘Absolutely crazy’ – Major champ lays into Patrick Cantlay over his decision on final hole of RBC Heritage

Report: Tiger Woods has ‘eliminated sex’ in preparation for the 2024 Masters

Two star names reportedly blanked Jon Rahm all week at the Masters

2-time major champ announces shock retirement from the sport at age of 33

Report: LIV Golf identifies latest star name they hope to sign to breakaway tour


Daniel Berger WITB 2024 (April)
Daniel Berger what’s in the bag accurate as of the Farmers Insurance Open. More photos from the event here. Driver:...


Rasmus Højgaard WITB 2024 (April)
Rasmus Højgaard what’s in the bag accurate as of the Zurich Classic. Driver: Callaway Ai Smoke Triple Diamond (10.5 degrees)...


Rory McIlroy WITB 2024 (April)
Rory McIlroy what’s in the bag accurate as of the Zurich Classic. Driver: TaylorMade Qi10 (9 degrees) Shaft: Fujikura Ventus...


Sam Burns WITB 2024 (April)
Sam Burns’ what’s in the bag accurate as of the RBC Heritage. Driver: Callaway Paradym Triple Diamond S (9 degrees...
-
 19th Hole2 weeks ago
Dave Portnoy places monstrous outright bet for the 2024 Masters
-
 19th Hole3 days ago
Justin Thomas on the equipment choice of Scottie Scheffler that he thinks is ‘weird’
-
 19th Hole2 weeks ago
Tiger Woods arrives at 2024 Masters equipped with a putter that may surprise you
-
 19th Hole2 days ago
‘Absolutely crazy’ – Major champ lays into Patrick Cantlay over his decision on final hole of RBC Heritage
-
 19th Hole3 weeks ago
Report: Tiger Woods has ‘eliminated sex’ in preparation for the 2024 Masters
-
 19th Hole1 week ago
Two star names reportedly blanked Jon Rahm all week at the Masters
-
 19th Hole1 week ago
Report: LIV Golf identifies latest star name they hope to sign to breakaway tour
-

 19th Hole1 week ago
Neal Shipley presser ends in awkward fashion after reporter claims Tiger handed him note on 8th fairway
Mark s
Mar 15, 2017 at 9:21 pm
When I try this grip it feels like I need a shorter putter with a flatter lie angle. Does that seem right?
Pingback: ben crenshaw putting grip | World's Hourly News
Pingback: Ben Crenshaw Putting Grip | Cotton Candy
Pingback: Ben Crenshaw Putting Grip | Pen Pal
Pingback: Ben Crenshaw Putting Grip | admirals blog
Pingback: Ben Crenshaw Putting Grip | Just A News
Pingback: Ben Crenshaw Putting Grip | just for fun
manz60
Jan 1, 2015 at 6:48 pm
Thanks for your article. I’ve read the Dave Pelz Putting’Bible’ and he refers to a PILS Stroke (Perfect In Line Stroke). He used a grid and special photography to show strokes that appear to go slightly inside square to inside (like a screen door), but actually go straight back and thru. He refered to this as an optical illusion. You need to see the stroke from the target line or from above the ball. Otherwise if you view the stroke from head on (like on TV), the stroke will be seen as a ‘screen door’ but its not.
The arms hang straight down from the shoulders to create a vertical penduleum and despite the lie angle of the putter, the putter head moves straight back and thru.
ref: p81 Pelz Putting Bible
M60
Michael Howes
Jan 1, 2015 at 10:55 pm
Hello M60 – I have also read Mr. Pelz ‘Putting Bible, as well as ‘Putt Like The Pros’ and am familiar with his PILS method. Here are a few points I believe worth noting in the above excerpt. Having access to current technology like SAM Putt Lab, I will say that the putter does swing on an arc. This is due to the angle of the club shaft and fact that we are bent over at the waist to address a ball on the ground, which we are standing to the side of. The degree of arc is greatly affected by our amount of forward bend, eye placement, forearm position, and other address conditions. Also if I remember correctly, the PERCY model used to demonstrate the PILS stroke had NO wrist or elbow joints.
My experience has been that golfers who are trying to truly execute a SBST stroke must make many compensations in an attempt to keep the putter from doing what it naturally wants to do, which is swing on an arc. These compensations usually show up as the putter head moving outside on the way back with a closed face, followed by a blocking type through stroke. I also see these players set up with their eyes positioned outside of the ball and require very upright lie angles when trying to get the right forearm and shaft on plane at address.
That being said, I am advocating allowing the putter to swing on a slight arc. The set up and grip that I outlined complement this arc and might even “Feel” SBST, depending on the player and their tendencies. Test it out and thanks for reading.
Michael Howes
Jan 1, 2015 at 11:05 pm
typo: PERFY
bradford
Jan 5, 2015 at 7:59 am
In fact, the only way to actually bring the club straight back and straight through without breaking the wrists is to adopt the Michelle Wie stance (or possibly Nicklaus), whereby the club is actually hanging straight down.
David Partridge
Dec 31, 2014 at 6:55 pm
Nice article. I like how you noted the importance of the grip. I believe that’s where the majority of amatuers get it wrong. Probably worthy of a mention is that with the correct grip the forearms can become an extension of the putter shaft allowing the correct plane for the putter to travel
Michael Howes
Jan 1, 2015 at 11:06 am
Right on David. Complementary Angles at address lead to simple strokes. Thx for posting.
Edward McMahon
Dec 31, 2014 at 3:27 pm
Michael,
Really enjoy the instruction since putting is the biggest mystery in my golf game. I have a tendency to push short putts and pull long putts. I’ve tried multiple different grips and occasionally succeed for a short time. How much pressure is applied by each hand? And does either hand assume a more dominant role?
Ed
Michael Howes
Dec 31, 2014 at 5:21 pm
Edward & Steve, here is my recommendation on grip pressure. We want as little tension in the forearms as possible. When holding the putter horizontal to the ground I should not be able to pull the club from your grip, but we still want your hands and forearms relaxed. This is why I advocate the putter be gripped in the fingers with the heel pad on top, as opposed to a lifeline grip which is commonly taught. Gripping in the fingers allows for touch and control by relieving the forearm pressure created when the putter’s only support is the thumb pads. Tiger Woods wrote in his 2001 book, How I Play Golf, “The handle of the putter runs under the butt of my left hand. Most players like the handle running straight up the palm so the club shaft is parallel to the left forearm. My grip is unique this way, but I believe gives me a little extra feel and gives me freedom in my wrists when I need it.” Tiger goes on to write of his conversation with Ben Crenshaw on grip pressure and Ben’s advice to grip light enough so that he be able to “feel the weight of the putterhead at the other end of the shaft”. When pressed for a number between 1 and 10, I have heard Crenshaw say 4. Hand placement has a huge effect on grip pressure and deserves experimentation at the very least.
Try this drill: Tie some type of weight (I use brass washers) to the end of a piece of nylon string. Grip the putter with the string lying in your fingers and running on the underside of the putting grip. Begin making strokes, keeping the putter and the weight swinging in unison. Increase grip pressure until the weight and putter no longer keep pace. Relax your pressure until you are able to regain a swinging motion. This is your “Feel”.
Steve
Dec 31, 2014 at 1:52 pm
One question I have is that No one ever seems to talk about the Grip, by that I mean “How tight” should you hold the Putter.
With a wedge its ” Soft hands” as if you were holding an ‘open Tube of Tooth paste’ which I can understand and feel the difference if I were to hold it ( The wedge ) too tight.
But what about the Putter ??
Steve ( UK )
Michael Howes
Dec 31, 2014 at 5:22 pm
Good question Steve! Please see my above response to you and Edward in reagrds to grip pressure.
Mchapp2
Dec 29, 2014 at 1:15 pm
Michael, great article!
Look forward to trying it soon. Sounds like it can greatly help me. Also got excited when I was reading the article and recognized the clubhouse in the background. Played there once and loved it! Always great to know there are other WRXers around Louisiana.
Michael Howes
Dec 29, 2014 at 10:23 pm
pleasure to hear from an La golf enthusiast. Keep me posted on your putting progress and have a great New Years!
Eagle006
Dec 28, 2014 at 8:26 am
Nice article. A follow up article on the mechanics of the stroke would be very helpful too.
Michael Howes
Dec 29, 2014 at 1:09 pm
Thx for reading.
Pingback: How to Improve Your Putting Arc | Golf Gear Select
Golfraven
Dec 27, 2014 at 6:10 pm
ok, so how about the left hand low grip? I like the idea with the grip though
Michael Howes
Dec 27, 2014 at 6:59 pm
Did you switch to left hand low, due to right hand “hit”? Try out the grip procedure outlined in article and you should find a much more passive right hand.
Golfraven
Dec 28, 2014 at 3:59 pm
Hi, I stragled with the conventional grip recent years so thought I try something new. Actually I like the feel of the left hand low and I seem to be more consistent. Still tinkering with my hand positions slighly so will try some of your instructions. cheers
Gloover
Dec 27, 2014 at 10:58 am
Good article. Thanks!
If one putts face-on, the stroke becomes nearly straight back and through. No need for the arc.
jl
Dec 26, 2014 at 8:46 pm
“Connect the heel pad of the trail hand to the lead hand’s middle and ring fingernails for stability.” But in the picture isn’t the heel pad of the trail hand resting more on the lead hand’s thumb?
Michael Howes
Dec 27, 2014 at 5:28 pm
JL – in the completed grip picture, the right hand’s heel pad is on the fingernails of left hand. The only part touching the lead hand, is the trail hand’s thumb and thumb pad. Hope that helps.
Ponjo
Dec 26, 2014 at 6:41 pm
Hi Michael,
Love this article regarding the putting arc as this has recently been introduced to me by my golf coach following a lesson after having a turbulent year on the greens.
I was taking the club away slightly on the outside “thinking I was taking it back in a straight line” you can guess the rest 🙂
Many many hours later the movement is better and am utilising an MSIII aid to drill the natural movement even more.
Thanks
Michael Howes
Dec 27, 2014 at 5:24 pm
Great to hear Ponjo. You’re on the right track – set the right forearm up correctly at address & that outside takeaway will be a thing of the past! Keep on it.