Instruction
Keys to finding the right angle of attack in a bunker
Thwack — that’s the sound of the ball coming out of the bunker at ankle high and moving at Mach One over the green — what a great feeling! If I had a dollar for every shot like this I’ve seen (or hit personally), I’d be rich.
Bunkers scare average golfers like no other shot in golf because they really don’t understand what has to happen in order to hit good bunker shots. It’s this enigma that makes people reluctant to practice out of the bunker, and their lack of practice time only makes things worse. However, if you learn what things cause what type of shots I promise you will become a better bunker player.
In my opinion there are three keys that you must master in order to get out of the bunker time after time: spinal tilt, wrist hinge and “getting the snakes.”
Spinal Tilt
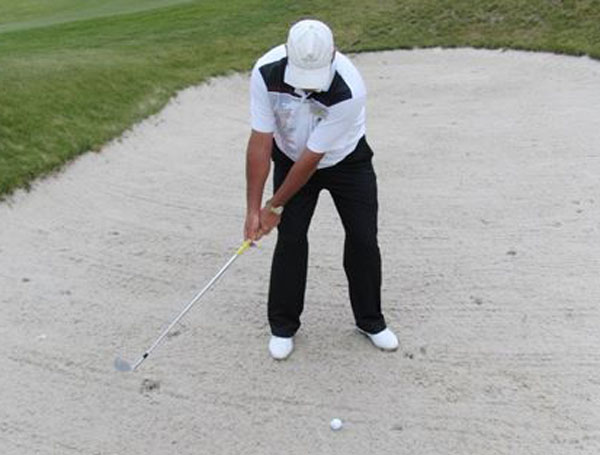
The lateral bending of your spin influences your low point — where the club impacts the sand. So if you tend to have your spine leaning too far to the right at address you will find that it is almost impossible to only hit a few inches behind the ball.
Excessive spinal tilt leads to impact points that are way too far behind the ball, which leads to shots staying in the bunker. I’d suggest a centered spine at address, one that is not leaning right or left. This will help you control your low point a better and hopefully you will impact the ground in the same place time after time.
Wrist Hinge
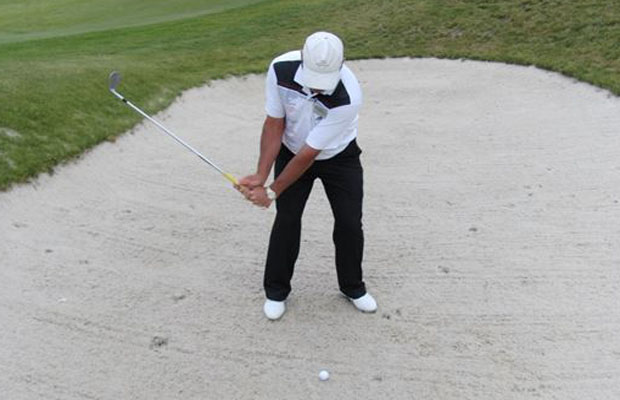
The hinging of the wrists controls your “angle of attack,” which is how shallow or steeply you come into impact. It’s this AoA that helps you get down to the ball in a funky lie or skim just a touch under the ball for a soft, controlled bunker shot.
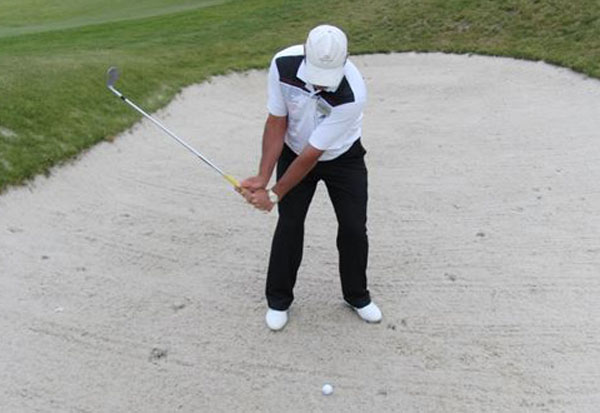
The more you hinge your wrists, the steeper the club will return into the ball. Getting steeper (as shown in the photo above) allows you to get the ball on to the green softer when it’s in those “down” lies, and also helps you not to skull the ball over the green. If you wrist hinge is too steep, you will find that you can dig down too much into the sand and leave the ball in the bunker. But too little wrist hinge (as shown in the photo below) is also a problem. The lie you have will dictate the amount of hinge needed to get down to the golf ball; the worse the lie the more hinge you need.
Conversely the other type of issue that can arise from wrist hinge is having too little. Whenever you have a lack of wrist hinge, you will come into the ball on a very shallow angle. While having a shallow angle of attack is OK most of the time, it can be a problem for the players who tend to “back up” or “fall back” through impact causing fat and thin shots. However, if you have a good pivot motion, having a more shallow AOA will give you better control around the greens with all other things being equal.
Getting the Snakes

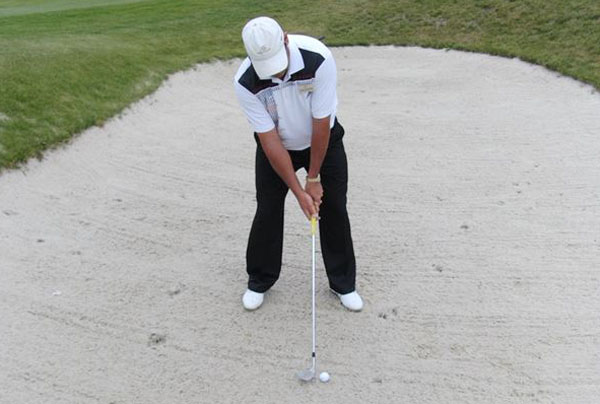
The last key to your bunker play is to control the “low point,” or where the club enters and leaves the sand by using the snake drill. Draw two lines in the bunker (perpendicular to your target) as shown above, place the ball in the middle of the lines and make your swing. You should take both lines out with a full finish. If you hit behind the first line you will tend to leave shots in the bunker. If you only hit the line closest to the target you will tend to hit thin shots.
In a perfect world, you want all your divots to begin on the first line and end on the second line. This ensures consistent contact and consistent bunker shots if you also control your angle of attack.
So remember the key to bunker shots are the following points:
- Centered spine at address.
- Hinge wrists on the way to the top.
- Get both snakes out of the bunker with a full finish.
If you have any other questions regarding bunker play see my Youtube channel playlist on bunker play.
- LIKE7
- LEGIT0
- WOW0
- LOL0
- IDHT0
- FLOP0
- OB0
- SHANK0

Not the dreaded headcover under the armpit drill! As if your body is defective and can’t function by itself! Have you seen how incredible the human machine is with all the incredible feats of agility all kinds of athletes are accomplishing? You think your body is so defective (the good Lord is laughing his head off at you) that it needs a headcover tucked under the armpit so you can swing like T-Rex?
- LIKE0
- LEGIT1
- WOW2
- LOL0
- IDHT0
- FLOP0
- OB0
- SHANK2

This is a classic drill that has been used for decades. However, the world of marketed training aids has grown so much during that time that this simple practice has been virtually forgotten. Because why teach people how to play golf using everyday items when you can create and sell a product that reinforces the same thing? Nevertheless, I am here to give you helpful advice without running to the nearest Edwin Watts or adding something to your Amazon cart.
For the “scoring clubs,” having a solid connection between the arms and body during the swing, especially through impact, is paramount to creating long-lasting consistency. And keeping that connection throughout the swing helps rotate the shoulders more to generate more power to help you hit it farther. So, how does this drill work, and what will your game benefit from it? Well, let’s get into it.
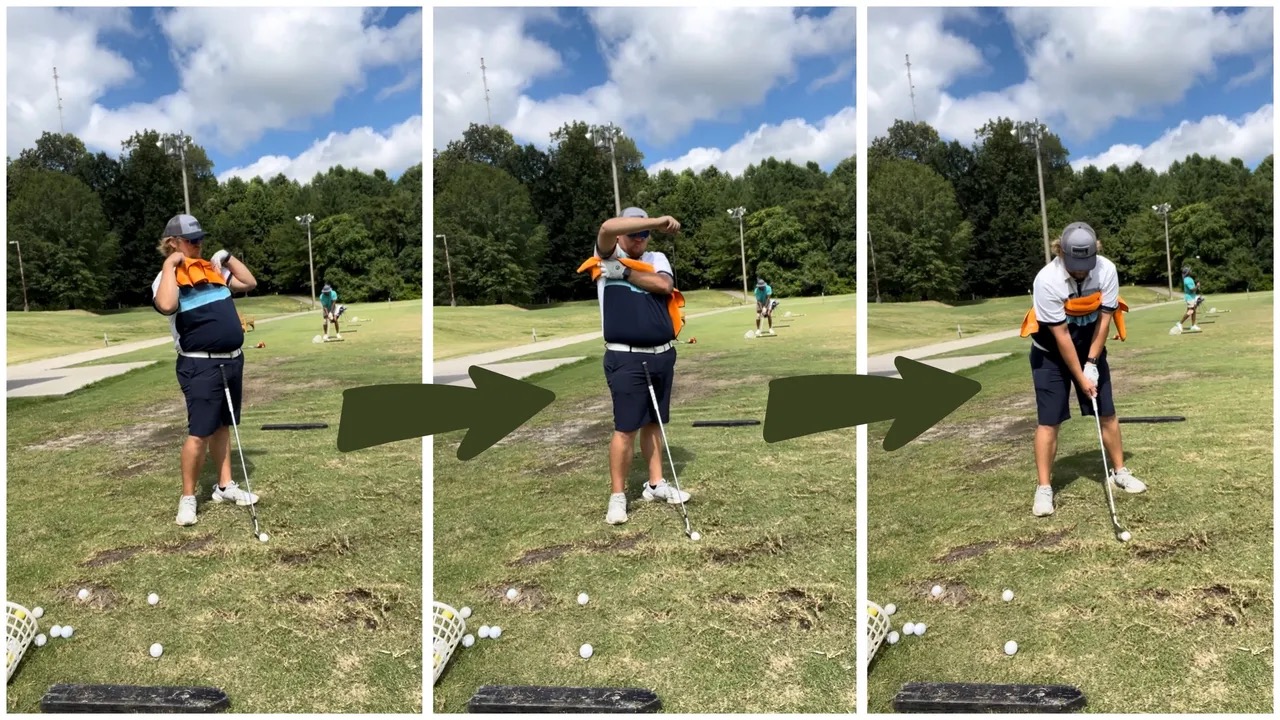
Setup
You can use this for basic chip shots up to complete swings. I use this with every club in my bag, up to a 9 or 8-iron. It’s natural to create incrementally more separation between the arms and body as you progress up the set. So doing this with a high iron or a wood is not recommended.
While you set up to hit a ball, simply tuck the towel underneath both armpits. The length of the towel will determine how tight it will be across your chest but don’t make it so loose that it gets in the way of your vision. After both sides are tucked, make some focused swings, keeping both arms firmly connected to the body during the backswing and follow through. (Note: It’s normal to lose connection on your lead arm during your finishing pose.) When you’re ready, put a ball in the way of those swings and get to work.
Get a Better Shoulder Turn
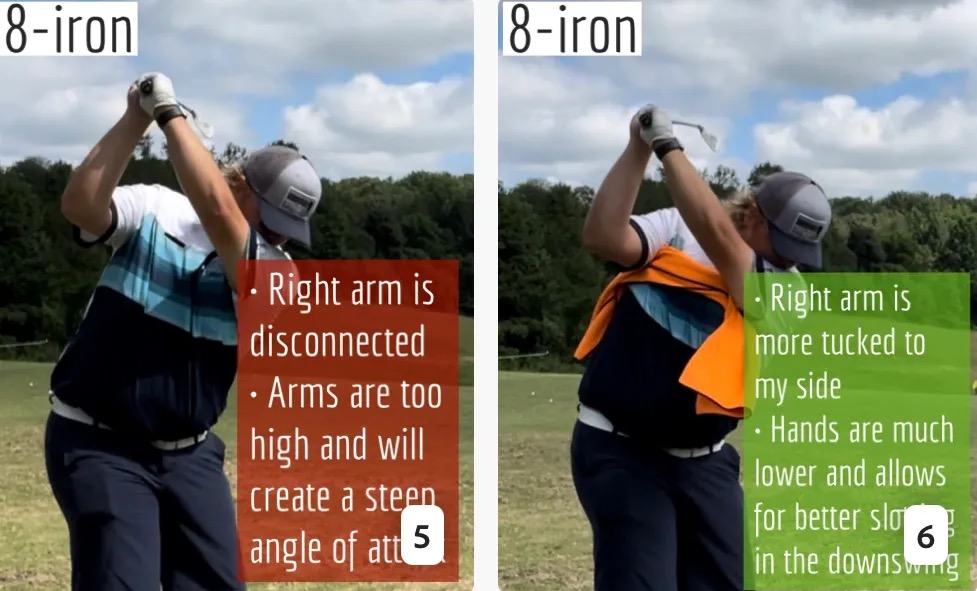
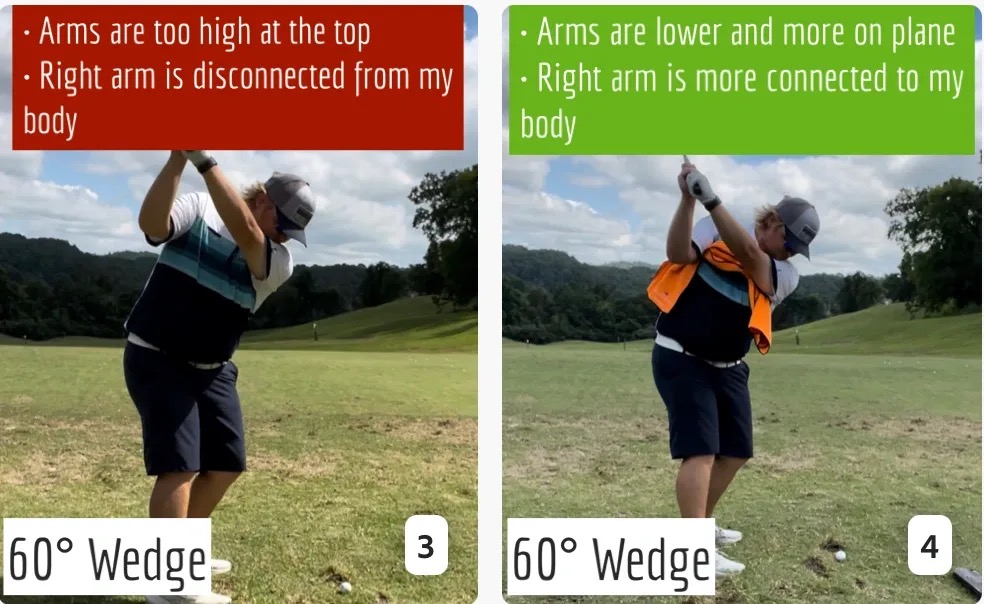
Many of us struggle to have proper shoulder rotation in our golf swing, especially during long layoffs. Making a swing that is all arms and no shoulders is a surefire way to have less control with wedges and less distance with full swings. Notice how I can get in a similar-looking position in both 60° wedge photos. However, one is weak and uncontrollable, while the other is strong and connected. One allows me to use my larger muscles to create my swing, and one doesn’t. The follow-through is another critical point where having a good connection, as well as solid shoulder rotation, is a must. This drill is great for those who tend to have a “chicken wing” form in their lead arm, which happens when it becomes separated from the body through impact.
In full swings, getting your shoulders to rotate in your golf swing is a great way to reinforce proper weight distribution. If your swing is all arms, it’s much harder to get your weight to naturally shift to the inside part of your trail foot in the backswing. Sure, you could make the mistake of “sliding” to get weight on your back foot, but that doesn’t fix the issue. You must turn into your trial leg to generate power. Additionally, look at the difference in separation between my hands and my head in the 8-iron examples. The green picture has more separation and has my hands lower. This will help me lessen my angle of attack and make it easier to hit the inside part of the golf ball, rather than the over-the-top move that the other picture produces.
Stay Better Connected in the Backswing
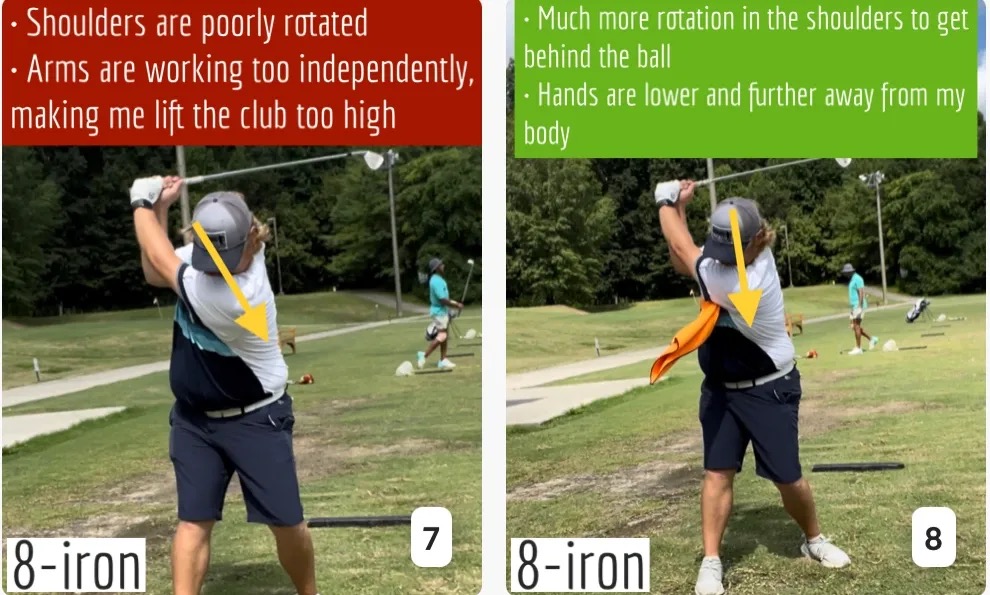
When you don’t keep everything in your upper body working as one, getting to a good spot at the top of your swing is very hard to do. It would take impeccable timing along with great hand-eye coordination to hit quality shots with any sort of regularity if the arms are working separately from the body.
Notice in the red pictures of both my 60-degree wedge and 8-iron how high my hands are and the fact you can clearly see my shoulder through the gap in my arms. That has happened because the right arm, just above my elbow, has become totally disconnected from my body. That separation causes me to lift my hands as well as lose some of the extension in my left arm. This has been corrected in the green pictures by using this drill to reinforce that connection. It will also make you focus on keeping the lead arm close to your body as well. Because the moment either one loses that relationship, the towel falls.

Conclusion
I have been diligent this year in finding a few drills that target some of the issues that plague my golf game; either by simply forgetting fundamental things or by coming to terms with the faults that have bitten me my whole career. I have found that having a few drills to fall back on to reinforce certain feelings helps me find my game a little easier, and the “towel drill” is most definitely one of them.
- LIKE11
- LEGIT1
- WOW2
- LOL0
- IDHT0
- FLOP2
- OB0
- SHANK8
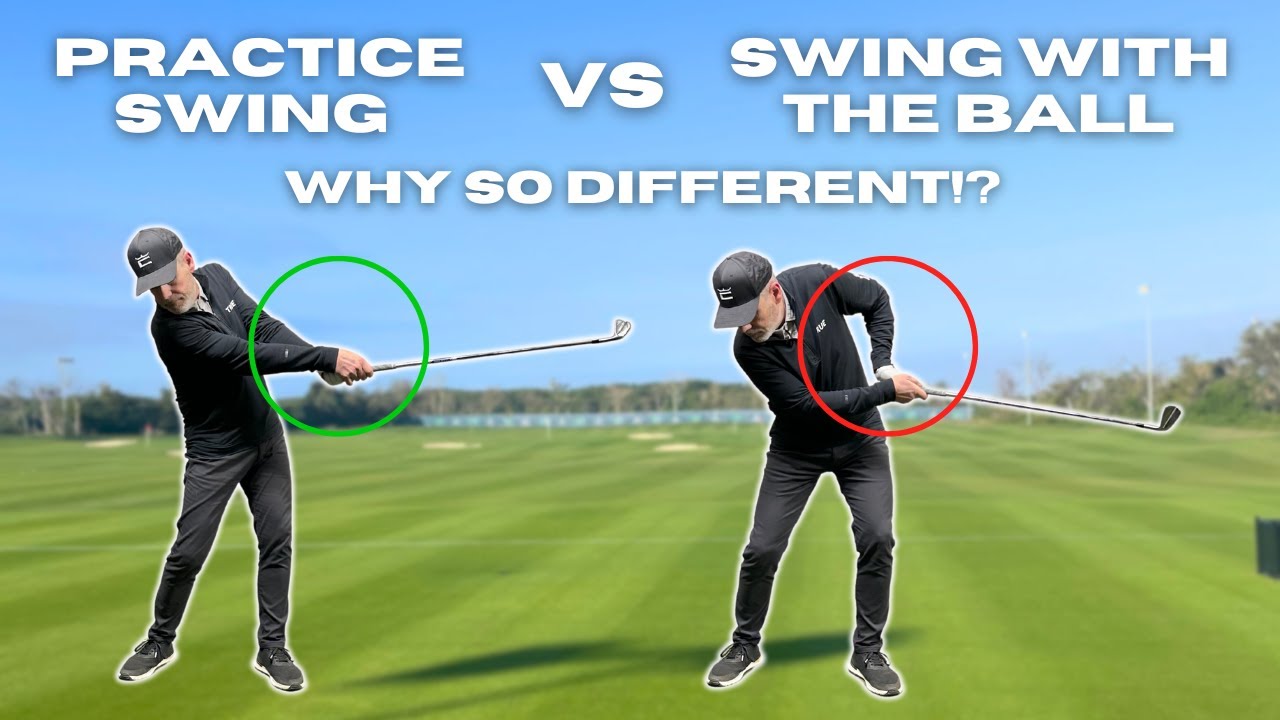
You hear that one all the time; I wish I could put my practice swing on the ball! We explain the huge importance of what to focus on to allow the ball to be perfectly in the way of your practice swing. Enjoy!
- LIKE0
- LEGIT0
- WOW0
- LOL0
- IDHT0
- FLOP0
- OB0
- SHANK2


The Wedge Guy: Golf mastery begins with your wedge game

Tour pro calls Anthony Kim a ‘f*****g idiot’ following Instagram comeback post

Insider photos from Tiger Woods’ launch event for his new “Sun Day Red” apparel line

John Daly stuns fans into silence with brutal opening tee shot on PGA Tour Champions

Anthony Kim WITB 2024 (February)

This Rory McIlroy post-round ‘The Match’ moment is going viral…but all is likely not what it seems

Scottie Scheffler WITB 2024 (March)

Photos from the 2024 Arnold Palmer Invitational

Anthony Kim’s speculated LIV Golf sign-on fee may surprise you

Tiger Woods opts for veteran caddie to loop for him this week at Riviera


Cameron Young WITB 2024 (March)
Cameron Young WITB accurate as of the Valspar Championship. Driver: Titleist TSR3 (9 degrees) Shaft: Accra Tour Z5 65 M5...


Nelly Korda WITB 2024 (March)
Nelly Korda’s WITB accurate as of her win at the Fir Hills Seri Pak Championship. Driver: TaylorMade Qi10 Max (10.5...


Peter Malnati’s winning WITB: 2024 Valspar Championship
Driver: Titleist TSR3 (10 degrees) Buy here. Shaft: Project X Denali Blue 60 TX 3-wood: Titleist TSi3 (15 degrees) Buy here....


Taylor Montgomery WITB 2024 (March)
Taylor Montgomery what’s in the bag accurate as of the Cognizant Classic. Check out more photos from the event here. ...
-
 19th Hole20 hours ago
John Daly stuns fans into silence with brutal opening tee shot on PGA Tour Champions
-
 Whats in the Bag3 weeks ago
Scottie Scheffler WITB 2024 (March)
-

 19th Hole3 weeks ago
Paulina Gretzky opens up on receiving death threats following DJ’s move to LIV Golf
-

 19th Hole3 weeks ago
Vincenzi’s LIV Golf Hong Kong betting preview: Trio of major champs primed for big week
-

 19th Hole5 days ago
2-time major champ announces shock retirement from the sport at age of 33
-

 19th Hole6 days ago
Edoardo Molinari reveals the latest PGA Tour golfer to turn down ‘good offer’ from LIV Golf
-

 19th Hole1 week ago
Scottie Scheffler had an interesting response when asked how he ‘quiets the noise’ following Players victory
-

 19th Hole7 days ago
Jon Rahm dealt fresh blow to hopes of qualifying for 2025 Ryder Cup
Roger
Feb 22, 2014 at 1:33 pm
Tom, thanks for a great article.
I was getting the Spine Tilt wrong and Not enough Wrist Hinge.
Yesterdays bunker shots, 30m long one perfect
and the Tuff 60 degree high over the Lip to the Down hill Pin
worked with renewed accuracy and boosted confidence a lot!
Thanks !
Tom Stickney
Feb 22, 2014 at 10:09 pm
Appreciate it. Now stay out of the bunkers! 🙂
Anthony
Feb 19, 2014 at 2:07 am
Hey Tom,
Totally agree but if I may add 1 thing that I find is a big help with the average amateurs inconsistency is the amount that they tend to sway when attempting to get out of bunkers. I teach all the things you mentioned above but include the philosophy of being as calm in the lower body as possible to create maximum consistency. Also the relaxed hands, wrists and arms allows the hinge to happen more naturally.
Nice article,
Regards,
Anthony.
Tom Stickney
Feb 19, 2014 at 9:58 am
Spot on sir!
Andrew
Feb 18, 2014 at 12:28 pm
How far apart should the “two snakes” be?
Tom Stickney
Feb 18, 2014 at 1:39 pm
2-3 inches before and after ball