Instruction
Master these 3 set-up keys for fewer 3 putts
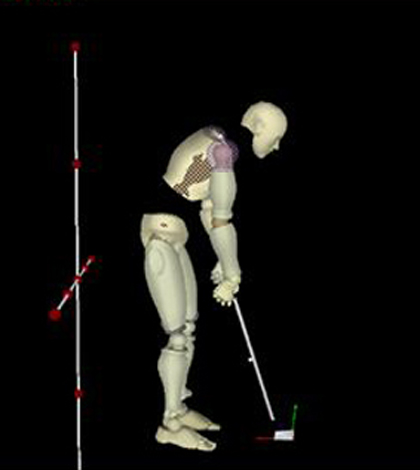
It seems that everyone wonders why they do not make more putts. But if you consider the multitude of variables that affect putting, it is a wonder that golfers make any at all.
Identifying the most important factors within the set-up will help you to make more putts on a daily basis. But let’s not forget, putting is a tough task for anyone to master because it places golfers to the side of a golf ball that is sitting on sloped ground. That can alter visual acuity, causing you to see the “incorrect” line, or settle into a posture that makes it much harder to move the putter back and forth consistently.
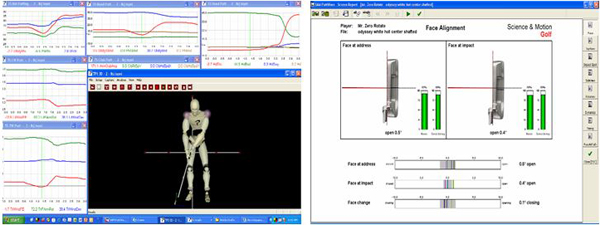
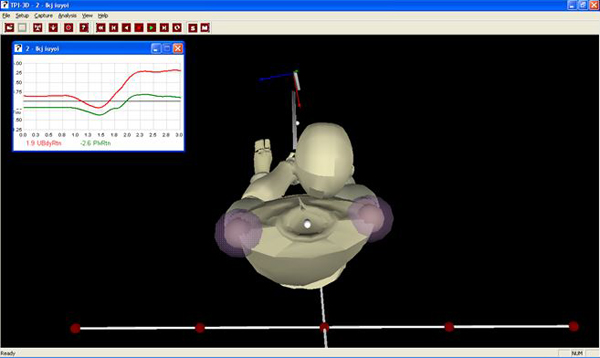
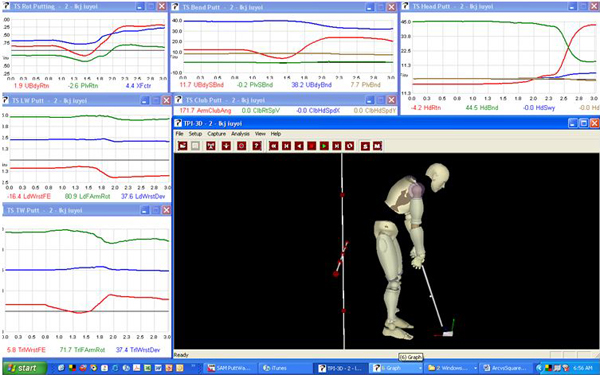
Within my putting academy, I use many high-tech tools in order to examine putting strokes. This article will feature discussion of the Advanced Motion Measurement’s 3D Analysis System and the SAM PuttLab by Science and Motion Sports. These high-tech tools give instructors a personal MRI of a golfer’s putting stroke and provide the player with research and a treatment value.
The putting research I have done has been benefited greatly by the relationship I have developed with Lanny L. Johnson, M.D. and PGA Tour player Howard Twitty. They have tested more than 150 PGA Tour players’ putting strokes during the last several years on the SAM PuttLab. For this article, I have merged our putting data together and believe that this may be the most accurate analysis to date in regards to alignments, posture and aiming.
The three major categories that players must understand during the set-up position are the following:
1. The Proper Alignments of the Body (Frontal View)
- Stance
- Grip
- Center of gravity (CG) control
- Spinal tilt and the “low point” of the stroke
- The proper ball position
- The ball’s position and its influence on aiming
- Illusion of the putter shaft
2. The Proper Posture (Down the Line View)
- Putter fitting
- The “flowlines” of the body
- Rear forearm “on-plane”
- The eyes
- Head and chin positioning
- The proper forward bending of the torso
- Your center of gravity
3. Proper Aiming
- Address aim and impact aim
- Putter geometry
- The “best” tested aiming routine
The Proper Alignments of the Body
Body: You must have the ability to understand where your body is in space and have the “feel” to place your body in the proper position consistently.
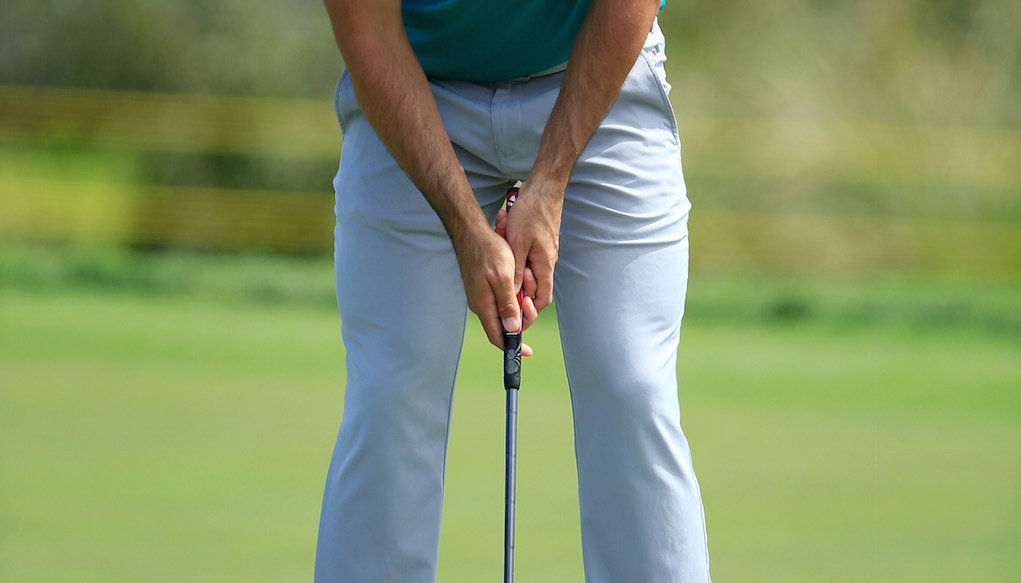
Grip: Different putting grips have certain positives and negatives based on the different handicap levels; however, once you pick the grip style that best suits your stroke it is important to remember one fundamental. The best putting grips are ones that have the palms facing one another and the thumbs down the center of the grip. With this being said, there are several grip styles that go against this concept (i.e. the claw), but they are used for specific flaws within a player’s game so they match up with what they are trying to do — this is OK. However, most players will find that a palms-facing style will be the easiest to reproduce on a consistent basis.
Stance Width: As with any type of stroke that needs accuracy, it is important that you have a firm base in order to balance your torso during the motion. With putting, it is no different. Studies have shown that narrower stances tend to allow the body to rotate too much on longer putts, while wider stances deliver the most stability and the required “tilting and rocking” of the shoulders. The actual width of the stance is not as important on putts from 15 feet and in, but it is very important on putts outside of this length because of the issues listed above. In fact, putts outside 30 feet (on non-PGA Tour greens) require a harder hit, which changes the mechanics from those in the typical putting stroke.
Center of gravity (CG) control: Even with the proper stance width, it is important that you have the proper balance from side to side. The proper center of gravity (CG) at address is necessary in order to keep your body stable (not sliding from side to side during the stroke). Most players have their CG between 55 percent left to 55 percent right, depending on where they like to feel their weight. Remember that your CG will influence your stability, as well as the low point of your putting stroke.
Spinal tilt and the low point of your stroke arc: The lateral (side-to-side) bending of the spine influences the low point of the stroke, and you must make sure your spinal tilt, CG and stance width all correlate. Your grip style also influences the tilting of the spine as well. If you move any of these factors out of position, you will have poor balance and very little control as to where the putter “bottoms-out” during the forward stroke.
Whenever the spine is tilted too much toward or away from the target at address, the “low point” will move and thus the ball’s position must be altered as well.
When the spine tilts toward the target at address (as shown above), the golfer’s CG tends to shift to the left (for a right-handed golfer). It also changes the low point of a golfer’s stroke arc.
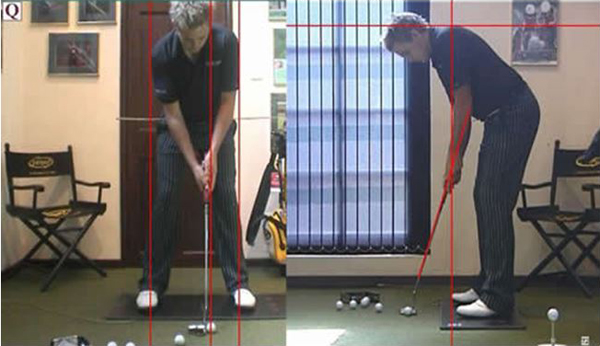
Ball: Testing has shown that there is no ideal ball position for all golfers. The ball’s position should be just after the low point of the putting stroke arc, and it should match up with a golfer’s frontal posture. The best way to figure out this correlation is to set up in front of a mirror (shown below) and see if everything looks balanced and “centered.” Then, you will be able to adjust your ball position to match up with the low point of your stroke and its needs.
Ball position and its influence on impact aiming:
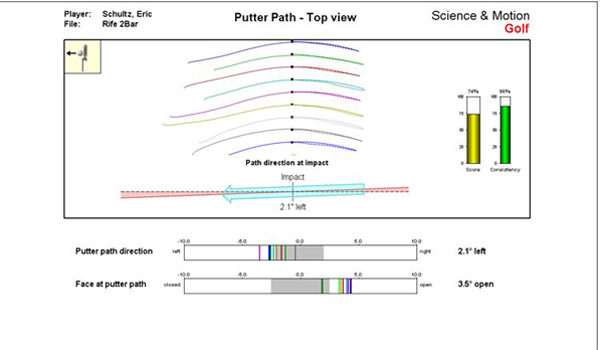
In order to understand your correct ball position, you must first have your torso alignments and postures correct. Then you must match your ball position with the size of your arc. The SAM can measure your arc size (as you can see from the above player), as the size of the arc increases the importance of ball position in your stance. If the player above placed the ball too far back in his stance, the ball would tend to hang out to the right unless compensations were made by the hands.
I would suggest finding an instructor with a SAM unit in order to help you determine the “exact” ball position for your arc size. The only other way to do this would be to experiment with a video camera looking down at the ball from outside the line.
Illusion of the puttershaft
In the picture above, you will notice that the putter shaft is perpendicular to the ground, however, as this player looks down the shaft will appear to be backward leaning (photo below).
Though the putter shaft appears to be leaning from the players’ view, it is basically perpendicular (the club shaft is only leaning 0.2 degrees forward). Make sure that you understand this visual “illusion” so you can set your putter perpendicular to the ground at address.
The Proper Posture
Putter Fitting: If you pick up just about any putter off the rack in your local golf shop, you will find that most are about the same length and lie (34 inches and 71 degrees). This is because manufactures build putters in bulk. The cost of customizing each putter before shipment would make putter sales way too slow and expensive for the average player, and this is what we have to contend with as golfers.
My suggestion is to pick a putter that you like the look of and have it custom fit by your local professional or club repair technician. If you do this, you will have a fighting chance to make more putts than you did without the proper putter fitting. In fact, the putter has the least margin for error of any club in your bag. However, less than five percent of the golfers today get fit correctly!
The “flowlines” of the body: 3D and SAM testing has shown that when your body’s “flowlines” are all aligned and pointing in the same direction, most players have a better chance of making a more consistent stroke.
Over time, instructors have seen great putters align themselves “open” or left of their target line with their body because they said they could “see the line” better. However, with the advent of 3D-motion analysis and the SAM Putt Lab, instructors now know that this is a very inefficient way to set up to the ball because it causes the shoulders to point too far left, which means the putter path will follow suit. Doing this almost necessitates a physical compensation within the putting stroke in order to not begin the ball too far left of the line you have chosen. Over time, the body will physically compensate for your faulty alignment, because instructors have come to learn that the body is smarter than the brain.
Setting up “open” will cause your flowlines and visual perception to be altered.
Your stroke path will compensate as well, producing an out-to-in path, UNLESS an intentional physical manipulation is made during the stroke!
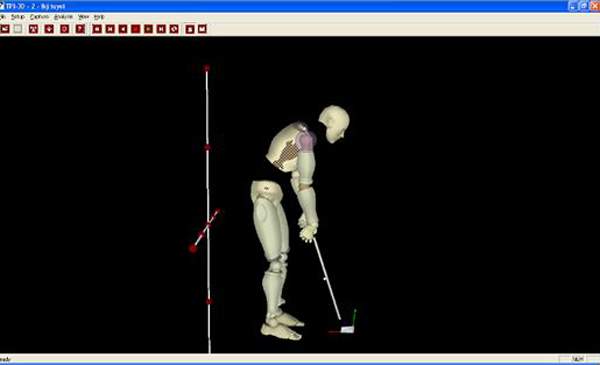
Rear forearm on-plane: One of the most forgotten fundamentals of putting is to keep your rear forearm on plane with the club shaft at address. If you draw a line up from the club shaft, it should bisect the rear forearm. This ensures that the rear arm can power the stroke down the line that a golfer chooses. It is this very reason why “the claw” and the cross-handed grips work for so many golfers.
When the rear forearm rides “high” it can stem from several sources:
- Your rear-hand grip could be in an overly weak position (too much on top of the club shaft).
- Your shoulders could be open to your intended target line.
- Your spine could be leaning too much toward the target at address. A “cross-handed” grip can solve this problem, and has been the solution of choice for many players who fight a high rear forearm.
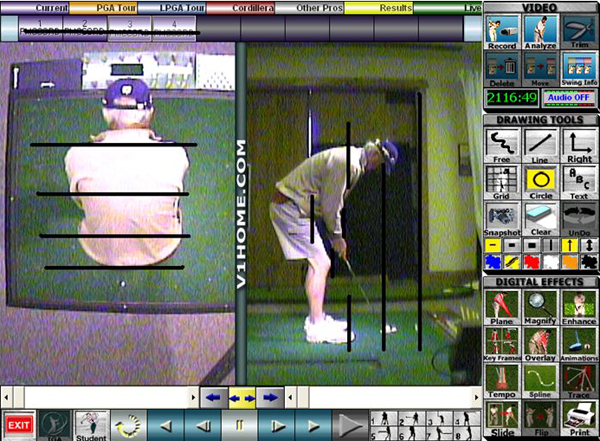
As you can see with the stick-figure above, this player’s rear forearm is above the plane of the shaft. This causes an out-to-in stroke path, which result in pushes and pulls.
The Eyes: The brain sees a target most accurately with the dominant eye. Eye dominance is not dissimilar to hand or foot dominance.The brain favors only one of the two eyes to define the body’s relation to the target in terms of direction, and habitually uses only that eye to target objects and locations in space in terms of direction. Over time, the vision yielded by the other eye is ignored by the brain, so effectively when we sight targets we use only our dominant eye. Trying to target only with the non-dominant eye is a little like trying to sign your name with the wrong hand: it can be done, but not gracefully.
To Determine Your Eye Dominance: Try holding both hands out at arm’s length, thumbs up side by side like a gun sight. Use the sight to target a distant object with both eyes open. Close the right eye. If the object jumps to the left, you are right-eye dominant. Confirm this by opening both eyes, re-sighting, and then closing the left eye. The object will remain in the sight. You are left-eye dominant if when you close the right eye the object remains sighted, and when you use only the right eye, the object jumps to the right of the sight.
Two-eyed vision is necessary for depth perception, one of many distance clues, but it has little to do with locating the proper direction sighting. Here, only the dominant eye matters. And you must place the dominant eye on the line that extends from the target back to the ball and extending to you, so if you face directly toward the target, looking at the ball and the line, your dominant eye will be on the line and your nose and center of your body will be just to the side of the line. You also need to stand square to the line: that is, parallel/horizontal lines across your eyes, ears, shoulders, hips, knees and ankles should all be perpendicular to the line of the putt, as stated on “The Putting Zone” in an article by Geoff Mangum.
Head position: In studies done by Howard Twitty and Dr. Lanny Johnson on the PGA Tour have found that in order to place your eyes in the most advantageous position for interpreting the truth in alignment, it is necessary for you to optimize the position of your head relative to the ground.
Moving the head down from the usual “chin-up” position so that your chin and eyes are in the same plan provides the best look down the line. The chin-up position that most players possess will erroneously look to the left (for a right-handed golfer). The “level-headed” position will allow the brain to better code the information given by your eyes. The easiest way to ensure your head is in the correct position is to make sure that the plane “drawn” through your chin and forehead are parallel to the ground.
Ninety-nine percent of the golfers will have their chin “up” slightly, causing the eyes to actually look downward in their sockets in order to see the ball’s line. This, along with the dominant eye information from above, helps you to understand how easy it would be to move your eyes and body your of the proper alignment. The unsuspected error of looking left with the head up is best illustrated with a training aid called “The Pro-Aim Glasses” that can be found on www.golftrainingstuff.com.
The incorrect head position causes the eyes to look “out and down” in order to see the ball’s target line. This will alter the flowlines of your body, which requires a mental and physical compensation.
The Proper Forward Bending of the Torso:
When the putter is correctly fit for the player in regards to its length and lie, you will find that the eyes will be over the ball, and the proper forward bending of the spine will happen naturally. The proper forward bending of the spine for most players is between 33 to 37 degrees at address. If you get much more or much less bending, you will find that you will have a hard time keeping your arms free from your body and your eyes over the ball. In order to have the proper forward bending at address, you MUST have your putter fit to your body. Do NOT try and accommodate the putter’s length and lie by setting up differently than you do naturally!
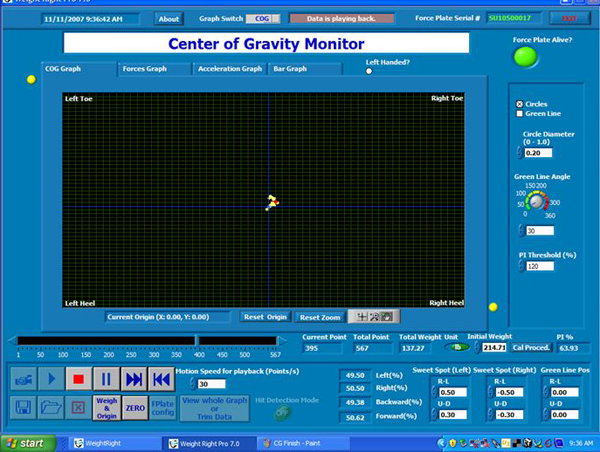
Center of Gravity: When the body has the proper alignment (flow lines to the fitting of your putter) the last step is to make sure you are in balance from back to front in regards to your feet. This balance is also important as stated above with your side-to-side balance. Thus, if you are out of balance in any way you will have trouble staying still!
As you can in the CG monitor analysis above, this player is balanced from side-to-side, but he is also balanced from back-to-front. This is shown by the percentage of weight on each portion of the foot on the lower left of the CG Screen. This dynamic balance helps golfers remain stable during the putting stroke and will ensure a solid centered impact of the putter with the ball.
Proper Aiming
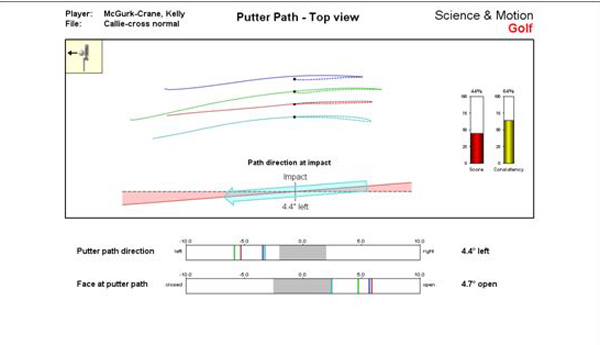
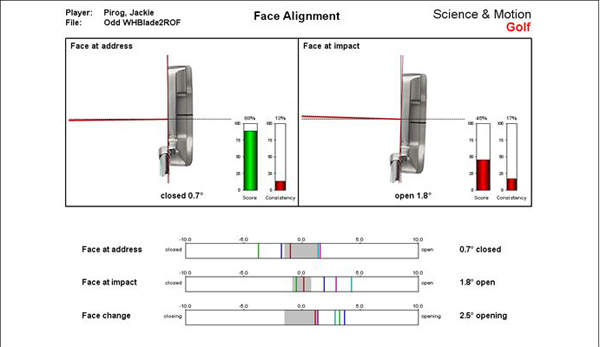
Address Aim and Impact Aim: The “alignment aim” of the putter head relative to your chosen targetline is your address aim, while the direction your putter face is pointing at impact is called the impact aim. The impact aim is the more important concept of the two.
Alignment of the face at impact is the most important factor in determining what direction the ball leaves the blade, and it is the benchmark for your body to understand. In fact, impact aim accounts for 83 percent of ball error! If you are one degree off at impact, the ball will be 3 inches off your intended target line at 15 feet. This one degree of error is more than enough to miss your intended 15 footer!
Most consistent putters have the putter aligned at address between 0 and 0.5 degrees at address, and they return their putter at impact within the same range. However, there are some exceptions. One top putter on the PGA Tour aligns his blade 2.2 degrees to the right very consistently yet returns the blade to impact on the line he originally determined. While this is not the best way to putt, it can be said that if you consistently aim in the same manner (open or closed), the body can adjust to this to some degree. This is best illustrated by the golfer who unknowingly lines up to the right of a target with a 7 iron. While performing the shot, his body will respond by pulling the shot back on line. Although a golfer may perceive that they are aligned correctly intellectually, their body knows better and will often make the appropriate correction during the golf swing. This happens with the putter on a daily basis as well.
If you have no alignment consistency at address, then your body must make a different compensatory adjustment each time at impact. This will not allow you to have the same impact aim either, which is represented by the image above. This player cannot aim the putter at address the same way twice, giving him a consistency score of 13 percent and a face-at-impact score of 17 percent.
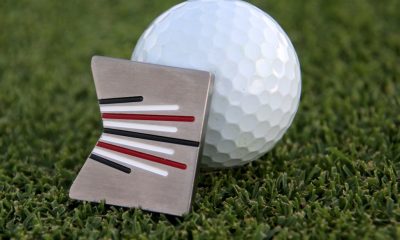
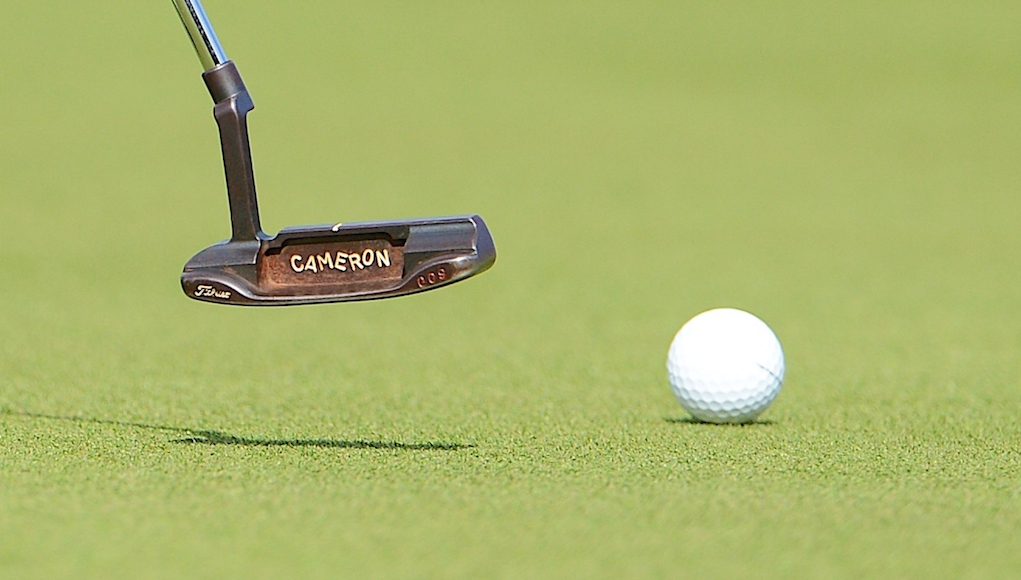
Putter geometry: Studies with SAM have also showed that a putter with a rectangle somewhere on the top and perpendicular aiming lines help most players line up more effectively at address. Using such rectangle-shaped putters and a ball with an aim line drawn on it has proven to be the most effective way to line up a putt at address for the average player. Putters with curved, circle or half-moon designs give players the most trouble with alignment.
Two points to consider:
- “Square” geometry provides the best opportunity for the player to bring the putter face back to square at impact.
- “Rounded” geometry is otherwise confusing to the brain, and gives no inherent hint of direction.
This does not mean that you must only use “blocky” types of putters, however, if you choose to use “rounded” putter head designs it is more challenging from a psychomotor standpoint. In this case, we recommend reading off the face of the putter itself. Thus, if you consistently have alignment issues, then you might need to adopt a more “blocky” putter design due to the facts above.
The “best” tested aiming routine: The best alignment routine I have seen to date and used personally comes from the Tour testing done by Dr. Lanny Johnson and Howard Twitty. This aiming technique uses the golfer’s innate ability to understand his own spatial relationship and his natural skills to place the putter in the correct position naturally.
- The player stands behind the ball and views the intended target line. Consider for a moment how you would aim a rifle. You put the rifle up and look down the barrel — you don’t stand to the side and aim it this way.The best way to aim a gun and a putt is looking from down the line only.
- Next, approach the ball from behind with the putter in the dominant hand, walking toward the ball. The instant that you turn and look down at the ball, rest the putter head on the ground immediately behind the ball.
- Without looking up, assume your stance and grip the putter with your other hand.
- From there, look once at the hole to identify the distance and go. Do NOT try and re-aim the putter again. You have already set the alignment you need from behind the ball.
Amazingly, SAM testing confirms that in two to three attempts the golfer who previously had alignment problems is almost perfectly on line using this method. This is an example of the “body being smarter than the brain.” One of the best putters on the PGA Tour, Aaron Baddeley, has been observed to use features of this method. Over the ball, he looks at the hole to confirm its position and quickly strikes the ball. We believe this is why he one of the Tour’s best putters consistently.
The Conclusion
Serious golfers must take the time to understand the three set-up issues that control their overall consistency on the greens: alignments, posture and aiming. Use the subsections of each category to analyze your current stroke and see if you are deficient in any of the area discussed above. If so, you will find that putting inconsistently is a byproduct of your set-up position, not your stroke itself.
- LIKE1
- LEGIT0
- WOW0
- LOL0
- IDHT0
- FLOP0
- OB0
- SHANK0
Instruction
The Wedge Guy: The easiest-to-learn golf basic
My golf learning began with this simple fact – if you don’t have a fundamentally sound hold on the golf club, it is practically impossible for your body to execute a fundamentally sound golf swing. I’m still a big believer that the golf swing is much easier to execute if you begin with the proper hold on the club.
As you might imagine, I come into contact with hundreds of golfers of all skill levels. And it is very rare to see a good player with a bad hold on the golf club. There are some exceptions, for sure, but they are very few and very far between, and they typically have beat so many balls with their poor grip that they’ve found a way to work around it.
The reality of biophysics is that the body moves only in certain ways – and the particulars of the way you hold the golf club can totally prevent a sound swing motion that allows the club to release properly through the impact zone. The wonderful thing is that anyone can learn how to put a fundamentally sound hold on the golf club, and you can practice it anywhere your hands are not otherwise engaged, like watching TV or just sitting and relaxing.
Whether you prefer an overlap, interlock or full-finger (not baseball!) grip on the club, the same fundamentals apply. Here are the major grip faults I see most often, in the order of the frequency:
Mis-aligned hands
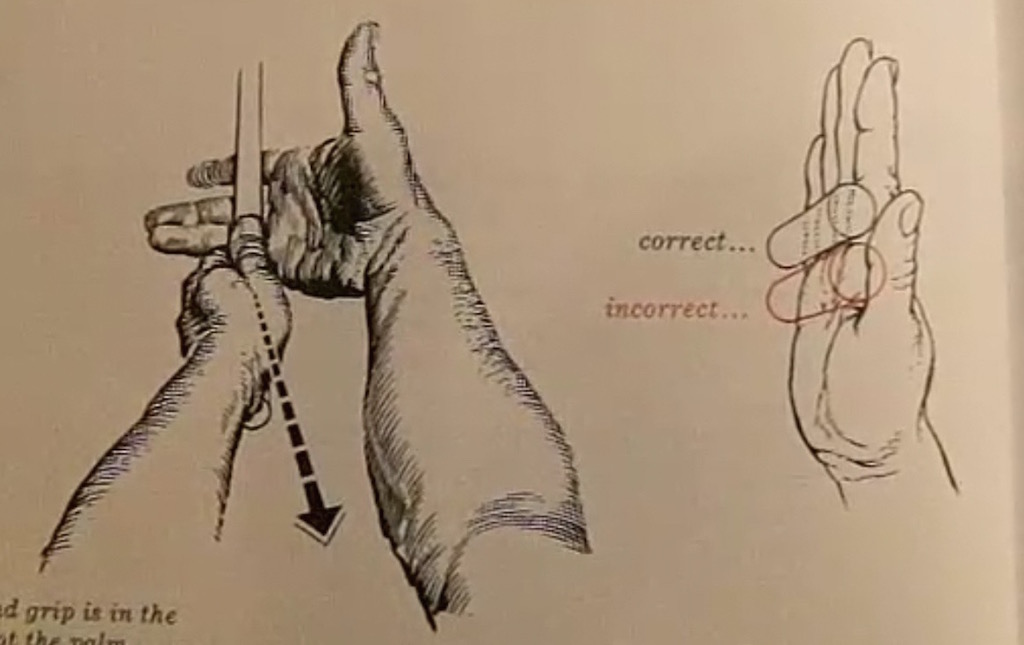
By this I mean that the palms of the two hands are not parallel to each other. Too many golfers have a weak left hand and strong right, or vice versa. The easiest way to learn how to hold the club with your palms aligned properly is to grip a plain wooden ruler or yardstick. It forces the hands to align properly and shows you how that feels. If you grip and re-grip a yardstick several times, then grip a club, you’ll see that the learning curve is almost immediate.
The position of the grip in the upper/left hand
I also observe many golfers who have the butt of the grip too far into the heel pad of the upper hand (the left hand for right-handed players). It’s amazing how much easier it is to release the club through the ball if even 1/4-1/2″ of the butt is beyond the left heel pad. Try this yourself to see what I mean. Swing the club freely with just your left hand and notice the difference in its release from when you hold it at the end of the grip, versus gripping down even a half inch.
To help you really understand how this works, go to the range and hit shots with your five-iron gripped down a full inch to make the club the same length as your seven-iron. You will probably see an amazing shot shape difference, and likely not see as much distance loss as you would expect.
Too much lower (right) hand on the club
It seems like almost all golfers of 8-10 handicap or higher have the club too far into the palm of the lower hand, because that feels “good” if you are trying to control the path of the clubhead to the ball. But the golf swing is not an effort to hit at the ball – it is a swing of the club. The proper hold on the club has the grip underneath the pad at the base of the fingers. This will likely feel “weak” to you — like you cannot control the club like that. EXACTLY. You should not be trying to control the club with your lower/master hand.
Gripping too tightly
Nearly all golfers hold the club too tightly, which tenses up the forearms and prevents a proper release of the club through impact. In order for the club to move back and through properly, you must feel that the club is controlled by the last three fingers of the upper hand, and the middle two fingers of the lower hand. If you engage your thumbs and forefingers in “holding” the club, the result will almost always be a grip that is too tight. Try this for yourself. Hold the club in your upper hand only, and squeeze firmly with just the last three fingers, with the forefinger and thumb off the club entirely. You have good control, but your forearms are not tense. Then begin to squeeze down with your thumb and forefinger and observe the tensing of the entire forearm. This is the way we are made, so the key to preventing tenseness in the arms is to hold the club very lightly with the “pinchers” — the thumbs and forefingers.
So, those are what I believe are the four fundamentals of a good grip. Anyone can learn them in their home or office very quickly. There is no easier way to improve your ball striking consistency and add distance than giving more attention to the way you hold the golf club.
More from the Wedge Guy
- The Wedge Guy: Golf mastery begins with your wedge game
- The Wedge Guy: Why golf is 20 times harder than brain surgery
- The Wedge Guy: Musings on the golf ball rollback
- LIKE85
- LEGIT13
- WOW6
- LOL1
- IDHT0
- FLOP4
- OB1
- SHANK8
Instruction
Clement: Stop ripping off your swing with this drill!

Not the dreaded headcover under the armpit drill! As if your body is defective and can’t function by itself! Have you seen how incredible the human machine is with all the incredible feats of agility all kinds of athletes are accomplishing? You think your body is so defective (the good Lord is laughing his head off at you) that it needs a headcover tucked under the armpit so you can swing like T-Rex?
- LIKE0
- LEGIT2
- WOW2
- LOL0
- IDHT0
- FLOP0
- OB0
- SHANK2
Instruction
How a towel can fix your golf swing
This is a classic drill that has been used for decades. However, the world of marketed training aids has grown so much during that time that this simple practice has been virtually forgotten. Because why teach people how to play golf using everyday items when you can create and sell a product that reinforces the same thing? Nevertheless, I am here to give you helpful advice without running to the nearest Edwin Watts or adding something to your Amazon cart.
For the “scoring clubs,” having a solid connection between the arms and body during the swing, especially through impact, is paramount to creating long-lasting consistency. And keeping that connection throughout the swing helps rotate the shoulders more to generate more power to help you hit it farther. So, how does this drill work, and what will your game benefit from it? Well, let’s get into it.
Setup
You can use this for basic chip shots up to complete swings. I use this with every club in my bag, up to a 9 or 8-iron. It’s natural to create incrementally more separation between the arms and body as you progress up the set. So doing this with a high iron or a wood is not recommended.
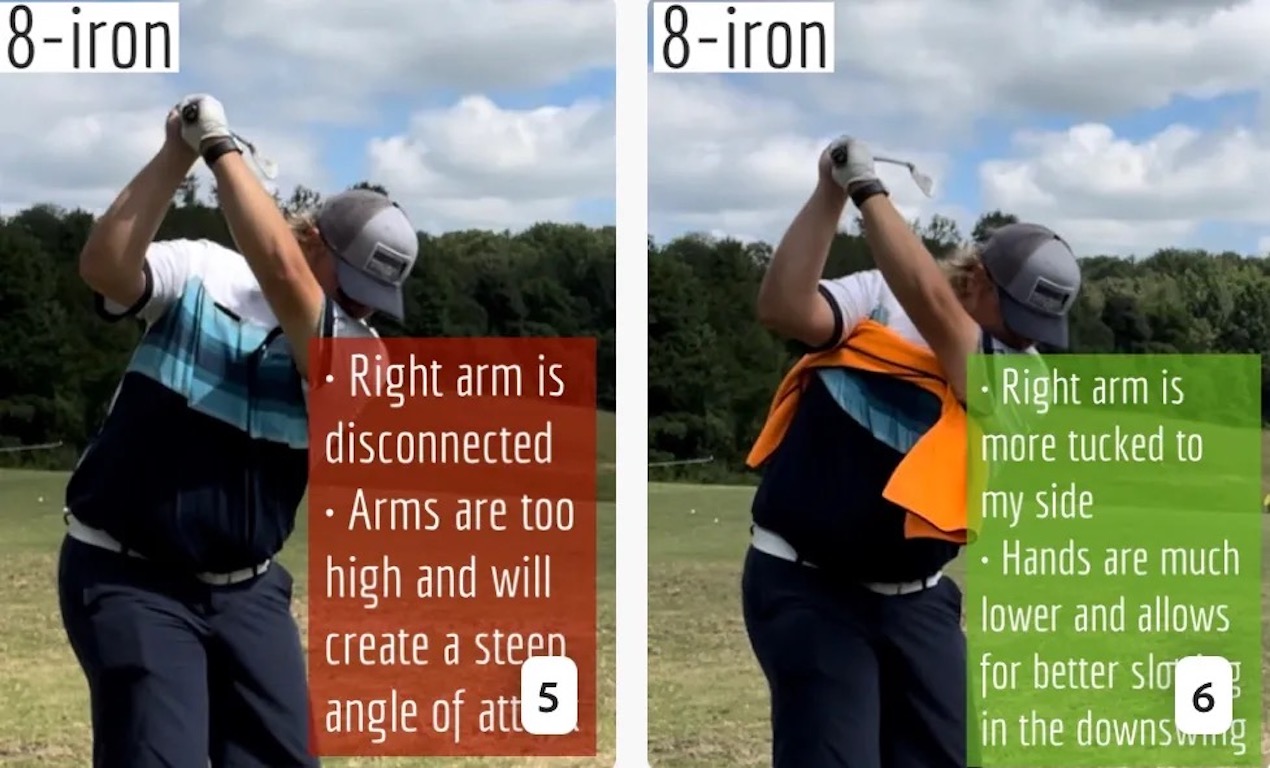
While you set up to hit a ball, simply tuck the towel underneath both armpits. The length of the towel will determine how tight it will be across your chest but don’t make it so loose that it gets in the way of your vision. After both sides are tucked, make some focused swings, keeping both arms firmly connected to the body during the backswing and follow through. (Note: It’s normal to lose connection on your lead arm during your finishing pose.) When you’re ready, put a ball in the way of those swings and get to work.
Get a Better Shoulder Turn
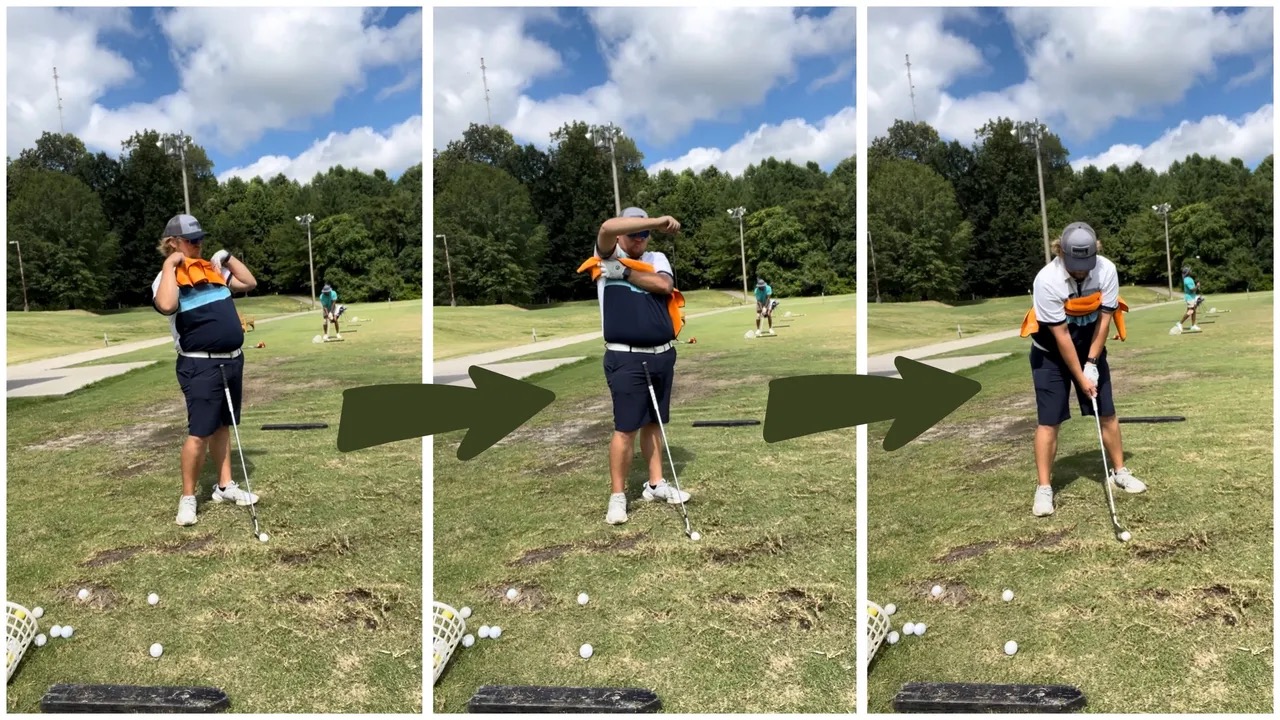
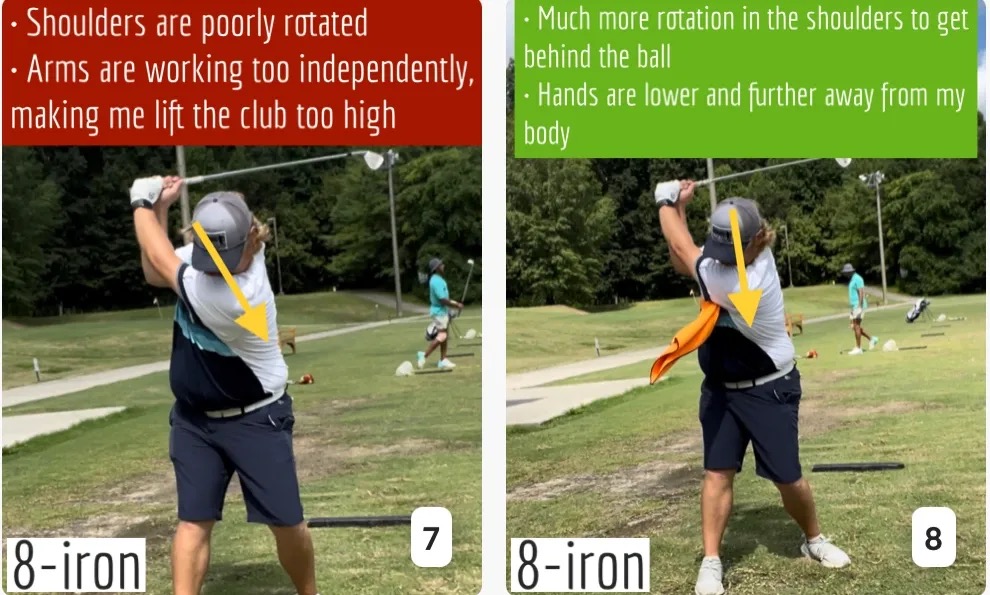
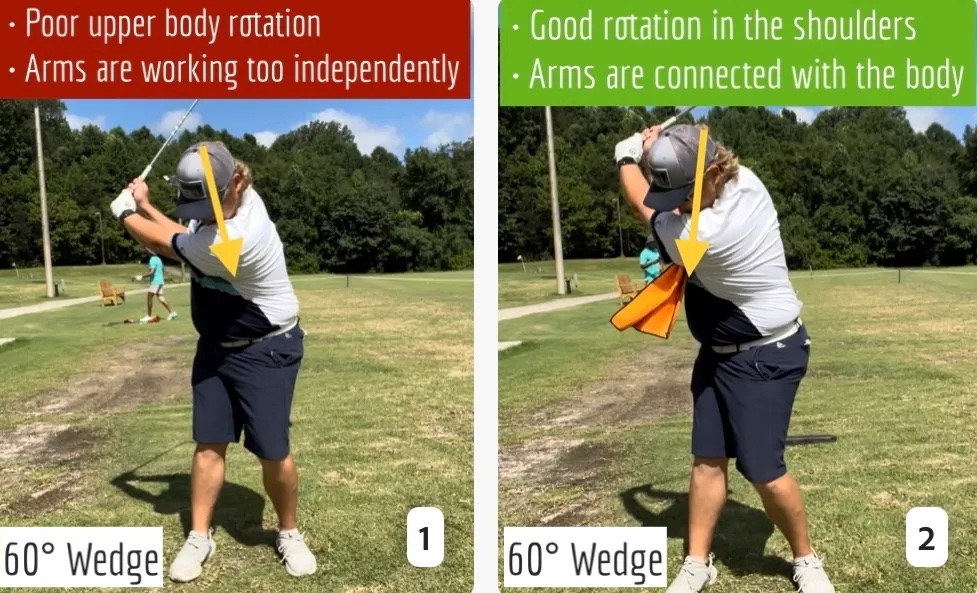
Many of us struggle to have proper shoulder rotation in our golf swing, especially during long layoffs. Making a swing that is all arms and no shoulders is a surefire way to have less control with wedges and less distance with full swings. Notice how I can get in a similar-looking position in both 60° wedge photos. However, one is weak and uncontrollable, while the other is strong and connected. One allows me to use my larger muscles to create my swing, and one doesn’t. The follow-through is another critical point where having a good connection, as well as solid shoulder rotation, is a must. This drill is great for those who tend to have a “chicken wing” form in their lead arm, which happens when it becomes separated from the body through impact.
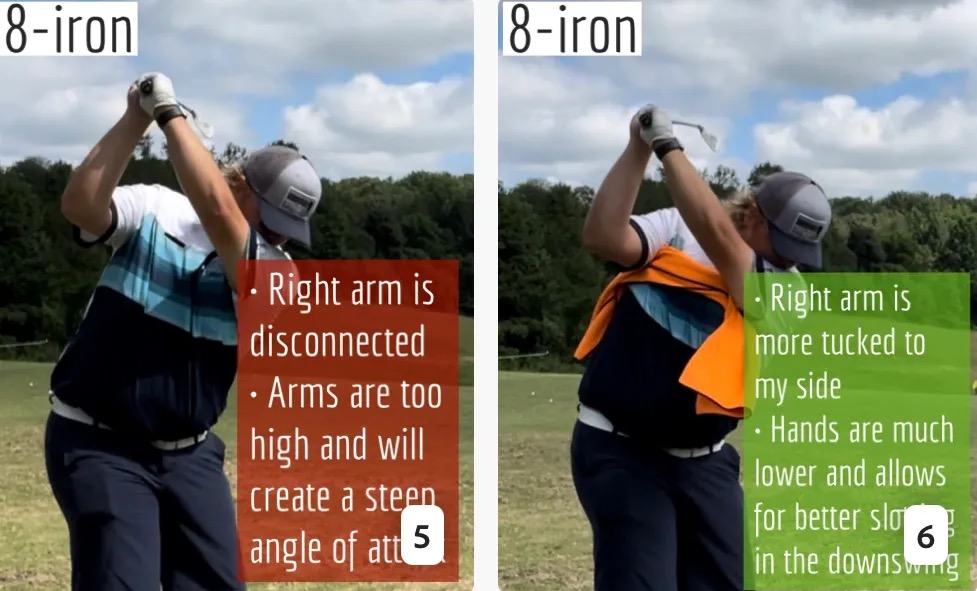
In full swings, getting your shoulders to rotate in your golf swing is a great way to reinforce proper weight distribution. If your swing is all arms, it’s much harder to get your weight to naturally shift to the inside part of your trail foot in the backswing. Sure, you could make the mistake of “sliding” to get weight on your back foot, but that doesn’t fix the issue. You must turn into your trial leg to generate power. Additionally, look at the difference in separation between my hands and my head in the 8-iron examples. The green picture has more separation and has my hands lower. This will help me lessen my angle of attack and make it easier to hit the inside part of the golf ball, rather than the over-the-top move that the other picture produces.
Stay Better Connected in the Backswing
When you don’t keep everything in your upper body working as one, getting to a good spot at the top of your swing is very hard to do. It would take impeccable timing along with great hand-eye coordination to hit quality shots with any sort of regularity if the arms are working separately from the body.
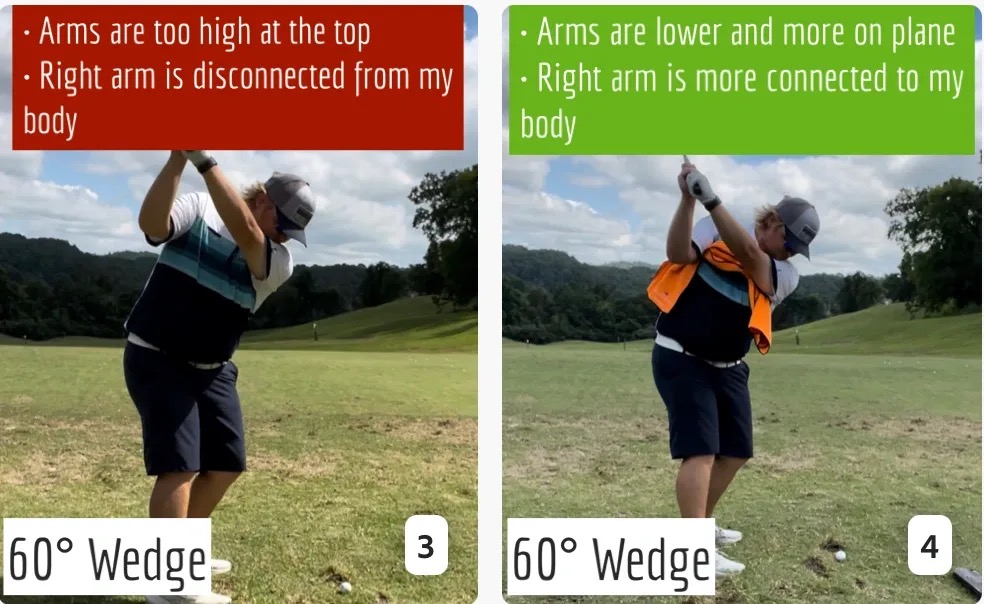
Notice in the red pictures of both my 60-degree wedge and 8-iron how high my hands are and the fact you can clearly see my shoulder through the gap in my arms. That has happened because the right arm, just above my elbow, has become totally disconnected from my body. That separation causes me to lift my hands as well as lose some of the extension in my left arm. This has been corrected in the green pictures by using this drill to reinforce that connection. It will also make you focus on keeping the lead arm close to your body as well. Because the moment either one loses that relationship, the towel falls.
Conclusion
I have been diligent this year in finding a few drills that target some of the issues that plague my golf game; either by simply forgetting fundamental things or by coming to terms with the faults that have bitten me my whole career. I have found that having a few drills to fall back on to reinforce certain feelings helps me find my game a little easier, and the “towel drill” is most definitely one of them.
- LIKE12
- LEGIT2
- WOW2
- LOL0
- IDHT0
- FLOP2
- OB0
- SHANK8
-

 19th Hole1 week ago
Dave Portnoy places monstrous outright bet for the 2024 Masters
-
 19th Hole2 weeks ago
Things got heated at the Houston Open between Tony Finau and Alejandro Tosti. Here’s why
-

 19th Hole1 week ago
Tiger Woods arrives at 2024 Masters equipped with a putter that may surprise you
-
 19th Hole2 weeks ago
Report: Tiger Woods has ‘eliminated sex’ in preparation for the 2024 Masters
-
 19th Hole3 days ago
Two star names reportedly blanked Jon Rahm all week at the Masters
-
 19th Hole3 days ago
Neal Shipley presser ends in awkward fashion after reporter claims Tiger handed him note on 8th fairway
-

 19th Hole2 weeks ago
Addiction, spinal fusion, and scam artists – Everything Anthony Kim revealed in candid interview with David Feherty
-

 19th Hole2 weeks ago
Anthony Kim says doctors told him that he ‘may not have much time left’ ahead of LIV return

















Tom Stickney
Oct 21, 2013 at 2:55 pm
Oops…hit button by accident. Not a chance…there are ALWAYS exceptions to the rules. I will say if you have that few putts you might need to work on hitting more greens???
Raymond CHASTEL
Oct 21, 2013 at 12:38 pm
Fine article and study ,very well documented and fantastically illustrated.I’m a fairly good putter(28/32 puts per round ) sometimes 25(I even went down to 20),but now I have read this study I feel I do every thing wrong ,at least not scientifically your way!I have the posture and stance of old time golfers (HENRY PICARD ,ALEX MORRISON and alia ),elbows stuck into the chest (“anchored”),long shaft (35 inches ),left hand grip -handle in the life line ,butt of handle slightly protruding and “stuck”to left forearm ,and I put more or less the BOBBY LOCKE way ,ball off left big toe ,stance closed 3 inches,long flowing stroke .Unconventional ,but it works fine for me .Should I change to putt way more orthodoxely?
Tom Stickney
Oct 21, 2013 at 2:52 pm
Not a chance!
Tom Stickney
Oct 21, 2013 at 11:00 am
Thx for the comments.
John
Oct 20, 2013 at 9:56 pm
I always just get up and hit the thing… sometimes it works – sometimes it doesn’t!!
Interesting article though…
jeff
Oct 20, 2013 at 2:13 pm
Well done
Chris b
Oct 20, 2013 at 3:34 am
what a wealth of information. Fantastic article, PDF’ing this one for future reference.
Tom Stickney
Oct 16, 2013 at 2:35 pm
Sadly I have not. But I’m sure it works well for many people. Thx.
nik
Oct 15, 2013 at 5:49 pm
wowwow. really great article. kudos. well done.
have you ever tested people putting sidesaddle?