Instruction
Help your driving with an “Air Divot”

Many times, there seems to be an unexplained void between a golfer’s ability to strike the driver as consistently solid as they do with their irons. They feel like they are making the same swing, but the contact is just not as sweet.
Obviously the driver is not designed to squash the ball between the club face and the ground, so the question is:
How do golfers get the same compressed strike with a driver that they get when squeezing an 8 iron off of the turf?
My suggestion is to take an “air divot.”
The air divot concept is one that I use to help golfers transition from irons to driver by heightening impact awareness when they no longer have the ground to compress the ball against.
We have all seen the photos of touring pros at impact with the driver. A straight line can be drawn from the fulcrum of the lead shoulder all of the way down to the club head. We know this means that the hands were slightly ahead of the ball at impact, the lead wrist was flat, the trail wrist was bent and the same relative alignments were achieved as when hitting a solidly stuck iron shot.
So what changes should there be when switching between the irons and driver, apart from ball placement and the fact that the object is now sitting in the air on a tee? Well, nothing has changed from a swing standpoint. The forward position and height of the tee places the ball at the proper low point on our swing arc, while the correct swing plane provides angle of attack and launch.
Most likely, the only thing that has changed for many golfers is the perception of impact and what they think they are trying to accomplish. So let’s use our same 8 iron swing, adjust our perceptions, and mash that driver!
Get your head out of the clouds and learn to take an air divot.
Impact Bag Forward Drill
(Use easy swings when hitting the bag with a driver so as not to damage the graphite shaft. Substituting a soft pillow is every bit as effective.)
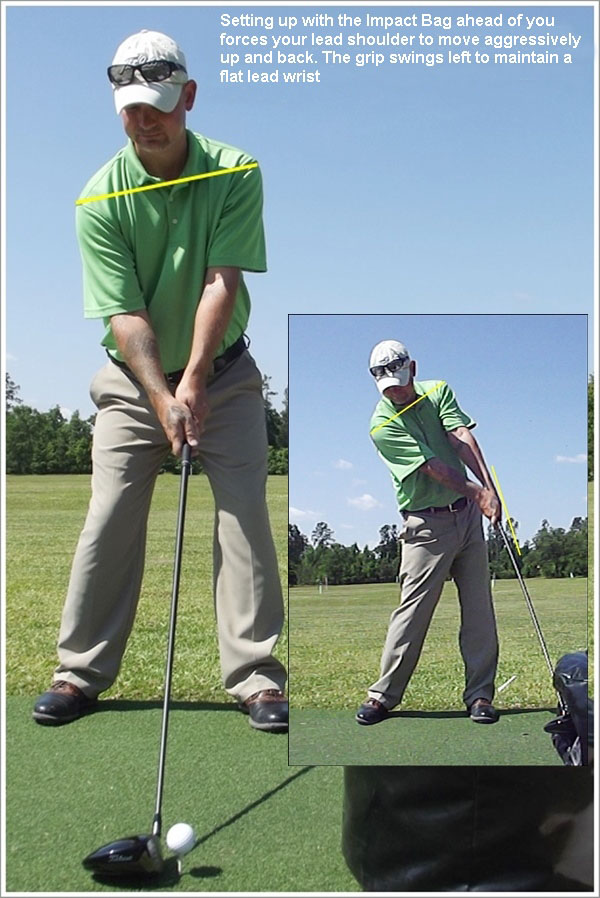
- Just as with the irons, we use an impact bag to freeze frame impact conditions; however, this time we are going to position the bag well forward in our stance.
- Remove the ball.
- Now make your swing and clip the tee before crashing into the bag.
- You will feel impact occurring well ahead of your normal position, which will heighten your awareness of contact when you start hitting from your standard ball position.
- This forward placement of the bag also insures that you are swinging through impact by forcing the lead shoulder to continue aggressively move up and back, as well as the grip end swinging left to maintain a flat lead wrist.
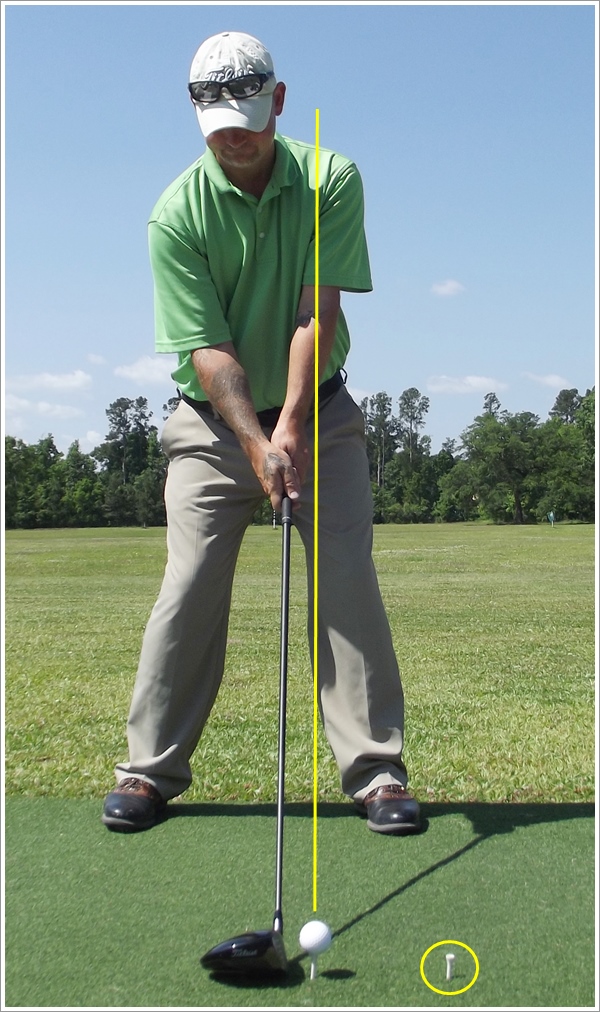
Two Tee Driver Drill
- Tee up a ball with your driver and place a second tee in the ground in front of your ball.
- Hit the ball while clipping the second tee. The secondary tee will assist with lead arm extension and width of swing arc.
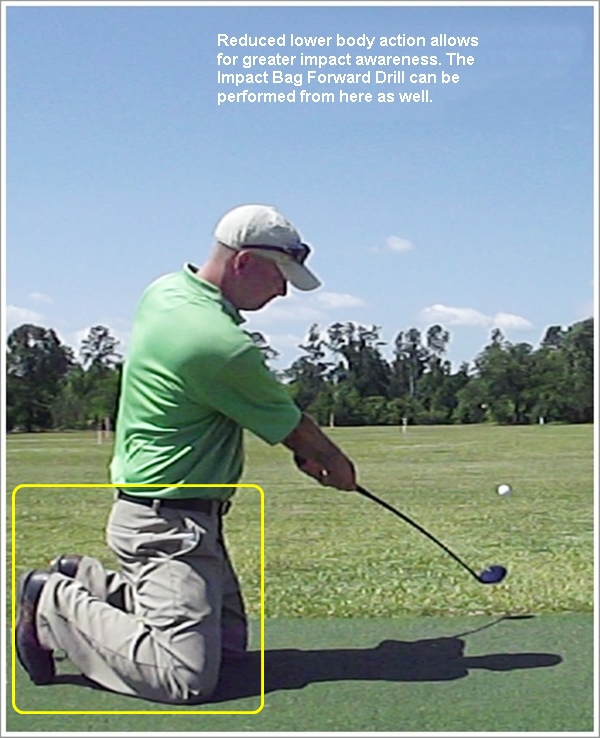
Junior Driver Drill
- This drill can be done with your standard driver, but I prefer to use a junior length club for heightened air divot awareness. Hitting from our knees reduces lower body activity and simplifies shift in swing plane.
- Now hit some drives. You will find it much easier to focus on your impact sensations and air divot from this set up.
- The Impact Bag Forward drill can also be performed from here.

Catch some air
- Here is a backyard exercise I came up with that requires some balloons.
- Insert a tee though the extra rubber end that is located behind the knot where you tied the balloon.
- Stick the tee into the ground, there by holding the balloon in place.
- Swing through and make it pop at impact!
Putting it into play: Make a swoosh instead of a divot
- This can become part of your pre-shot routine. Take two practice swings before each tee shot and let the swoosh sound represent your air divot.
Now you have several different ways to create some resistance through the hitting area when the ball is teed up. Try this concept the next time you play and mash that driver!
- LIKE4
- LEGIT0
- WOW1
- LOL2
- IDHT0
- FLOP0
- OB0
- SHANK0


Some call the image on the left laid off, but if you are hitting a fade, this could be a perfect backswing for it! Same for across the line for a draw! Stop racking your brain with perceived mistakes and simply match backswing to shot shape!
- LIKE0
- LEGIT0
- WOW0
- LOL0
- IDHT0
- FLOP0
- OB0
- SHANK0
My golf learning began with this simple fact – if you don’t have a fundamentally sound hold on the golf club, it is practically impossible for your body to execute a fundamentally sound golf swing. I’m still a big believer that the golf swing is much easier to execute if you begin with the proper hold on the club.
As you might imagine, I come into contact with hundreds of golfers of all skill levels. And it is very rare to see a good player with a bad hold on the golf club. There are some exceptions, for sure, but they are very few and very far between, and they typically have beat so many balls with their poor grip that they’ve found a way to work around it.
The reality of biophysics is that the body moves only in certain ways – and the particulars of the way you hold the golf club can totally prevent a sound swing motion that allows the club to release properly through the impact zone. The wonderful thing is that anyone can learn how to put a fundamentally sound hold on the golf club, and you can practice it anywhere your hands are not otherwise engaged, like watching TV or just sitting and relaxing.
Whether you prefer an overlap, interlock or full-finger (not baseball!) grip on the club, the same fundamentals apply. Here are the major grip faults I see most often, in the order of the frequency:
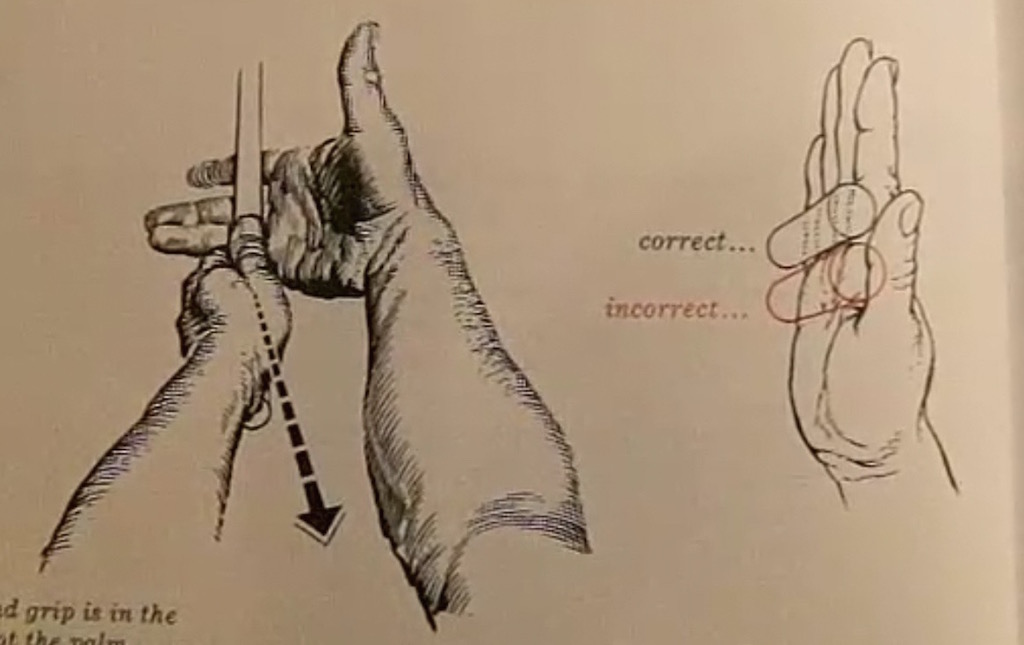
Mis-aligned hands
By this I mean that the palms of the two hands are not parallel to each other. Too many golfers have a weak left hand and strong right, or vice versa. The easiest way to learn how to hold the club with your palms aligned properly is to grip a plain wooden ruler or yardstick. It forces the hands to align properly and shows you how that feels. If you grip and re-grip a yardstick several times, then grip a club, you’ll see that the learning curve is almost immediate.
The position of the grip in the upper/left hand
I also observe many golfers who have the butt of the grip too far into the heel pad of the upper hand (the left hand for right-handed players). It’s amazing how much easier it is to release the club through the ball if even 1/4-1/2″ of the butt is beyond the left heel pad. Try this yourself to see what I mean. Swing the club freely with just your left hand and notice the difference in its release from when you hold it at the end of the grip, versus gripping down even a half inch.
To help you really understand how this works, go to the range and hit shots with your five-iron gripped down a full inch to make the club the same length as your seven-iron. You will probably see an amazing shot shape difference, and likely not see as much distance loss as you would expect.
Too much lower (right) hand on the club
It seems like almost all golfers of 8-10 handicap or higher have the club too far into the palm of the lower hand, because that feels “good” if you are trying to control the path of the clubhead to the ball. But the golf swing is not an effort to hit at the ball – it is a swing of the club. The proper hold on the club has the grip underneath the pad at the base of the fingers. This will likely feel “weak” to you — like you cannot control the club like that. EXACTLY. You should not be trying to control the club with your lower/master hand.
Gripping too tightly
Nearly all golfers hold the club too tightly, which tenses up the forearms and prevents a proper release of the club through impact. In order for the club to move back and through properly, you must feel that the club is controlled by the last three fingers of the upper hand, and the middle two fingers of the lower hand. If you engage your thumbs and forefingers in “holding” the club, the result will almost always be a grip that is too tight. Try this for yourself. Hold the club in your upper hand only, and squeeze firmly with just the last three fingers, with the forefinger and thumb off the club entirely. You have good control, but your forearms are not tense. Then begin to squeeze down with your thumb and forefinger and observe the tensing of the entire forearm. This is the way we are made, so the key to preventing tenseness in the arms is to hold the club very lightly with the “pinchers” — the thumbs and forefingers.
So, those are what I believe are the four fundamentals of a good grip. Anyone can learn them in their home or office very quickly. There is no easier way to improve your ball striking consistency and add distance than giving more attention to the way you hold the golf club.
More from the Wedge Guy
- The Wedge Guy: Golf mastery begins with your wedge game
- The Wedge Guy: Why golf is 20 times harder than brain surgery
- The Wedge Guy: Musings on the golf ball rollback
- LIKE86
- LEGIT13
- WOW6
- LOL1
- IDHT0
- FLOP4
- OB1
- SHANK8

Not the dreaded headcover under the armpit drill! As if your body is defective and can’t function by itself! Have you seen how incredible the human machine is with all the incredible feats of agility all kinds of athletes are accomplishing? You think your body is so defective (the good Lord is laughing his head off at you) that it needs a headcover tucked under the armpit so you can swing like T-Rex?
- LIKE0
- LEGIT2
- WOW2
- LOL0
- IDHT0
- FLOP0
- OB0
- SHANK2


Dave Portnoy places monstrous outright bet for the 2024 Masters

John Daly stuns fans into silence with brutal opening tee shot on PGA Tour Champions

Things got heated at the Houston Open between Tony Finau and Alejandro Tosti. Here’s why

Tiger Woods arrives at 2024 Masters equipped with a putter that may surprise you

Justin Thomas on the equipment choice of Scottie Scheffler that he thinks is ‘weird’

‘Absolutely crazy’ – Major champ lays into Patrick Cantlay over his decision on final hole of RBC Heritage

Report: Tiger Woods has ‘eliminated sex’ in preparation for the 2024 Masters

Two star names reportedly blanked Jon Rahm all week at the Masters

2-time major champ announces shock retirement from the sport at age of 33

Report: LIV Golf identifies latest star name they hope to sign to breakaway tour


Daniel Berger WITB 2024 (April)
Daniel Berger what’s in the bag accurate as of the Farmers Insurance Open. More photos from the event here. Driver:...


Rasmus Højgaard WITB 2024 (April)
Rasmus Højgaard what’s in the bag accurate as of the Zurich Classic. Driver: Callaway Ai Smoke Triple Diamond (10.5 degrees)...


Rory McIlroy WITB 2024 (April)
Rory McIlroy what’s in the bag accurate as of the Zurich Classic. Driver: TaylorMade Qi10 (9 degrees) Shaft: Fujikura Ventus...


Sam Burns WITB 2024 (April)
Sam Burns’ what’s in the bag accurate as of the RBC Heritage. Driver: Callaway Paradym Triple Diamond S (9 degrees...
-
 19th Hole2 weeks ago
Dave Portnoy places monstrous outright bet for the 2024 Masters
-
 19th Hole2 weeks ago
Tiger Woods arrives at 2024 Masters equipped with a putter that may surprise you
-
 19th Hole2 days ago
Justin Thomas on the equipment choice of Scottie Scheffler that he thinks is ‘weird’
-
 19th Hole2 days ago
‘Absolutely crazy’ – Major champ lays into Patrick Cantlay over his decision on final hole of RBC Heritage
-
 19th Hole3 weeks ago
Report: Tiger Woods has ‘eliminated sex’ in preparation for the 2024 Masters
-
 19th Hole1 week ago
Two star names reportedly blanked Jon Rahm all week at the Masters
-
 19th Hole1 week ago
Report: LIV Golf identifies latest star name they hope to sign to breakaway tour
-

 19th Hole1 week ago
Neal Shipley presser ends in awkward fashion after reporter claims Tiger handed him note on 8th fairway
Michael Howes
May 20, 2013 at 11:51 pm
Narf
Great going and I am very happy for your success!
A few things that I really liked about your comments:
•Now you’re thinking and the gears are turning.
•Your focus has started shifting away from the Ball as being your target. That is why I suggest hitting tees, bags, balloons, etc. Get the alignments first, then simply change the object that’s sitting on your circle.
•You are starting to sense impact and where it is occurring, which is the whole point behind the air divot concept. Most of the time if a golfer is driving their hands to the ball they will release early.
•Those trees on the range didn’t move any closer overnight – you’re making better contact!
I don’t have a problem with you setting up to the driver with the clubhead a little farther back. This is kind of like pre-setting the takeaway. Some players did similar versions of this when they used to start the swing with what we called a Scottish Lag.
Let the Swoosh be your air divot when you make your rehearsal swings on the tee box – then let it fly.
jed
May 9, 2013 at 9:10 pm
This makes it seem like you should be “hitting down” on your driver. It seems like I have heard multiple people say you need to be hitting the ball ever so slightly on the upswing.
Michael Howes
May 10, 2013 at 12:30 am
The “Air Divot” concept is certainly not meant to encourage you to hit down with the Driver. The idea is to help players achieve a compressed strike and proper impact alignments with the Driver when we do NOT have the sensation that we are hitting down and squashing the ball against the ground.
For example: Let’s say that you were struggling with thin iron shots and weak drives. We identified that your lead arm was bending through impact (chicken wing) and the club shaft was leaning backwards. So we grab an 8 iron and do some pivot/ impact drills. Soon we are getting a good divot, your hands are ahead of the ball at impact, the club shaft is leaning slightly forward, and that 8 iron is now flying with authority. The next day you tee one up on the first hole and all of the good sensations that you felt when punching the short iron are gone? You know that there is only one golf swing, not iron golf swing and driver golf swing, but how do you recreate those same sensations when the ball is teed up? You take an “Air” Divot.
I like to see the angle of attack +3 or +4 degrees with the Driver. This is a result of the path coming slightly from the inside and the ball position moving opposite your lead armpit. This makes contact occur more on the ascending side of your circle. Same swing, different address conditions.
The drills outlined here are designed to encourage making the same iron swing but moving it farther on the ascending side of your swing arc, achieving the same relative impact alignments with a + launch angle.
I hope that makes it more clear and thanks for posting.
Narf
May 15, 2013 at 1:53 pm
Eh, I still agree with Jed, particularly with the Two Tee Drill. There’s no way I can contact the ball on the upswing and still clip that forward tee. Focusing on clipping the forward tee will definitely cause me to move my “air divot” forward until it’s probably ahead of the ball…meaning I’m hitting down on the ball.
Seems to me, if you want to get the feeling of hitting up on the ball, you should work on hitting the ball but NOT hitting the forward tee.
Michael Howes
May 15, 2013 at 7:12 pm
We have to be aware that what we are attempting to accomplish with “Air Divot” is a way to transfer correct impact alignments from irons to driver. So first we have to be sure that those impact conditions with our irons are correct. Once that has been verified we are now working towards reproducing the same swing with our driver – not an iron swing and a driver swing. We don’t hit “up” with our irons, so we don’t want to hit “up” with our driver just because it is on a tee. Changes in set up and club design take care of that for us. If you look at the article’s “Impact Bag Forward” picture, you will see that my shoulders and spine are titled more away from the target, as well as my weight being less forward than with an iron. Both of these conditions, along with ball position promote the “up” that you seek.
The Two Tee Drill is a way to duplicate the impact bag forward drill, but while actually hitting a ball from normal position. This helps with lead arm extension (opposite of chicken wing pulling lead arm) and maintaining a nice wide swing arc (some long drive competitors perform drills by hitting balls teed in front of their lead foot to accomplish the same thing).
I started using the “Air Divot” concept after an aspiring mini tour player told he was having problems getting the same solid feel with his driver that he had with his irons. I suggested to “Feel” like he was taking an air divot. This concept has helped him and others adjust their perceptions of impact when the ball is teed up.
The article includes several drills, so try them all until you get one that “clicks”. Keep in mind that the goal is to keep your lead shoulder aggressively moving up and back, there by transporting our good flat lead wrist along with it. Thanks for reading!
Narf
May 20, 2013 at 12:19 pm
Michael,
Thanks for the responses, I appreciate the feedback. Just wanted to let you know I tried this stuff out at the range, and it was amazing.
I have to add a caveat here. I am a low-100’s player that struggles with the driver more than any other club, so I’m sure not everyone will see the type of improvement that I did.
Anyway, I was at the range and didn’t have balloons, an impact bag, or a junior club, but I started concentrating on the air divot concept, basically just focusing on putting the bottom of my swing arc in the right position, a few inches behind the ball. This did three things for me.
First, it gave me an additional, intermediate reference point for my club head path. If you think about the backswing, there are well known reference points along the way. For example, when the club shaft gets to horizontal, the shaft should be parallel to the target line, the toe should point up, etc. But I never really had good reference points on the downswing. But now, knowing that the club head would have to pass through the spot I was picturing for the air divot, and knowing that the club head has to contact the ball, I had a better visualization of my swing path and started coming into the ball straighter. By the way, after making this realization, I finally figured out that the Two Tee drill can help by adding even a third reference point in front of the ball. I still think that front tee needs to be teed up really tall for me to clip it on the upswing, but I’ll play with that later.
The second thing I noticed was that I no longer paid any attention to the ball itself. I’ve heard it said several times that one should not try to hit the ball…one should just make a smooth swing and let the ball get in the way. I was never really able to make that work, since, as I mentioned before, the only reference point I had was the ball itself. But now that I was just focusing on swinging through my Air Divot, I never even had to look at the ball, and it smoothed out my swing, and took the “hit” out of it. I even played with a setup change that was interesting, and I’d like your feedback on this: When you setup for an iron swing, you set up with the club head *behind* the divot you will take (with the ball between them). So I tried that with the driver. I saw the ball on the tee, pictured the air divot behind it, and then set up with the club head behind the air divot, some 8″ behind the ball. This seemed to really help make the driver swing much more similar to the iron swing.
The third thing I noticed, and by far the most dramatic for me, was that the air divot concept fixed my release issues. I had a tendency to try to “guide” the club head with my hands and wrists, and usually ended up casting pretty bad. By focusing on the air divot, I was forced to pay attention to putting the bottom of my swing arc in the right spot, and that helped me release at the right time. Of course, that leads to much more club head speed at impact, and my drives were all of a sudden going 15+ yards further than before…hard to judge exactly how much farther, because they were flying into the trees past the end of the driving range (It’s not a particularly long range).
Anyway, just wanted to thank you for the tip. I still need to groove this new swing before it gets consistent, but I’ve been tickled with what I’ve seen so far.