Instruction
Confessions of a hacker: Chipping yips and equipment fixes

There’s a saying in golf that, paraphrasing here, it’s the person holding the weapon, not the weapon. Basically, if you hit a bad shot, it’s almost certain that it was your fault, not the fault of the golf club. It has a better design than your swing. And while that truism is often correct, it ain’t necessarily so.
For example, if I were to try to hit one of those long drive drivers, I’d probably mis-hit it so badly that the ball might not be findable. That stick is way too long, stiff, and heavy for me. Similarly, if I were to use one of those senior flex drivers, I’d probably hit it badly, because it would be too floppy for my swing. It’s clear that there are arrows that this Indian can’t shoot well. Maybe a pro could adapt to whatever club you put in his hand, but there’s no reason he would accept less than a perfect fit. And there’s little reason why any amateur ought to accept less than a good fit.
I was never a competitive athlete, although I’m a competitive person. My path led a different direction, and as my medical career reached its mature years, I was introduced to our wonderful and frustrating game.
Being one who hates playing poorly, I immediately sought instruction. After fifteen years, multiple instructors, a wallet full of videos, and a wall full of clubs, I am finally learning how to do one particularly vexing part of the game reasonable well. I can chip! But as you may have guessed, the largest part of this journey has to do with the arrow, not the Indian.
We may immediately dismiss the golf shaft as a significant issue since chipping generally involves a low-speed movement. And as long as the grip is a reasonable fit for the hands, it’s not a big deal either. The rubber meets the road at the clubhead.
Manufacturers have worked hard to get the best ball spin out of the grooves. Their shape is precisely milled, and then smaller grooves and roughness are added to the exact maximum allowed under the rules. Various weighting schemes have been tried, with some success in tailoring wedges to players. And some manufacturers market the “newest” designs to make it impossible to screw up wedge shots. And yet, nothing seemed to solve my yips.
So I went on a mission. I studied all sorts of chipping techniques. Some advocate placing the ball far back to strike a descending blow. Others place it near the center of the stance. The swing must have no wrist hinge. The swing must have a hinge that is held. It should be a short swing. It should be a long swing. The face should be square. The face should be open. There should be a “pop.” There should be no power added.
If you are confused, join my club. So I went on a different mission. I started looking at sole construction. Ever since Gene Sarazen popularized a sole with bounce for use in the sand, manufacturers have been creating massive numbers of “different” sand wedges. They have one thing in common. They are generally all built to 55 or 56-degrees of loft.
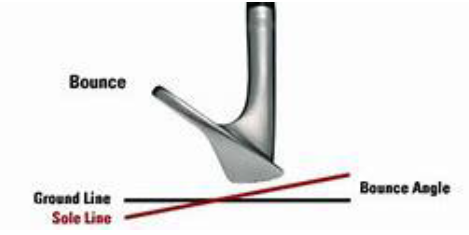
The basic design feature of the sand wedge is that the sole extends down and aft from the leading edge at some angle. This generally ranges from 6 to 18-degrees. Its purpose is to allow the wedge to dig into the sand, but not too far. As the club goes down into the sand, the “bounce” pushes it back up.
One problem with having a lot of bounce on the wedge is that it can’t be opened up to allow certain specialty shots or have a higher effective loft. When the player does that, the leading edge lifts, resulting in thin shots. So manufacturers do various things to make the wedge more versatile, typically by removing bounce in the heel area.
-

- Titleist M Grind
-

- Titleist M Grind Wide Sole
-

- Callaway PM Grind
-

- Ping Glide
At my last count, I have eight 56-degree wedges in my collection. Each one was thought to be a solution to my yips. Yet, until I listened to an interview with Dave Edel, I had almost no real understanding of why I was laying sod over a lot of my chips. Since gardening did not reduce my scores, I had to find another solution.
My first step was to look at the effective loft of a wedge in various ball positions. (Pictures were shot with the butt of the club at the left hip, in a recommended forward lean position. Since the protractor is not exactly lined up with the face, the angles are approximate.)
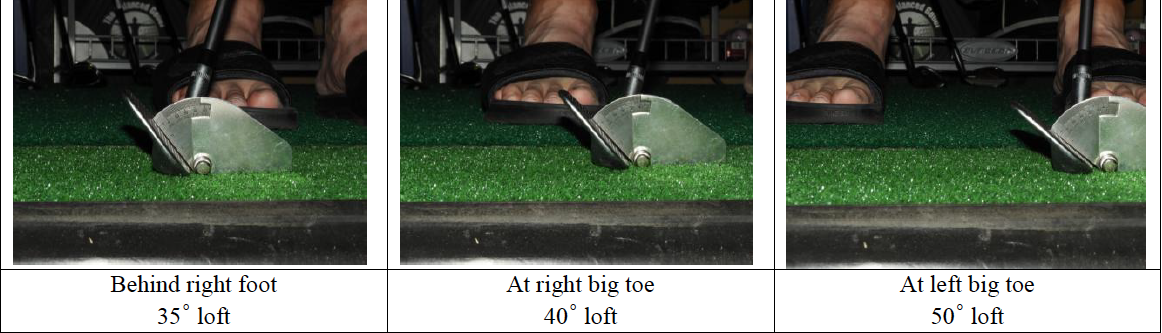
I had no idea that there was so much forward lean with a simple chip. If I were to use the most extreme rearward position, I would have to have 21-degrees of bounce just to keep the leading edge from digging in at impact. If there were the slightest error in my swing, I would be auditioning for greenskeeper.
My appreciation for the pros who can chip from this position suddenly became immense. For an amateur like me, the complete lack of forgiveness in this technique suddenly removed it from my alleged repertoire.
My next step was to look at bounce. As I commented before, bounce on sand wedges ranges between 6 and 18-degrees. As the drawing above shows, that’s a simple angle measurement. If I were to chip from the forward position, a 6-degree bounce sand wedge would have an effective bounce of 1-degree. That’s only fractionally better than the impossible chip behind my right foot. So I went to my local PGA Superstore to look at wedges with my Maltby Triangle Gauge in hand.
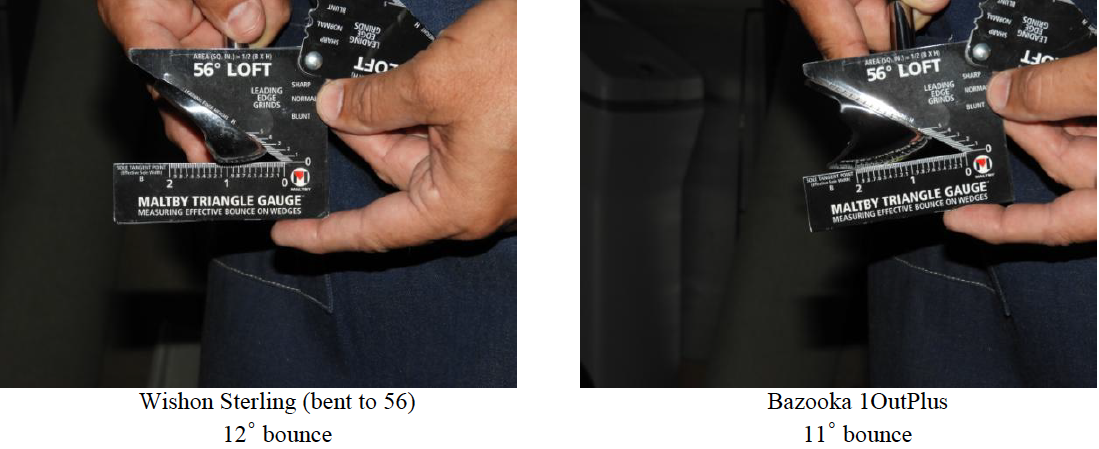
As you can see from the photos, there is a wide variation in wedges. What’s most curious, however, is that this variation is between two designs that are within one degree of the same nominal bounce. Could it be that “bounce is not bounce is not bounce?” Or should I say that “12-degrees is not 12-degrees is not 12-degrees?” If one looks below the name on the gauge, a curious bit of text appears. “Measuring effective bounce on wedges.” Hmmm… What is “effective bounce?”
The Maltby Triangle Gauge allows you to measure three things: leading-edge height, sole tangent point, and leading-edge sharpness. The last is the most obvious. If I’m chipping at the hairy edge of an adequate bounce, a sharp leading edge will dig in more easily than a blunt one. So if I’m using that far back ball position, I’ll need the 1OutPlus for safety, since its leading edge is the bluntest of the blunt. Even in that position, its 11-degree bounce keeps the leading edge an eighth of an inch up.
Wait a minute! How can that be? In the back position, the wedge is at 35-degrees effective loft, and 11-degrees of bounce ought to be 10-degrees less than we need. The difference here is found in combining all three parameters measured by the gauge, and not just the angle of the bounce.
The 1OutPlus is a very wide sole wedge. Its tangent point is a massive 1.7″ back. The leading edge rises .36″ off the ground and is very blunt. In other words, it has every possible design feature to create safety in case the chip from back in the stance isn’t as perfect as it might be. Since a golf ball is 1.68″ in diameter, that’s still less than halfway up to the center of the ball. But if you play the ball forward, this may not be the wedge for you.
Here are the measurements for the eight sand wedges that happen to be in my garage. All are either 56-degrees from the factory or bent to 56-degrees.
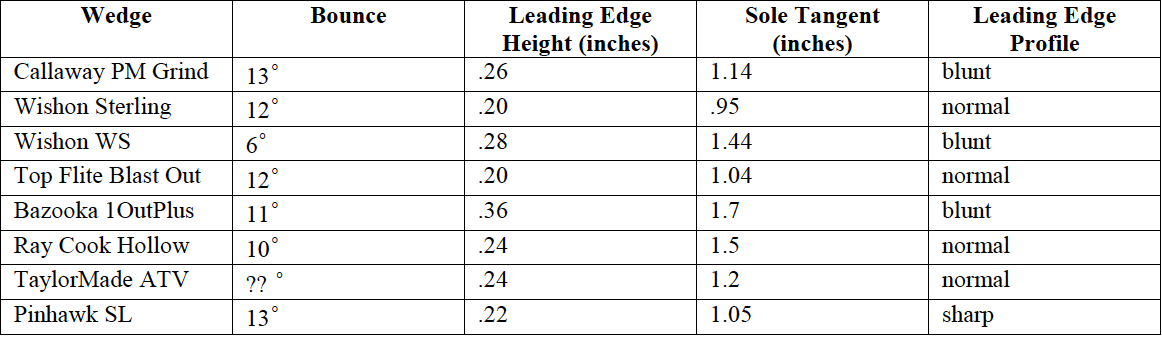
A couple of things jump out from this table. The Callaway PM Grind at 13-degrees has a lower leading edge (.26 inches) than the 11-degree Bazooka 1OutPlus (.36 inches). How can a lower bounce have a higher leading edge? Simple geometry suggests that if you want a higher leading edge, you will need a higher bounce angle. But it gets worse. The Wishon WS (wide sole) at 6-degrees (55-degree wedge bent to 56-degrees) has a leading-edge height of .28 inches, higher than the Callaway which has over twice the nominal bounce angle!
One thing is missing from this simple discussion of angles.
If I place one line at 34-degrees above the horizontal (loft is measured from the vertical), and then extend another at some angle below horizontal, the height above ground where the two join depends on how long the lower line is. This means that an 18-degree bounce with a narrow “C” grind will raise the leading edge a little bit. A 6-degree bounce on a wide sole may raise it more because the end of the bounce on the first wedge is so close to the leading edge.
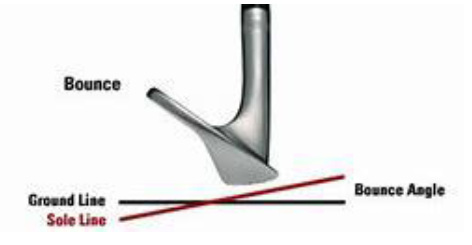
Let’s look at this in the picture. If the red line of the bounce is very short, it doesn’t get far below the black ground line. But if it goes further, it gets lower. This is the difference between narrow and wide soles.
This diagram describes the mathematical description of these relationships.

Our first task is to realize that the angle 0 in this diagram is the complement of the 56-degree loft of the wedge, or 90 – 56 = 34-degrees since loft is measured from vertical, not horizontal. But the angle 0 in the bounce equation is just that, the bounce value. These two angles will now allow us to calculate the theoretical values of various parts of the wedge, and then compare them to our real-world examples.
My PM Grind Callaway wedge has its 3rd groove, the supposed “perfect” impact point, 0.54 inches above the leading edge. This should put it 0.8 inches back from the leading edge, roughly matching the measured 0.82 inches. So far, so good. (I’m using the gauge correctly!)
The 13-degree bounce at 1.14″ calculates out to 0.284″ of leading-edge rise. I measured 0.26″, so Callaway seems to be doing the numbers properly, until I realize that the leading edge is already .45″ back, given a real tangent of .69″. Something is out of whack. Re-doing the math suggests that the real bounce is 20-degrees, 40 min. Hmmm…
Maybe that bounce angle measurement isn’t such a good number to look at. Without digging through all the different wedges (which would make you cross-eyed), we should go back to basics. What is it that we really need?
Most instructors will suggest that striking the ball on about the third groove will give the best results. It will put the ball close to the center of mass (sweet spot) of the wedge and give the best spin action. If my wedge is at an effective 45-degree angle (about my right big toe), it will strike the ball about half-way up to its equator. It will also be close to the third groove. But to make that strike with minimal risk of gardening, I have to enough protection to keep the edge out of the turf if I mis-hit the ball by a little bit. That can be determined by the leading edge height! The higher the edge, the more forgiveness there is on a mis-hit.
Now this is an incomplete answer. If the bounce is short, with a sharp back side, it will tend to dig into the turf a bit. It may not do it a lot, but it will have more resistance than a wider, smoother bounce. In the extreme case, the 1OutPlus will simply glide over the ground on anything less than a ridiculous angle.
The amount of leading-edge height you need will depend on your style. If you play the ball forward, you may not need much. But as you move the ball back, you’ll need to increase it. And if you are still inconsistent, a wider sole with a smooth contour will help you avoid episodes of extreme gardening. A blunt leading edge will also help. It may slow your club in the sand, but it will protect your chips.
There is no substitute for practice, but if you’re practicing chips from behind your right foot using a wedge with a sharp, low leading edge, you’re asking for frustration. If you’re chipping from a forward position with a blunt, wide sole wedge, you’ll be blading a lot of balls. So look at your chipping style and find a leading-edge height and profile that match your technique. Forget about the “high bounce” and “low bounce” wedges. That language doesn’t answer the right question.
Get a wedge that presents the club to the ball with the leading edge far enough off the ground to provide you with some forgiveness. Then knock ’em stiff!
- LIKE24
- LEGIT10
- WOW4
- LOL4
- IDHT2
- FLOP8
- OB4
- SHANK21
My golf learning began with this simple fact – if you don’t have a fundamentally sound hold on the golf club, it is practically impossible for your body to execute a fundamentally sound golf swing. I’m still a big believer that the golf swing is much easier to execute if you begin with the proper hold on the club.
As you might imagine, I come into contact with hundreds of golfers of all skill levels. And it is very rare to see a good player with a bad hold on the golf club. There are some exceptions, for sure, but they are very few and very far between, and they typically have beat so many balls with their poor grip that they’ve found a way to work around it.
The reality of biophysics is that the body moves only in certain ways – and the particulars of the way you hold the golf club can totally prevent a sound swing motion that allows the club to release properly through the impact zone. The wonderful thing is that anyone can learn how to put a fundamentally sound hold on the golf club, and you can practice it anywhere your hands are not otherwise engaged, like watching TV or just sitting and relaxing.
Whether you prefer an overlap, interlock or full-finger (not baseball!) grip on the club, the same fundamentals apply. Here are the major grip faults I see most often, in the order of the frequency:
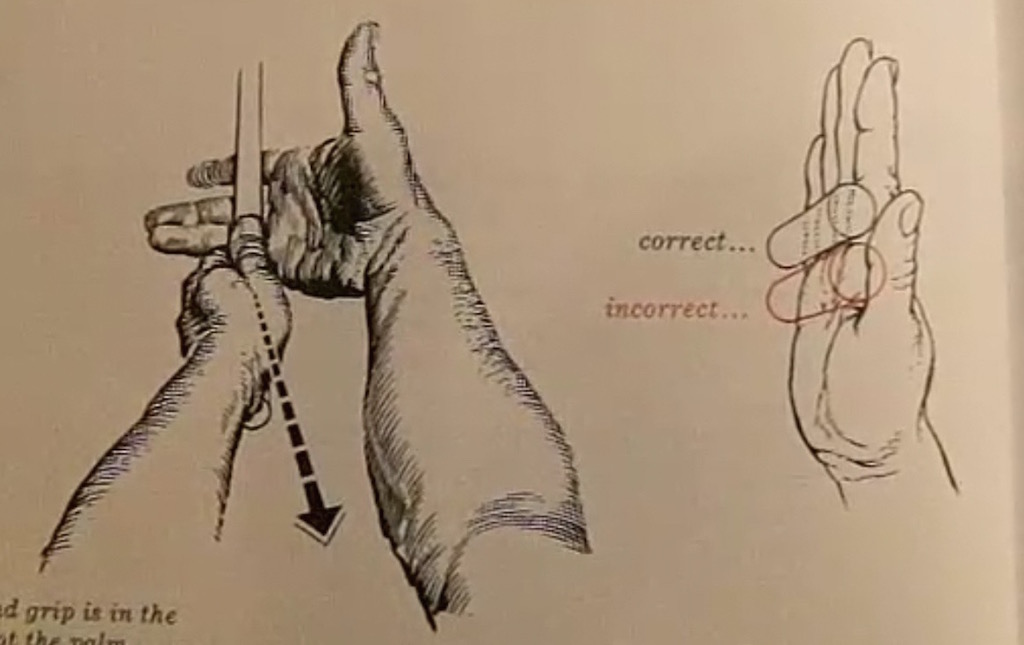
Mis-aligned hands
By this I mean that the palms of the two hands are not parallel to each other. Too many golfers have a weak left hand and strong right, or vice versa. The easiest way to learn how to hold the club with your palms aligned properly is to grip a plain wooden ruler or yardstick. It forces the hands to align properly and shows you how that feels. If you grip and re-grip a yardstick several times, then grip a club, you’ll see that the learning curve is almost immediate.
The position of the grip in the upper/left hand
I also observe many golfers who have the butt of the grip too far into the heel pad of the upper hand (the left hand for right-handed players). It’s amazing how much easier it is to release the club through the ball if even 1/4-1/2″ of the butt is beyond the left heel pad. Try this yourself to see what I mean. Swing the club freely with just your left hand and notice the difference in its release from when you hold it at the end of the grip, versus gripping down even a half inch.
To help you really understand how this works, go to the range and hit shots with your five-iron gripped down a full inch to make the club the same length as your seven-iron. You will probably see an amazing shot shape difference, and likely not see as much distance loss as you would expect.
Too much lower (right) hand on the club
It seems like almost all golfers of 8-10 handicap or higher have the club too far into the palm of the lower hand, because that feels “good” if you are trying to control the path of the clubhead to the ball. But the golf swing is not an effort to hit at the ball – it is a swing of the club. The proper hold on the club has the grip underneath the pad at the base of the fingers. This will likely feel “weak” to you — like you cannot control the club like that. EXACTLY. You should not be trying to control the club with your lower/master hand.
Gripping too tightly
Nearly all golfers hold the club too tightly, which tenses up the forearms and prevents a proper release of the club through impact. In order for the club to move back and through properly, you must feel that the club is controlled by the last three fingers of the upper hand, and the middle two fingers of the lower hand. If you engage your thumbs and forefingers in “holding” the club, the result will almost always be a grip that is too tight. Try this for yourself. Hold the club in your upper hand only, and squeeze firmly with just the last three fingers, with the forefinger and thumb off the club entirely. You have good control, but your forearms are not tense. Then begin to squeeze down with your thumb and forefinger and observe the tensing of the entire forearm. This is the way we are made, so the key to preventing tenseness in the arms is to hold the club very lightly with the “pinchers” — the thumbs and forefingers.
So, those are what I believe are the four fundamentals of a good grip. Anyone can learn them in their home or office very quickly. There is no easier way to improve your ball striking consistency and add distance than giving more attention to the way you hold the golf club.
More from the Wedge Guy
- The Wedge Guy: Golf mastery begins with your wedge game
- The Wedge Guy: Why golf is 20 times harder than brain surgery
- The Wedge Guy: Musings on the golf ball rollback
- LIKE84
- LEGIT13
- WOW5
- LOL1
- IDHT0
- FLOP4
- OB1
- SHANK8

Not the dreaded headcover under the armpit drill! As if your body is defective and can’t function by itself! Have you seen how incredible the human machine is with all the incredible feats of agility all kinds of athletes are accomplishing? You think your body is so defective (the good Lord is laughing his head off at you) that it needs a headcover tucked under the armpit so you can swing like T-Rex?
- LIKE0
- LEGIT2
- WOW2
- LOL0
- IDHT0
- FLOP0
- OB0
- SHANK2

This is a classic drill that has been used for decades. However, the world of marketed training aids has grown so much during that time that this simple practice has been virtually forgotten. Because why teach people how to play golf using everyday items when you can create and sell a product that reinforces the same thing? Nevertheless, I am here to give you helpful advice without running to the nearest Edwin Watts or adding something to your Amazon cart.
For the “scoring clubs,” having a solid connection between the arms and body during the swing, especially through impact, is paramount to creating long-lasting consistency. And keeping that connection throughout the swing helps rotate the shoulders more to generate more power to help you hit it farther. So, how does this drill work, and what will your game benefit from it? Well, let’s get into it.
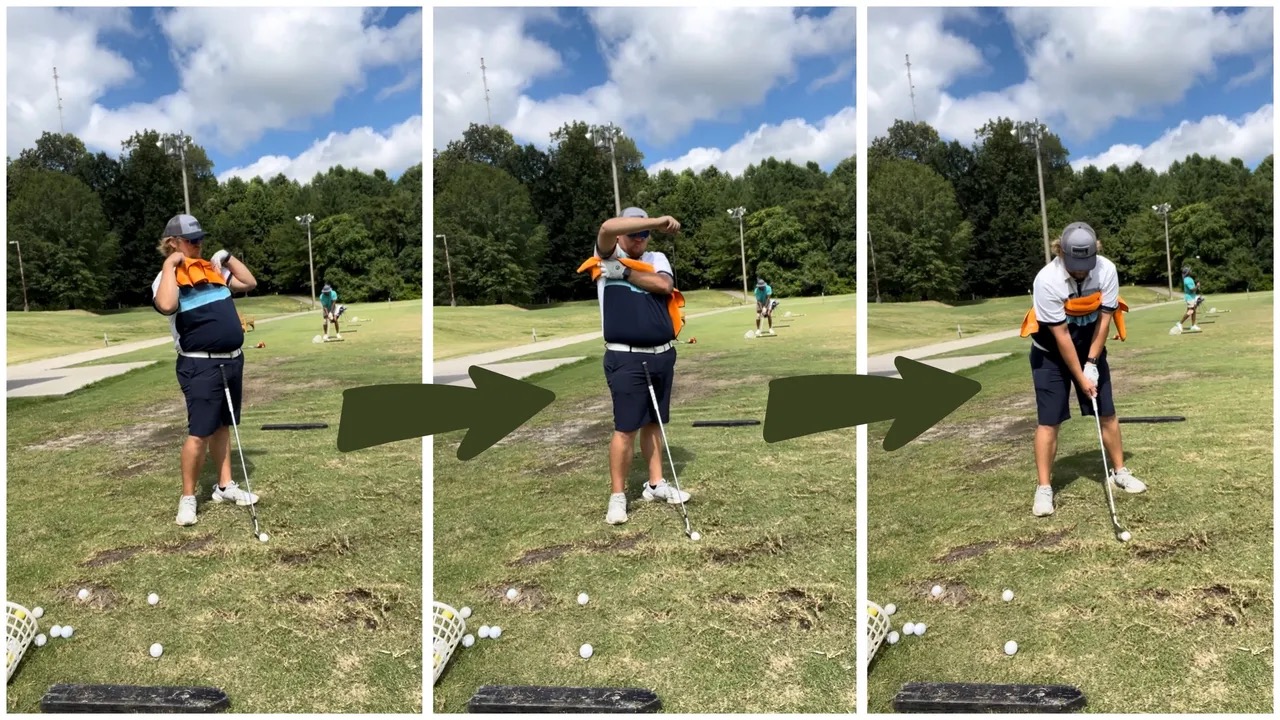
Setup
You can use this for basic chip shots up to complete swings. I use this with every club in my bag, up to a 9 or 8-iron. It’s natural to create incrementally more separation between the arms and body as you progress up the set. So doing this with a high iron or a wood is not recommended.
While you set up to hit a ball, simply tuck the towel underneath both armpits. The length of the towel will determine how tight it will be across your chest but don’t make it so loose that it gets in the way of your vision. After both sides are tucked, make some focused swings, keeping both arms firmly connected to the body during the backswing and follow through. (Note: It’s normal to lose connection on your lead arm during your finishing pose.) When you’re ready, put a ball in the way of those swings and get to work.
Get a Better Shoulder Turn
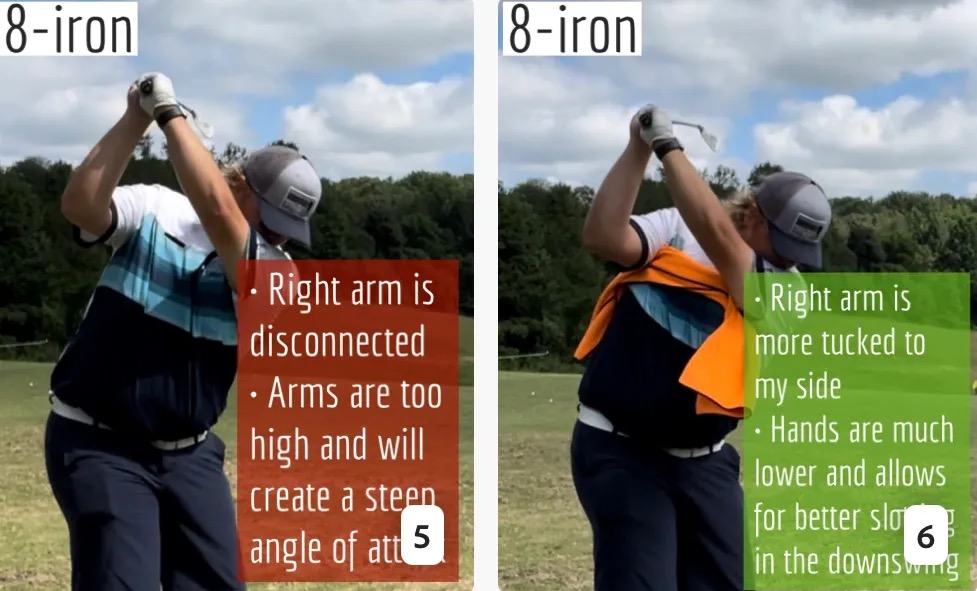
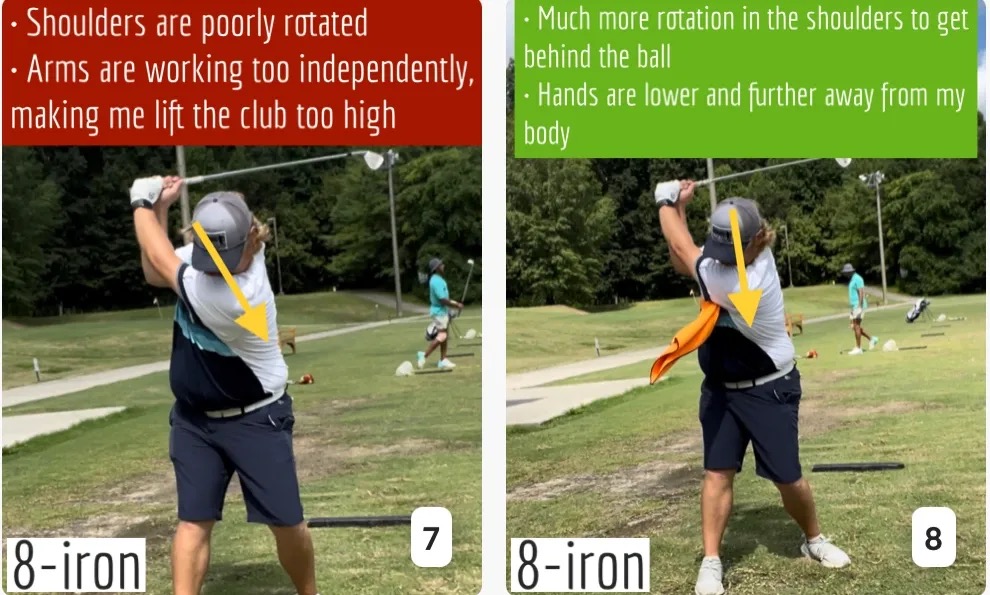
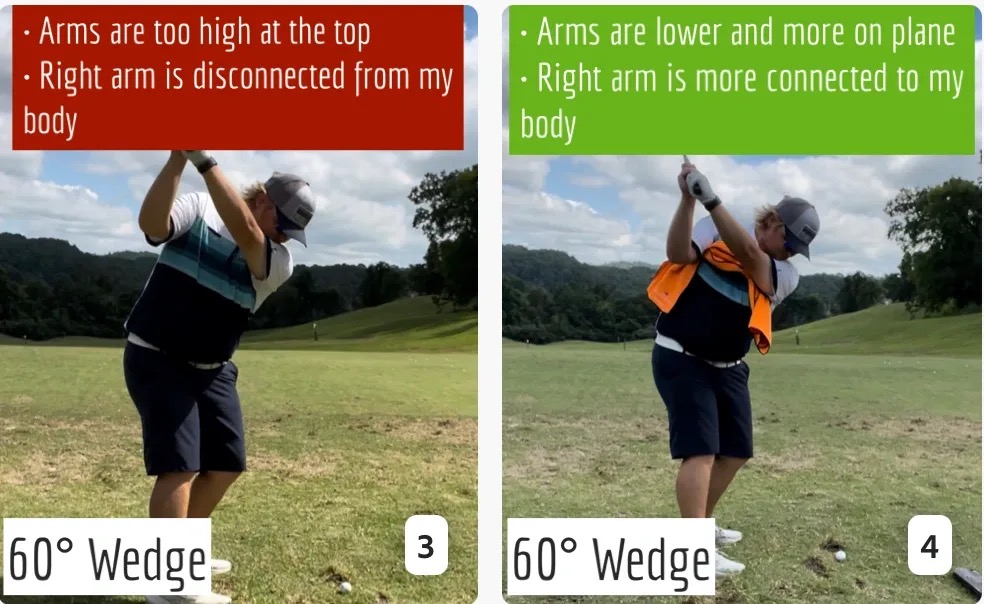
Many of us struggle to have proper shoulder rotation in our golf swing, especially during long layoffs. Making a swing that is all arms and no shoulders is a surefire way to have less control with wedges and less distance with full swings. Notice how I can get in a similar-looking position in both 60° wedge photos. However, one is weak and uncontrollable, while the other is strong and connected. One allows me to use my larger muscles to create my swing, and one doesn’t. The follow-through is another critical point where having a good connection, as well as solid shoulder rotation, is a must. This drill is great for those who tend to have a “chicken wing” form in their lead arm, which happens when it becomes separated from the body through impact.
In full swings, getting your shoulders to rotate in your golf swing is a great way to reinforce proper weight distribution. If your swing is all arms, it’s much harder to get your weight to naturally shift to the inside part of your trail foot in the backswing. Sure, you could make the mistake of “sliding” to get weight on your back foot, but that doesn’t fix the issue. You must turn into your trial leg to generate power. Additionally, look at the difference in separation between my hands and my head in the 8-iron examples. The green picture has more separation and has my hands lower. This will help me lessen my angle of attack and make it easier to hit the inside part of the golf ball, rather than the over-the-top move that the other picture produces.
Stay Better Connected in the Backswing
When you don’t keep everything in your upper body working as one, getting to a good spot at the top of your swing is very hard to do. It would take impeccable timing along with great hand-eye coordination to hit quality shots with any sort of regularity if the arms are working separately from the body.
Notice in the red pictures of both my 60-degree wedge and 8-iron how high my hands are and the fact you can clearly see my shoulder through the gap in my arms. That has happened because the right arm, just above my elbow, has become totally disconnected from my body. That separation causes me to lift my hands as well as lose some of the extension in my left arm. This has been corrected in the green pictures by using this drill to reinforce that connection. It will also make you focus on keeping the lead arm close to your body as well. Because the moment either one loses that relationship, the towel falls.

Conclusion
I have been diligent this year in finding a few drills that target some of the issues that plague my golf game; either by simply forgetting fundamental things or by coming to terms with the faults that have bitten me my whole career. I have found that having a few drills to fall back on to reinforce certain feelings helps me find my game a little easier, and the “towel drill” is most definitely one of them.
- LIKE12
- LEGIT2
- WOW2
- LOL0
- IDHT0
- FLOP2
- OB0
- SHANK8


Dave Portnoy places monstrous outright bet for the 2024 Masters

John Daly stuns fans into silence with brutal opening tee shot on PGA Tour Champions

Things got heated at the Houston Open between Tony Finau and Alejandro Tosti. Here’s why

Tiger Woods arrives at 2024 Masters equipped with a putter that may surprise you

Scottie Scheffler WITB 2024 (March)

Photos from the 2024 Arnold Palmer Invitational

The total sum that Sergio Garcia needs to pay in fines if he wants to return to DP World Tour revealed

Report: Tiger Woods has ‘eliminated sex’ in preparation for the 2024 Masters

Joaquin Niemann names 3 PGA Tour events he’d love to play each year ‘in a perfect world’

Spotted: Bettinardi irons at the Arnold Palmer Invitational


Scottie Scheffler’s winning WITB: 2024 Masters
Driver: TaylorMade Qi10 (8 degrees @8.25) Buy here. Shaft: Fujikura Ventus Black 7 X (45 inches) 3-wood: TaylorMade Qi10 (15 degrees) Buy...

WITB Time Machine: Danny Willett’s winning WITB, 2016 Masters
Driver: Callaway XR 16 (9 degrees) Shaft: Mitsubishi Rayon Diamana W-Series 60 X Length: 45.5 inches 3-wood: Callaway XR 16 (15 degrees) Shaft: Mitsubishi...


WITB Time Machine: Scottie Scheffler’s winning WITB, 2022 Masters
At the 2022 Masters, Scottie Scheffler delivered a steely Sunday performance to capture the green jacket in the 86th contesting...


WITB Time Machine: Hideki Matsuyama’s winning WITB, 2021 Masters
At the 2021 Masters, Hideki Matsuyama broke through to claim his first major championship, winning the first major for Japan...
-
 19th Hole5 days ago
Dave Portnoy places monstrous outright bet for the 2024 Masters
-
 19th Hole2 weeks ago
Things got heated at the Houston Open between Tony Finau and Alejandro Tosti. Here’s why
-
 19th Hole6 days ago
Tiger Woods arrives at 2024 Masters equipped with a putter that may surprise you
-
 19th Hole2 weeks ago
Report: Tiger Woods has ‘eliminated sex’ in preparation for the 2024 Masters
-

 19th Hole2 weeks ago
Addiction, spinal fusion, and scam artists – Everything Anthony Kim revealed in candid interview with David Feherty
-

 19th Hole1 week ago
Anthony Kim says doctors told him that he ‘may not have much time left’ ahead of LIV return
-

 19th Hole13 hours ago
Two star names reportedly blanked Jon Rahm all week at the Masters
-

 19th Hole1 week ago
Brooks Koepka and Sergio Garcia make significant equipment changes as 2024 Masters looms
numbersnerd
Aug 13, 2020 at 5:03 pm
Overwrought analysis. With that many numbers floating around in your head, no wonder you have the yips.
geohogan
Aug 8, 2020 at 11:37 am
absolutely nothing here addressing , chipping yips.
coops1967
Sep 5, 2020 at 5:13 am
No, but here’s some actually useful advice
https://forums.golfwrx.com/topic/1737218-chipping-woes-cure/?tab=comments#comment-22922750
geohogan
Nov 5, 2020 at 8:47 pm
Useful for setting up to hit a chip, but nothing about what causes YIPS.
Actually Malaska’s erroneous full swing advise, misquoting Jack Nicklaus
was more suitable to cure chipping YIPS.
Jack’s actual advise : “It’s impossible to release the club too early in the downswing — as long as you move to your left side and swing the club from inside the target line.”
If applied to chipping this is good advise to eliminate the YIPS.
https://www.golfdigest.com/story/flick-nicklaus-release