Opinion & Analysis
Building Golf Clubs at Home: The Essential Tips, Tricks and Tools
Like so many others I got into club building out of necessity and curiosity. As a kid, I loved to take anything and everything apart — from skateboards to old lawnmowers — so when I starting playing golf clubs were next. It started small, learning how to grip clubs with a Black & Decker workmate with my dad, and then slowly I moved into the more intricate aspects of building clubs. I’ve always joked that I was probably the only 16-year-old who asked for a lie-loft machine for his birthday.
In this article, I’m going to share with you my favorite tips, tricks and tools that I’ve used as a professional golf club builder. I hope to benefit those interested in building their own golf clubs at home, as well as relay valuable information about club building in general to knowledge-hungry GolfWRXers.
Overview
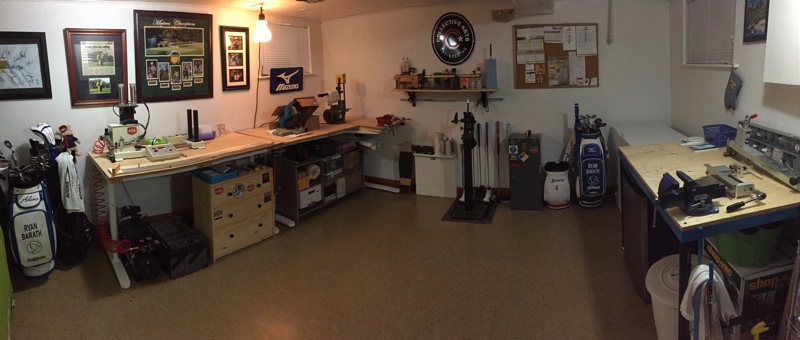
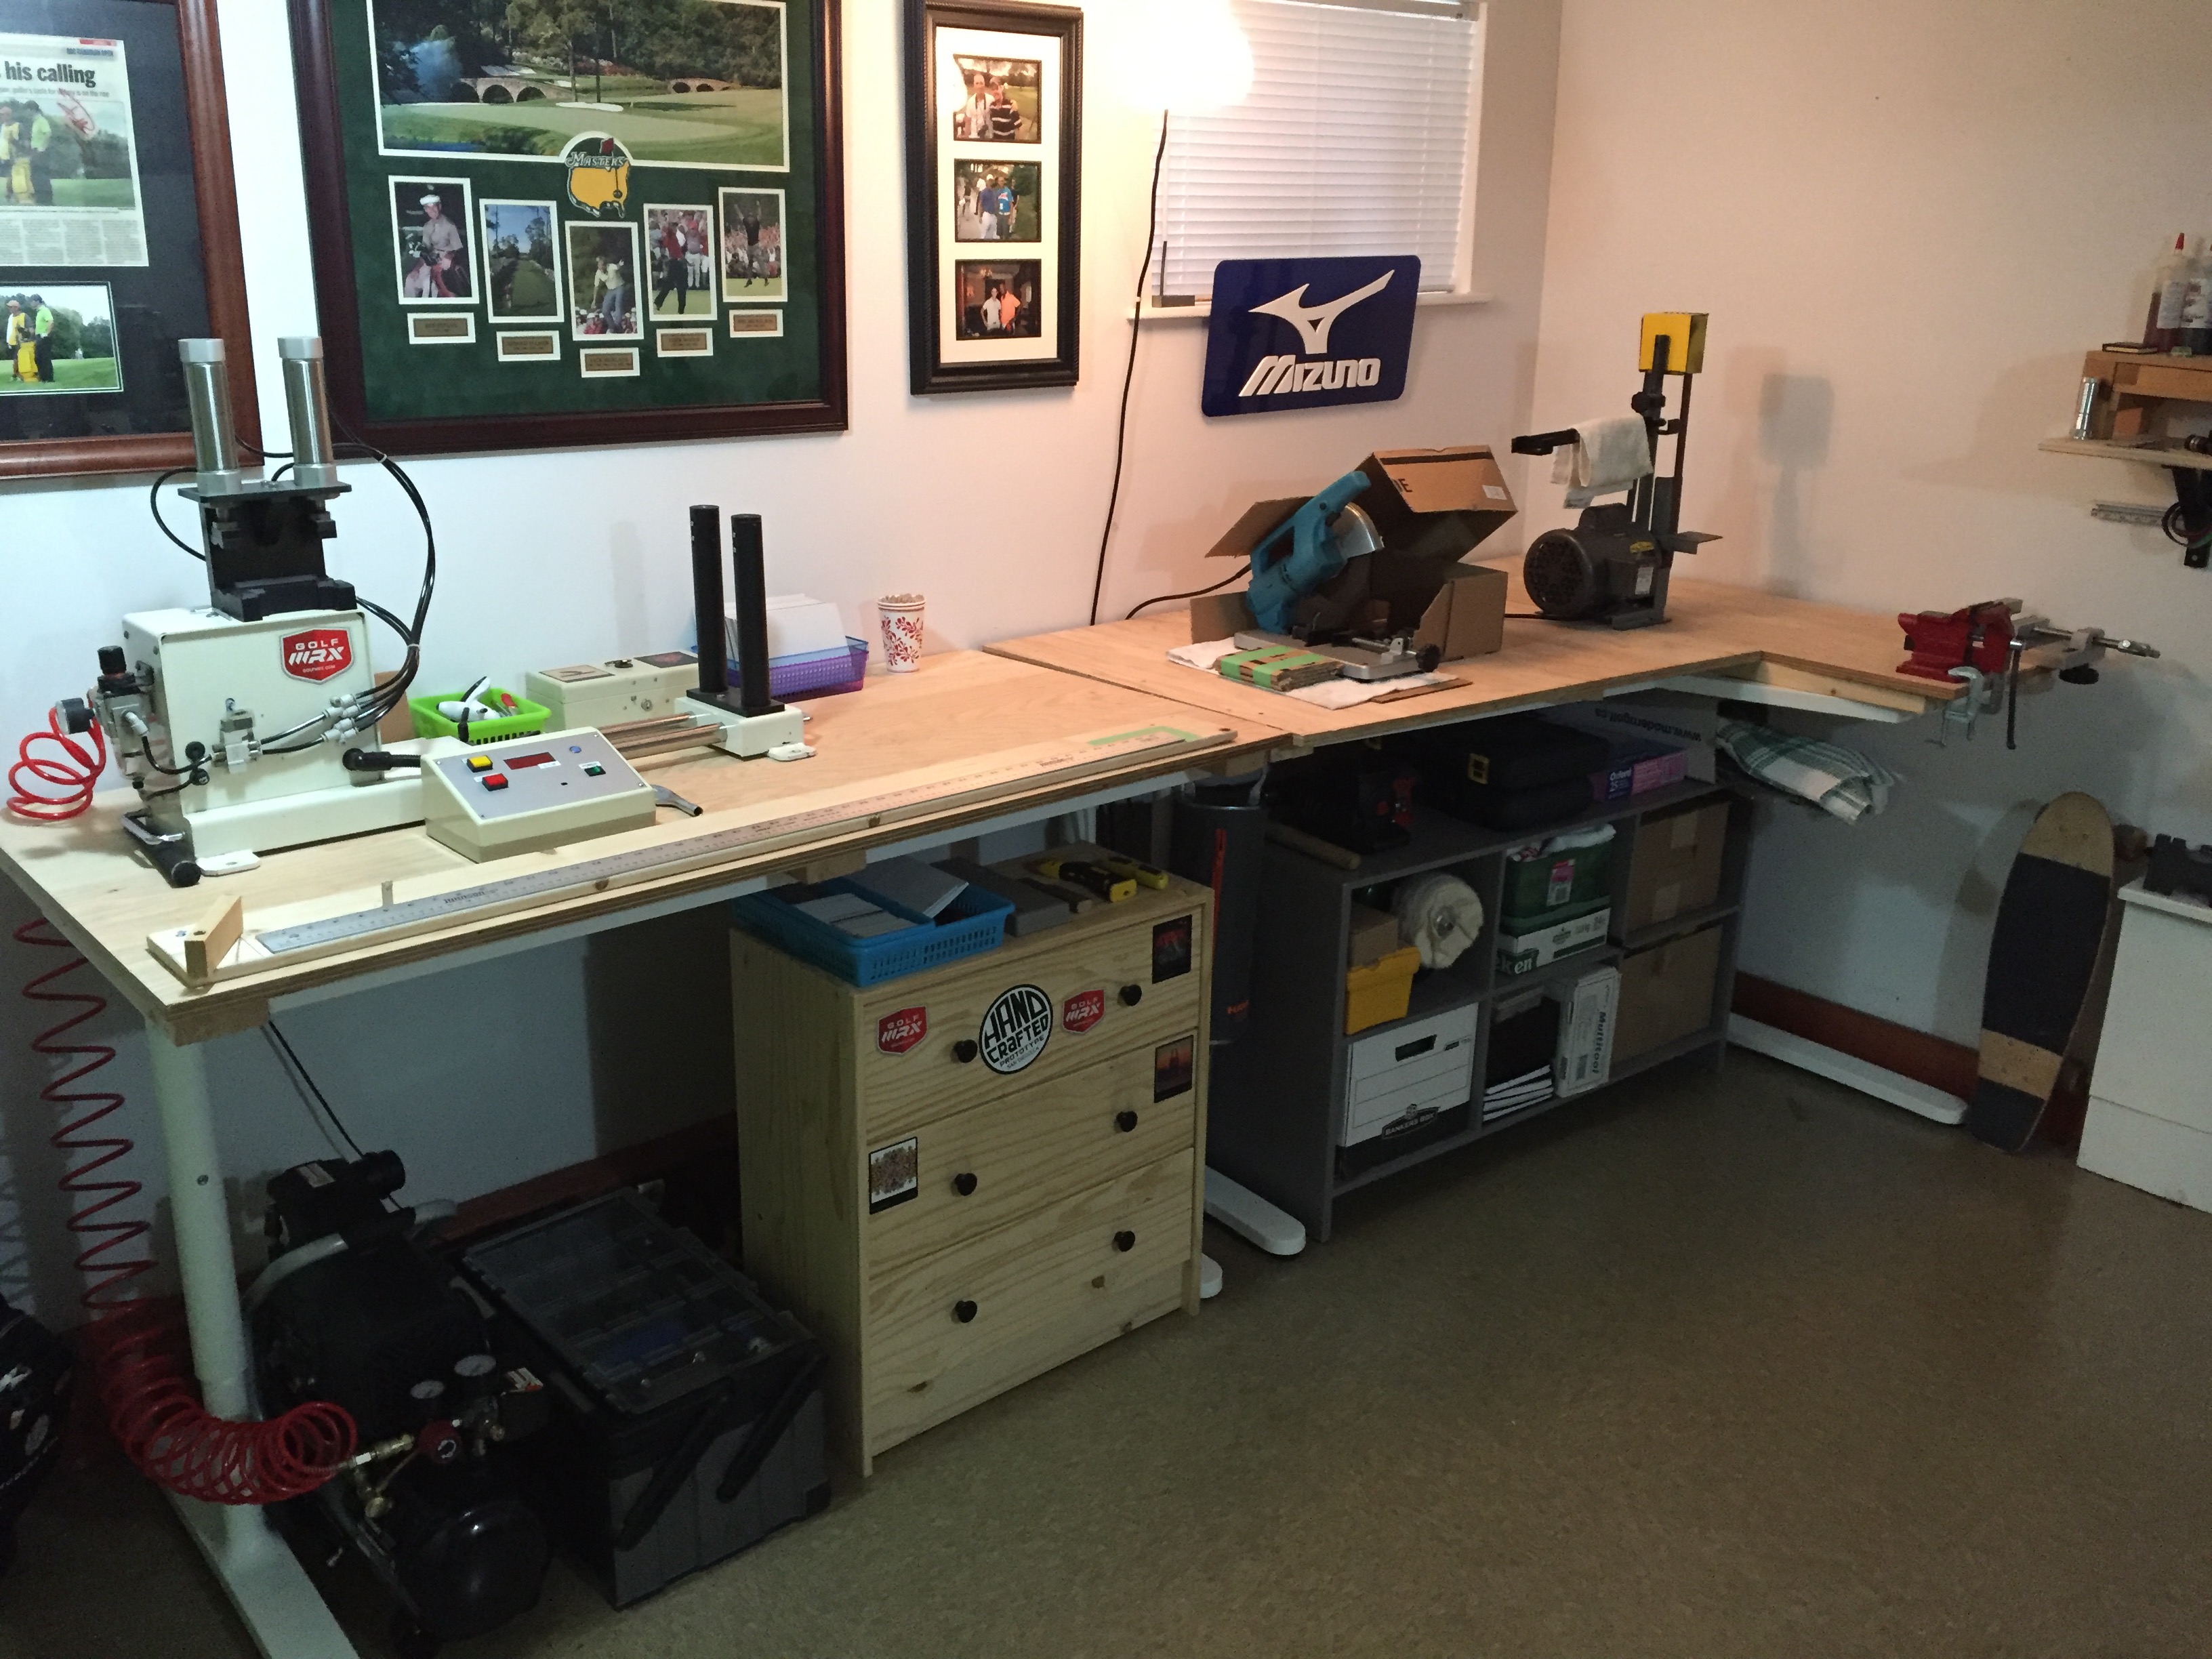
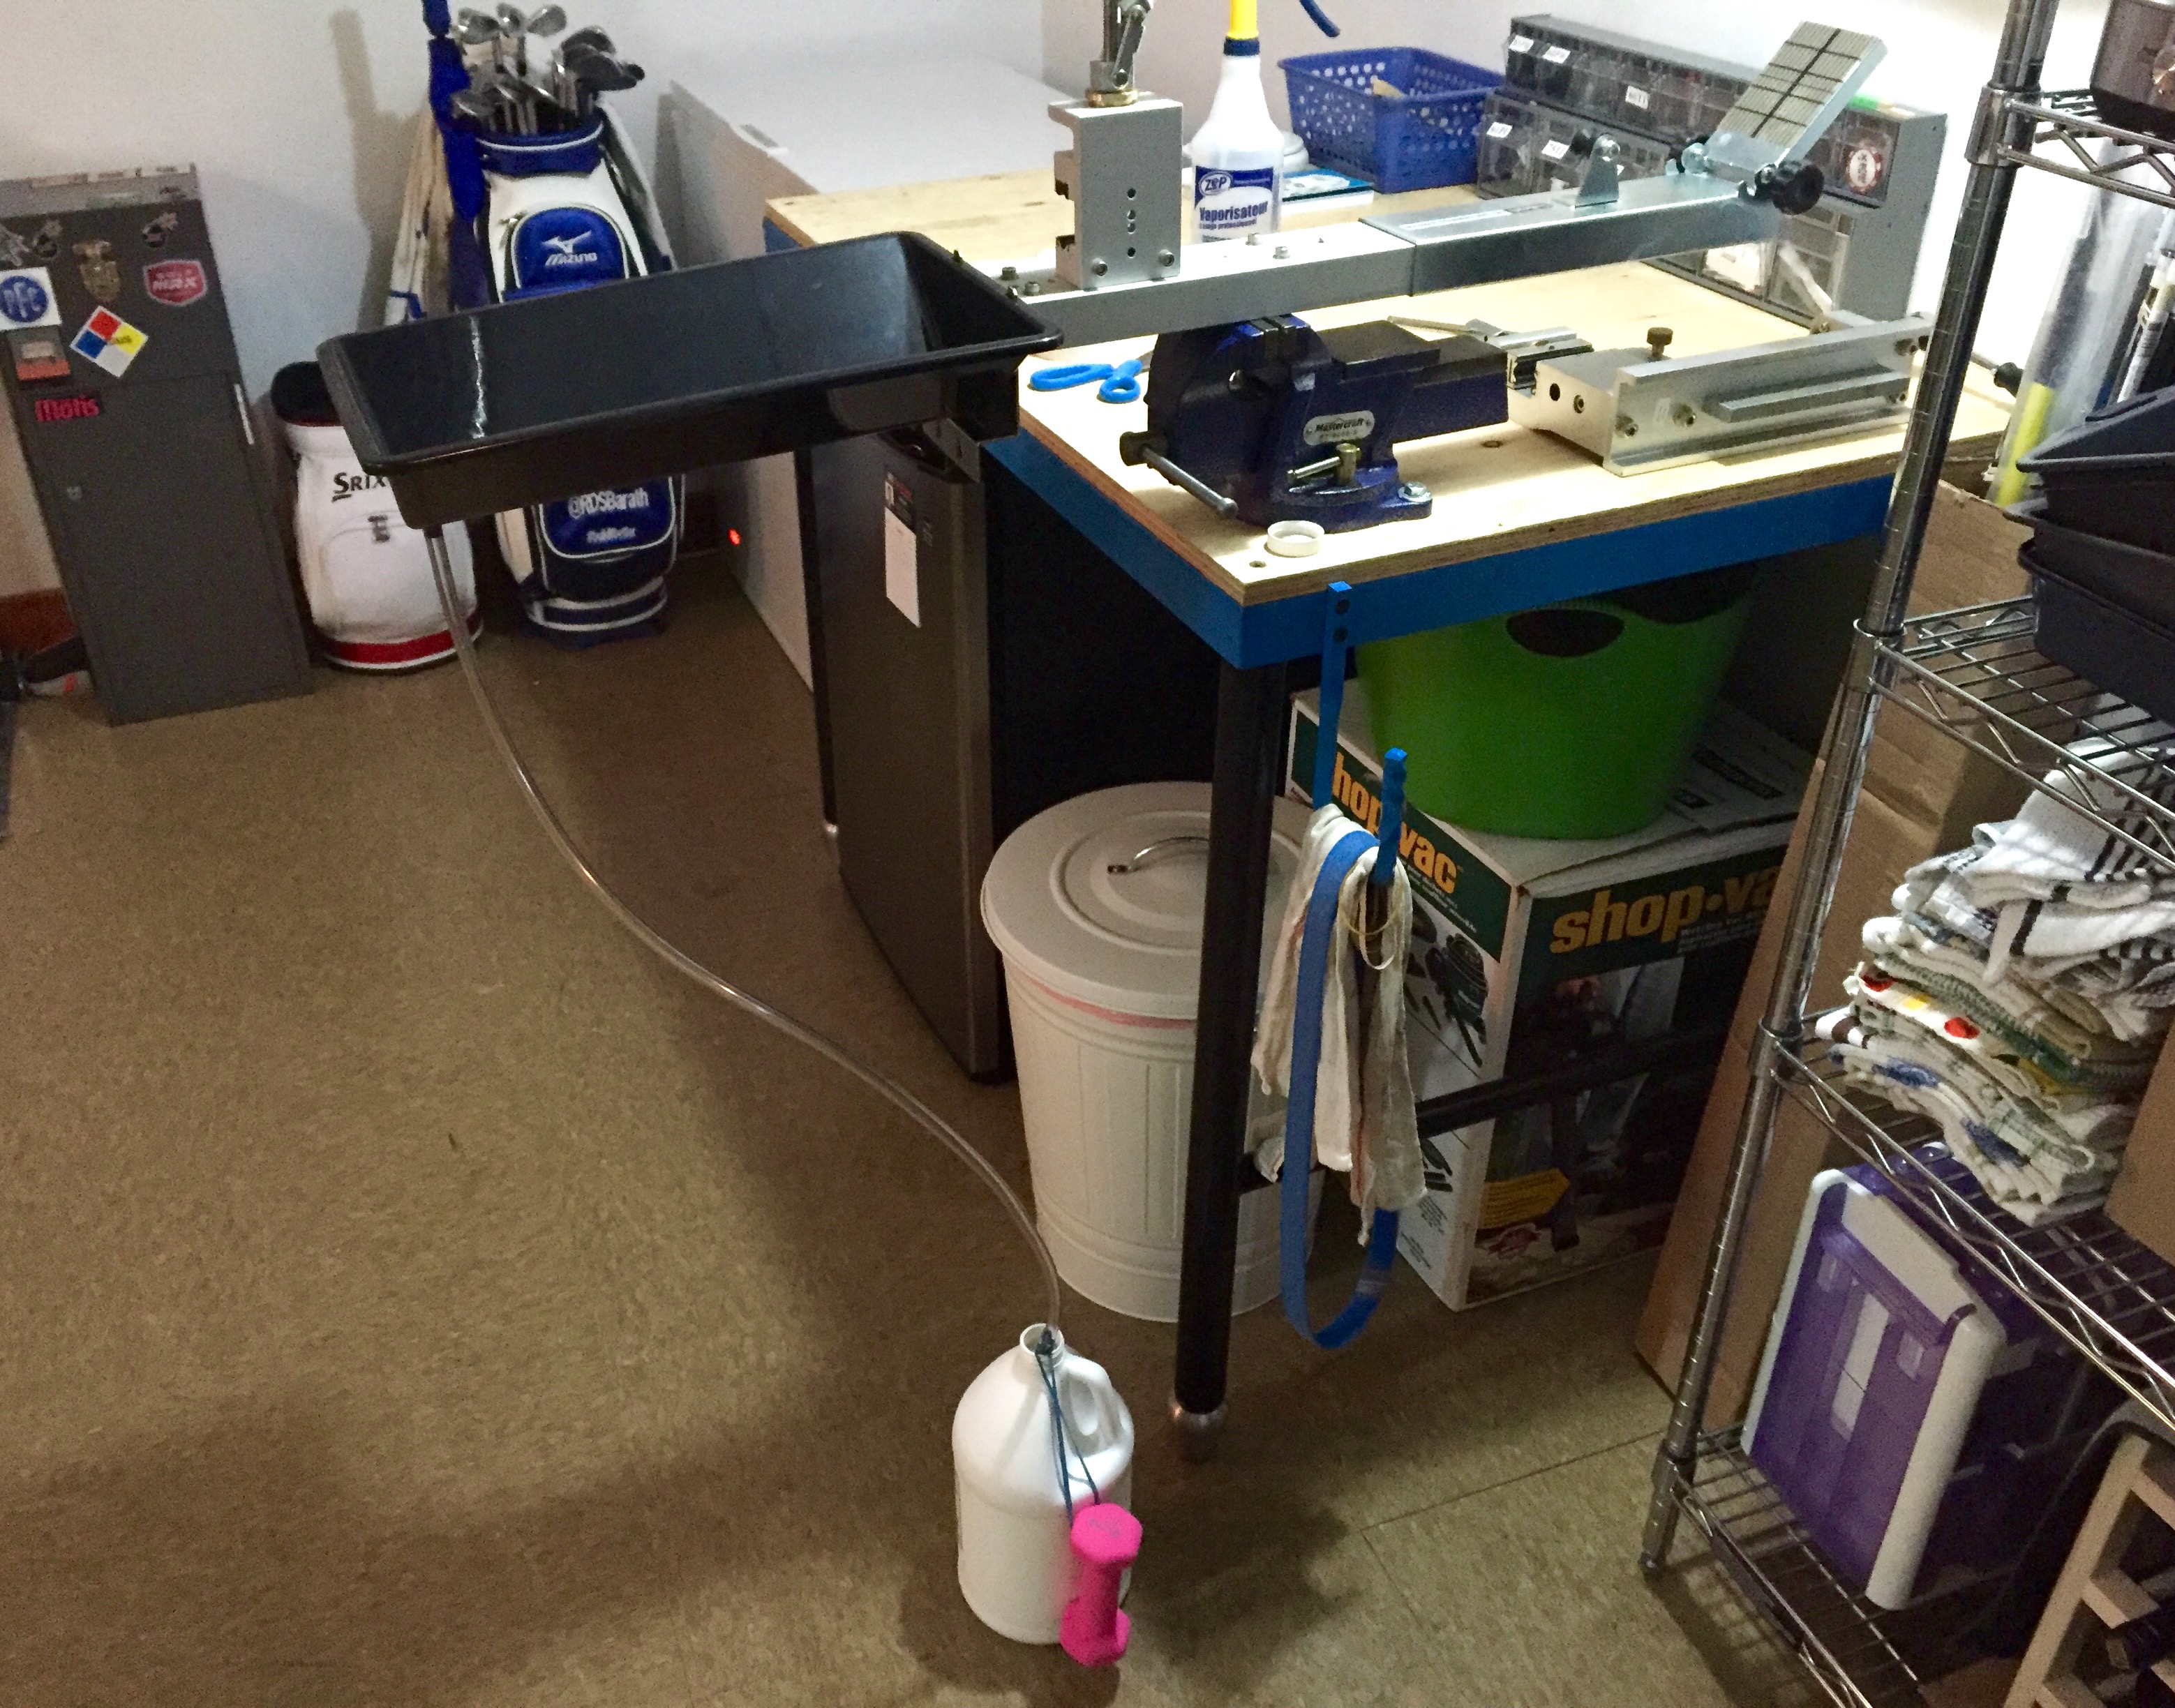
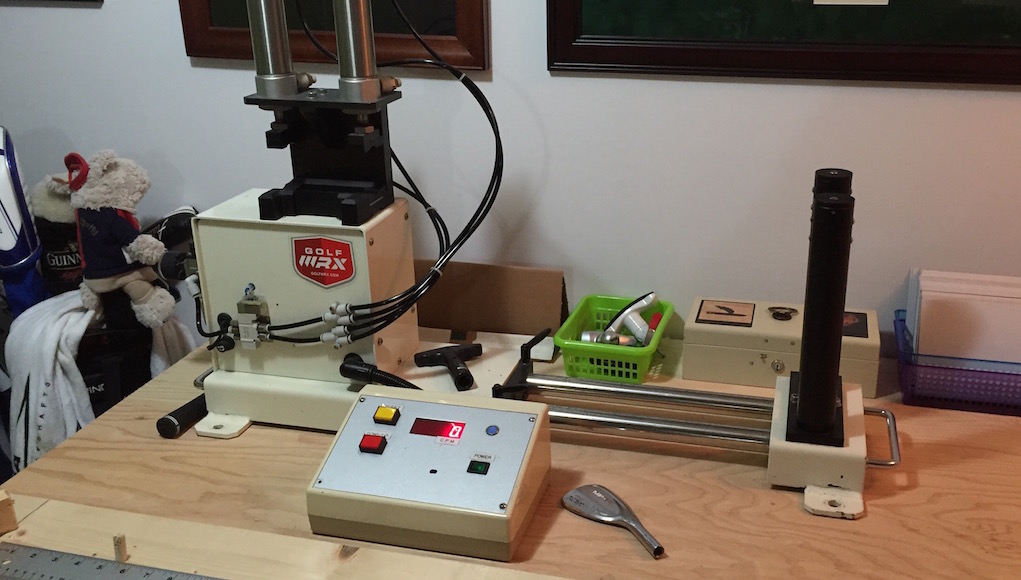
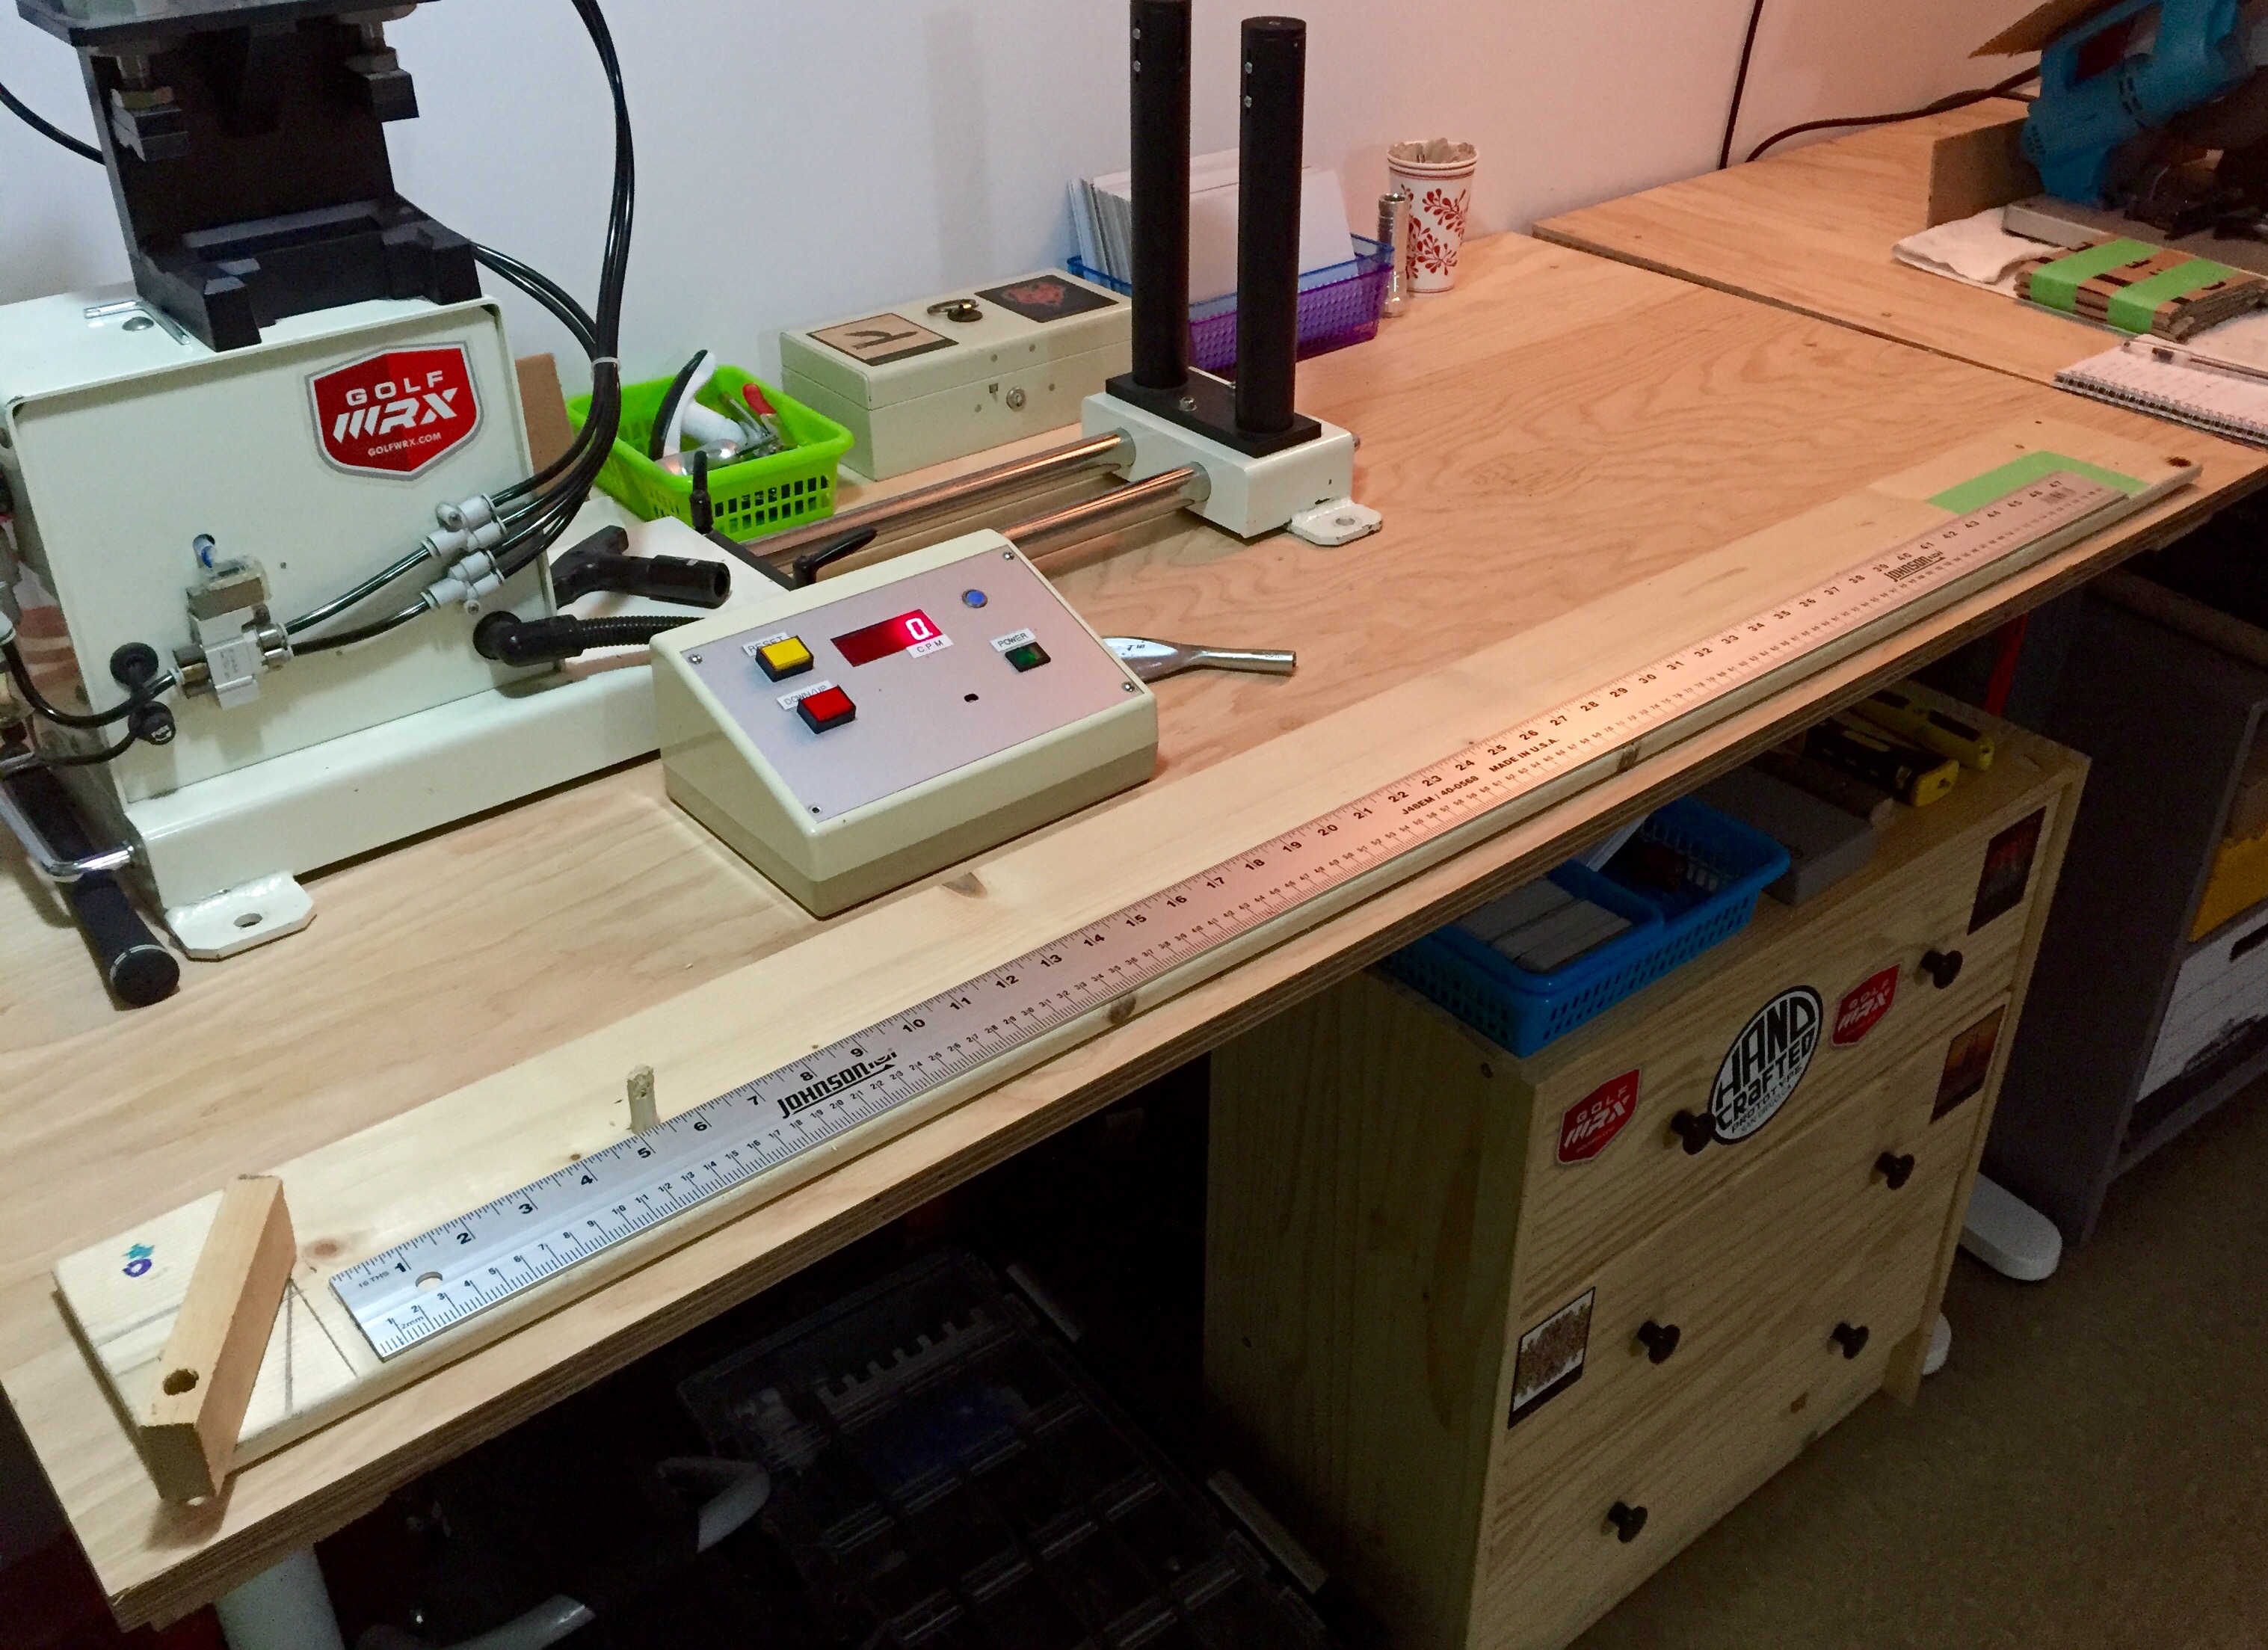
My basement build shop.
One of the most important things about building clubs is doing it properly with the right tools, and doing it safely. After setting up up multiple build shops over the years, from small hobby shops to large multi-station build shops, having the opportunity to build my own home shop from the ground up was something I always looked forward to. My shop is in my basement, and because of the limited space, it was imperative to find as many space saving-solutions as possible.
Like many people with a hobby they are passionate about, I look forward to one day having a stand-alone garage for all of my tools (and maybe a hitting net), but for now my basement gets the job done. I’m lucky to have access to a much large machine shop where I do wedge grinding, finishing and sand blasting, which are all jobs that make a lot more noise and create a lot more dust. I can’t get away with doing those things in a confined space, but we’ll touch on that later.
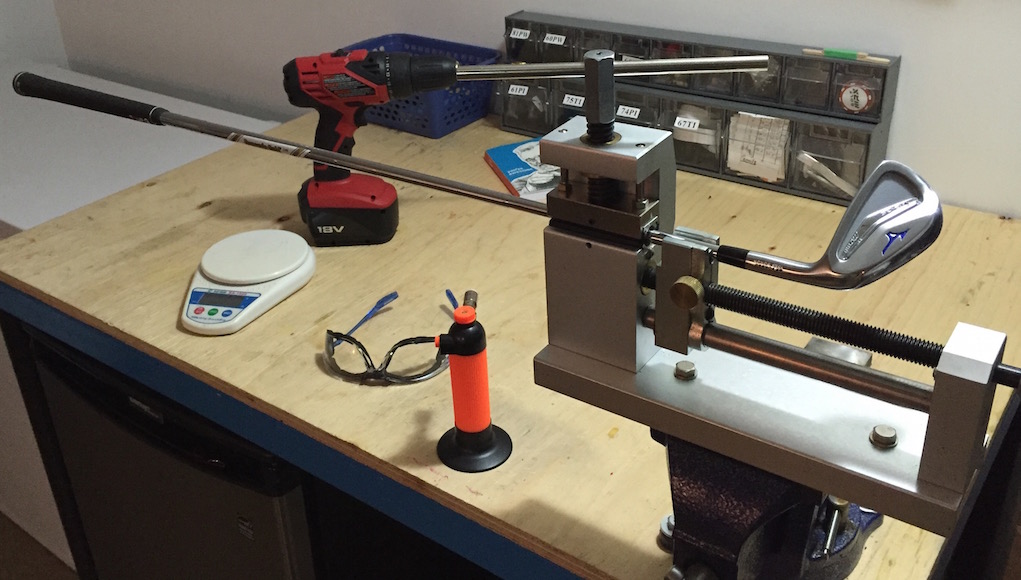
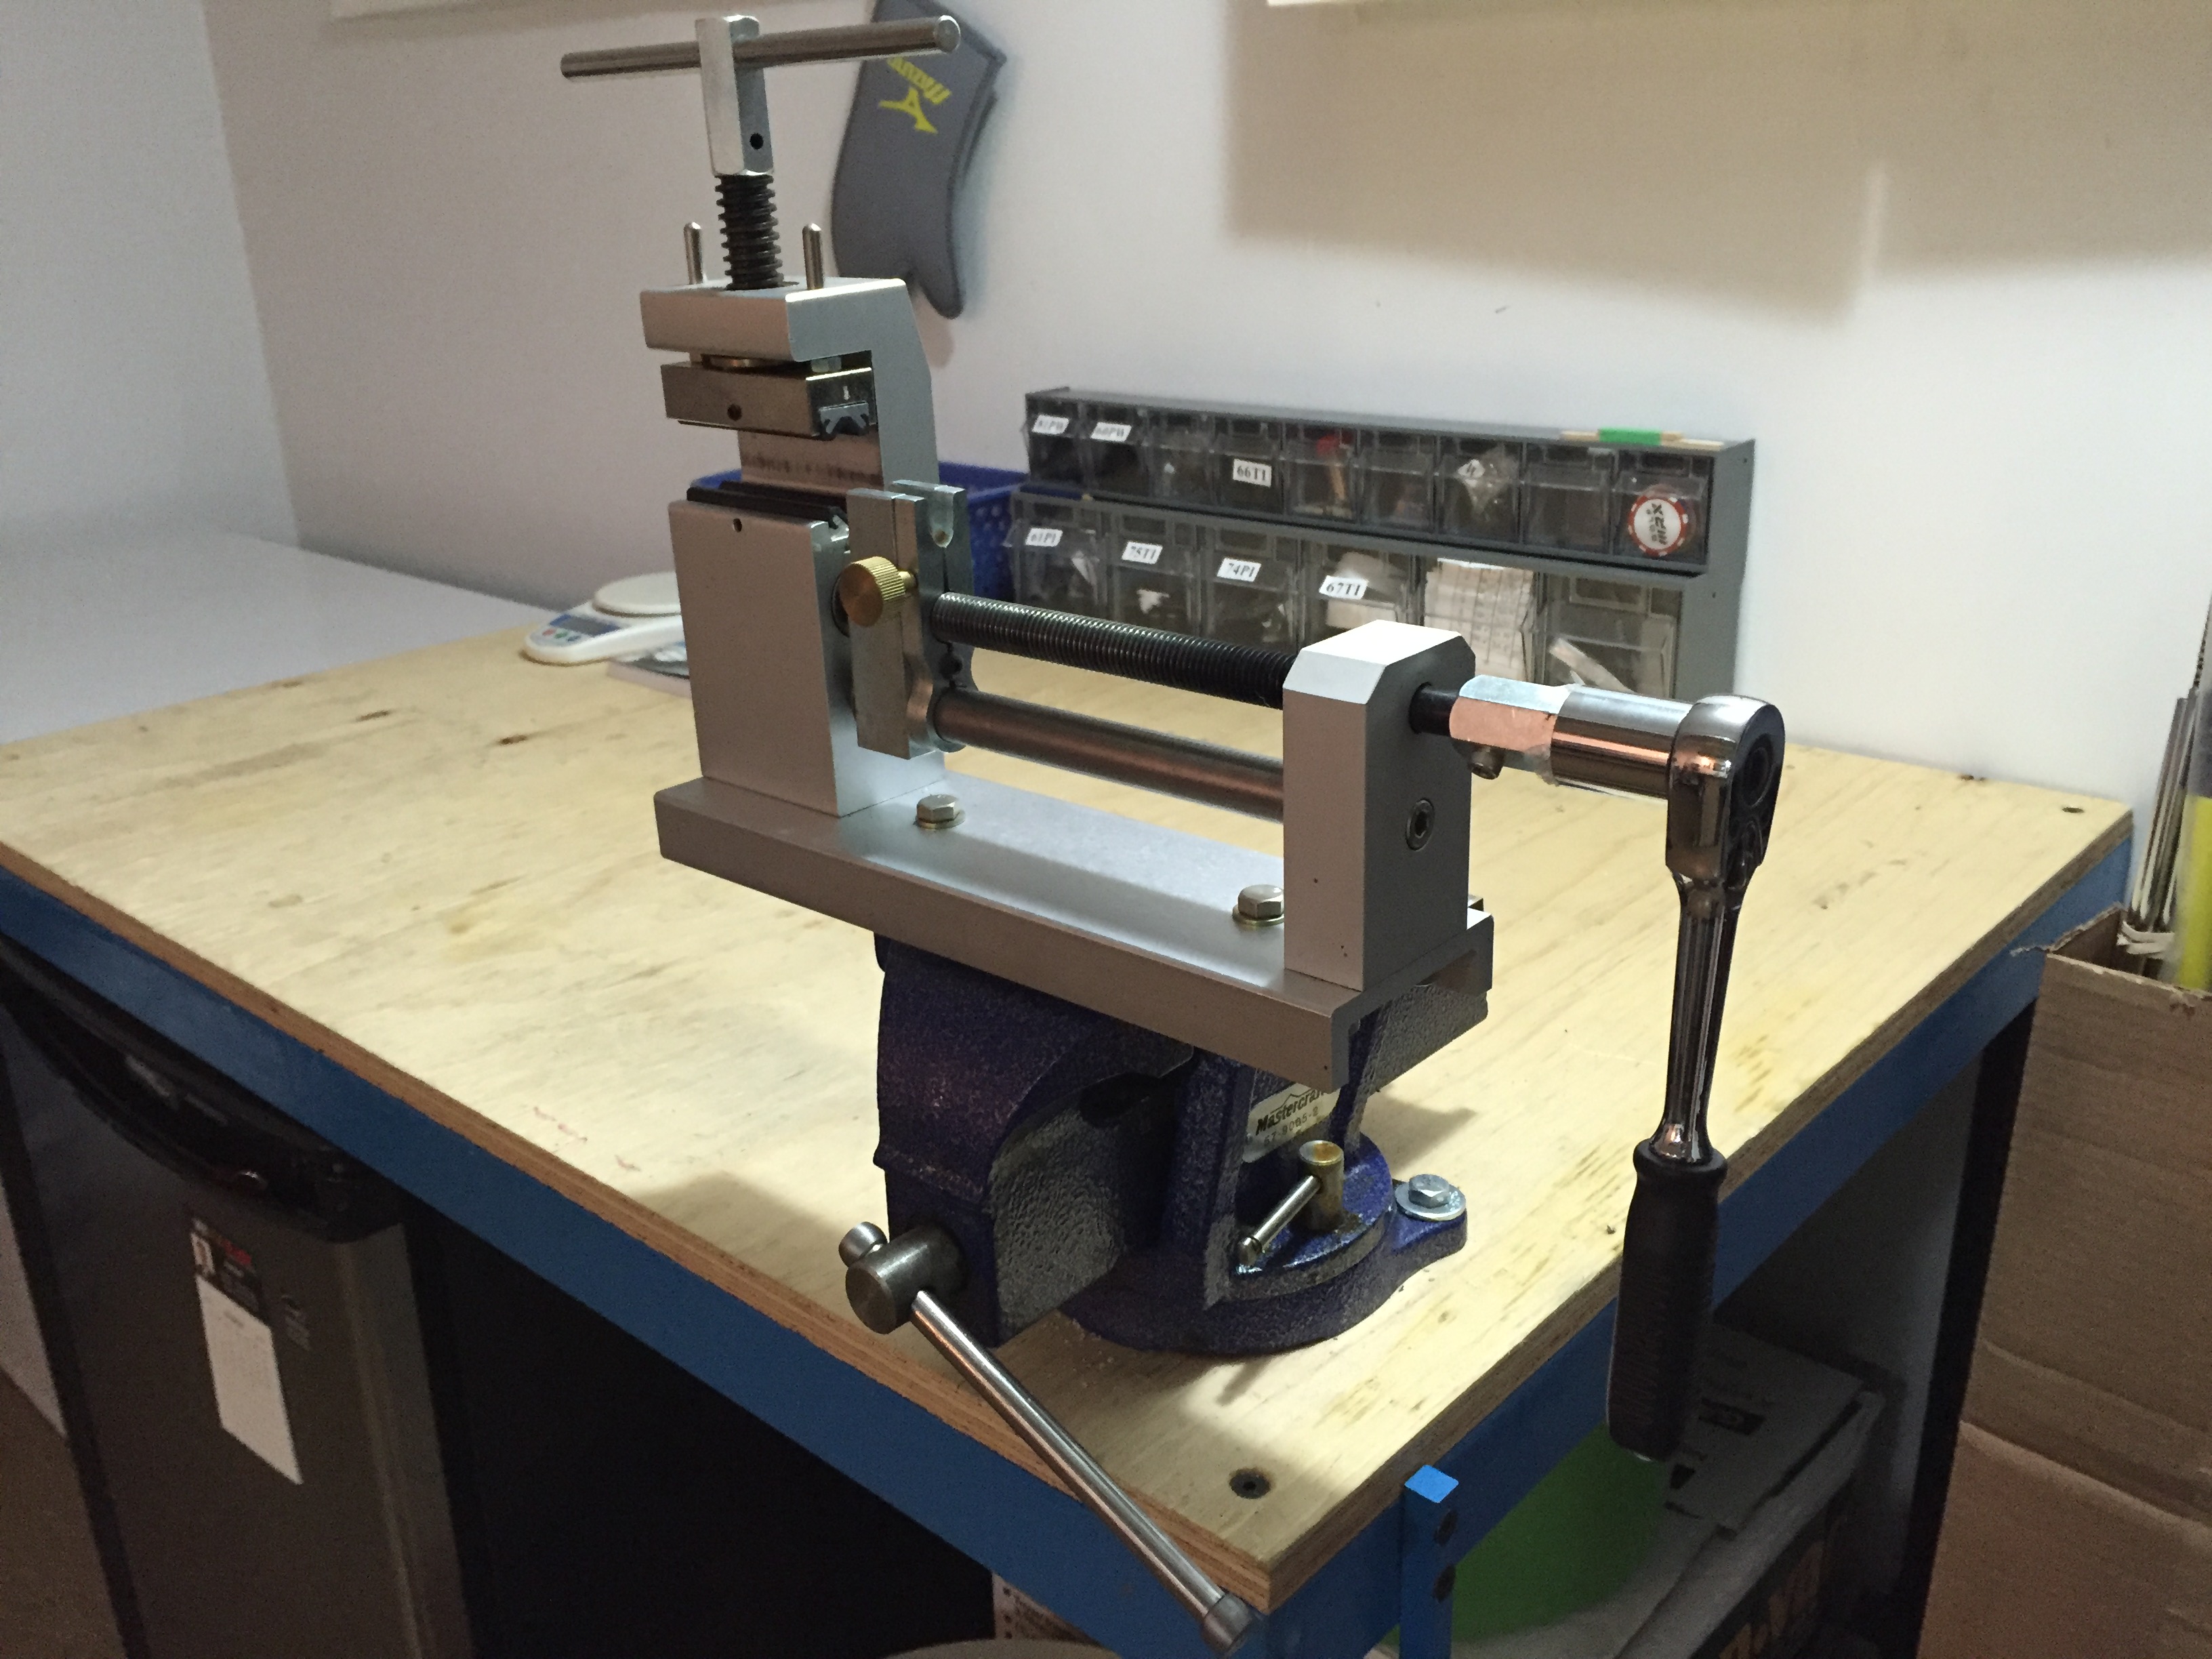
Although not a tool, arguably the most important piece of equipment is the work bench. Having a quality workbench is needed because of the amount of abuse that it will take over its lifespan. Also, just like a great kitchen design, you need counter space and a good workbench provides that. Dropping a clubhead (especially a driver or fairway wood with nice paint job) can be costly. The next extension of the workbench is a good vice that has been properly attached to the bench with bolts. Like I’ve said in previous articles, I believe when you do something you should take the time to do it properly. I once saw a vice screwed into a workbench with 1.25-inch screws, and as soon as someone went to use the vice it ripped out and took a club with it.
My workbench setup… with vice and a convenient beer fridge.

My 5-inch vice with 90-degree pivot properly mounted.
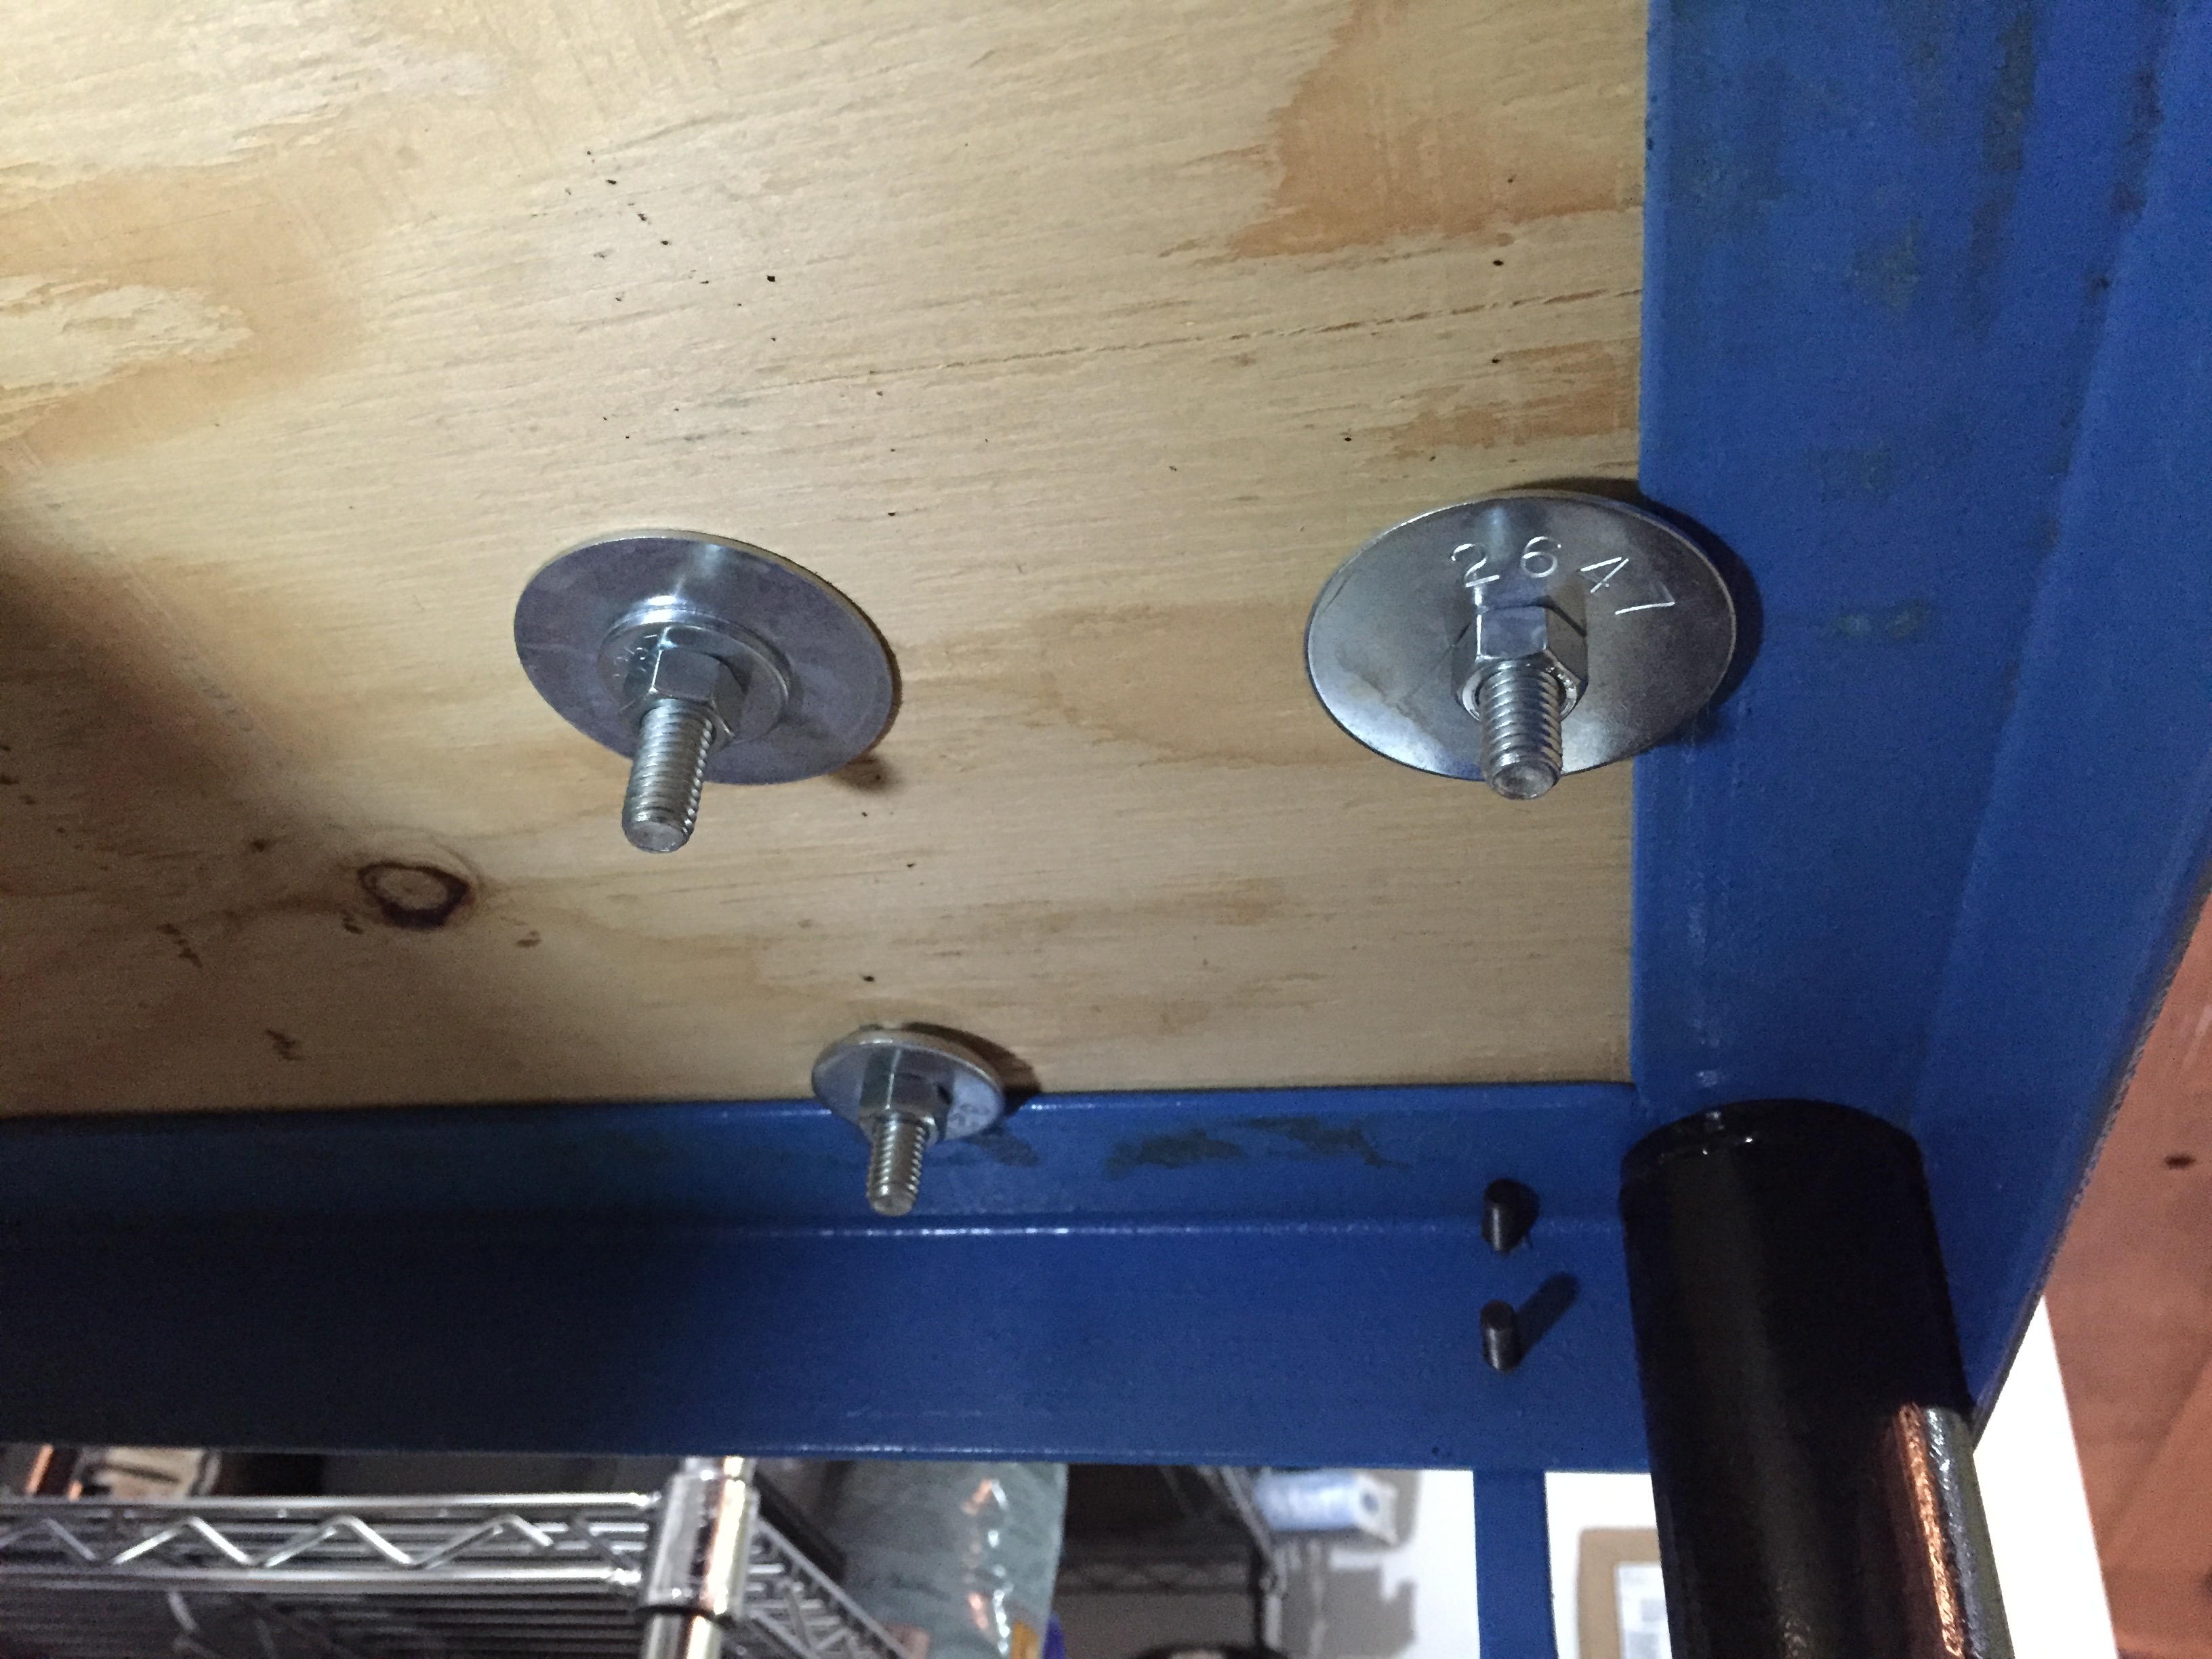
A demonstration of how to properly secure a vice through the a table top using bolts and washers.
Not every surface needs to be as stable as a full-scale industrial workbench, but having counter space is important. My personal solution to this was IKEA (honestly, who doesn’t love IKEA?). I recommend checking out Ikea Hacks (just Google it) for space-saving tips. If your space is really limited or needs to be multi-use, flip-up table ends are a perfect solution. As much as I like finding quick solutions to problems, it’s way more satisfying to build things yourself if possible. That way, at the end of the project, you have something that is exactly the way you wanted it.
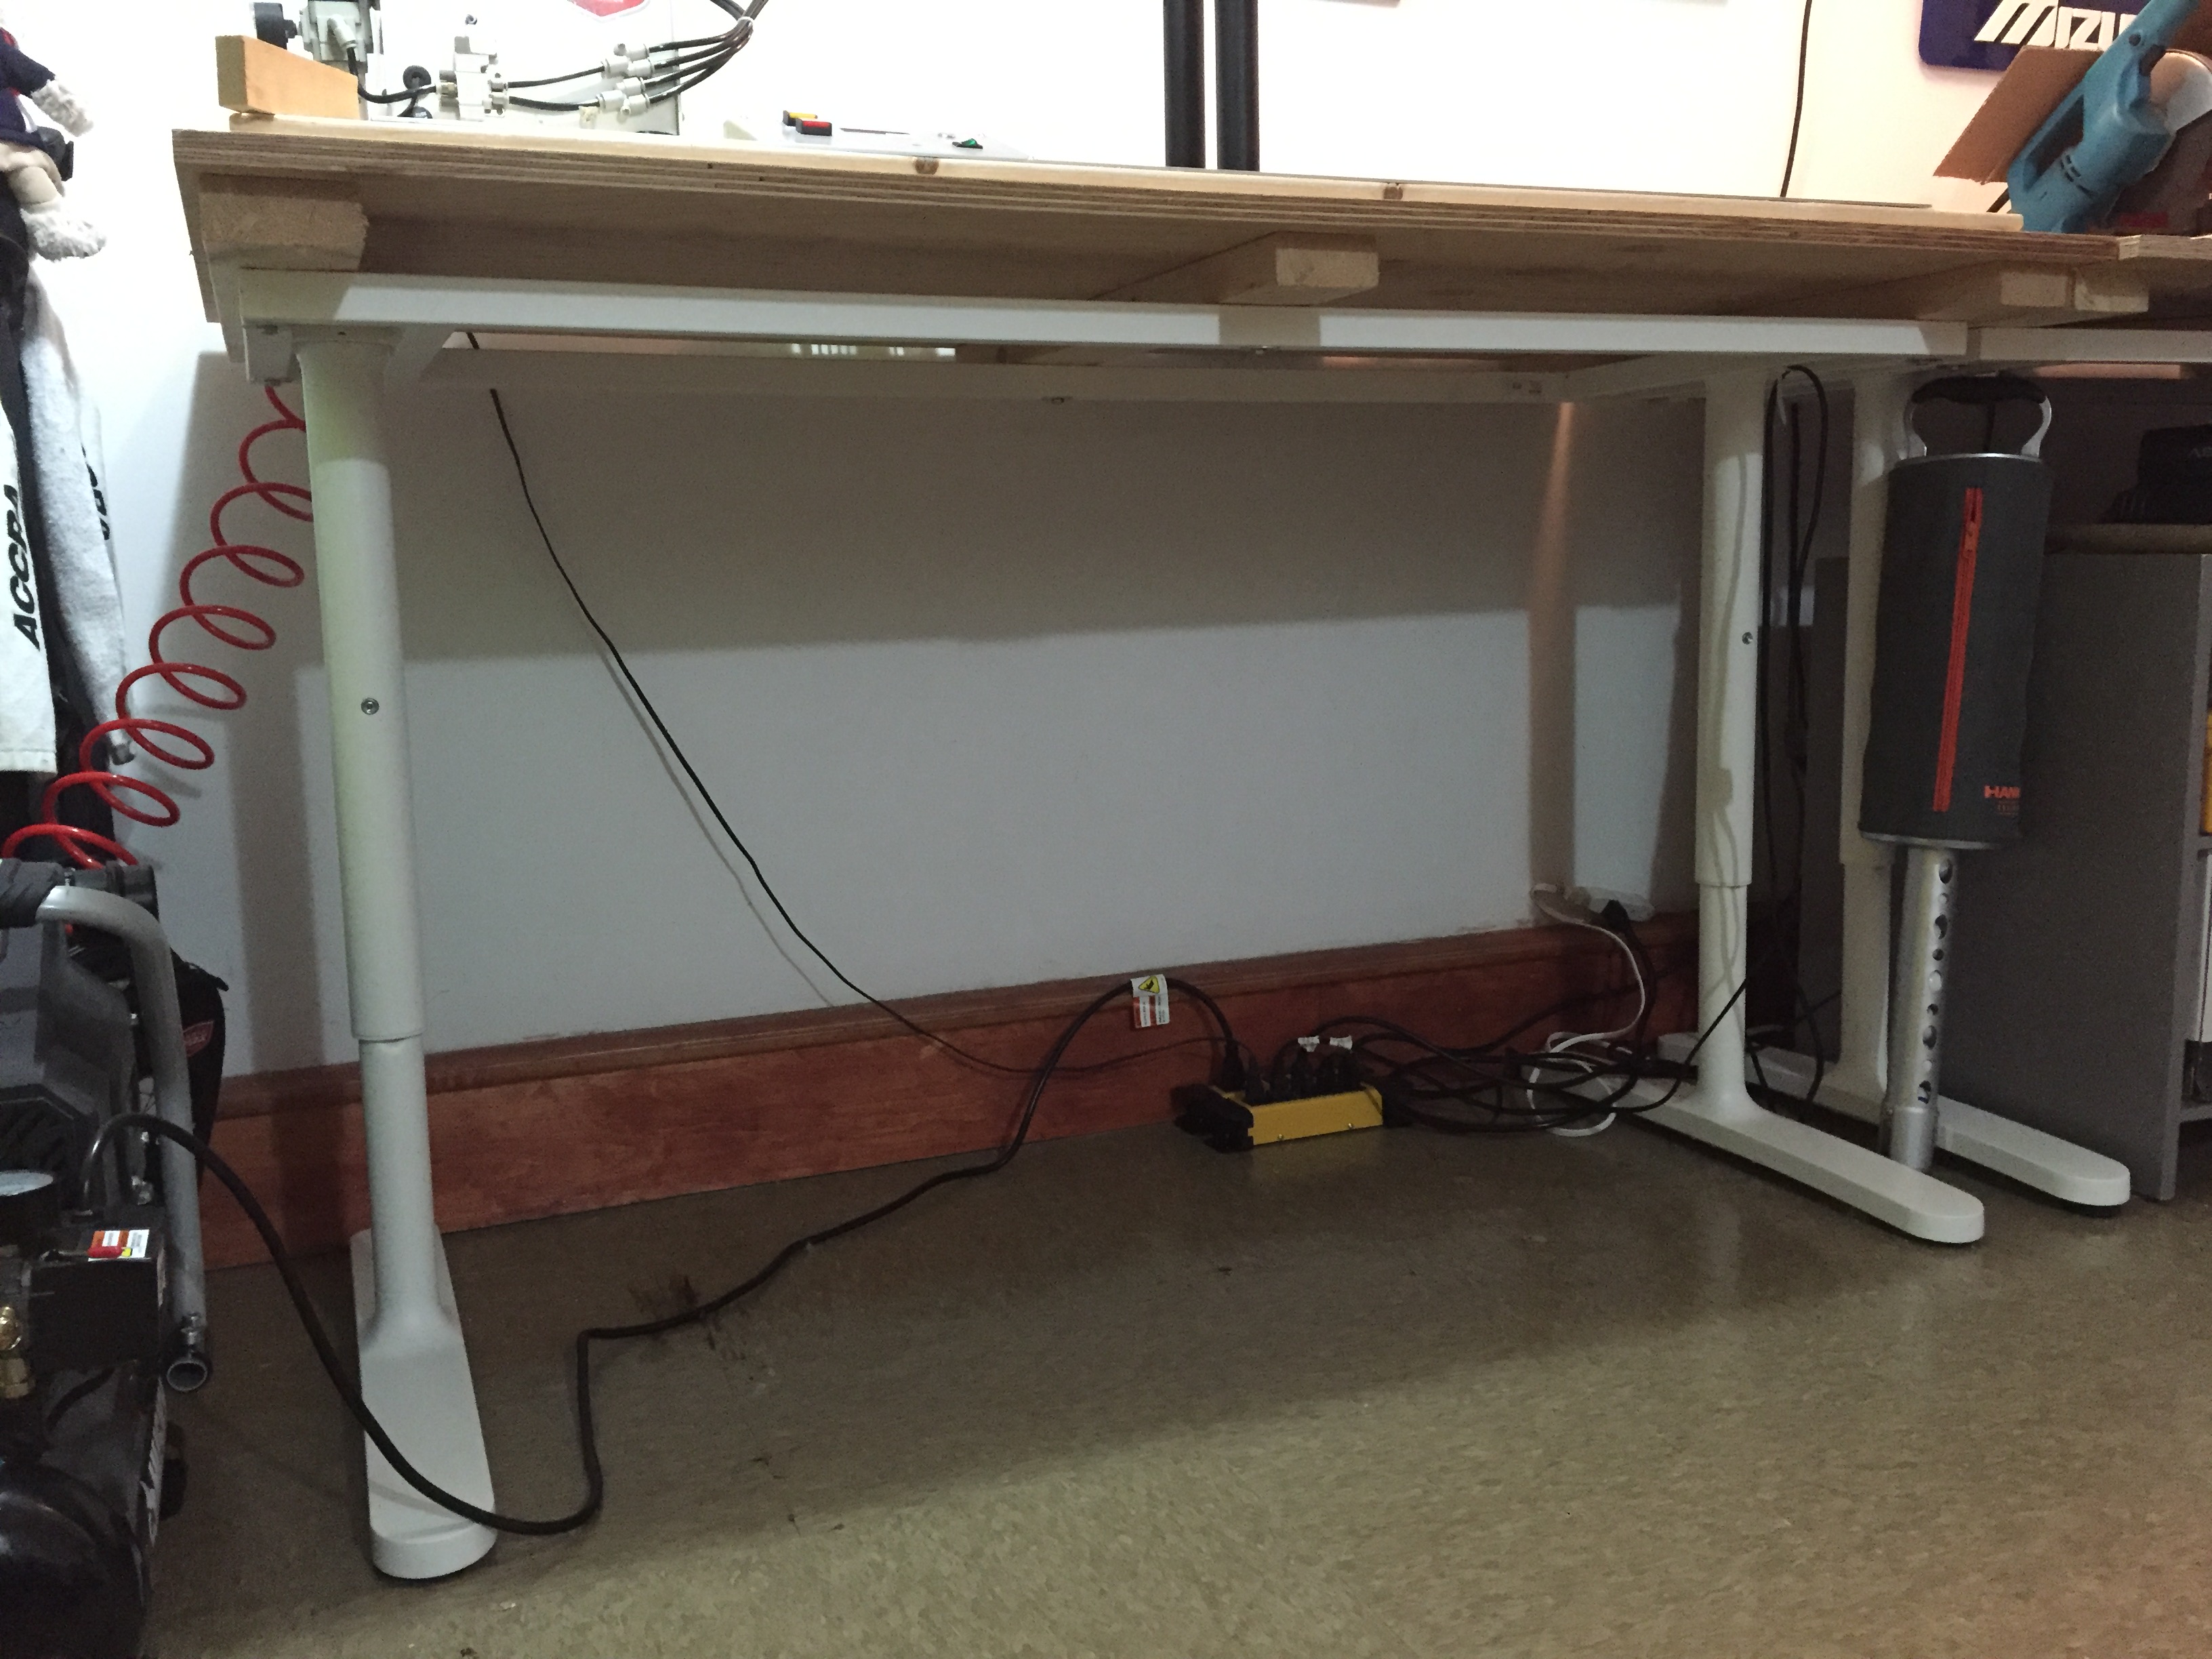
As seen in the pictures below, I re-purposed two Ikea BEKAN desk bases from the As-Is section into a full workbench after getting a 4-foot by 8-foot piece of 0.75-inch plywood cut to size. This saved me hundreds of dollars and got me close to 30 square feet of counter space to mount other tools including my bench ruler, chop saw, belt sander and frequency machine. And since these desk bases have adjustable heights, I was able to get them to a comfortable workbench height.
There are lots of kits available online to build benches to fit almost any space. Get creative, and customize it to your needs.
My work table built on Ikea BEKANT bases.
The top was secured with screws to the 2×4’s.
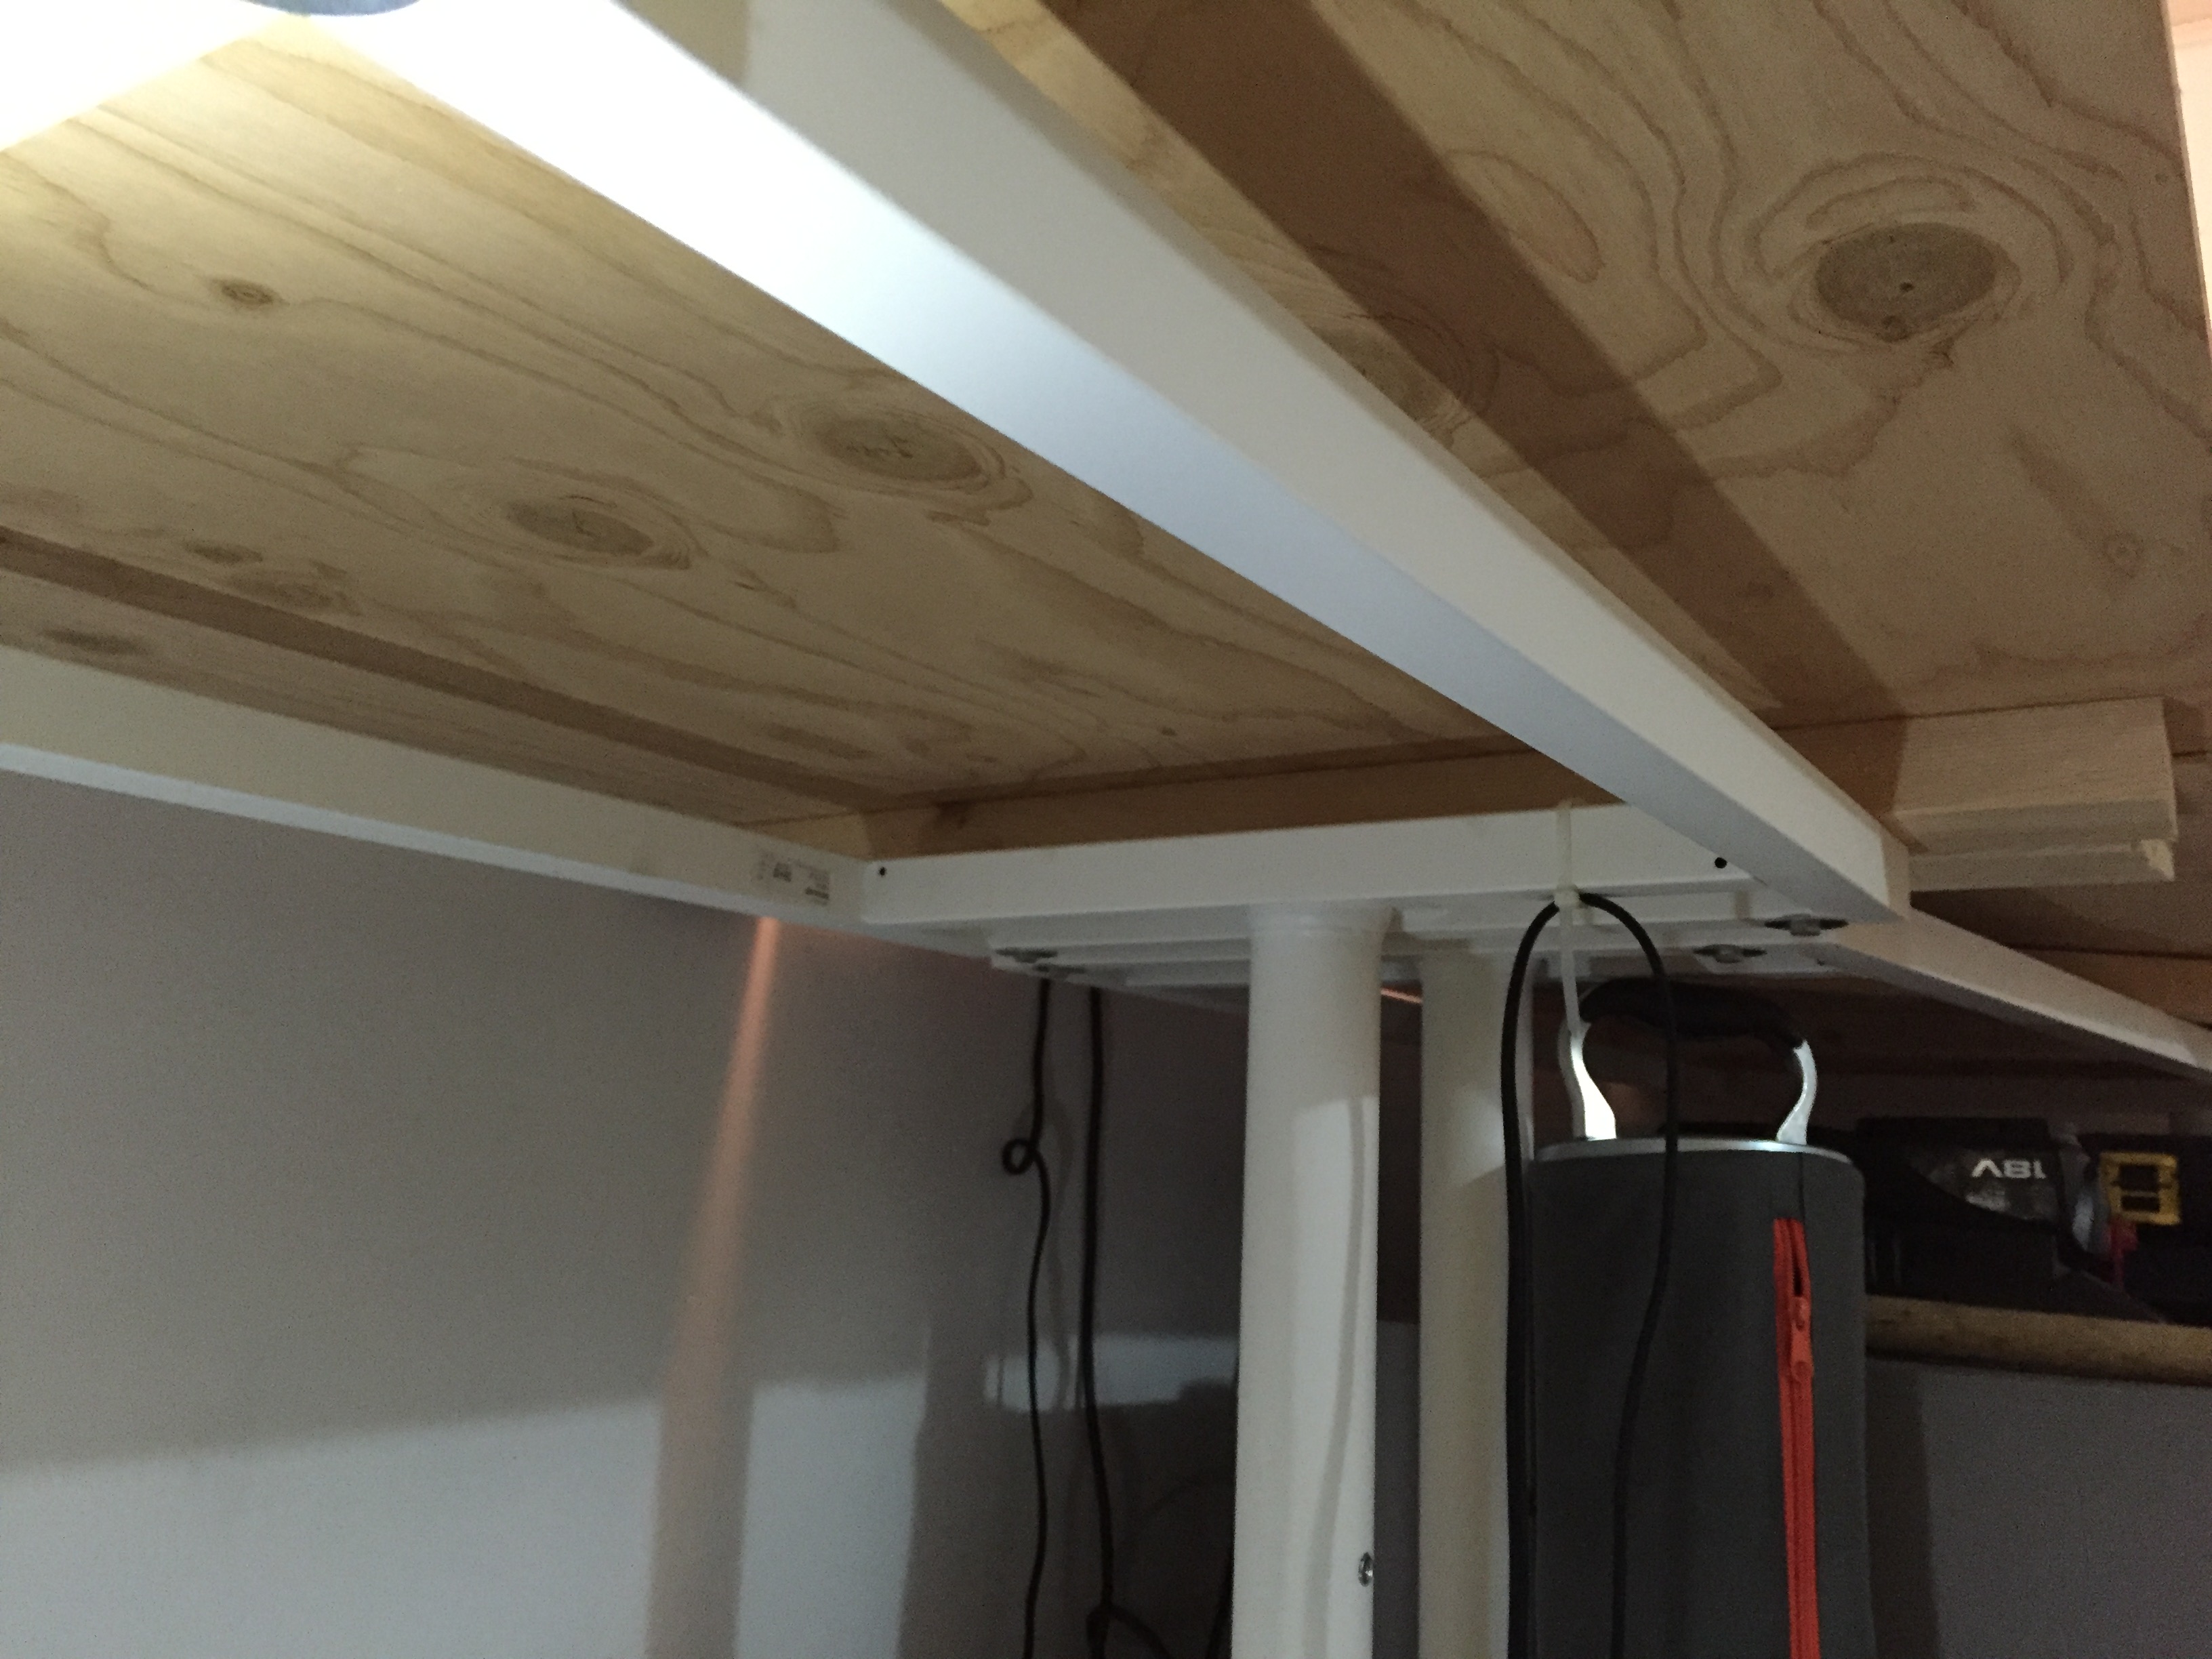
Lagbolts through preexisting holes in the frame hold the top to the base.
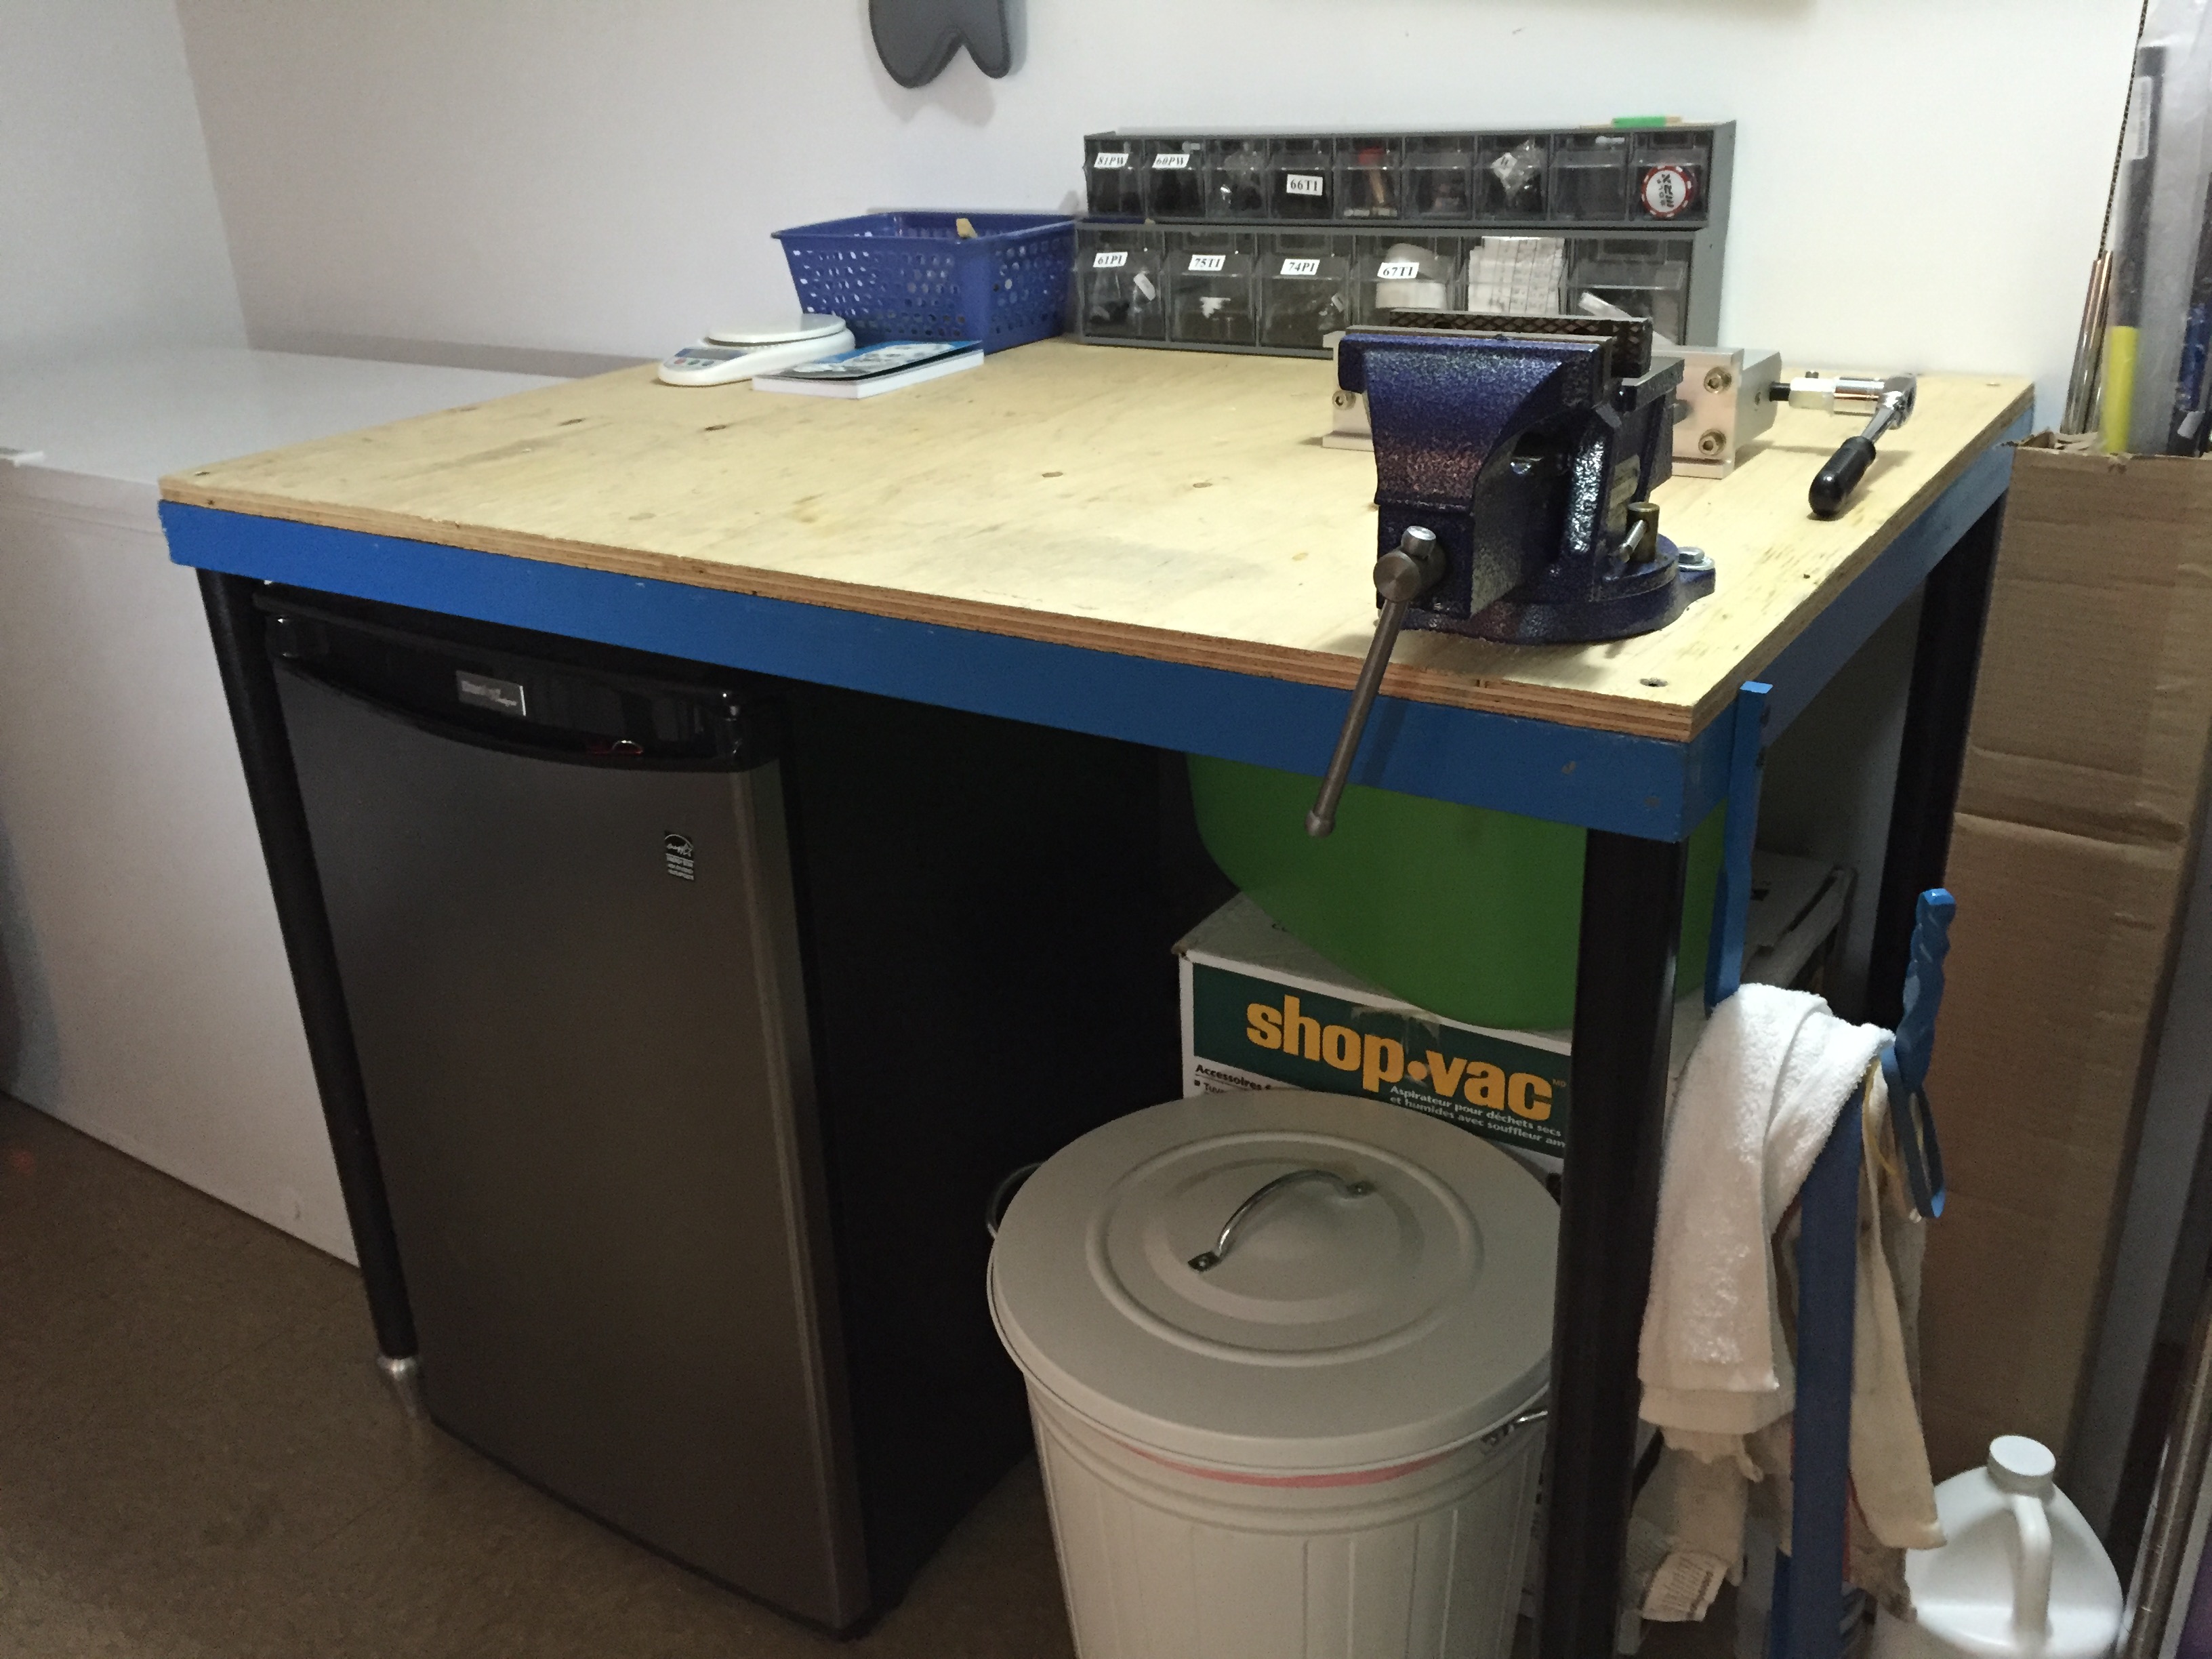
One of the other things that’s very important is organization. Having a few small organizational tools can make a difference: think storage bins, trays and component drawers, which are especially useful for ferrules and tip weights. Make sure to put labels on them, too, so it’s always easy to find what you need.
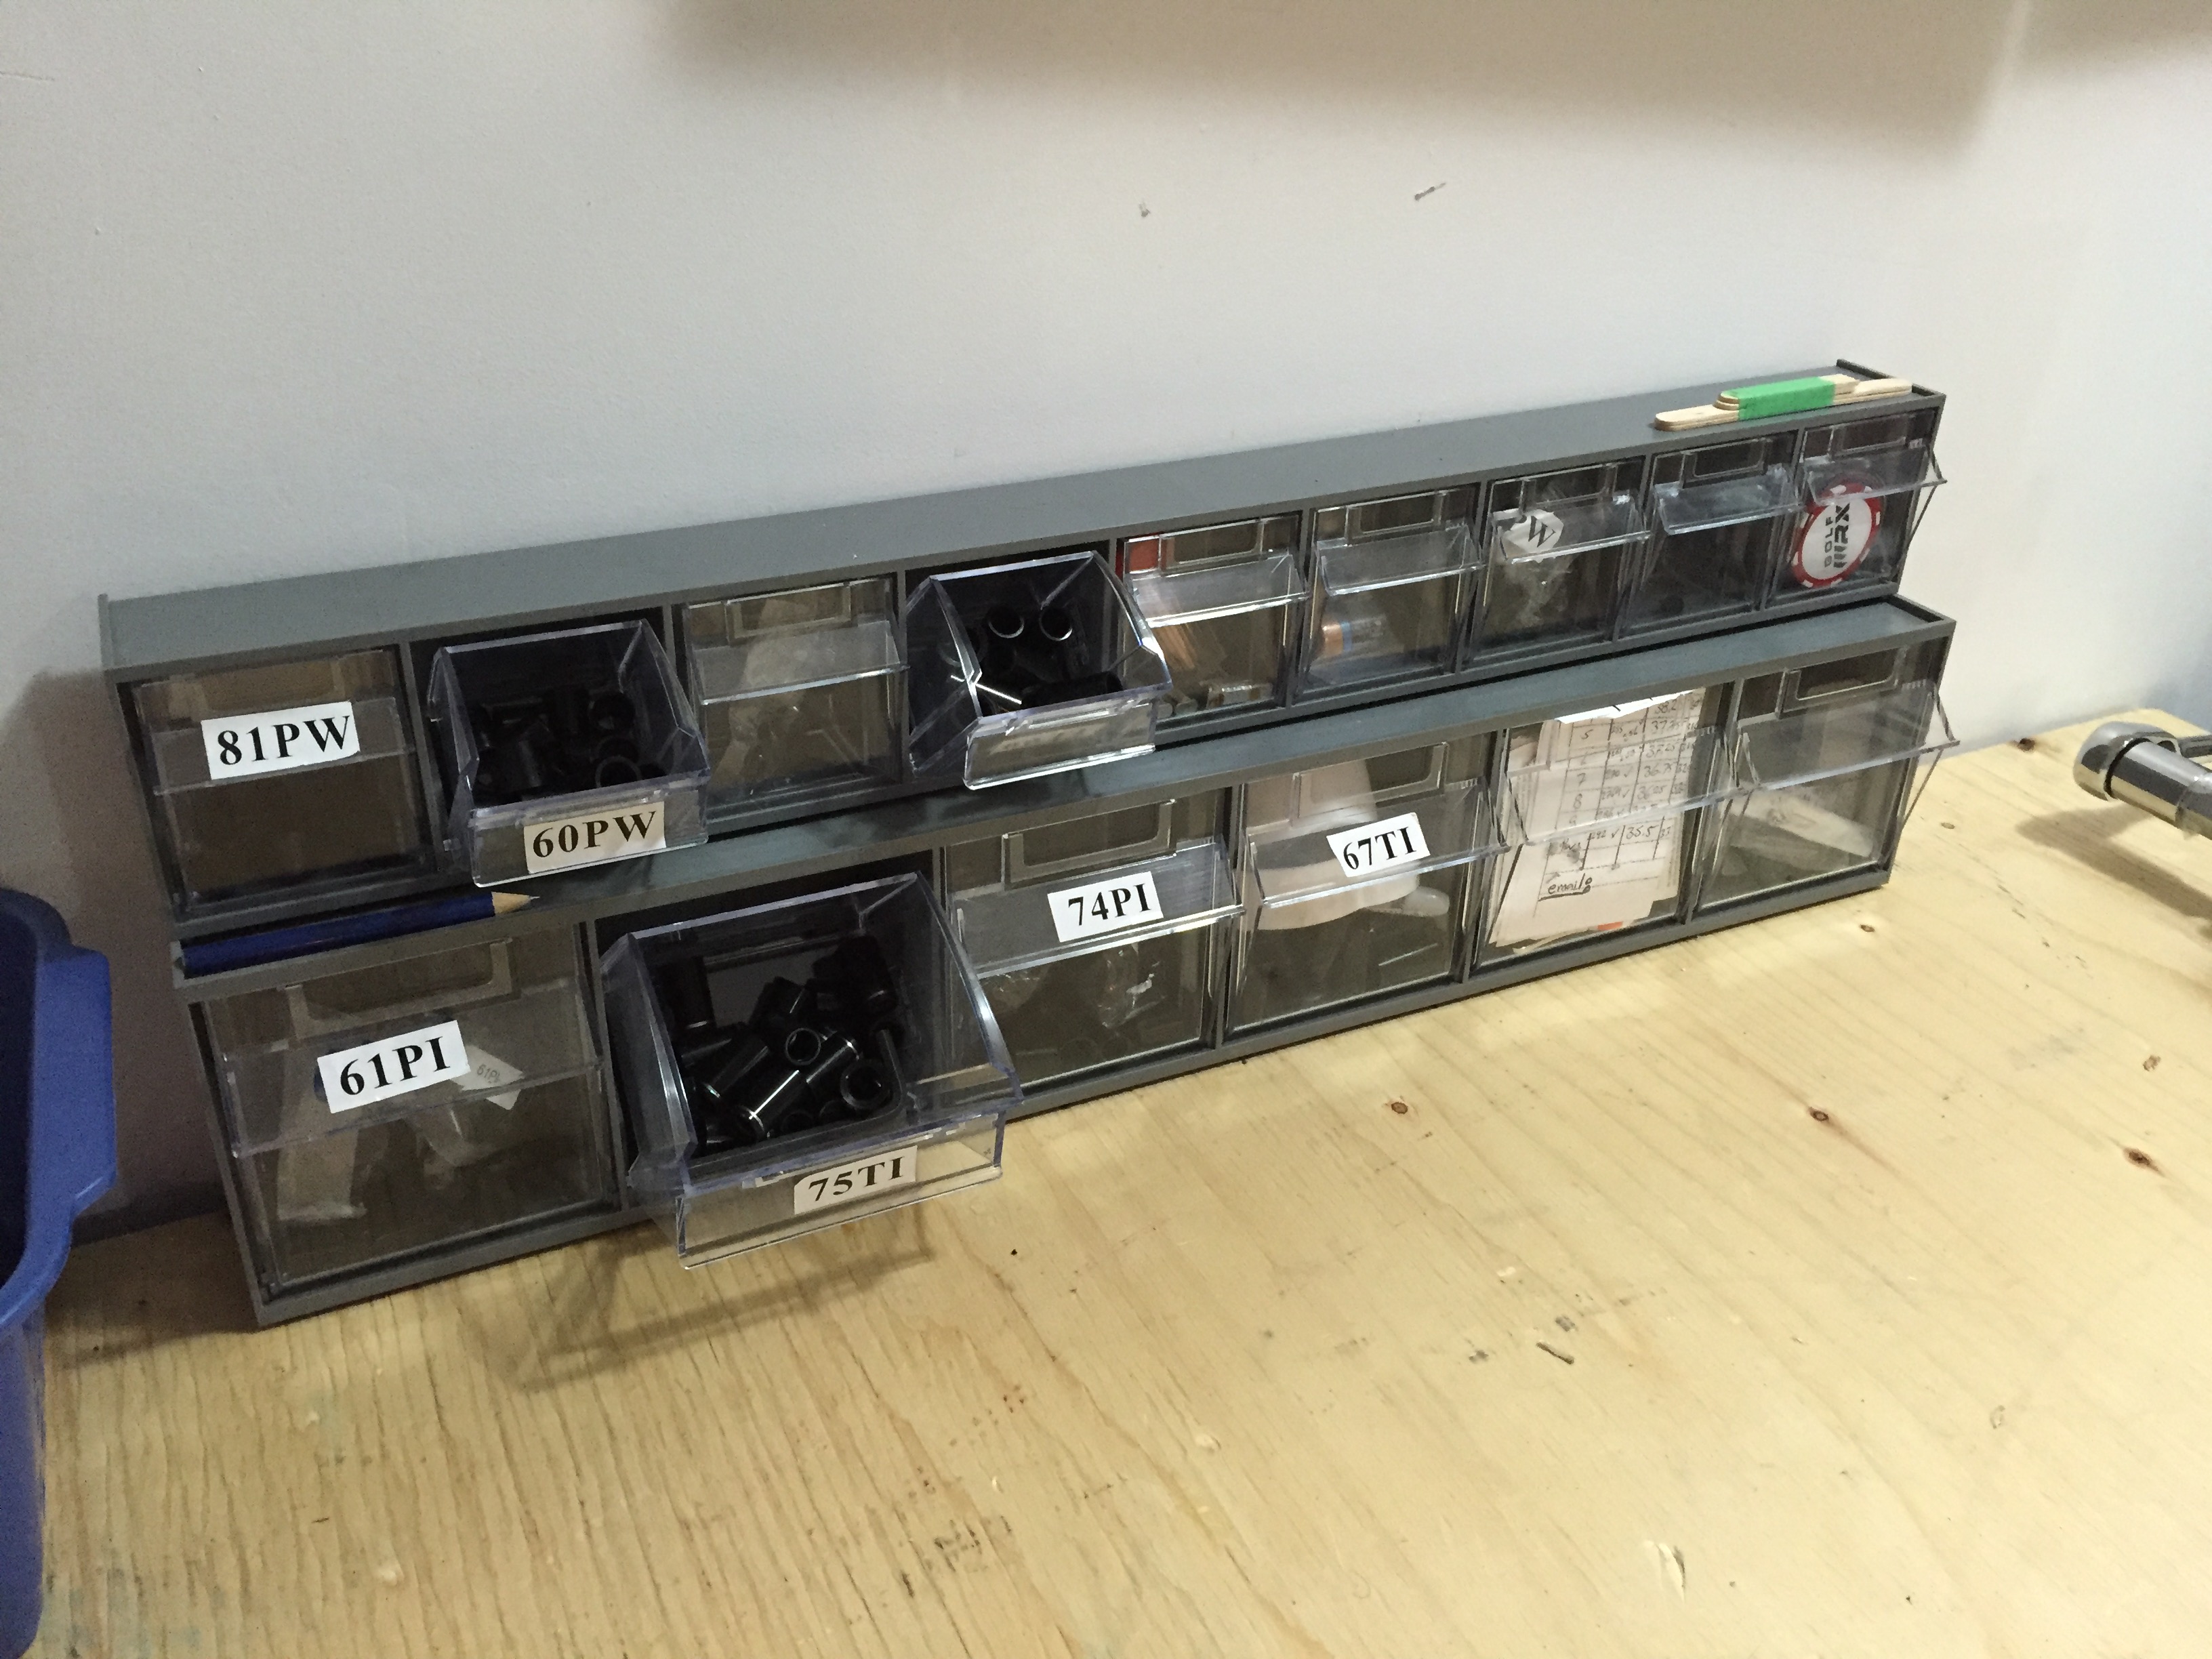
Drawers like this make great storage for small parts like ferrules.
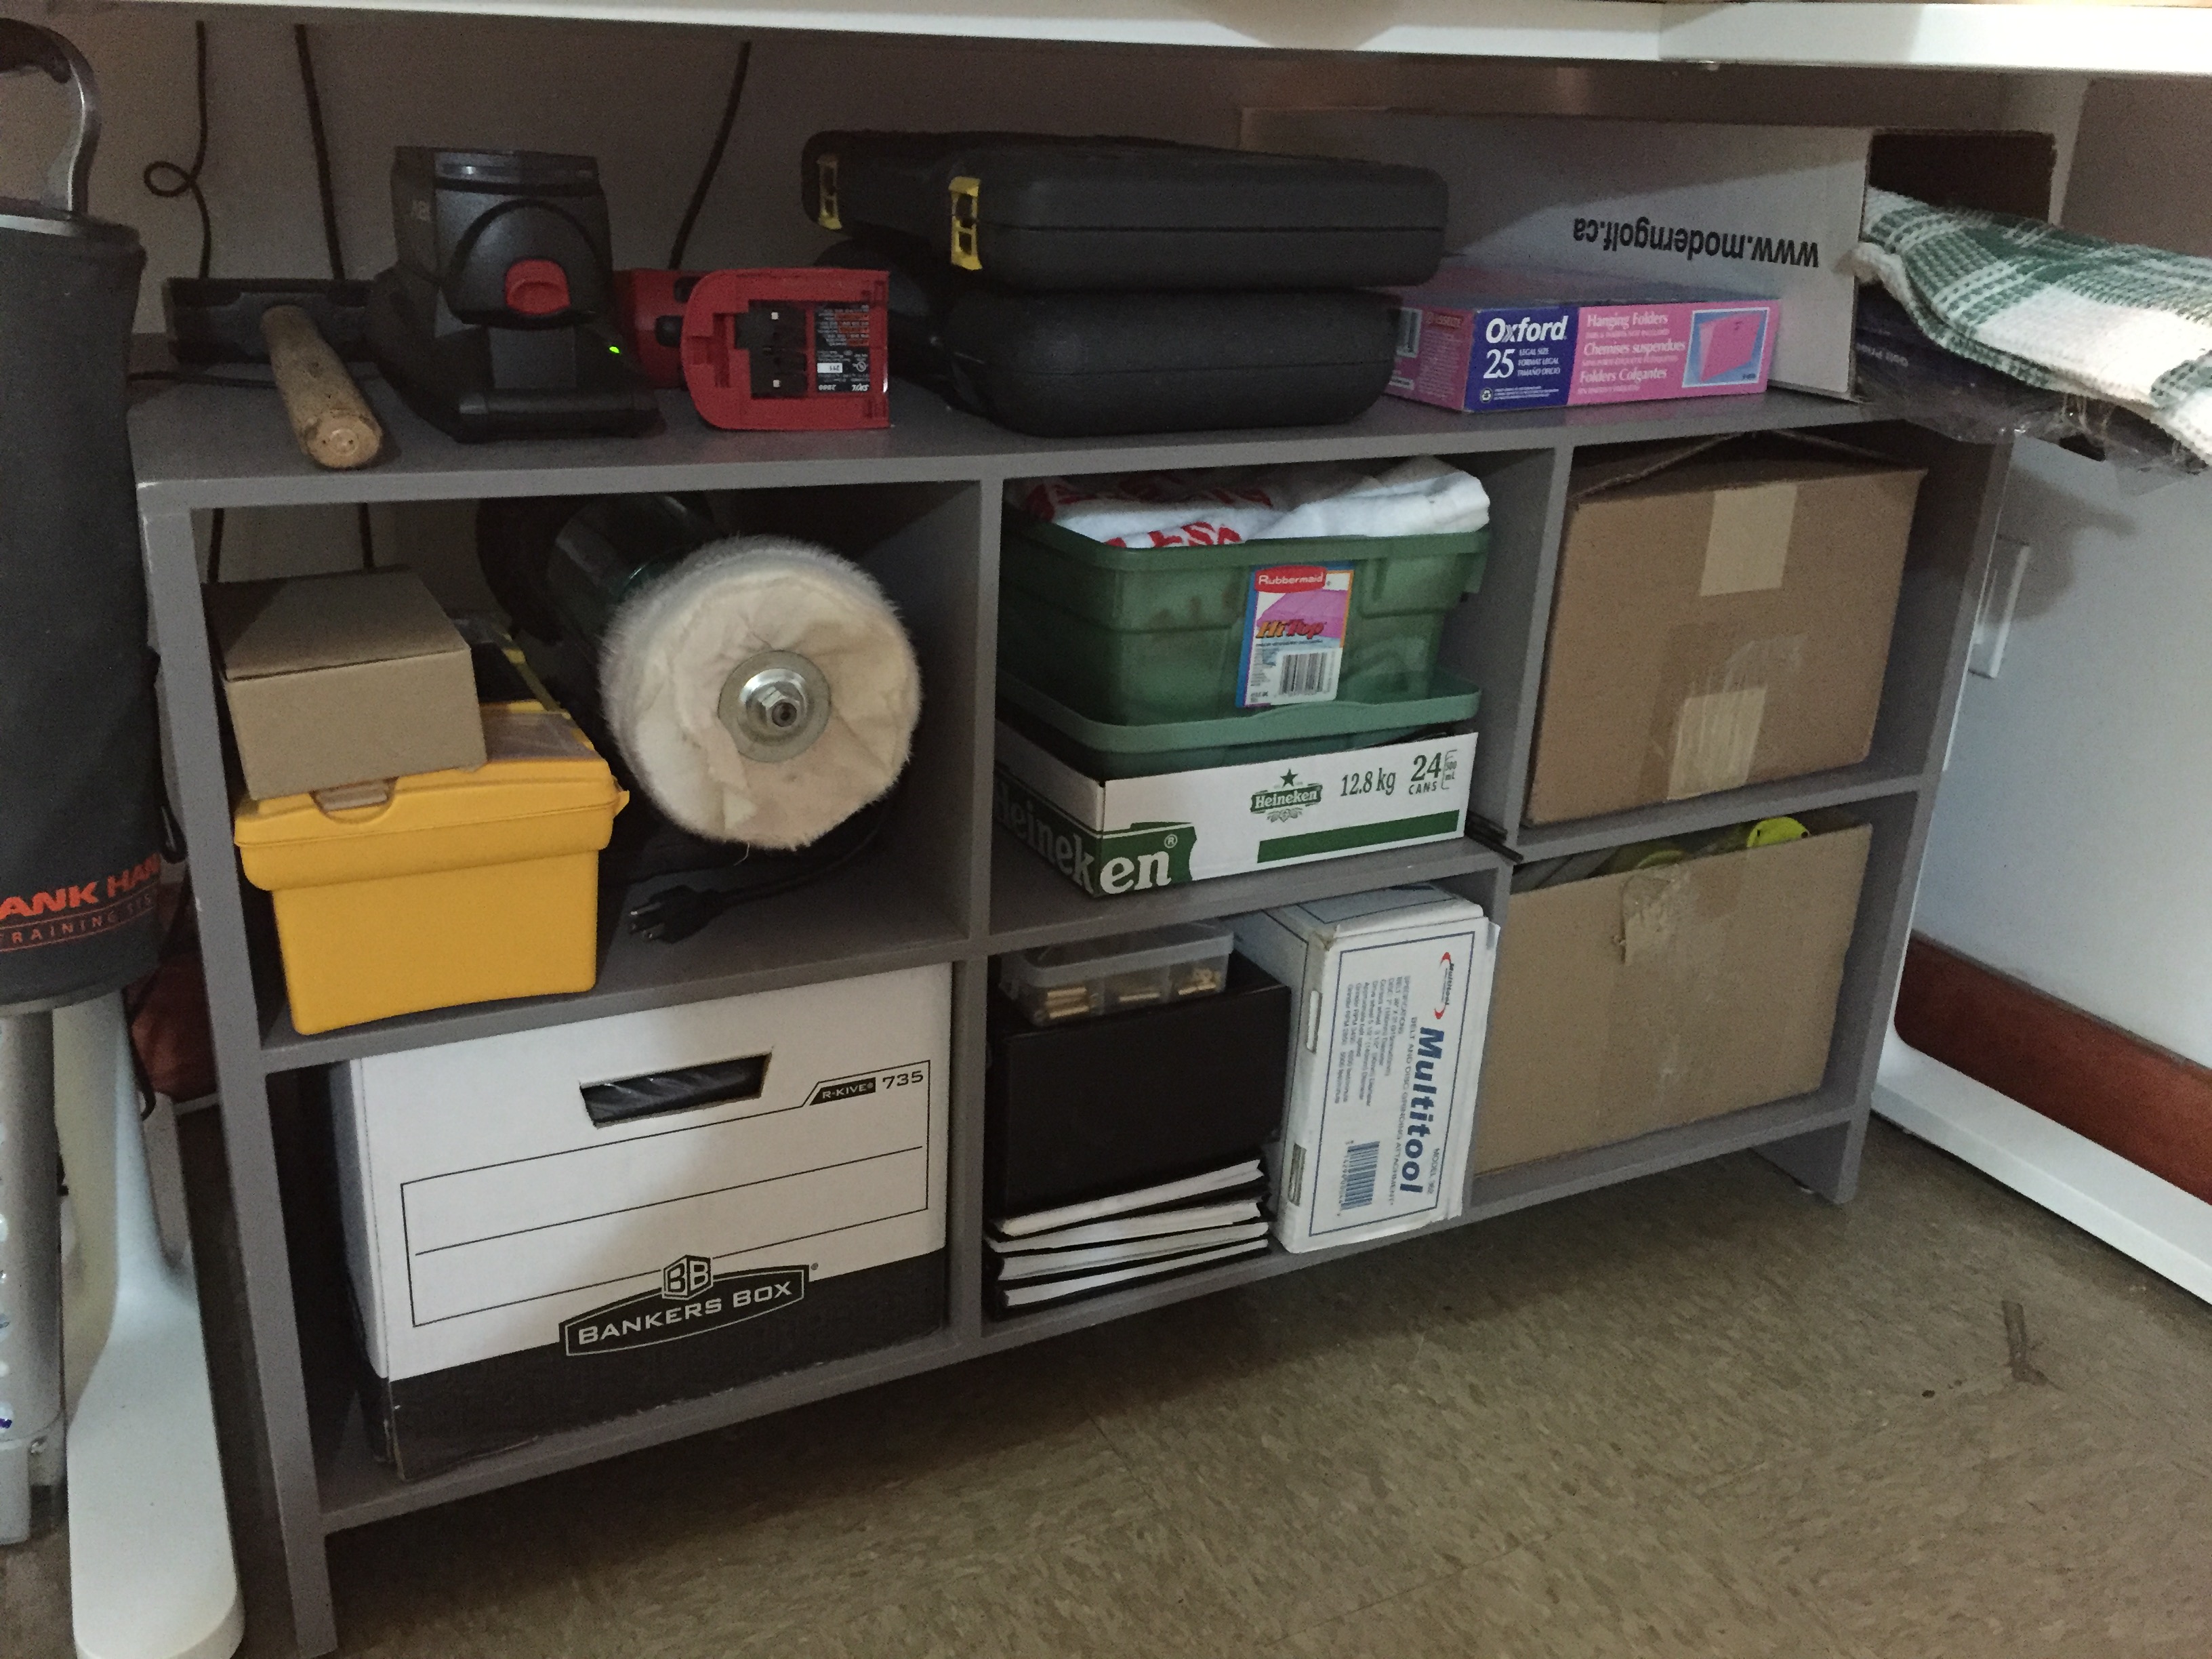
An under-bench storage unit holds a lots of tools and saves valuable space.
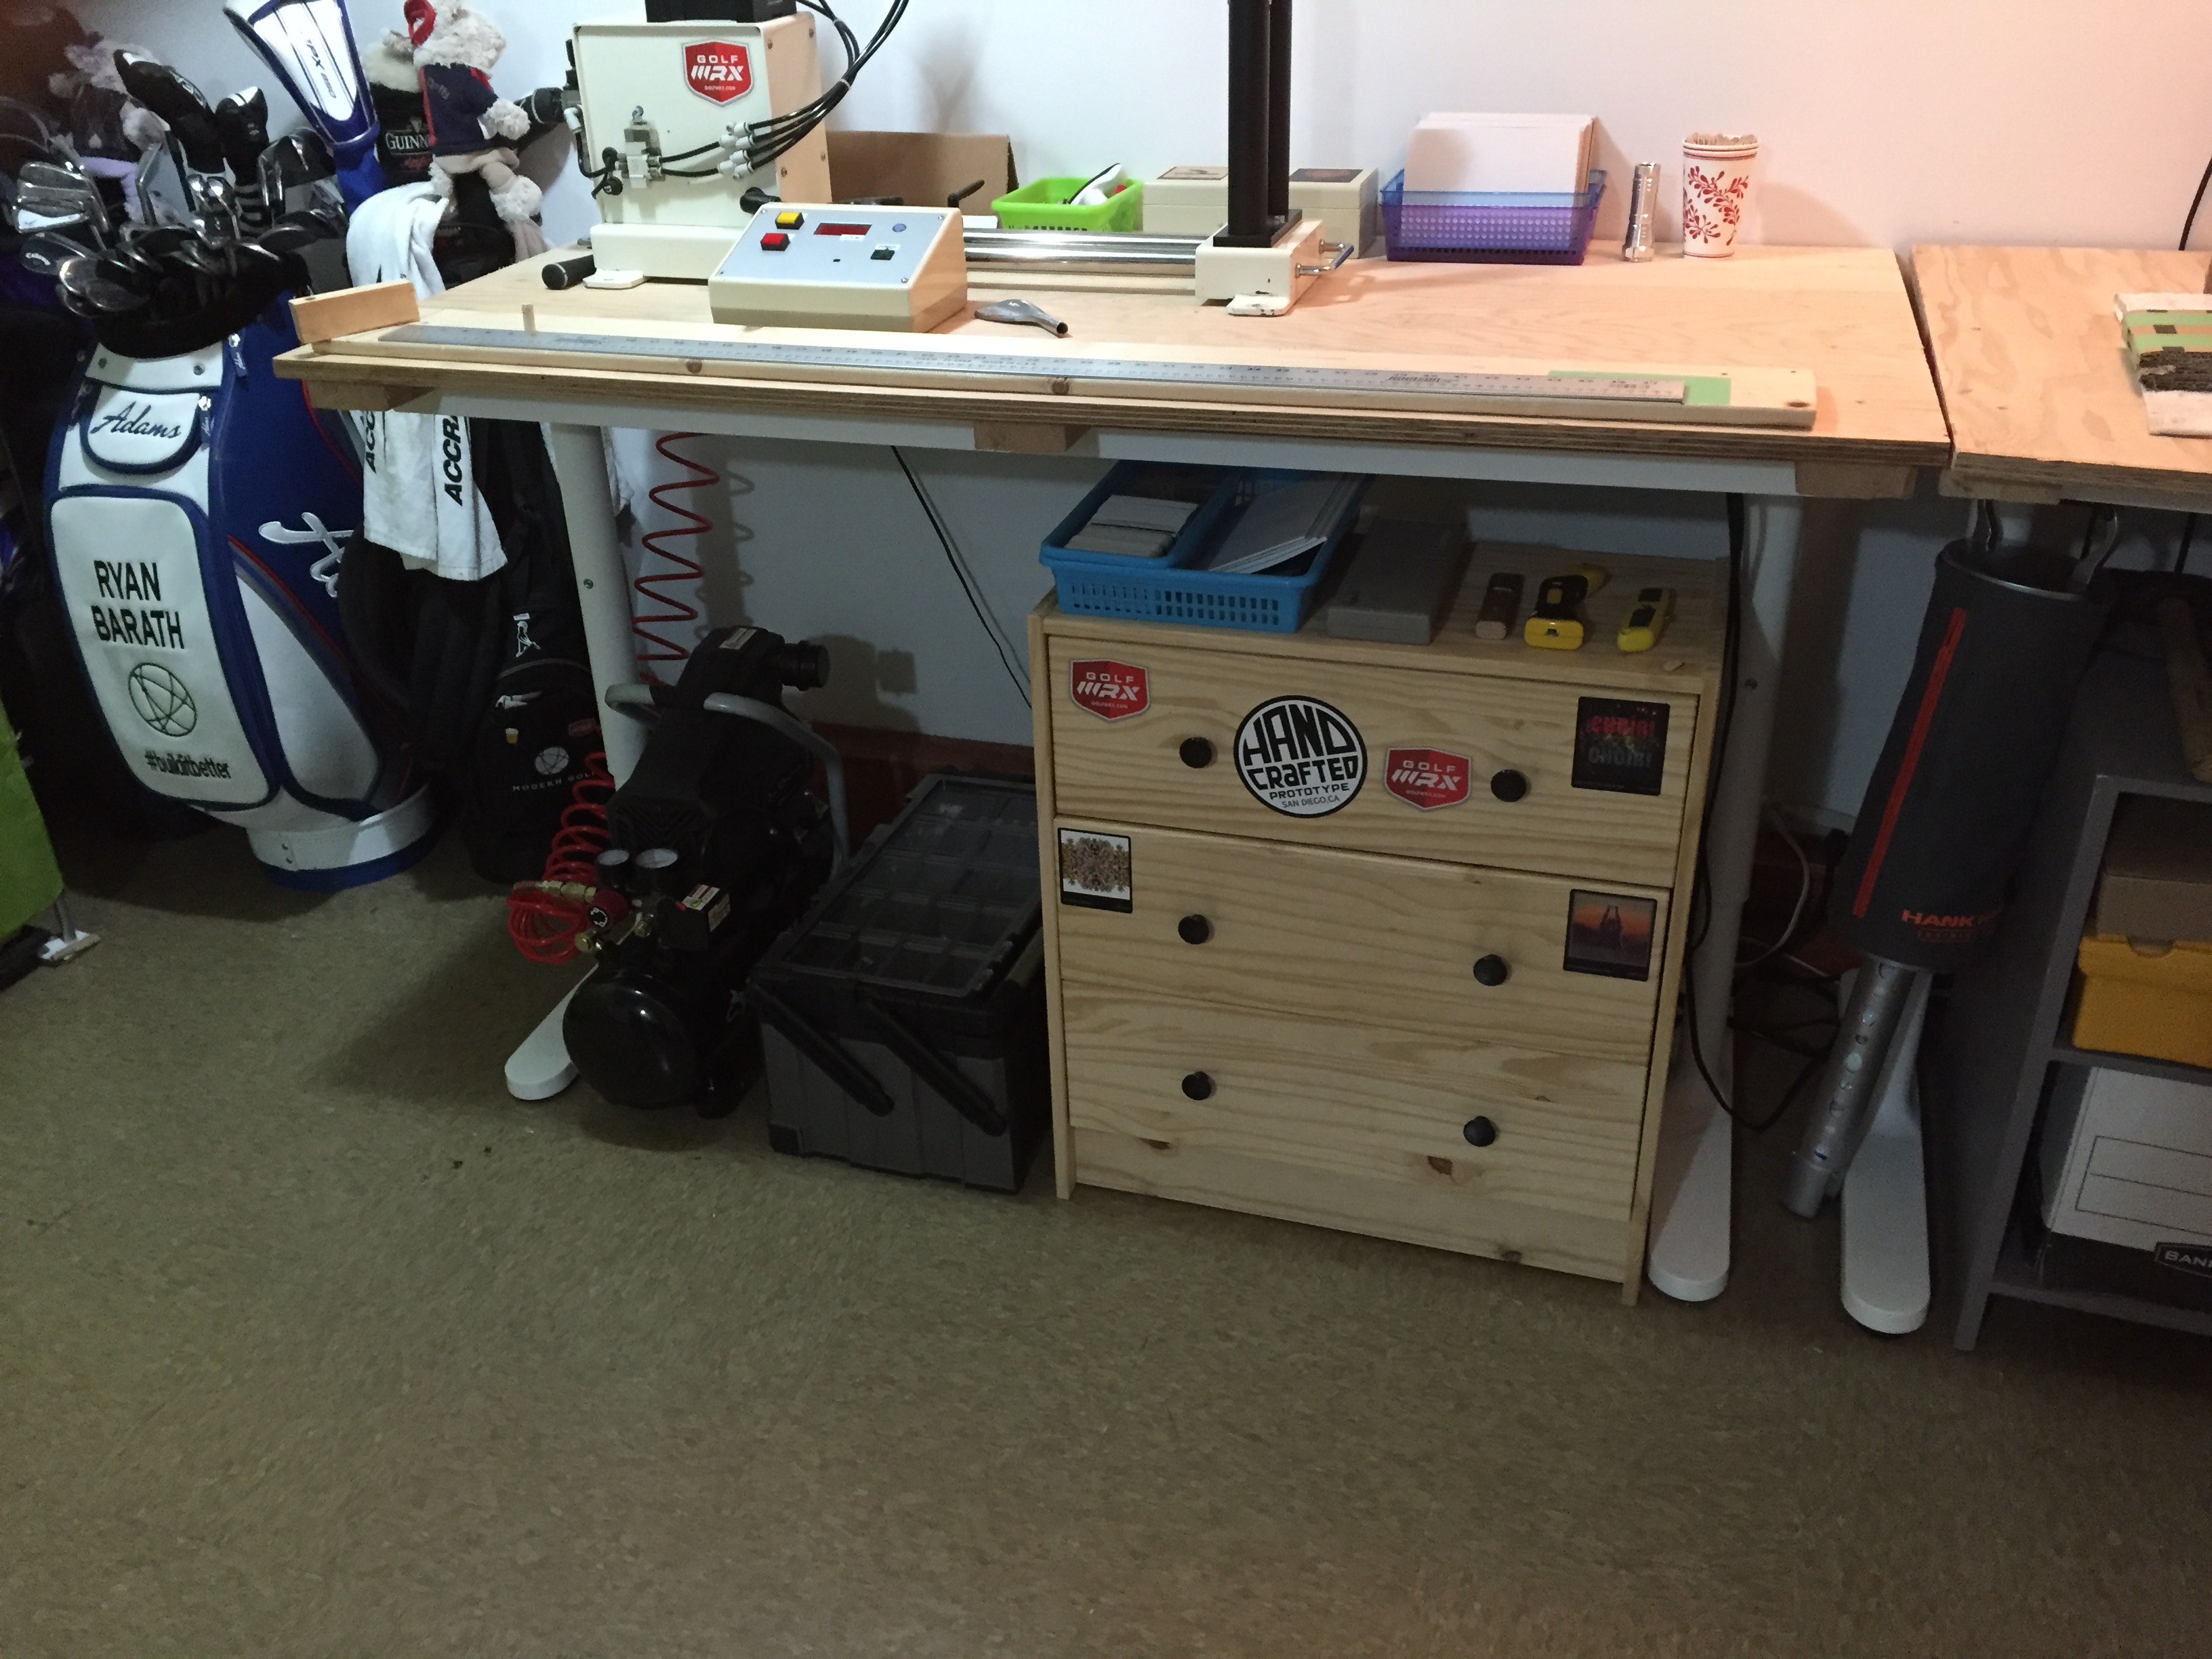
Maximizing the space under tables with storage solutions allow for less tabletop clutter.
The Tools
Unlike a golf bag where you are limited to 14 clubs, your build shop is only limited to the amount of space you have (and your budget). For me, every trip to the hardware store or to various tool supply shops has me finding another small tool or bit to help make things just a bit easier. Let’s put it this way; I have a lot of LED flashlights and finishing tools lying around.
What I’m trying to say is that what you should really focus on when building a shop from the ground up is quality over quantity. Having the proper tools will make building clubs and doing repairs a lot easier. There are very few things as frustrating as having a club not turn out the way you wanted because you weren’t prepared and didn’t have the right tools for the job.
Cordless Drill
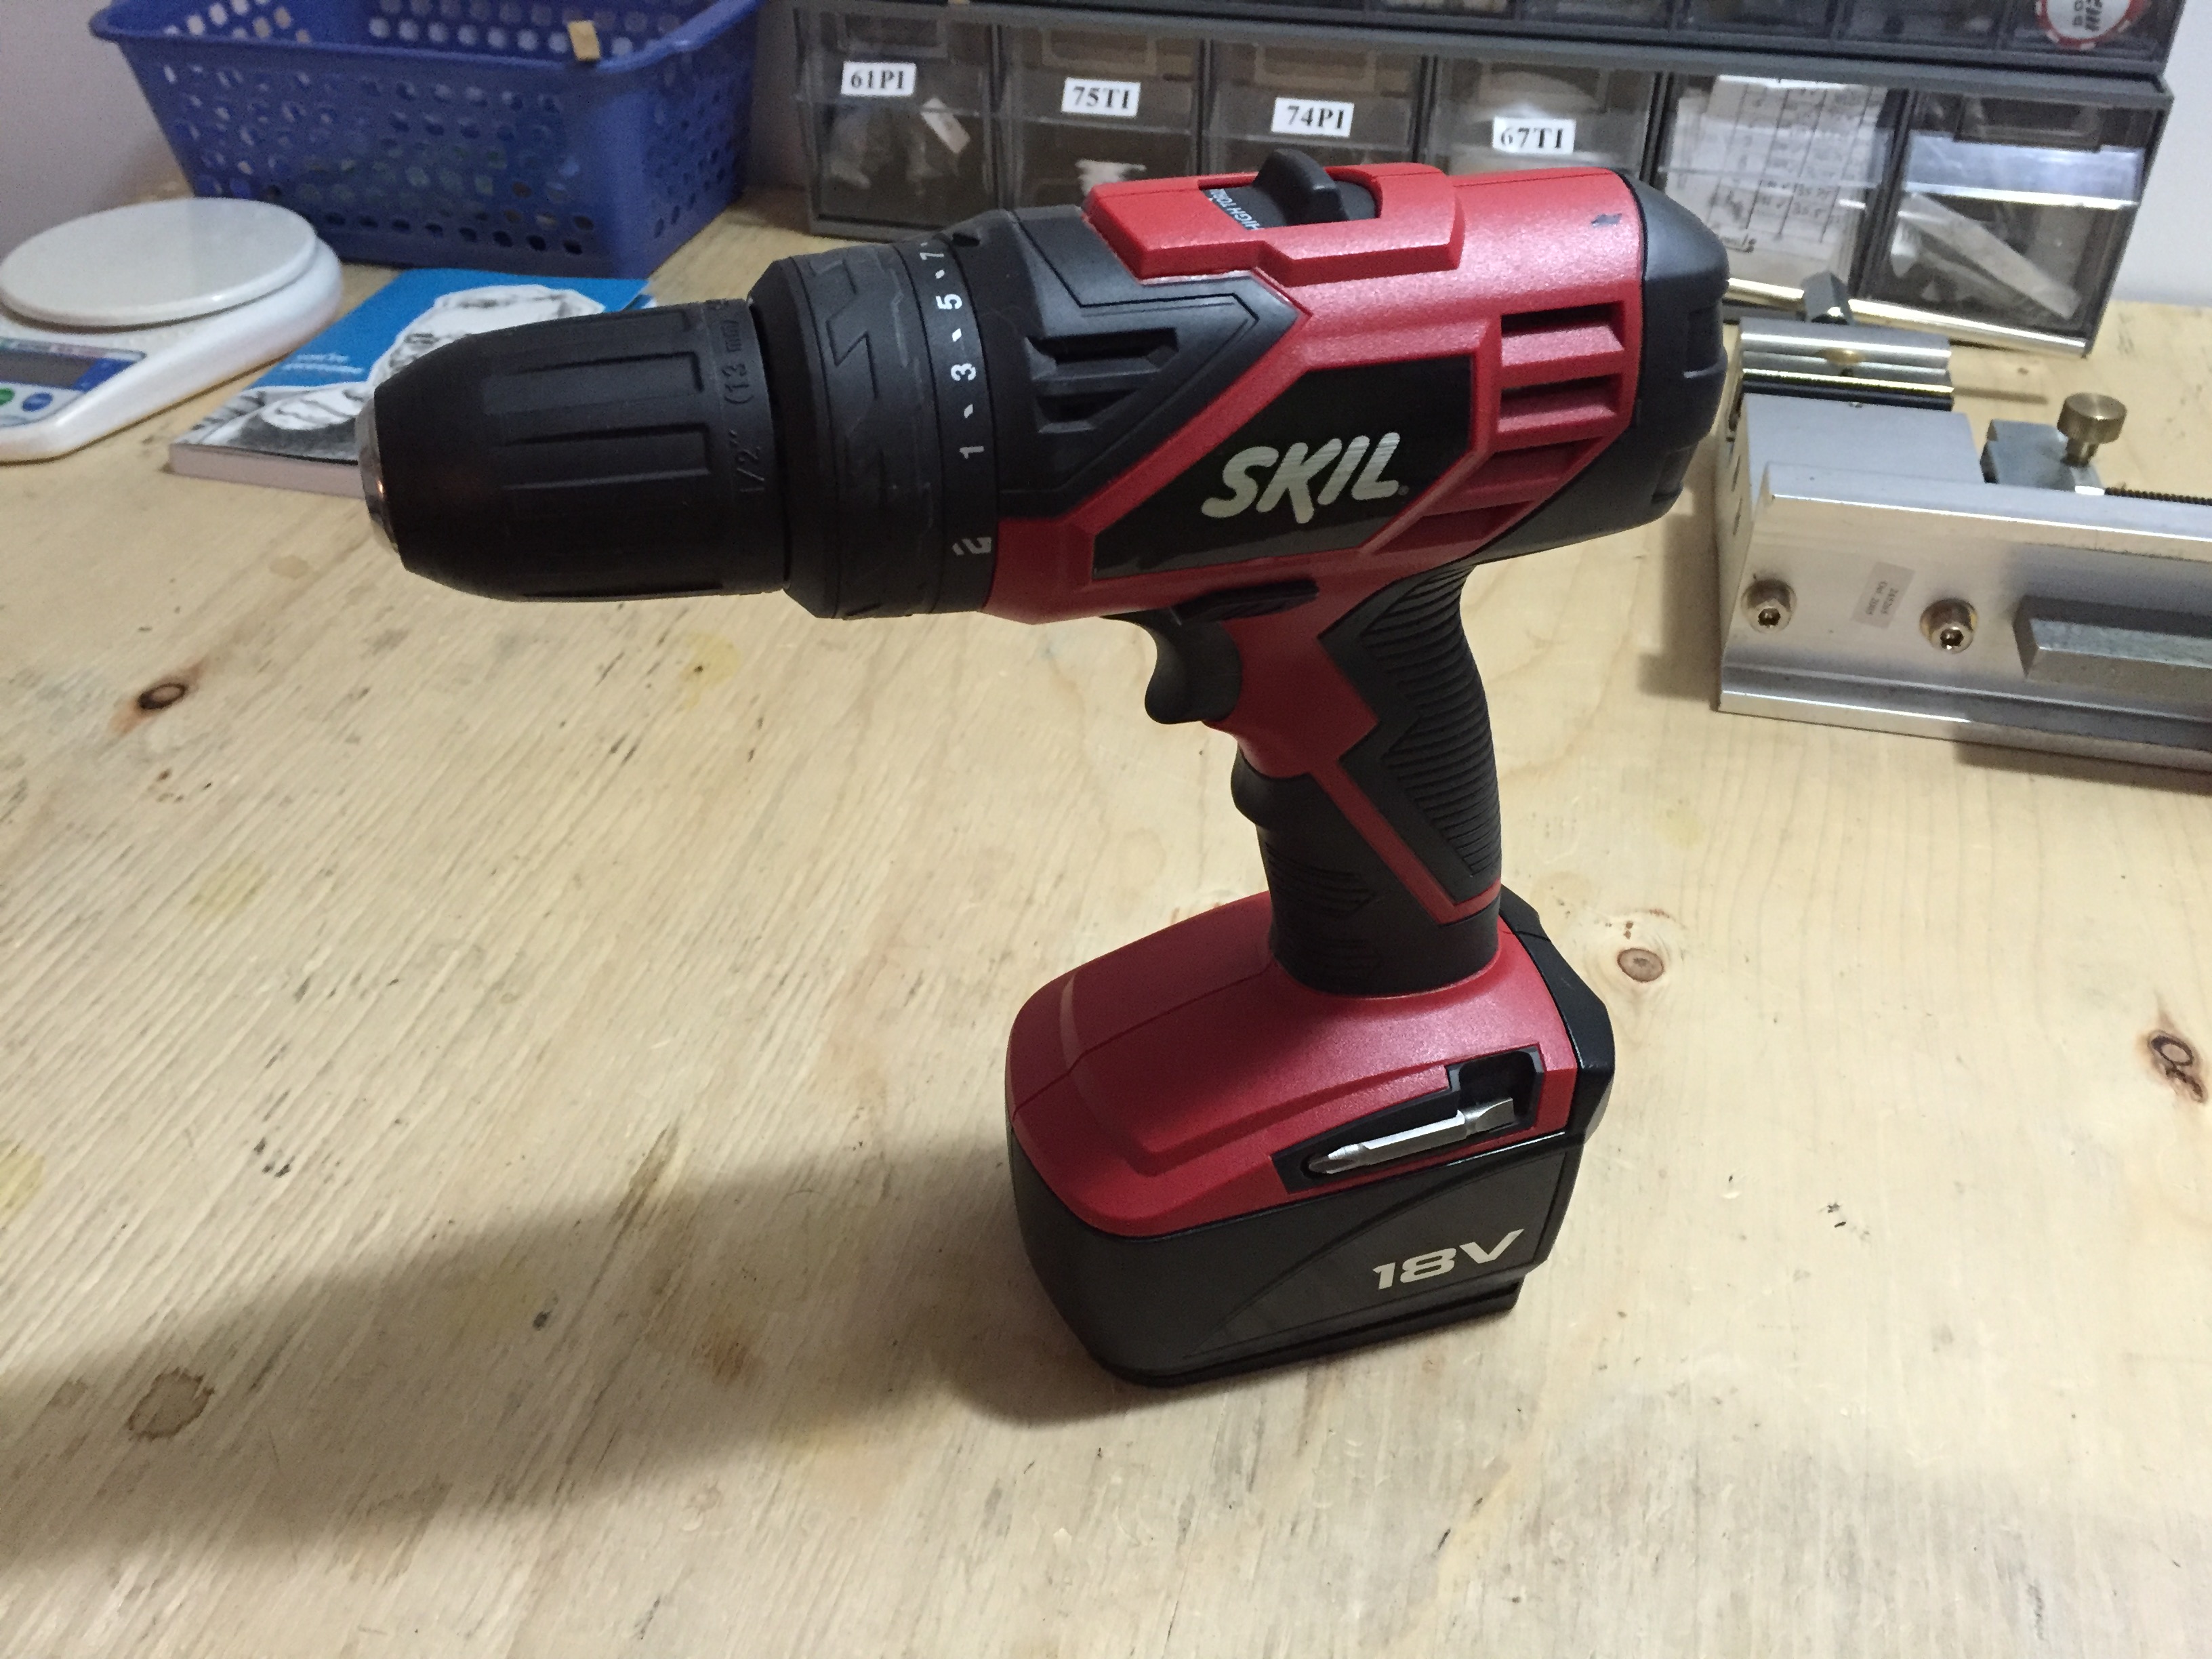
A cordless drill is great for small jobs and allows for quick moving around the shop.
A good cordless drill is a necessity, so make a quality purchase. I’m not an expert on drills, but any of the big name-brand drills that use an 18-20V battery have always done well for me. Make sure the drill has variable torque settings and, if possible, having one that has a built-in flashlight under the chuck makes it super easy to check hosels for debris while drilling. It’s also more ideal to find one in a kit that has two batteries with the charger — that way, if you’re drilling a lot for a single job, you will always have a fresh battery. You should expect to pay $119-$200.
I have seen many shops use a drill press, but personally I never found a real need for one on a day-to-day basis (plus they can take up a bunch of space). Drill presses can be useful for porting wedges, but that’s really not home-shop use.
Metal Drill Bits
Here’s where things get personal for me. I had an inexpensive drill bit break almost instantly and go right into the palm of my left hand (and off to the ER I went). I was not a happy camper, but I did learn a very valuable lesson; don’t buy cheap drill bits and never drill toward another body part. I still have a small scar to remind me of that mistake, and it also serves as a reminder to never take what you may consider a simple repair for granted. Bit sets can often be found on sale, but a small collection of proper bits will run you about $100.
Also, make sure to purchase proper metal drill bits. I’ve lost count of how many times I’ve seen people try and use either masonry or wood drill bits with little success.
Chop Saw
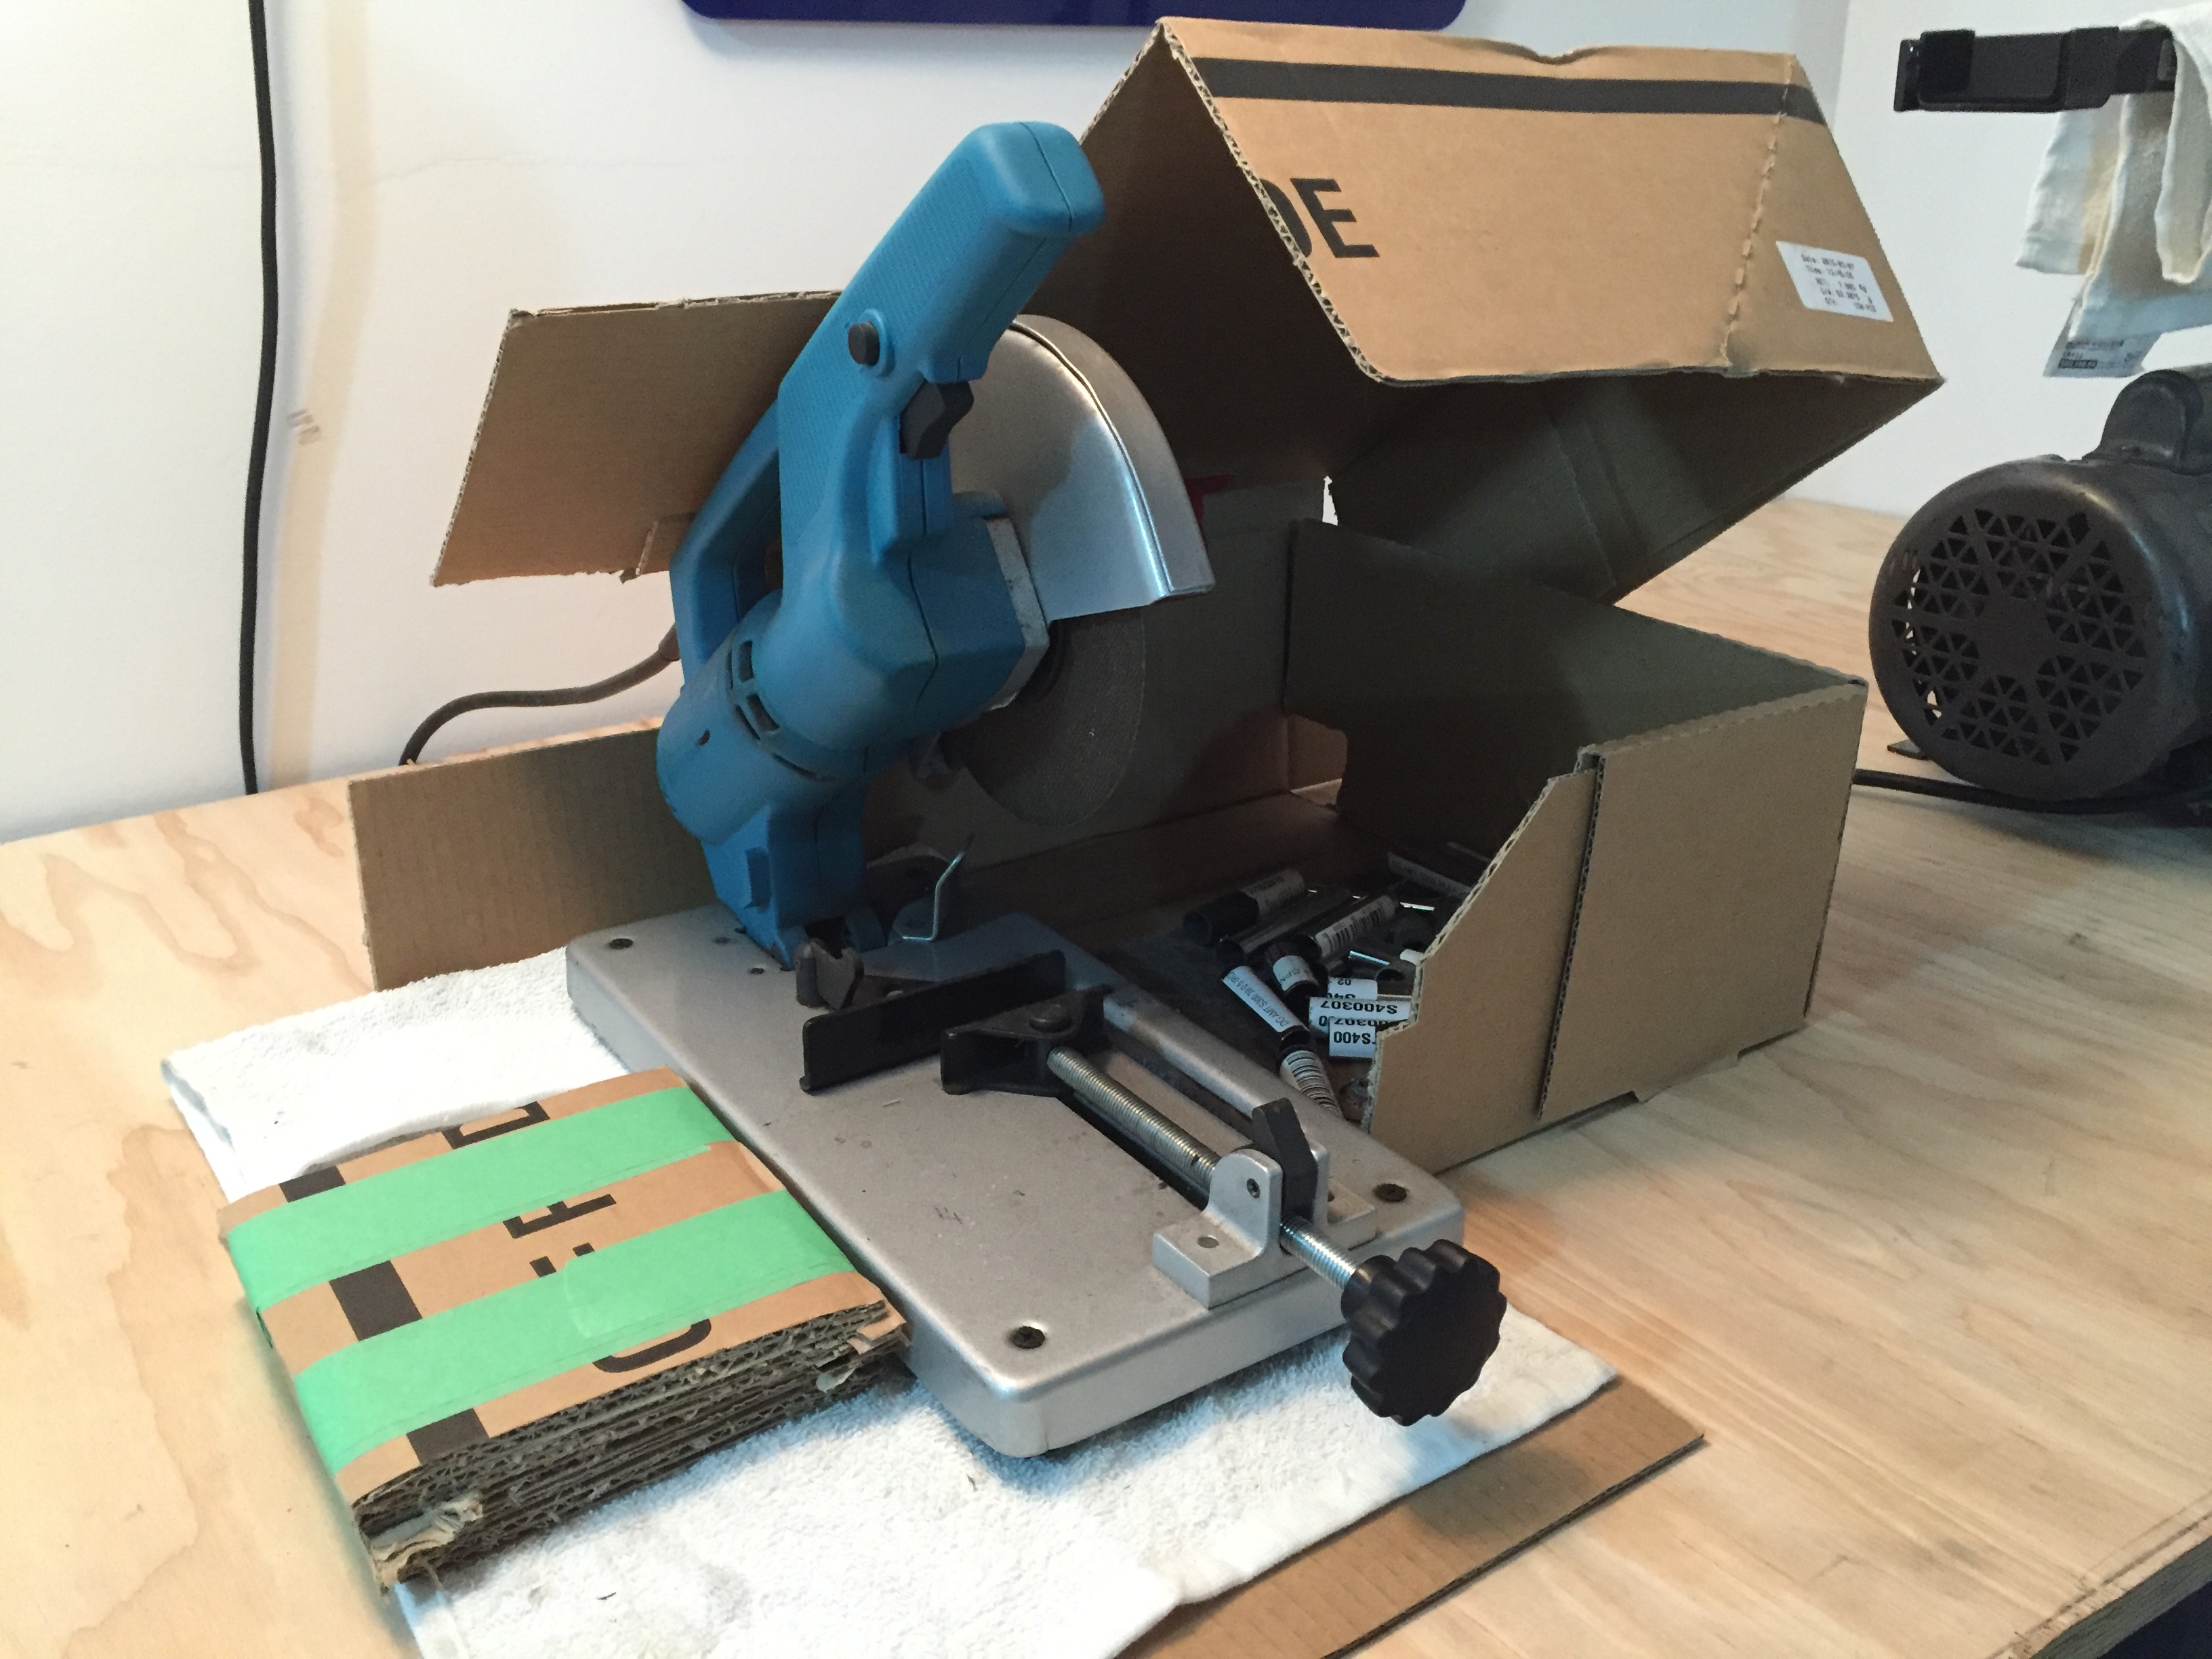
My saw setup has a simple negative air system and catch tray.
A good chop saw is worth every penny. There’s nothing worse than using a crappy saw and having it splinter the butt section of an expensive driver shaft. My personal favorite, and the favorite of many professionals, is the Gryphon Miter Saw. Almost any video in a tour van features one of these saws… and for good reason. They are compact, durable, use relatively inexpensive blades,and also make very precise cuts at high RPM. The better the blades and higher the RPM, the better the cut.
I don’t do that much volume in my basement, so I went with a more basic chop saw from GolfWorks that uses 6-inch blades. I did my research. It is still a good quality saw and worked with my budget, but compared to the Gryphon that I used in the past it is louder. The Gryphon is $260 direct from Gryphon, while mine was in the $80 range from GolfWorks. I’ve had my saw from almost eight years, and although is doesn’t see anything close to an industrial workload it performs great.
Side Note: Just like with drill bits, be sure to buy quality cutting wheels made for steel and other fibers. The thinner the better, because they will help keep dust down and reduce noise.
Belt Sander
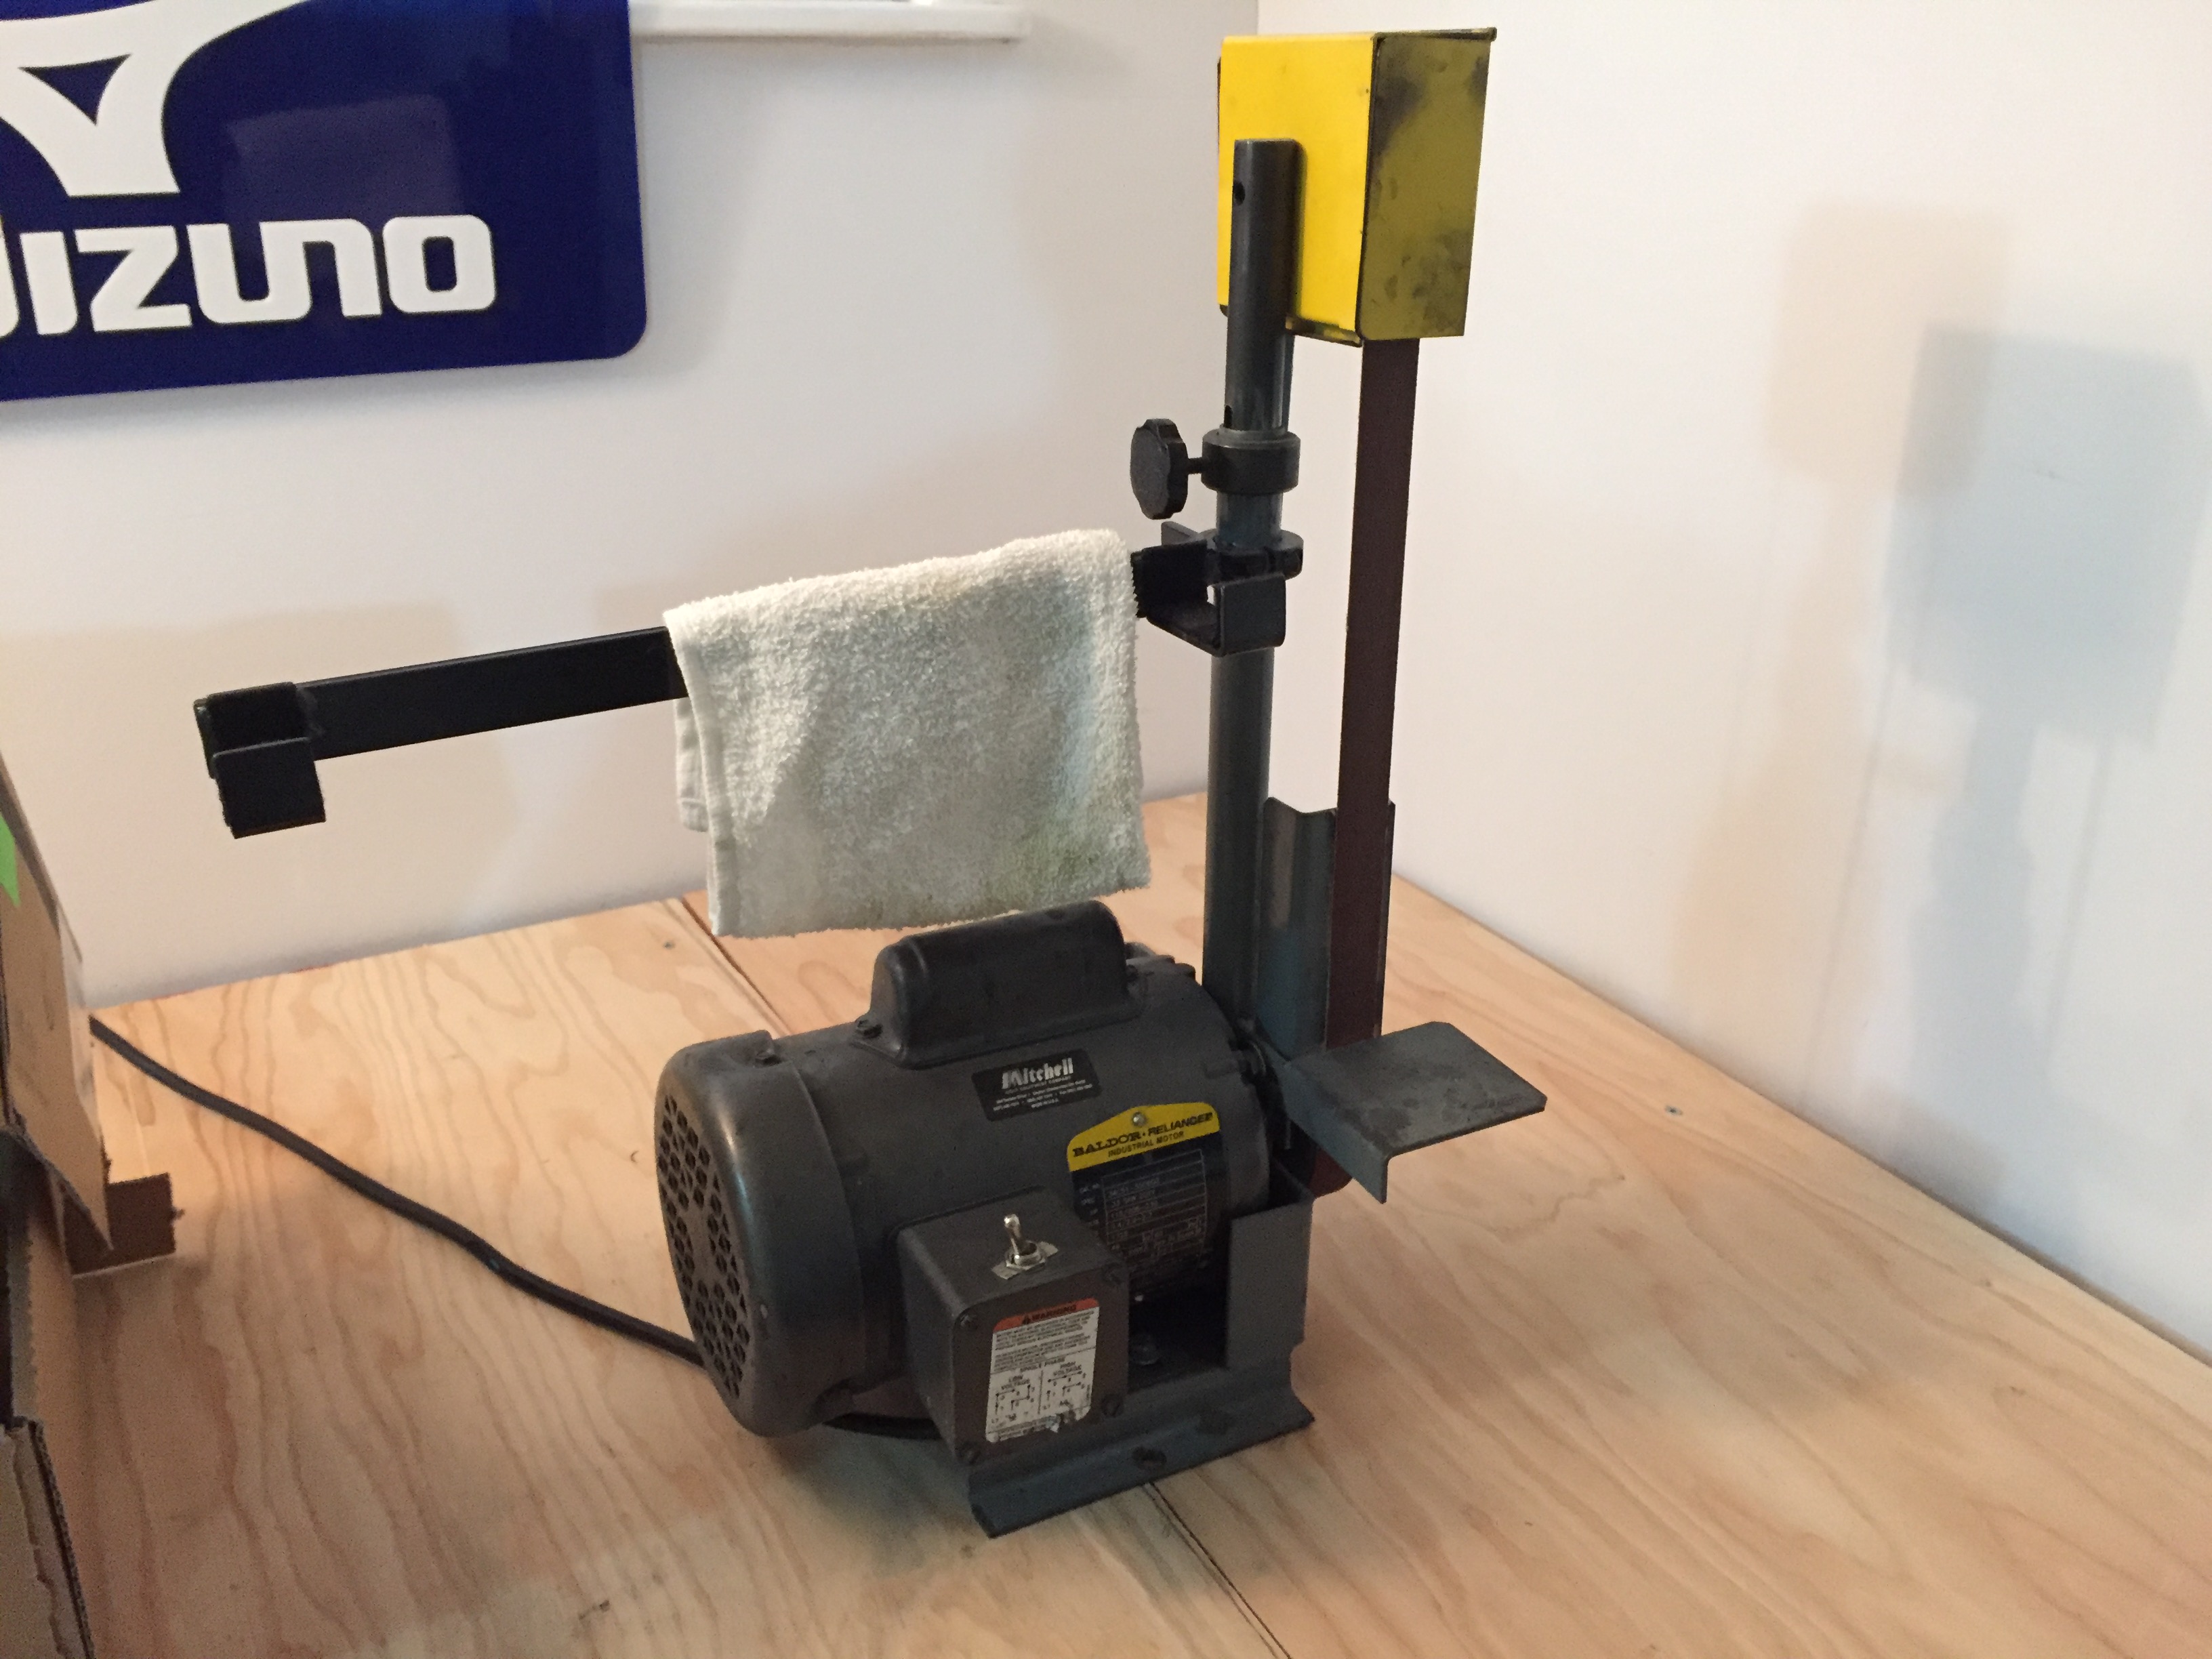
My Baldor motor with 42-inch belt attachment and ferrule turning arm.
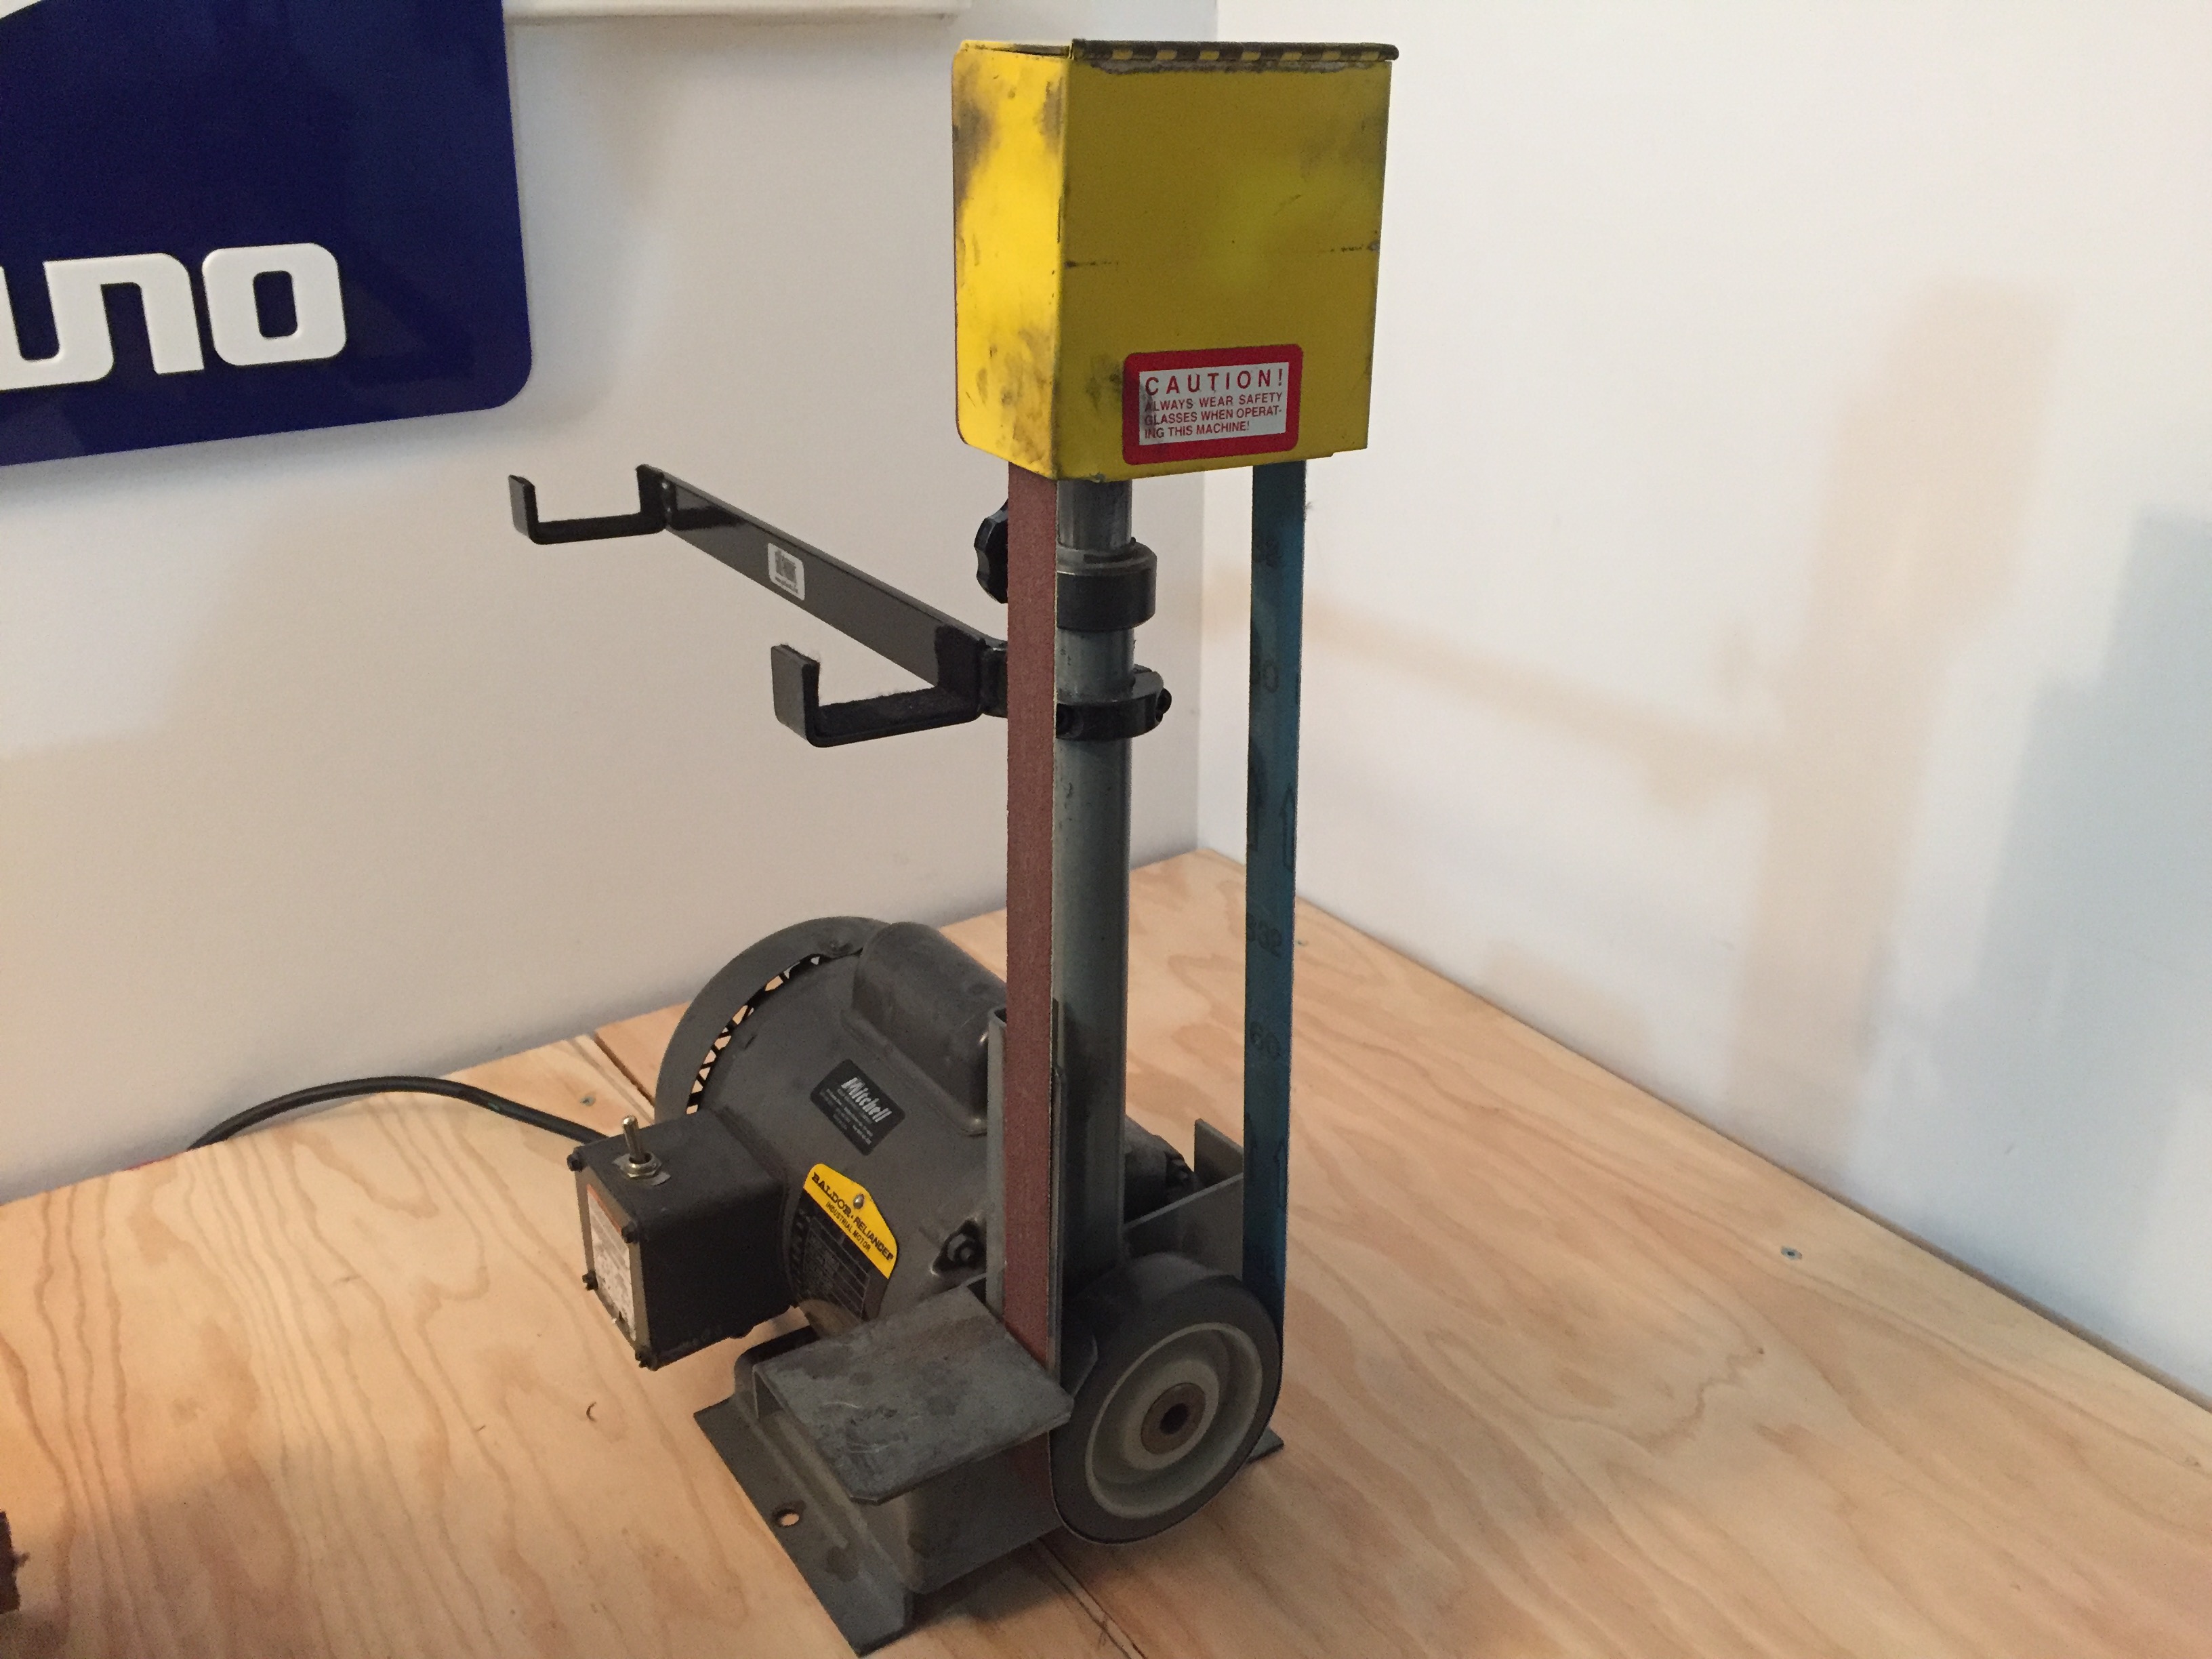
A side view of my belt sander/ferrule turning attachment.
Who doesn’t love the look of a properly turned-down ferrule that has just been shined with acetone? To me, this is one of the most important aspects of finishing a club. It seems simple, but it took me a long time to get really good at it.
To properly turn down a ferrule you need a belt sander, and don’t skimp on a cheap one. The best ones use 42-inch belts, and I prefer the DuraBrite Felt belts since they don’t take too much material off the ferrule at once. This makes them more forgiving, especially for beginners, and I find them much cleaner, which makes final finishing easier. You can use a belt sander with a inexpensive motor for around or under $100, but you can’t go cheap on the attachments. The attachment shown here is the most widely used and reliable one that I’ve found and costs around $200 from most suppliers. Some of the most reliable tools found in shops have Baldor Motors that alone start around $350. Since grinders are very common tools, you can often get a good deal on a used one if you stay patient.
Dust Collector
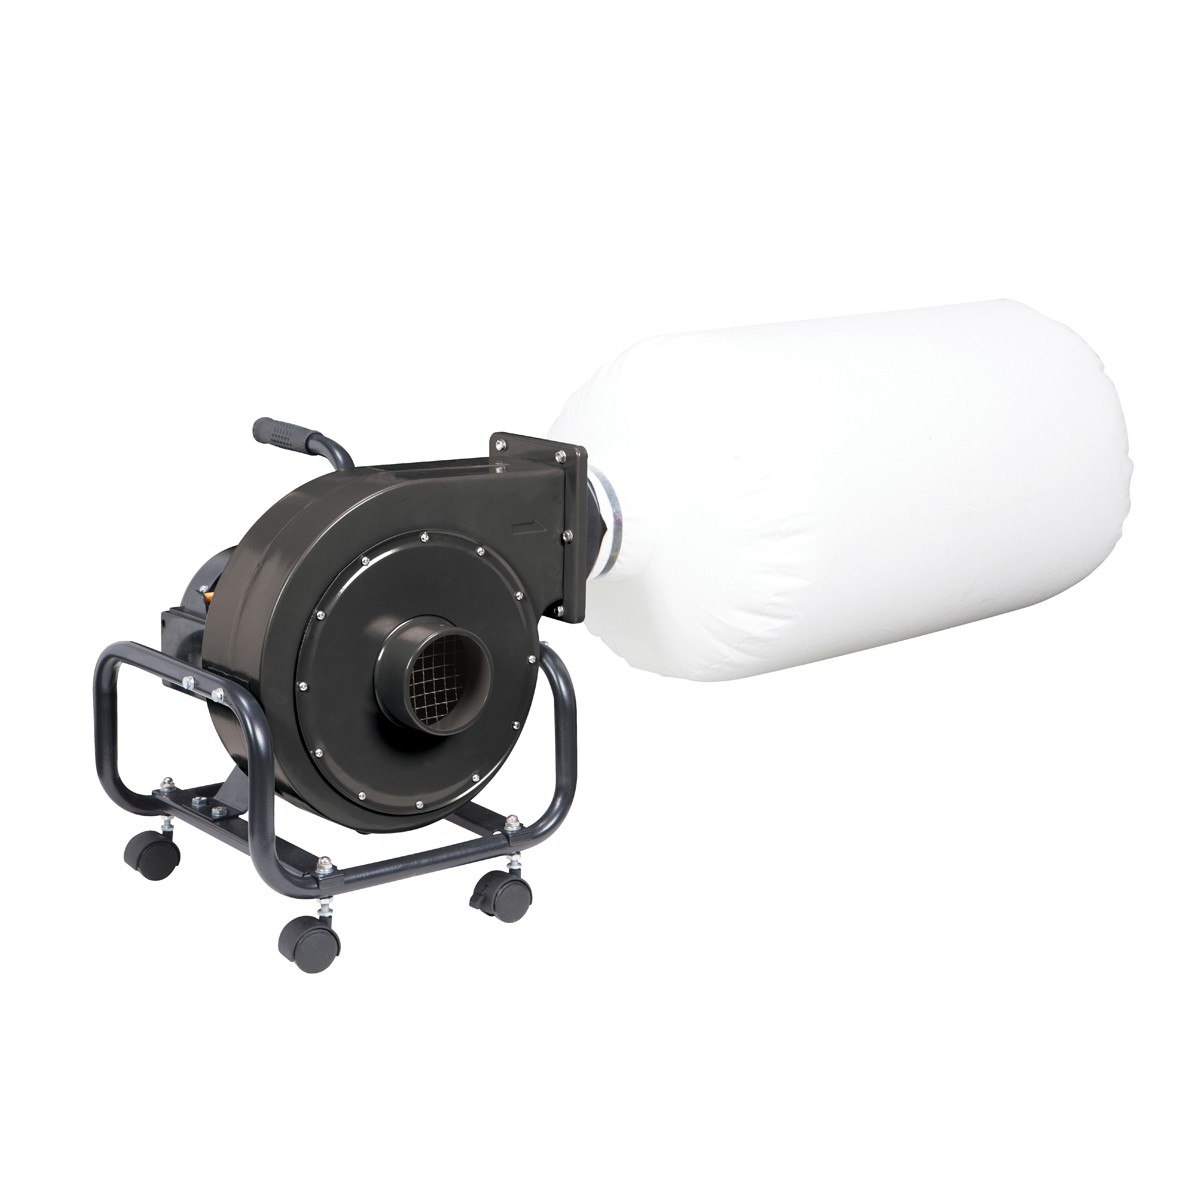
Harbour Freight dust collector
You can’t cut or sand at any volume without creating dust. I don’t know what the long-term effects of breathing in graphite and steel dust are, but I’m not ready to be a test subject either. You may have noticed the ugly looking box around my chop saw. It’s not only a catch basin for shaft ends, but is also used in conjunction with a shop vac to keep airborne dust to a minimum in my basement. I designed it to act as a mini-negative air system.
Most tool shops like Harbour Freight (or Princess Auto/Busy Bee Tools in Canada) have some type of inexpensive dust collector, and even a shop vac can do the trick. When purchasing a dust collection system, look out for CFM, or cubic feet per minute, which explains how much air/dust the system can collect as once. The more air that the system can pull through the filter the more dust it can pull out of the air. A simple cyclone system is about $100, but you can find mini 1HP systems (lots of power for a saw or small sander) for about $175 on sale or between $200-$250 full price.
Gripping Station
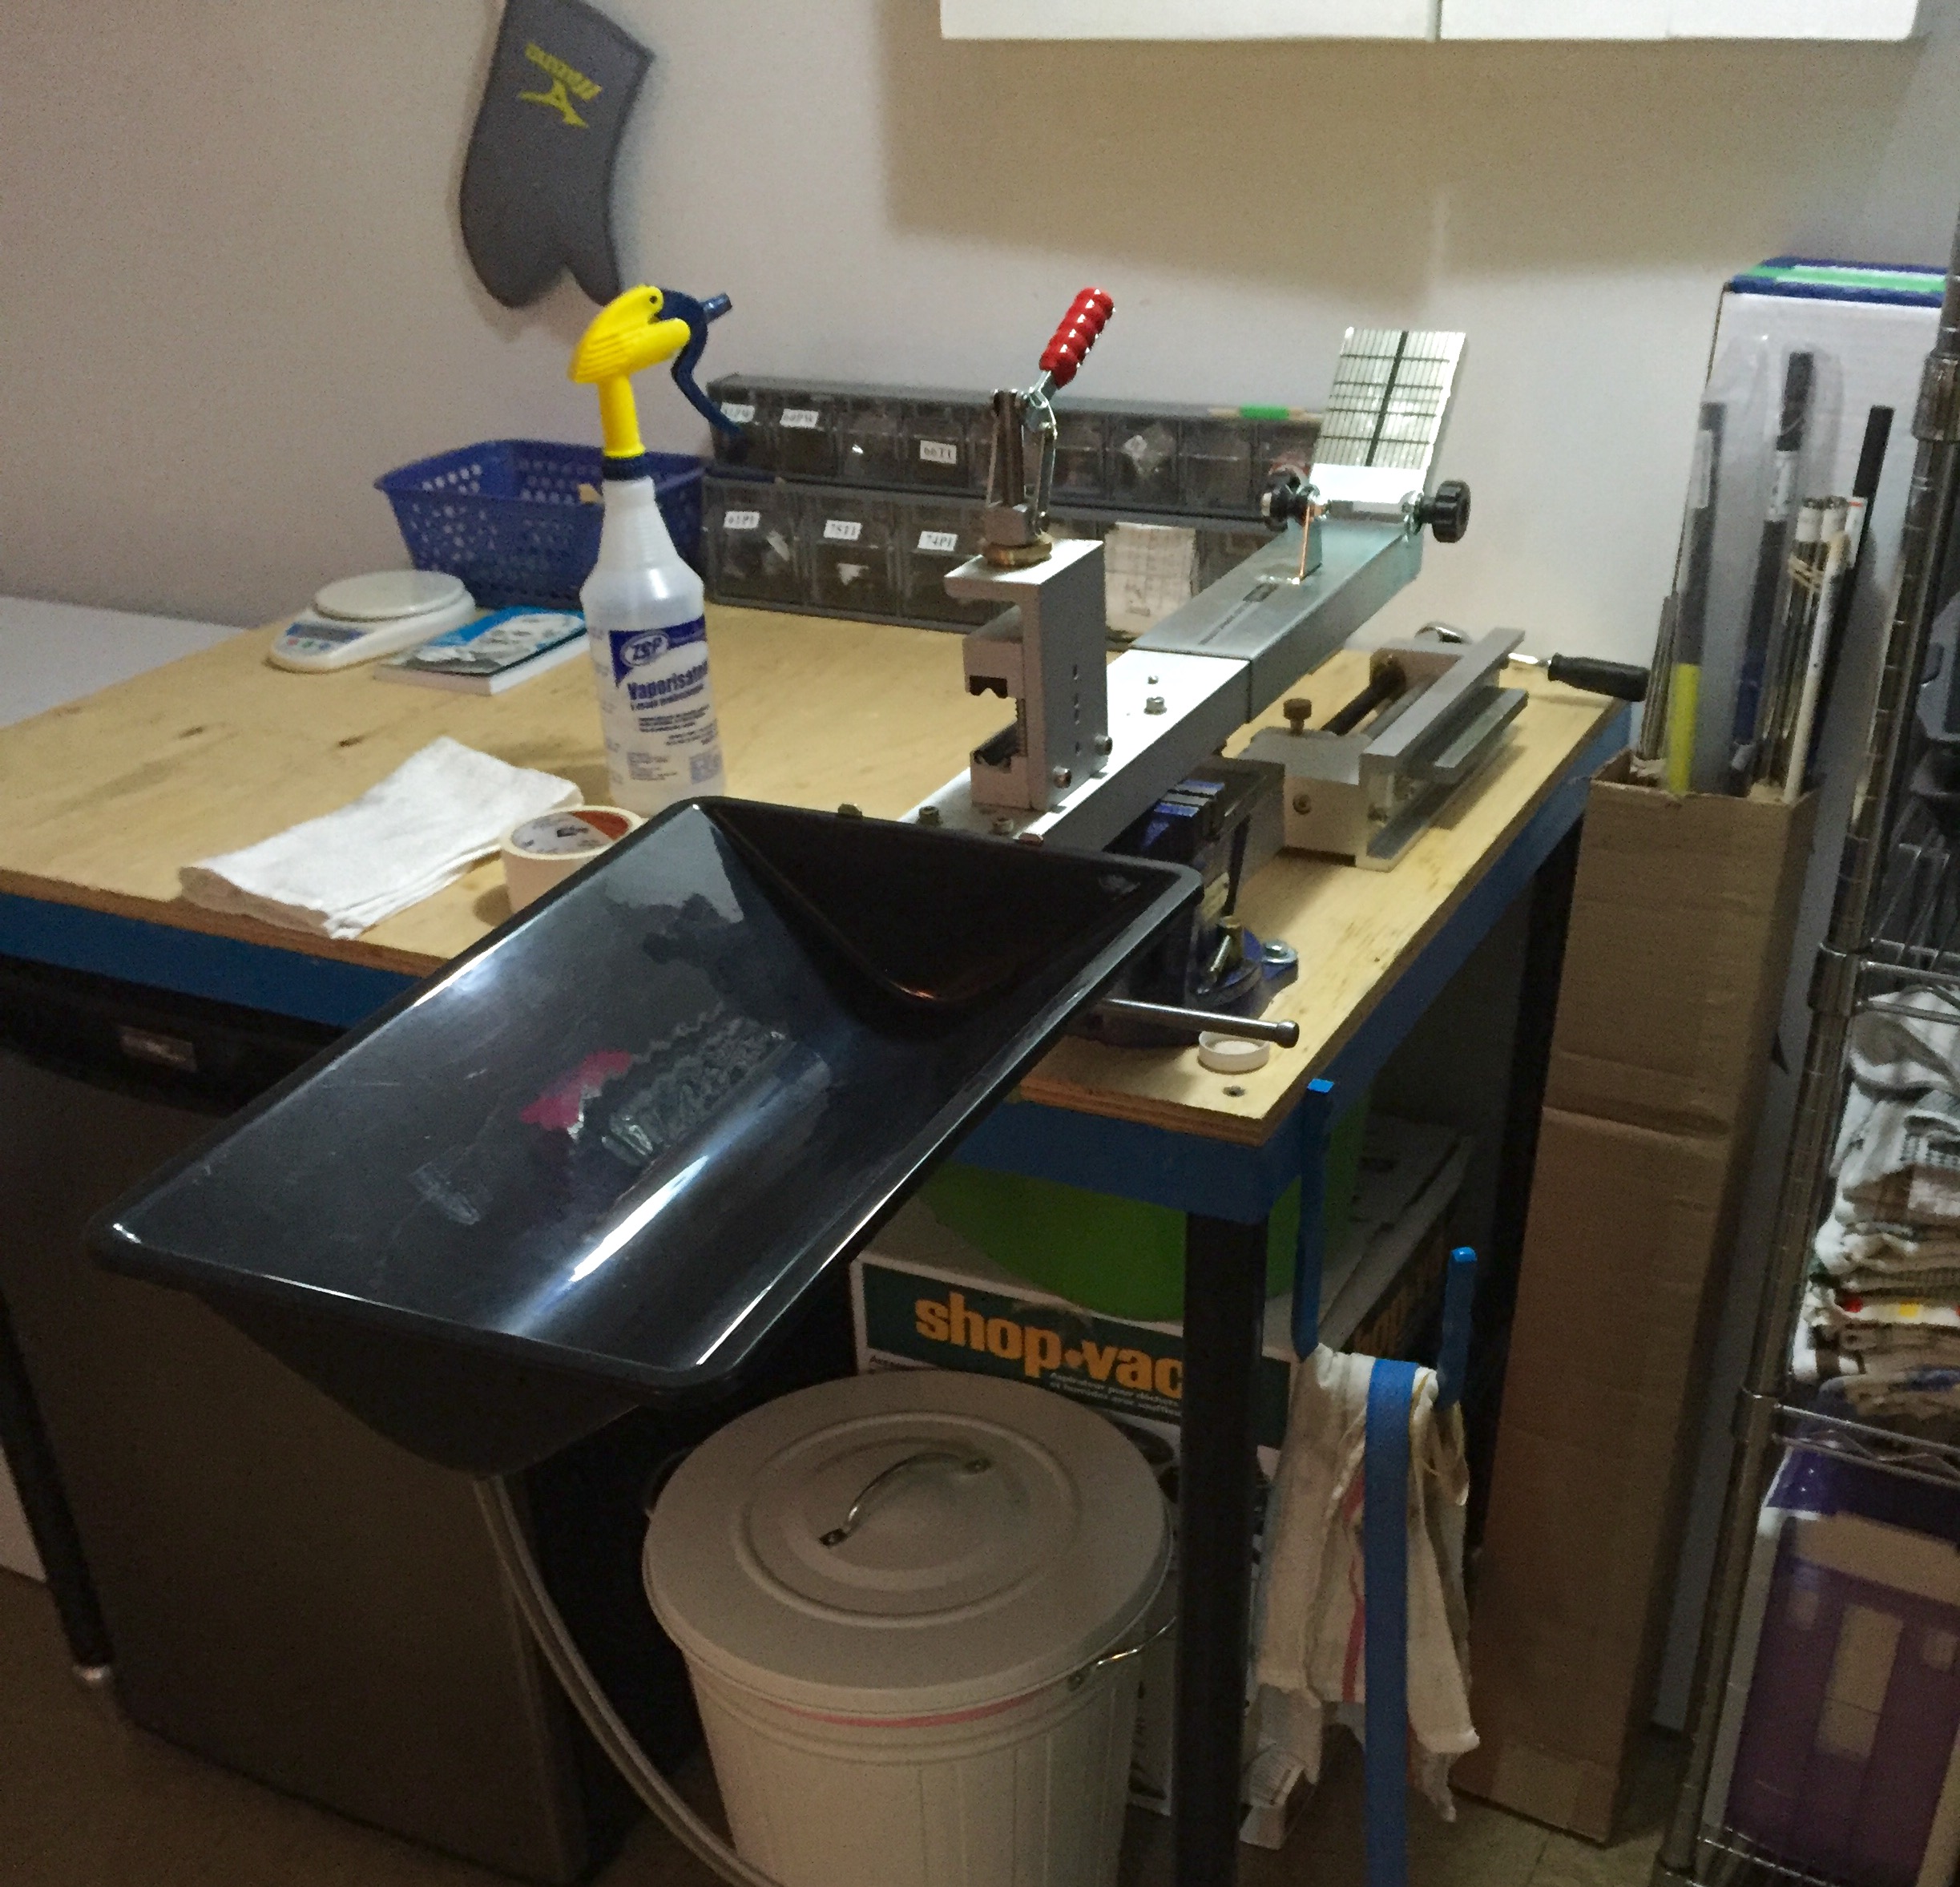
My GolfMechanix gripping station with catch basin in vice.
Having loose solvent is a hazard. Proper drainage and storage is key.

This simple setup makes sure the tube stays in the catch bottle.
When it comes to gripping clubs, the best solution is a proper gripping station that will collect and recycle grip solvent and safely hold a club “square.” The nicest shop I ever worked in had foot-activated pneumatic clamps that automatically adjusted pressure, just like a tour van. Starting with solvent, it’s never good to run that stuff into a drain or have it sitting in an open container, especially with children or pets kicking around. My setup, although not perfect, is very effective at not wasting solvent and allowing me to get grips on in a timely fashion. The picture shows exactly how I recycle my solvent. Like I said, it’s not fancy, but it is very effective. This exact system from GolfMechanix is $185 before the cost of solvent or tape.
Graphite Shaft Puller
My spring-loaded GolfMechanix shaft puller.
So you want to pull a graphite shaft? Like I mentioned in my last article, Avoid These 5 Club Building Disasters, there is a right way and a wrong a way to do it. Using a proper shaft extractor is necessary for graphite because of the fibers and the way the graphite sheets are wrapped. If you plan on doing a bit more than just the occasional shaft pull, I ALWAYS recommend using one with either a spring or hydraulic mechanism. Maltby makes a few really nice ones, as does GolfMechanix. I’ve had my Golf Mechanix shaft puller for more than 10 years now with no problems and hundreds of shafts pulled. The model in the photo retails for $350.
Loft-Lie Machine
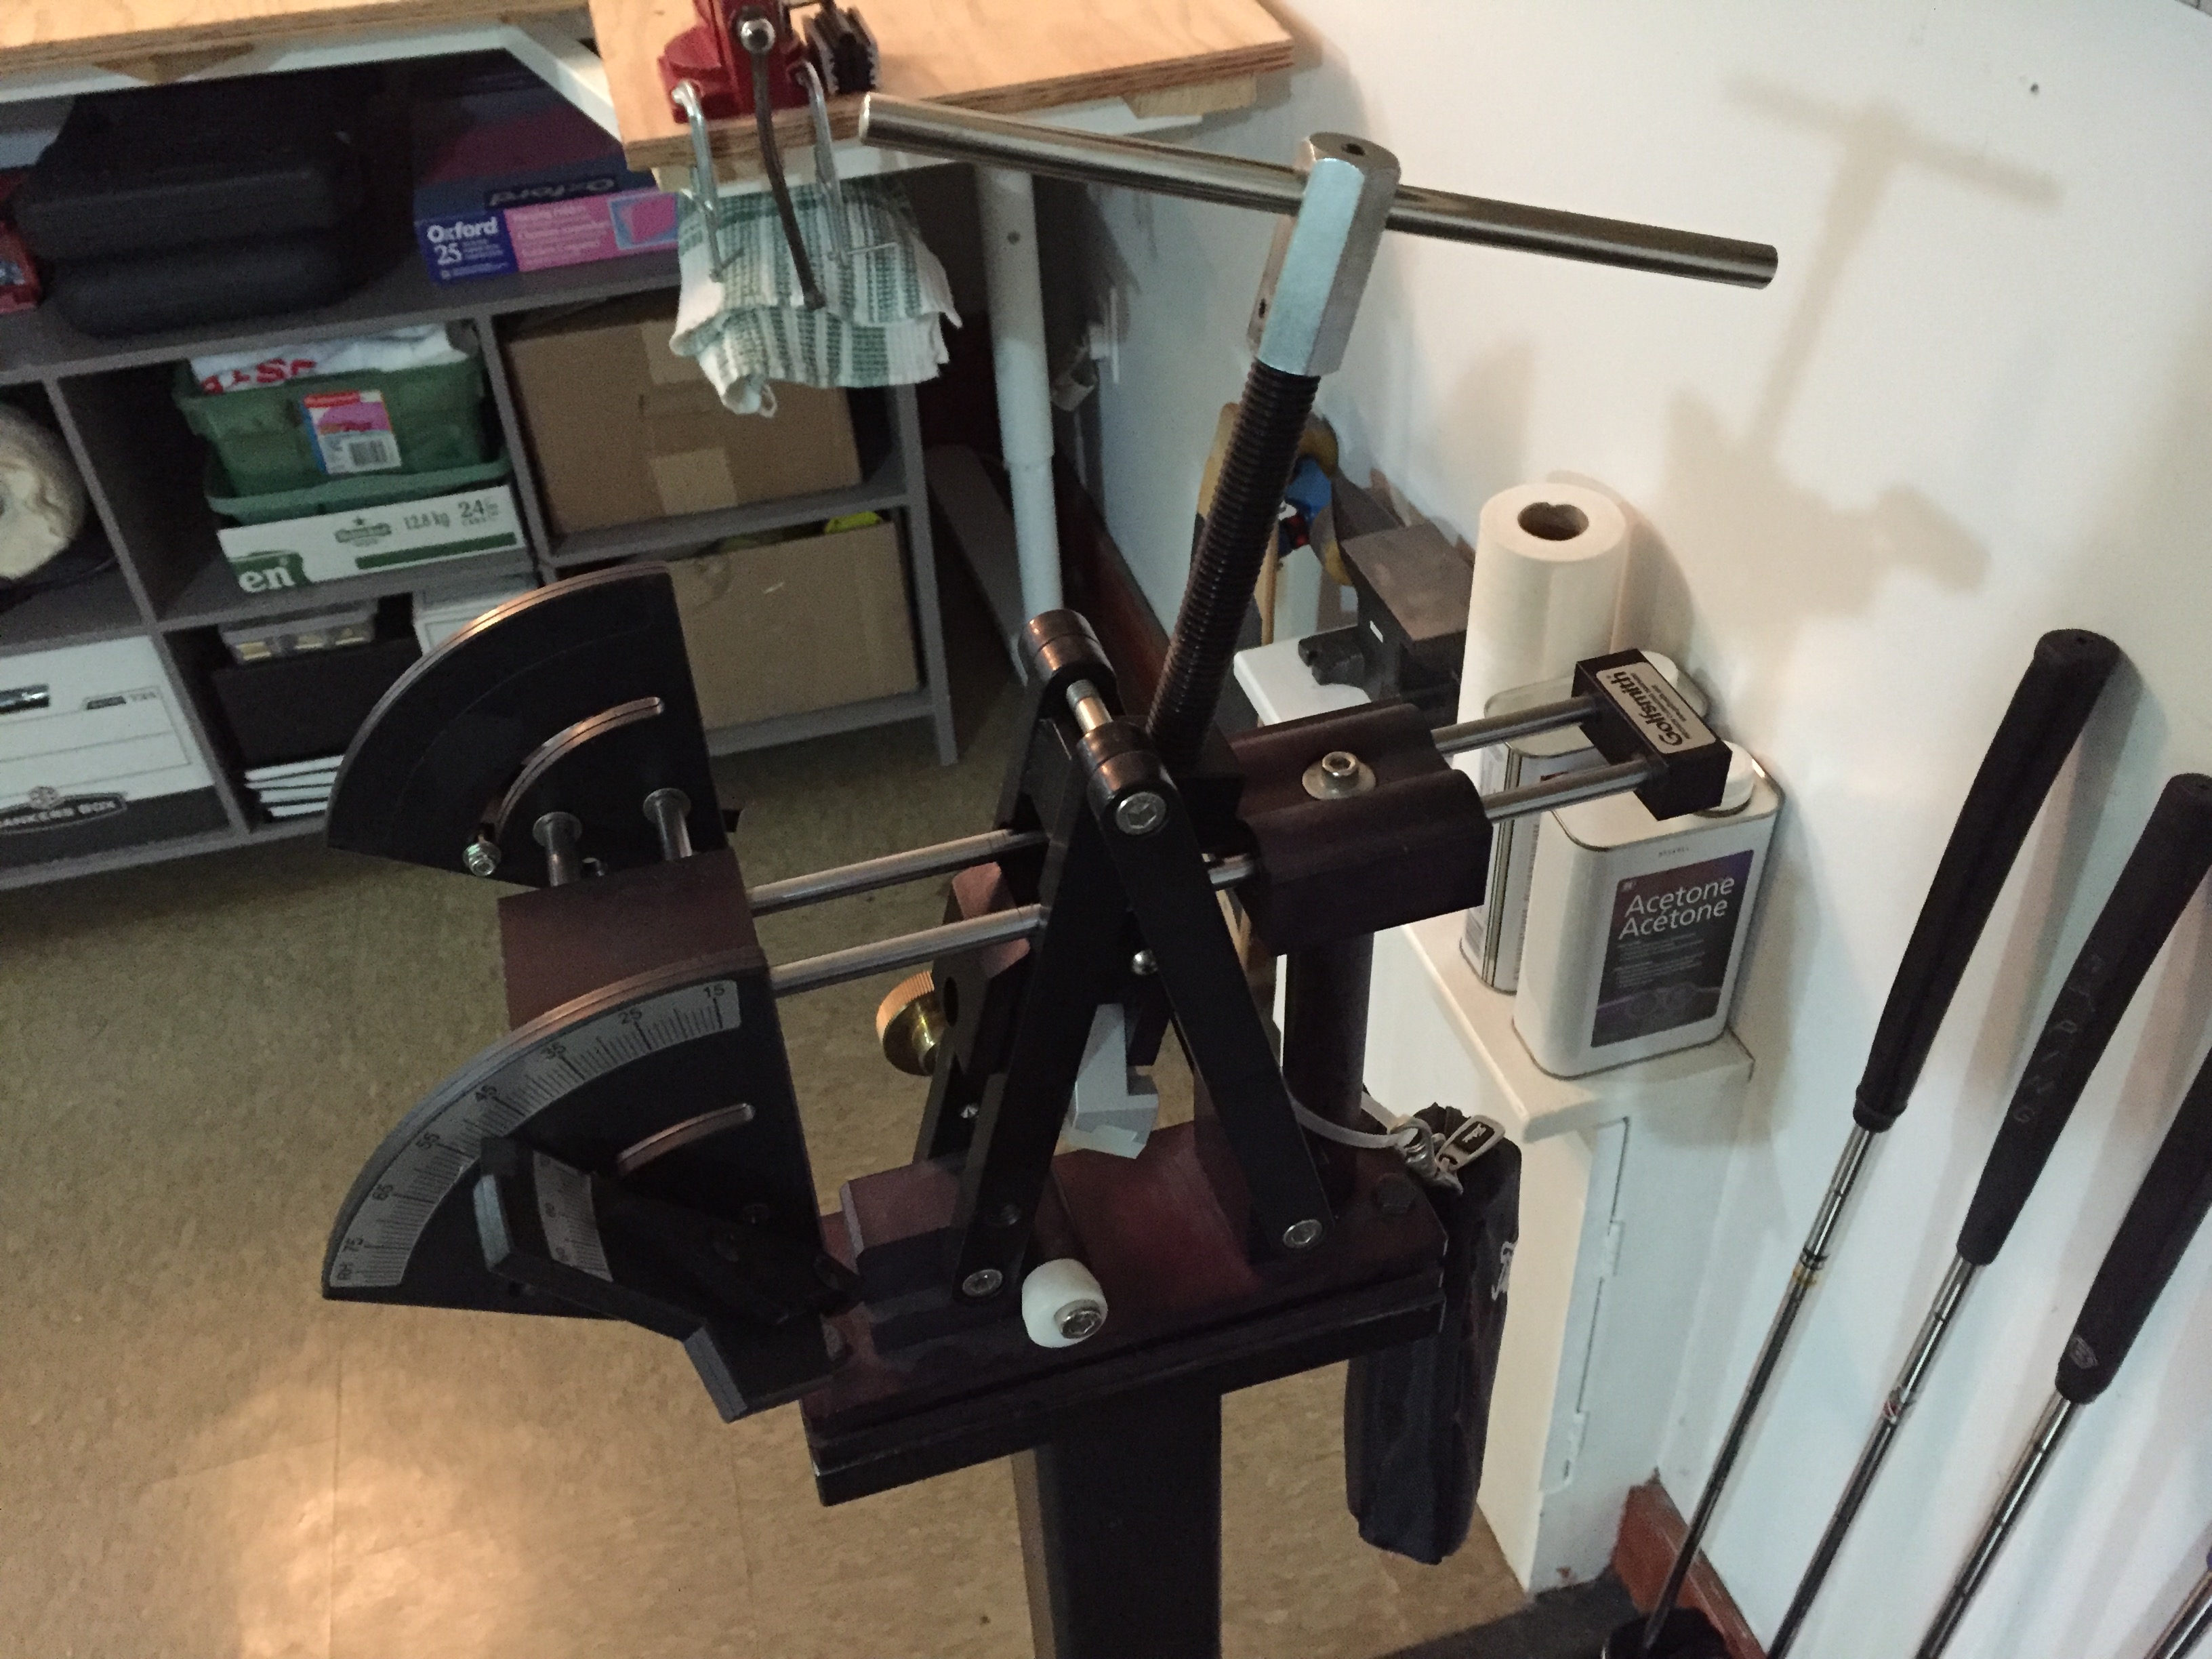
My simple analog lie/loft machine on custom base.
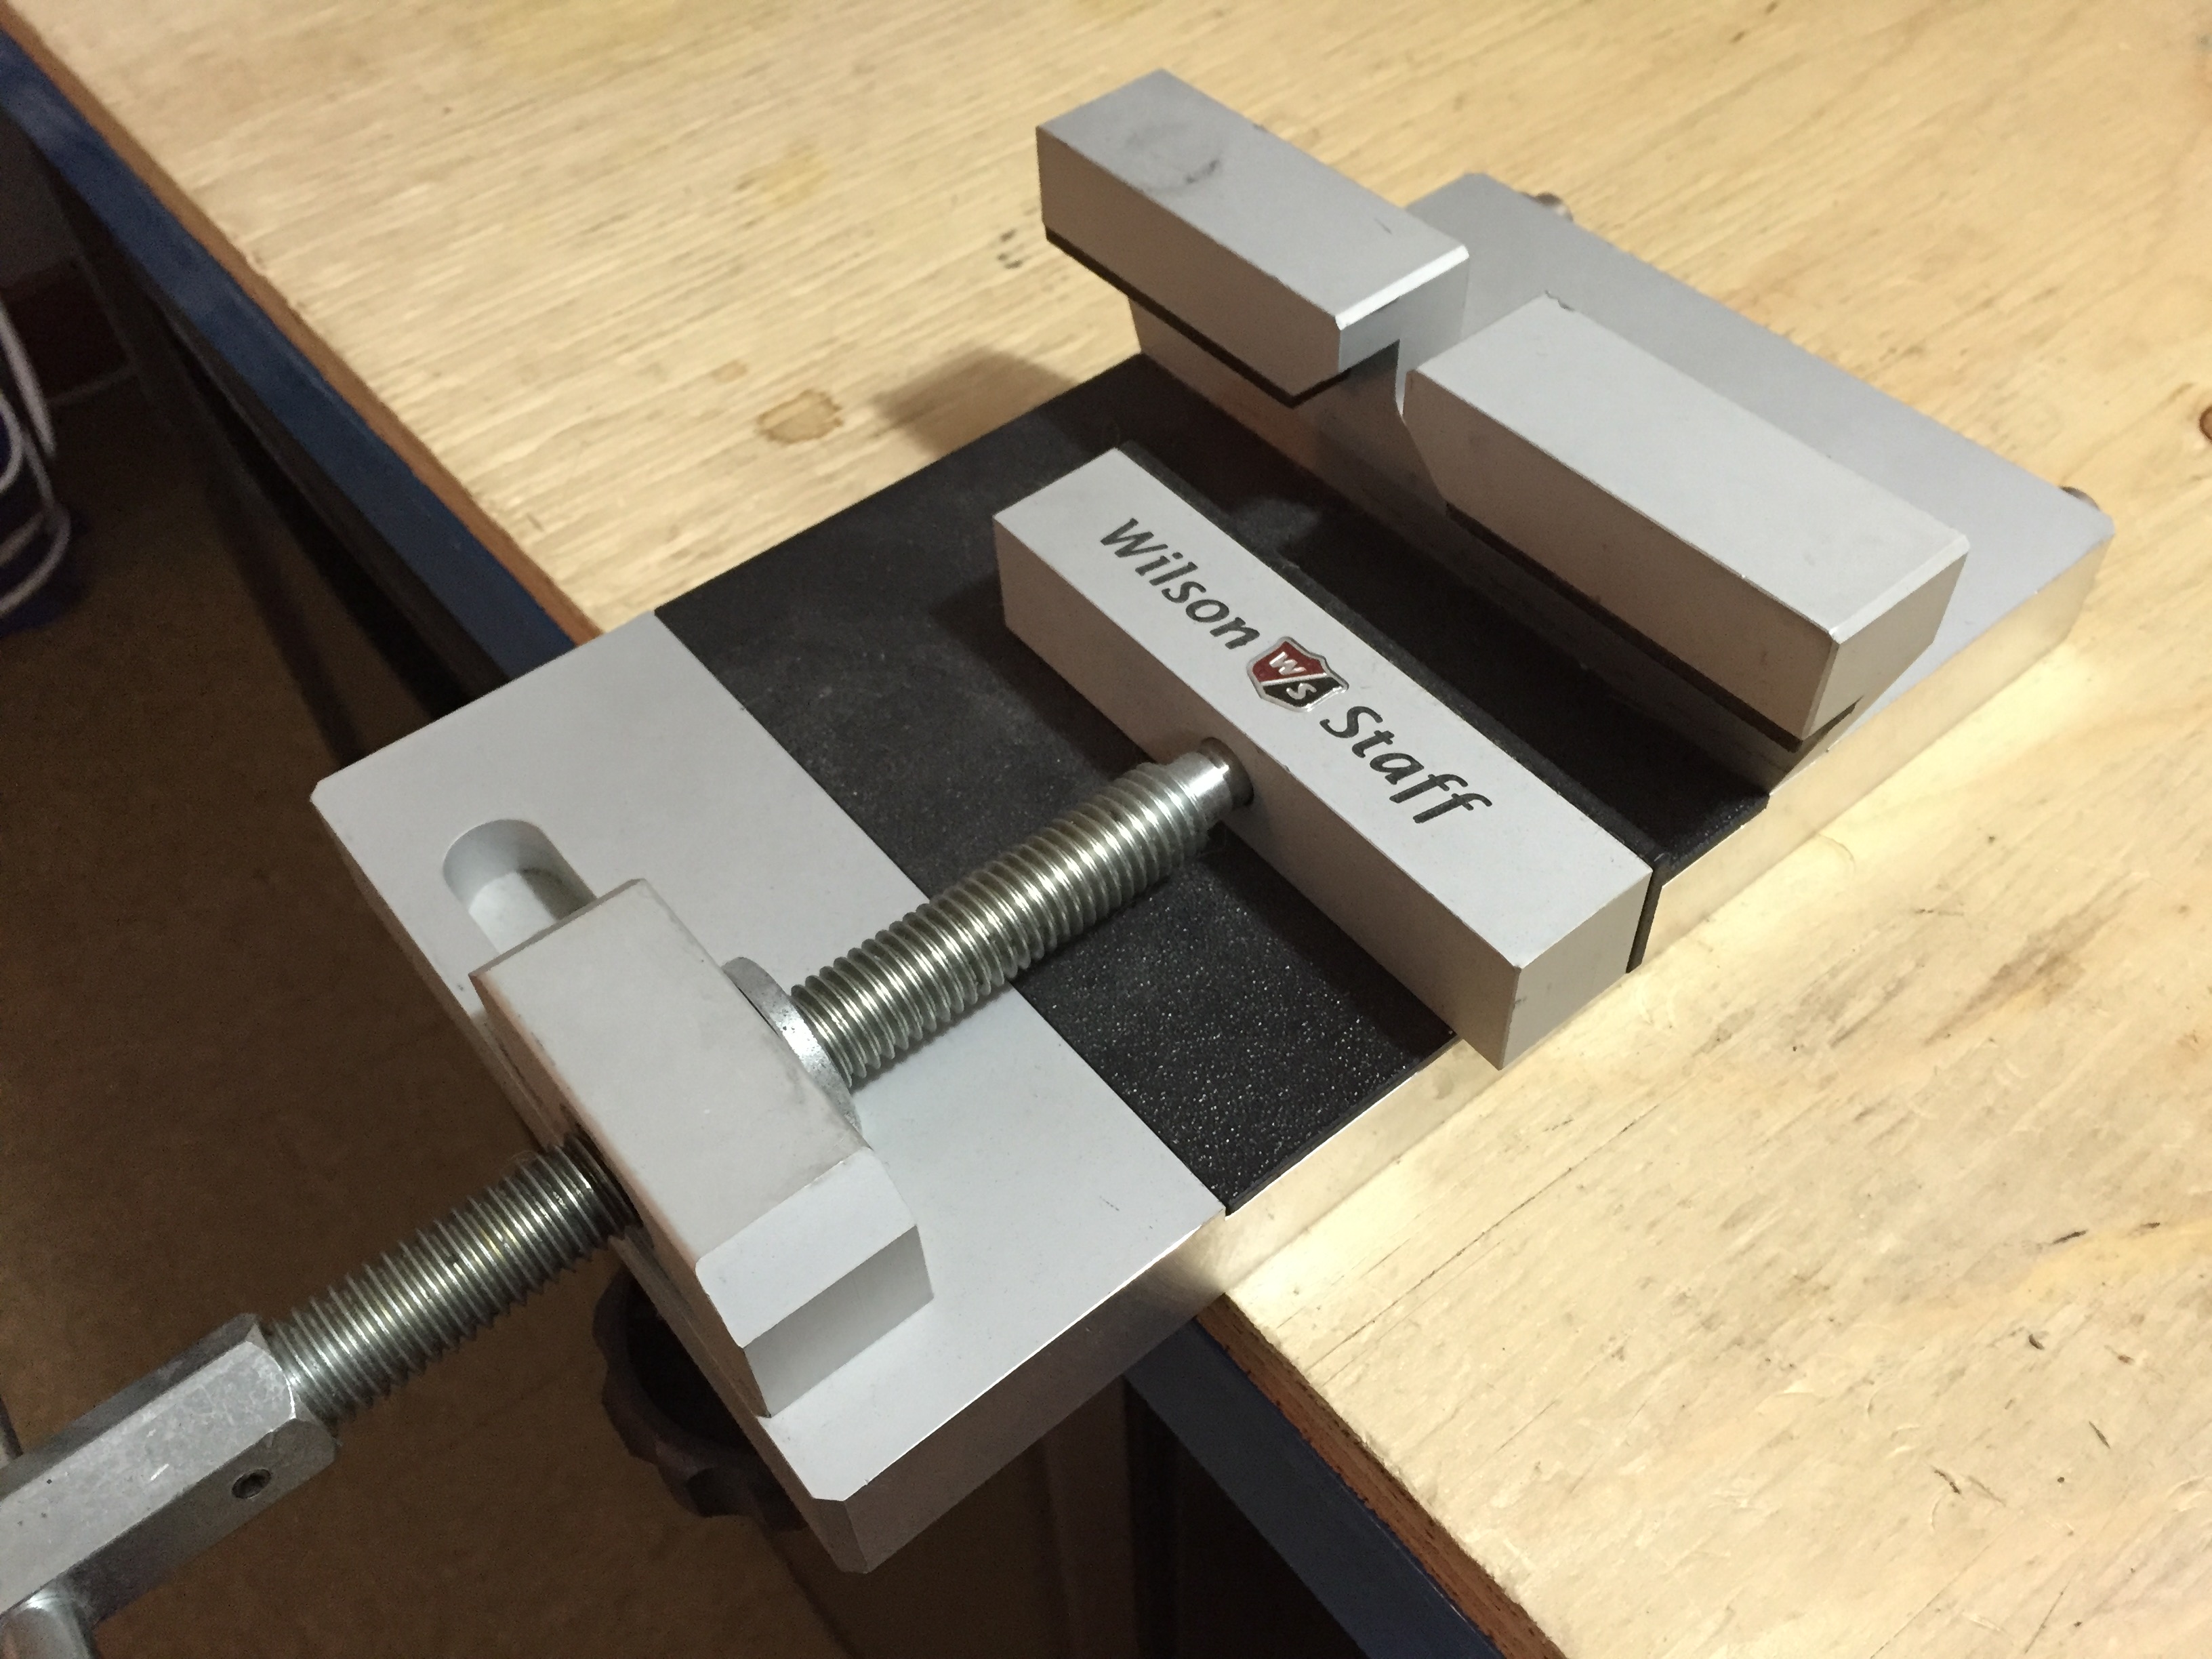
My putter lie/loft bending tool. Lie and loft have to be measured separate.
Loft-lie machines are pricey, but just like a belt sander a good one is very much worth it. If you’re entrepreneurial, loft-lie machines can be a good little money maker, too, since the golf shops that have them can be few and far between, depending on where you live. Do good work on a few clubs for friends and word will spread. Believe me.
The cream of the crop loft-lie machines are digital. I wish I had one, but know that a well-machined loft-lie machine can be just as effective. Just like with the shaft puller, a great one can be had from Maltby and Golf Mechanix. On top of a loft-lie machine for irons, a separate loft-lie machine for putters is a really nice thing to have. Mine is from an older Wilson Staff unit dating back to when Kirk Currie was still making putters. It’s most effective with blade style putters, but can be used with most styles. Again, you don’t need to completely break the bank to have an effective shop with the right tools.
Don’t forget to make sure to get a good, non-maring bending bar tool, too. Bending marks are almost unavoidable for certain iron heads, but to make as few marks as possible a good bending bar is key.
A professional-quality loft/lie machine starts at around $550, but prices can get into the thousands. On top of that, a proper base usually add about $100-$200 to the cost. Putter machines are about $300 to start, but remember, bend a few putters for friends with great results and you will start getting phone calls.
Frequency Machine
My frequency machine with 5-inch pneumatic clamp.
This is a tool that certainly falls under the category of a luxury build shop item. My personal machine is a older model that was built and designed by Fujikura, which has a pneumatic pressure controlled clamping system to ensure consistent results. The age or model of the frequency machine has little impact on the reading that are put out (as long as it’s a quality, properly calibrated machine). The other specification to pay attention to is clamp length. You will get vastly different readings depending on the clamp length used, and if you’re using a computer-based formula your entire set could be off because of the clamp length.
Some newer machines have clamps that can be adjusted from 3-5 inches. I wouldn’t build a set of irons without it, but then again, club building was my livelihood and I’ve gotten used to the luxury. A frequency machine is by no means a necessary tool when it comes to doing home builds and repairs, as they start at about $550. A nice one from Maltby goes for $650, and a top-of-the-line model from GolfMechanix will set you back $750.
Air Compressor
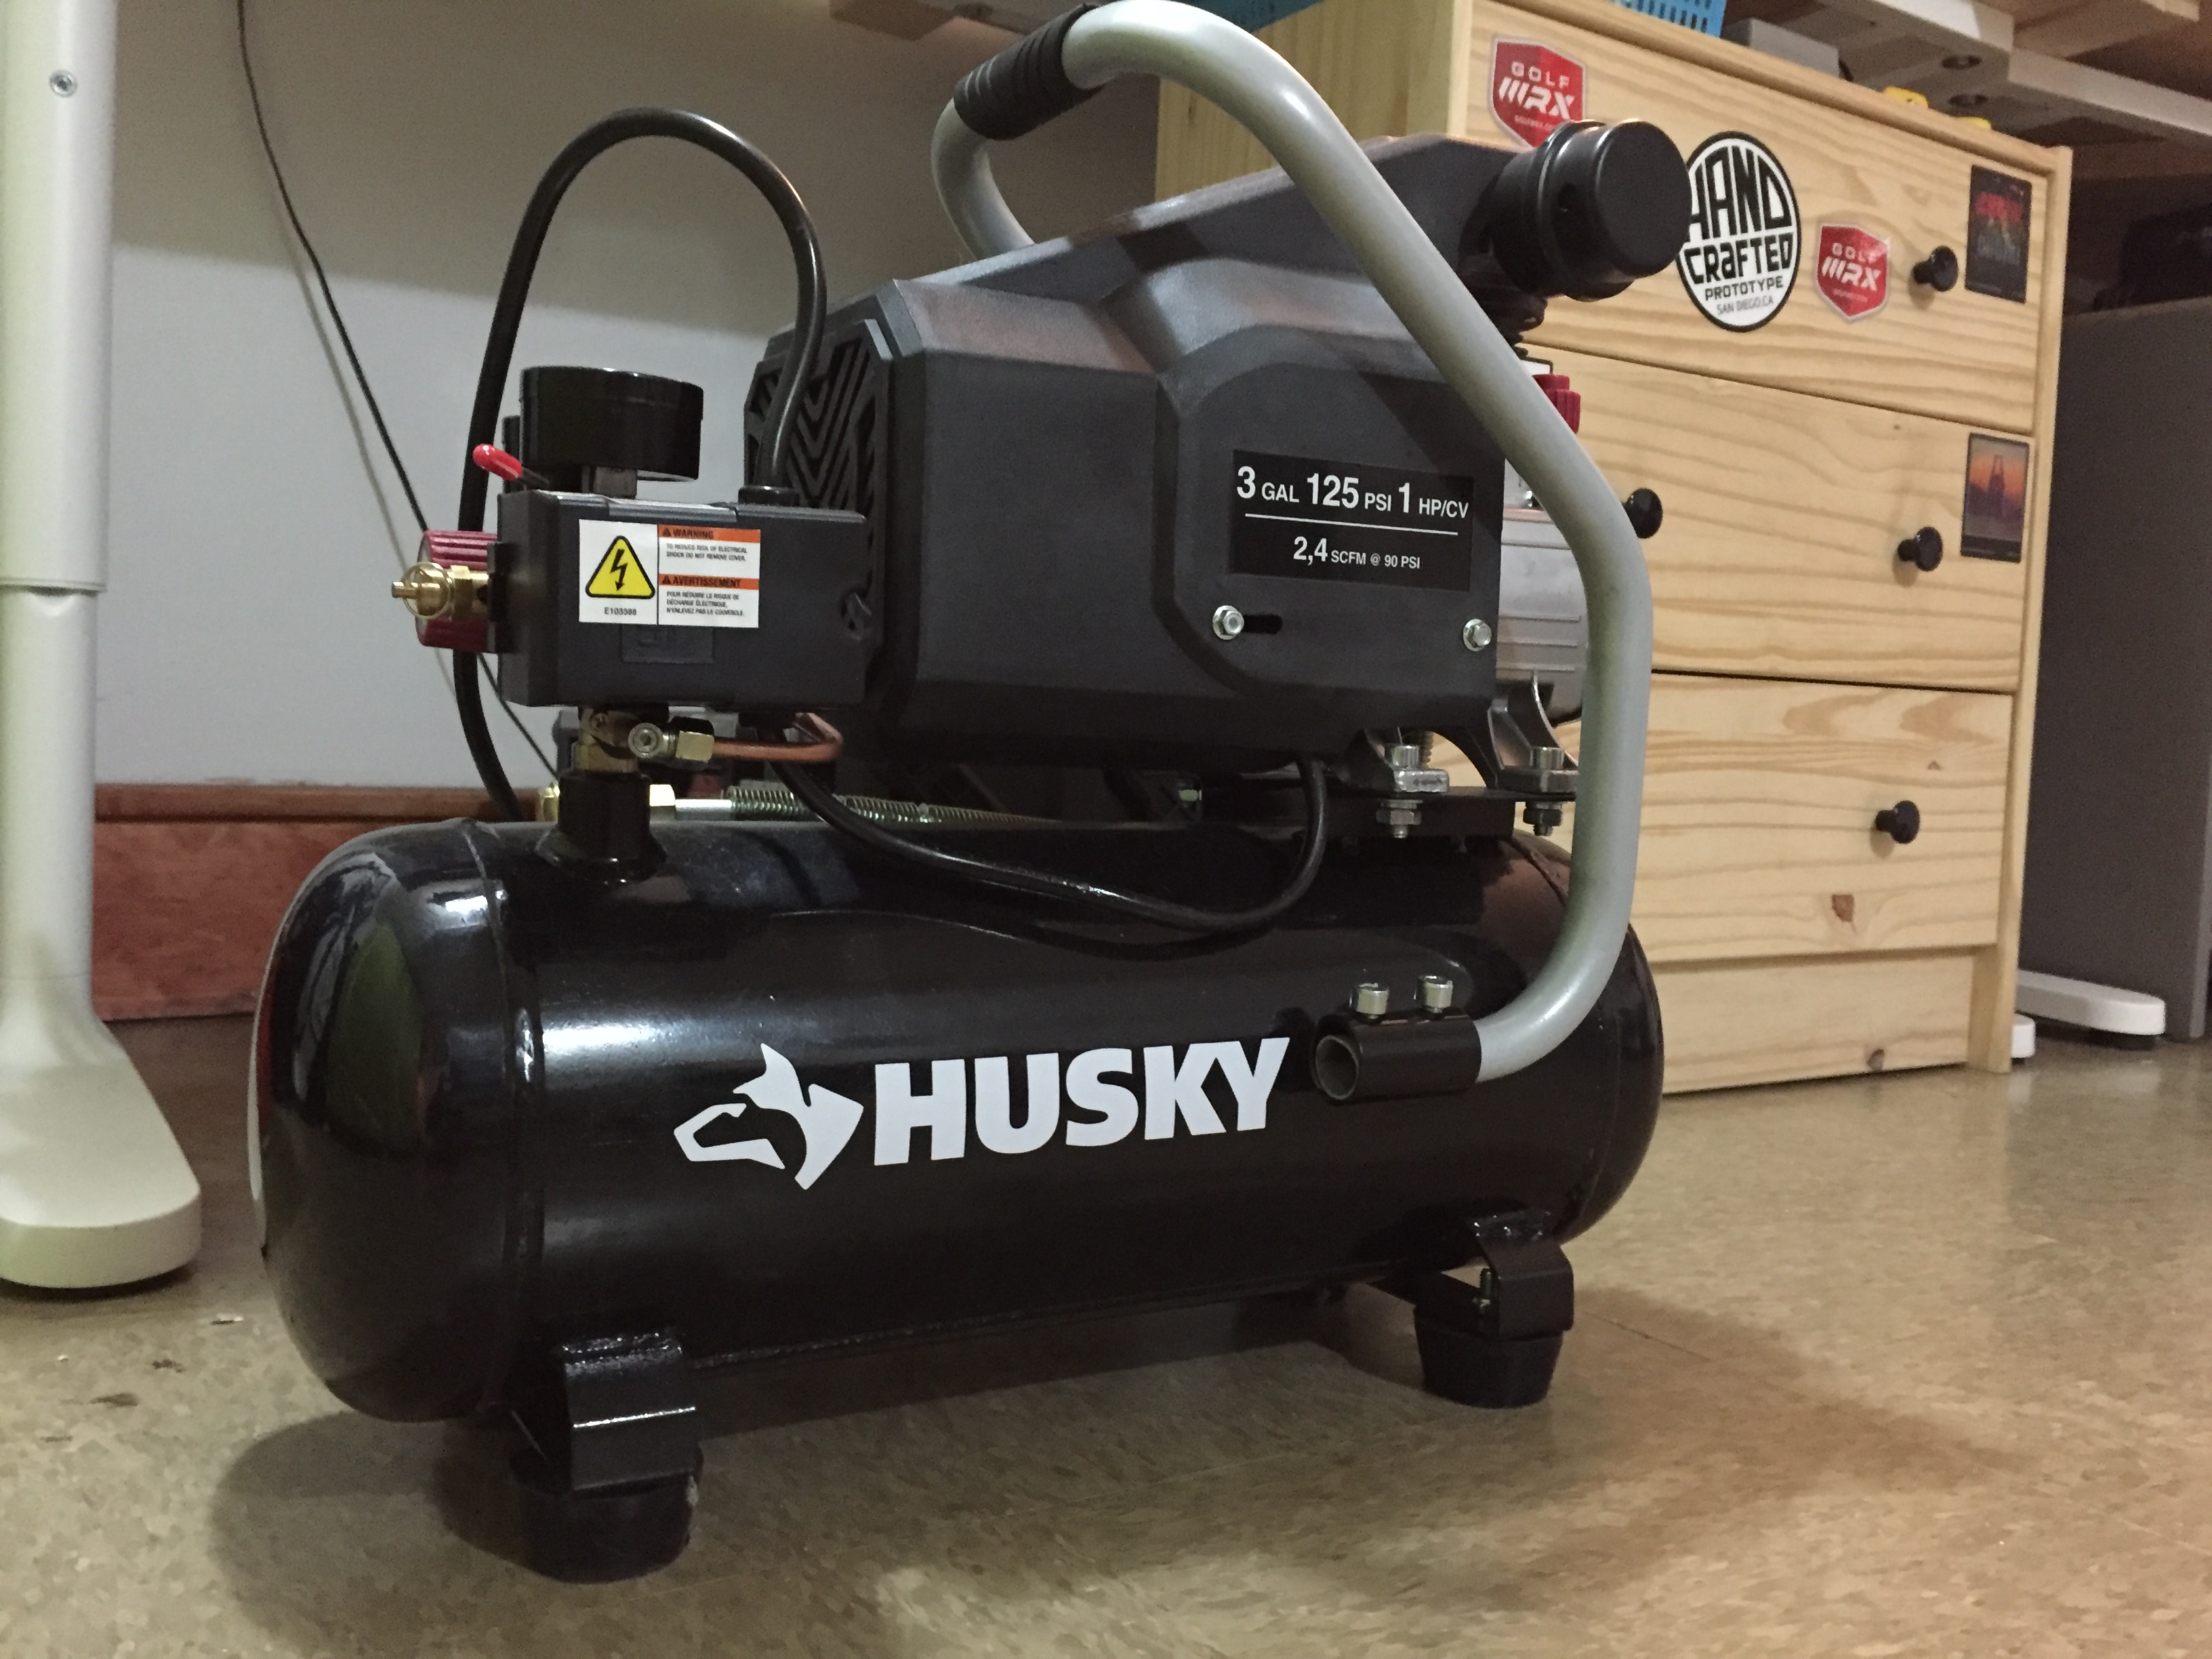
A Husky air compressor from Home Depot is perfect for small jobs.
An air compressor is a tool that falls under the category of “not just useful for a custom shop.” An air compressor has an abundance of uses including blowing on grips, cleaning out hosels and powering a plethora of pneumatic tools. I always charge mine up when building iron sets for use with my frequency machine, as well as making sure clubhead hosels are clean and ready to go for gluing. I selected mine based on three things:
- Size. This was important, because it needed to fit in my smaller shop.
- Volume. It needed have a tank big enough that it didn’t have to charge every time I used a tool. Also, pay attention to CFM (cubic feet per minute), which is how efficient the compressor is at filling the tanking and keeping up with demand.
- Noise. Most small compressors have a decibel rating. Try and find one that’s not too loud. Some are even advertised as being more quiet. It’s not always a big deal, especially if you’re working in a larger space, but can be key in a smaller shop.
A nice, simple compressor will go for around $150.
So what am I missing?
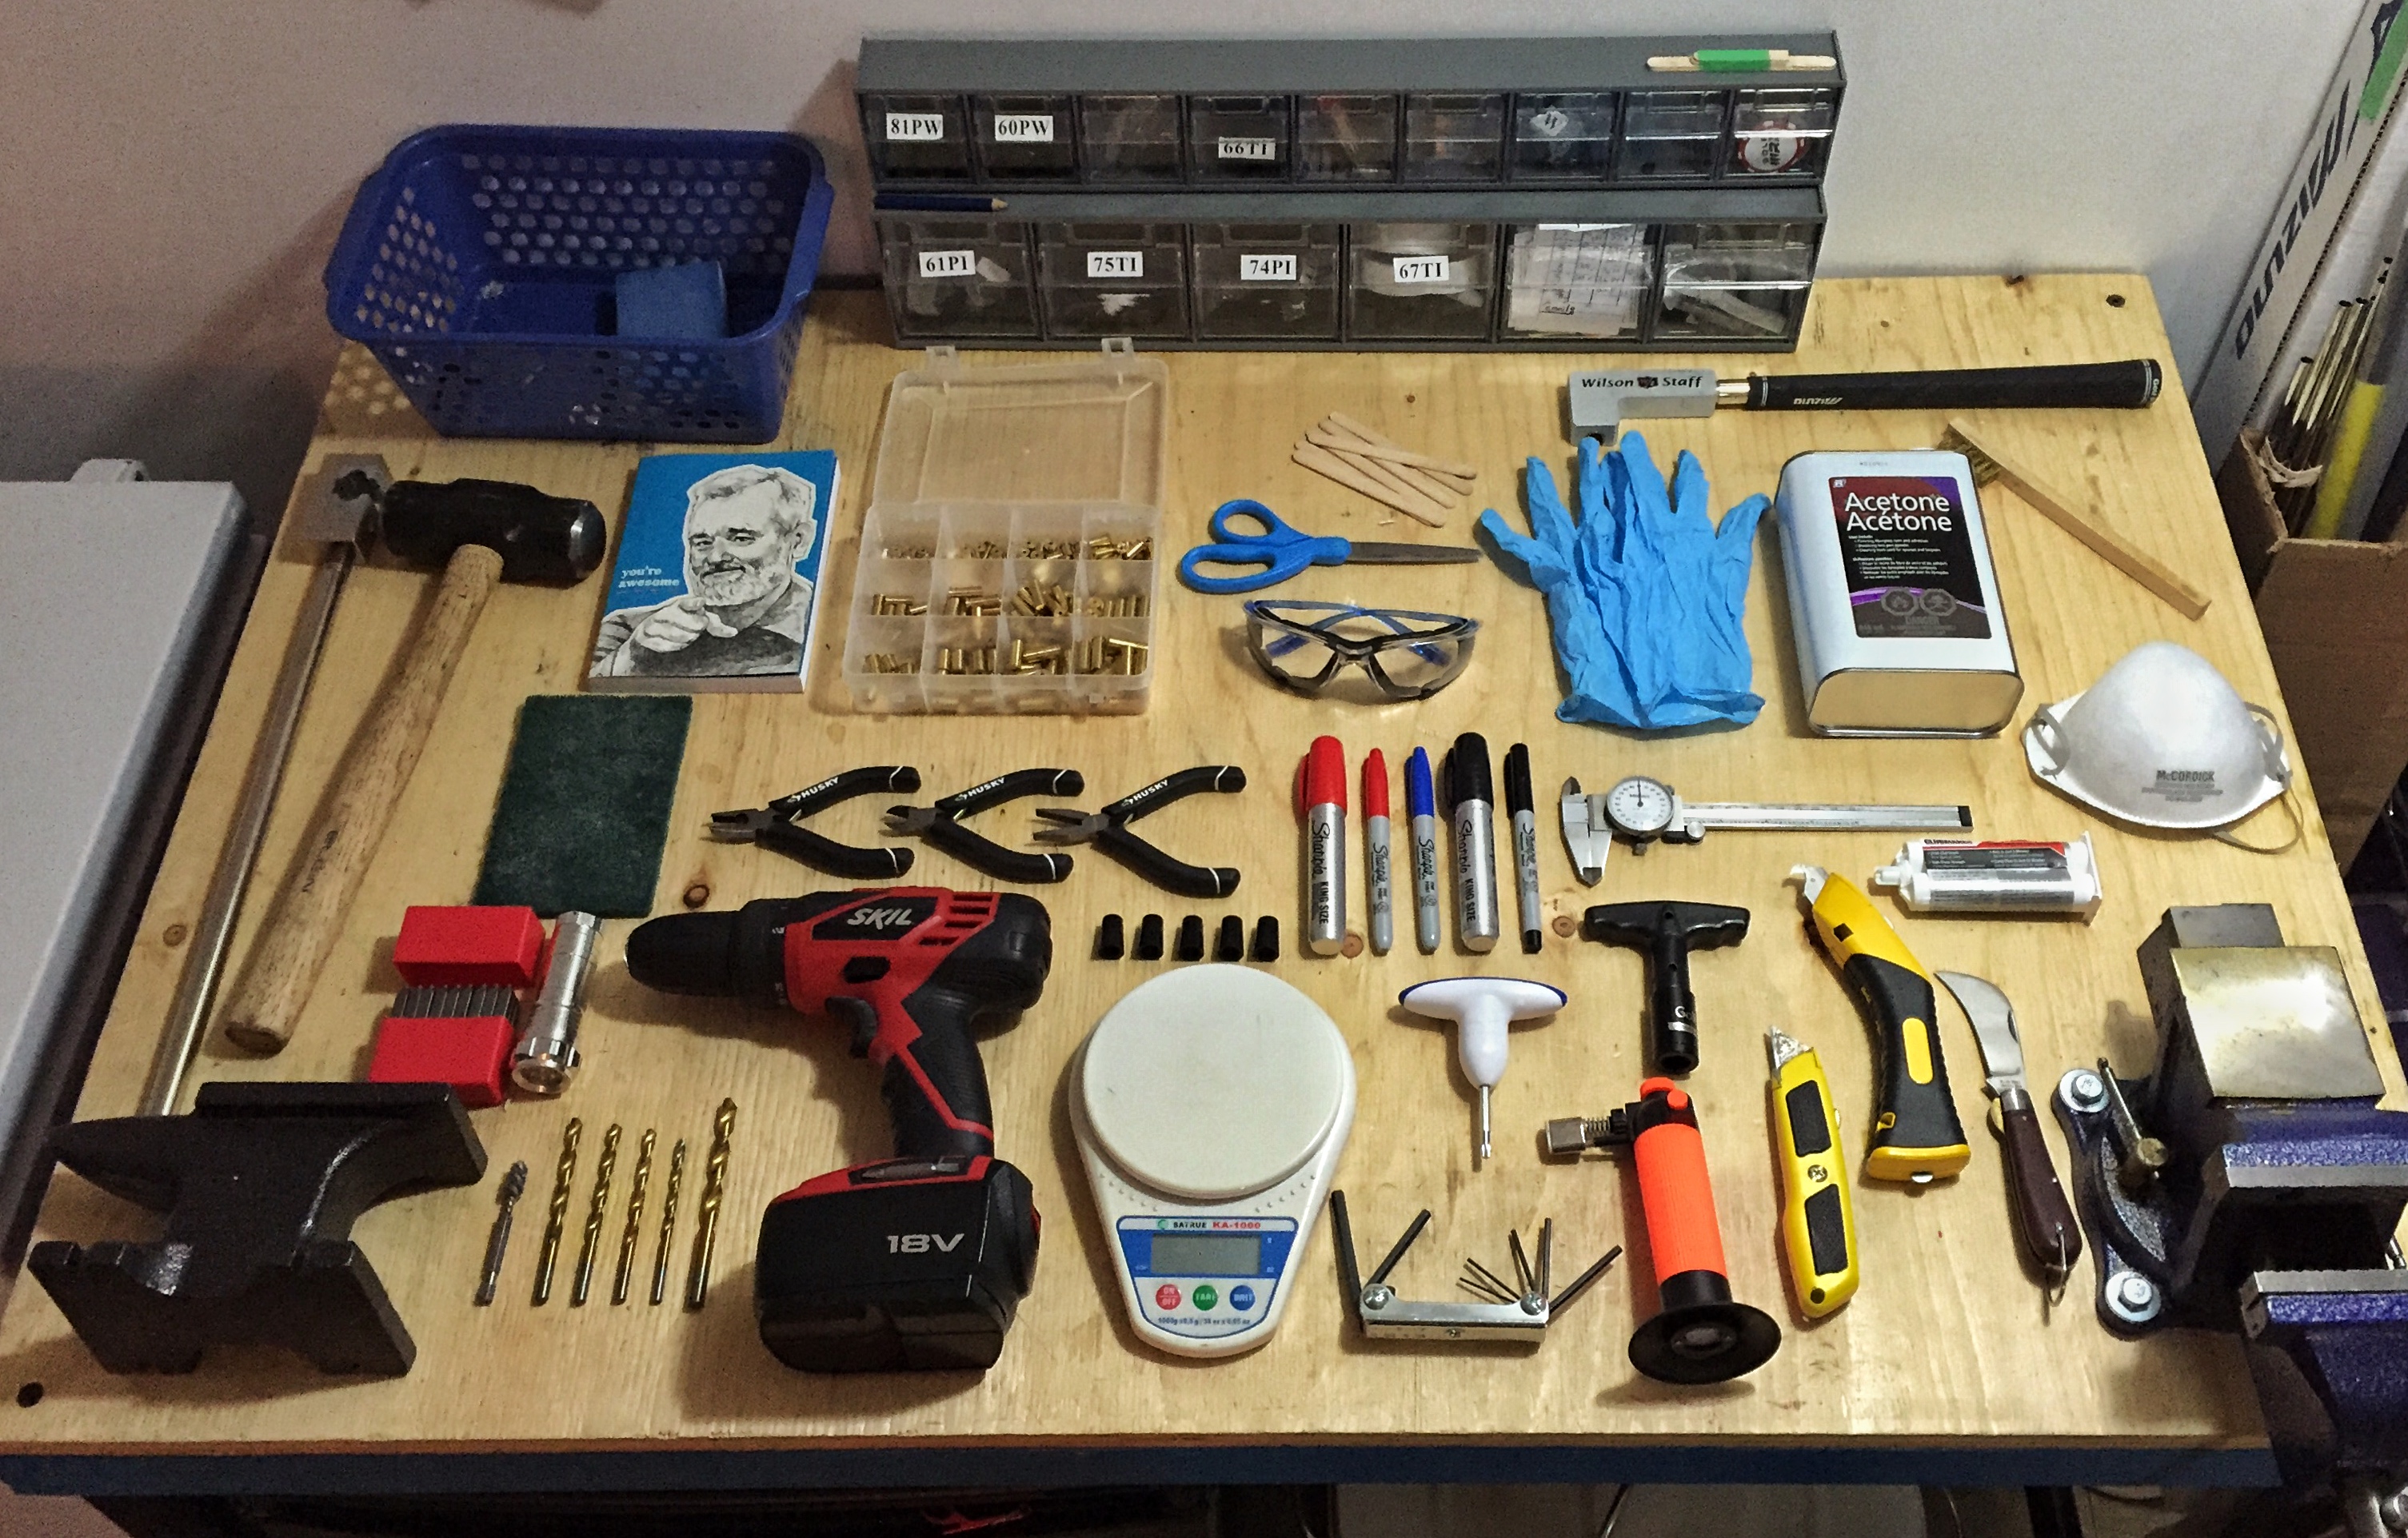
Almost everything you need to do shop work.
I realize that I haven’t even begun to cover cover all the small tools that can be very important when building clubs. In attempt to offer a complete list, I have compiled the items below.
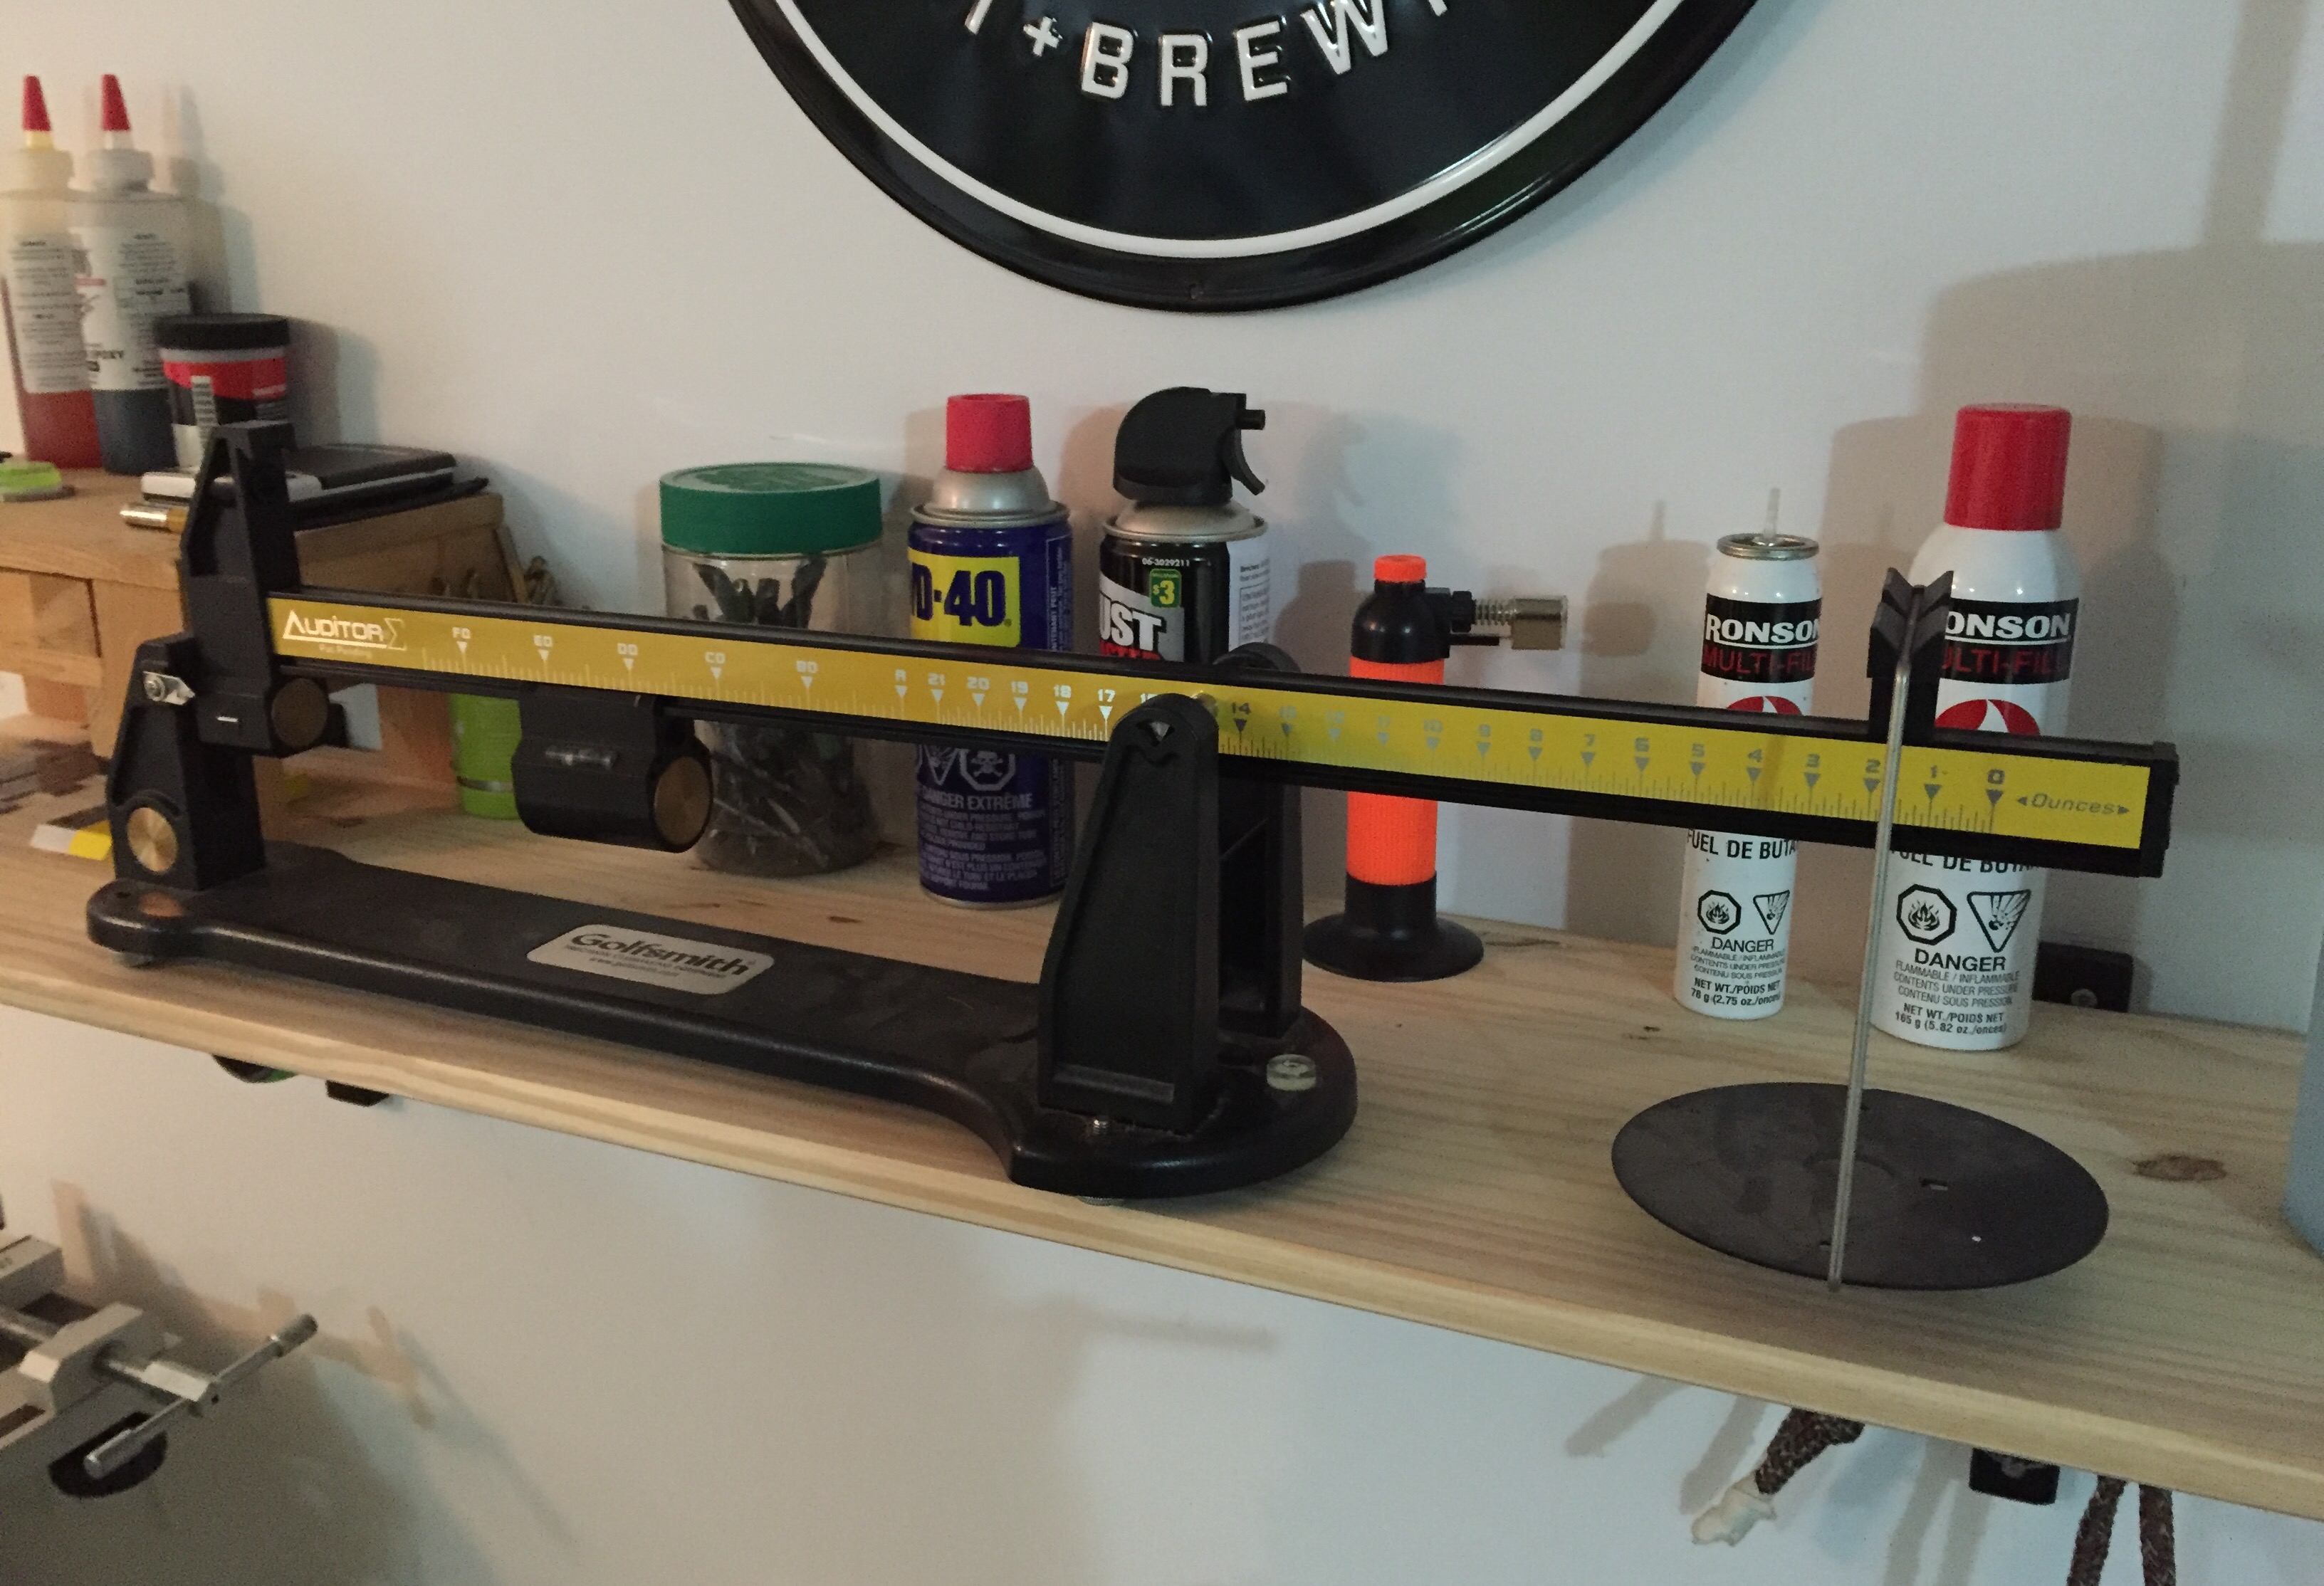
Swing weight scales haven’t changed much in 100 years.
A bench ruler I built to measure clubs at actual lie angles.
- Bench ruler designed to measure golf clubs.
- Swing weight scale. Digital is best, but conventional is still very good.
- Digital scale that reads to +/-0.1 grams.
- Wire brushes for cleaning out hosels.
- Ram rod for removing old stuck tip weights and epoxy.
- Ferrules of all sizes, shims and tip weights.
- Sanding belts for prepping shafts (80 or 120 grit works well).
- SHARPIES! You can never have enough.
- Small pliers and clips.
- Acetone.
- Sand paper of varying grits.
- Gloves for using acetone. It can be nasty on the skin.
- Safety glasses. I can’t stress this enough.
- Calipers (digital are best, but analog can do the trick).
- Grip tape.
- Sharp hook knife and straight blade.
- Butane torch with extra fuel.
- Flash lights.
- Scissors
- Metal trash bin
Questions, concerns or comments? Let me know in the comments section below. I’ll do my best to answer all I can.
- LIKE449
- LEGIT60
- WOW18
- LOL9
- IDHT3
- FLOP0
- OB1
- SHANK11
Of all the clubs in our bags, wedges are almost always the simplest in construction and, therefore, the easiest to analyze what might make one work differently from another if you know what to look for.
Wedges are a lot less mysterious than drivers, of course, as the major brands are working with a lot of “pixie dust” inside these modern marvels. That’s carrying over more to irons now, with so many new models featuring internal multi-material technologies, and almost all of them having a “badge” or insert in the back to allow more complex graphics while hiding the actual distribution of mass.
But when it comes to wedges, most on the market today are still single pieces of molded steel, either cast or forged into that shape. So, if you look closely at where the mass is distributed, it’s pretty clear how that wedge is going to perform.
To start, because of their wider soles, the majority of the mass of almost any wedge is along the bottom third of the clubhead. So, the best wedge shots are always those hit between the 2nd and 5th grooves so that more mass is directly behind that impact. Elite tour professionals practice incessantly to learn to do that consistently, wearing out a spot about the size of a penny right there. If impact moves higher than that, the face is dramatically thinner, so smash factor is compromised significantly, which reduces the overall distance the ball will fly.
Every one of us, tour players included, knows that maddening shot that we feel a bit high on the face and it doesn’t go anywhere, it’s not your fault.
If your wedges show a wear pattern the size of a silver dollar, and centered above the 3rd or 4th groove, you are not getting anywhere near the same performance from shot to shot. Robot testing proves impact even two to three grooves higher in the face can cause distance loss of up to 35 to 55 feet with modern ‘tour design’ wedges.
In addition, as impact moves above the center of mass, the golf club principle of gear effect causes the ball to fly higher with less spin. Think of modern drivers for a minute. The “holy grail” of driving is high launch and low spin, and the driver engineers are pulling out all stops to get the mass as low in the clubhead as possible to optimize this combination.
Where is all the mass in your wedges? Low. So, disregarding the higher lofts, wedges “want” to launch the ball high with low spin – exactly the opposite of what good wedge play requires penetrating ball flight with high spin.
While almost all major brand wedges have begun putting a tiny bit more thickness in the top portion of the clubhead, conventional and modern ‘tour design’ wedges perform pretty much like they always have. Elite players learn to hit those crisp, spinny penetrating wedge shots by spending lots of practice time learning to consistently make contact low in the face.
So, what about grooves and face texture?
Grooves on any club can only do so much, and no one has any material advantage here. The USGA tightly defines what we manufacturers can do with grooves and face texture, and modern manufacturing techniques allow all of us to push those limits ever closer. And we all do. End of story.
Then there’s the topic of bounce and grinds, the most complex and confusing part of the wedge formula. Many top brands offer a complex array of sole configurations, all of them admittedly specialized to a particular kind of lie or turf conditions, and/or a particular divot pattern.
But if you don’t play the same turf all the time, and make the same size divot on every swing, how would you ever figure this out?
The only way is to take any wedge you are considering and play it a few rounds, hitting all the shots you face and observing the results. There’s simply no other way.
So, hopefully this will inspire a lively conversation in our comments section, and I’ll chime in to answer any questions you might have.
And next week, I’ll dive into the rest of the wedge formula. Yes, shafts, grips and specifications are essential, too.
- LIKE22
- LEGIT7
- WOW1
- LOL1
- IDHT2
- FLOP2
- OB1
- SHANK1
Golf's Perfect Imperfections
Golf’s Perfect Imperfections: Amazing Session with Performance Coach Savannah Meyer-Clement

In this week’s episode, we spent some time with performance coach Savannah Meyer-Clement who provides many useful insights that you’ll be able to implement on the golf course.
- LIKE0
- LEGIT0
- WOW0
- LOL0
- IDHT0
- FLOP0
- OB0
- SHANK0
19th Hole
Vincenzi’s 2024 RBC Heritage betting preview: Patrick Cantlay ready to get back inside winner’s circle

Just a two-hour drive from Augusta National, the PGA TOUR heads to Harbour Town Golf Links in Hilton Head Island, S.C. Hilton Head Island is a golfer’s paradise and Harbour Town is one of the most beautiful and scenic courses on the PGA TOUR.
Harbour Town Golf Links is a par-71 that measures 7,121 yards and features Bermuda grass greens. A Pete Dye design, the course is heavily tree lined and features small greens and many dog legs, protecting it from “bomb-and-gauge” type golfers.
The field is loaded this week with 69 golfers with no cut. Last year was quite possibly the best field in RBC Heritage history and the event this week is yet another designated event, meaning there is a $20 million prize pool.
Most of the big names on the PGA Tour will be in attendance this week with the exceptions of Hideki Matsuyama and Viktor Hovland. Additionally, Webb Simpson, Shane Lowry, Gary Woodland and Kevin Kisner have been granted sponsors exemptions.
Past Winners at Harbour Town
- 2023: Matt Fitzpatrick (-17)
- 2022: Jordan Spieth (-13)
- 2021: Stewart Cink (-19)
- 2020: Webb Simpson (-22)
- 2019: CT Pan (-12)
- 2018: Sotoshi Kodaira (-12)
- 2017: Wesley Bryan (-13)
- 2016: Branden Grace (-9)
- 2015: Jim Furyk (-18)
In this article and going forward, I’ll be using the Rabbit Hole by Betsperts Golf data engine to develop my custom model. If you want to build your own model or check out all of the detailed stats, you can sign up using promo code: MATTVIN for 25% off any subscription package (yearly is best value).
Key Stats For Harbour Town
Let’s take a look at key metrics for Harbour Town Golf Links to determine which golfers boast top marks in each category over their past 24 rounds.
Strokes Gained: Approach
Strokes Gained: Approach is exceedingly important this week. The greens at Harbour Town are about half the size of PGA TOUR average and feature the second-smallest greens on the tour. Typical of a Pete Dye design, golfers will pay the price for missed greens.
Total SG: Approach Over Past 24 Rounds
- Scottie Scheffler (+1.27)
- Tom Hoge (+1.27)
- Corey Conners (+1.16)
- Austin Eckroat (+0.95)
- Cameron Young (+0.93)
Good Drive %
The fairways at Harbour Town are tree lined and feature many dog legs. Bombers tend to struggle at the course because it forces layups and doesn’t allow long drivers to overpower it. Accuracy is far more important than power.
Good Drive % Over Past 24 Rounds
- Brice Garnett (88.8%)
- Shane Lowry (+87.2%)
- Akshay Bhatia (+86.0%)
- Si Woo Kim (+85.8%)
- Sepp Straka (+85.1%)
Strokes Gained: Total at Pete Dye Designs
Pete Dye specialists tend to play very well at Harbour Town. Si Woo Kim, Matt Kuchar, Jim Furyk and Webb Simpson are all Pete Dye specialists who have had great success here. It is likely we see some more specialists near the top of the leaderboard this week.
SG: TOT Pete Dye per round over past 36 rounds:
- Xander Schauffele (+2.27)
- Scottie Scheffler (+2.24)
- Ludvig Aberg (+2.11)
- Brian Harman (+1.89)
- Sungjae Im (+1.58)
4. Strokes Gained: Short Game (Bermuda)
Strokes Gained: Short Game factors in both around the green and putting. With many green-side bunkers and tricky green complexes, both statistics will be important. Past winners — such as Jim Furyk, Wes Bryan and Webb Simpson — highlight how crucial the short game skill set is around Harbour Town.
SG: SG Over Past 24 Rounds
- Jordan Spieth (+1.11)
- Taylor Moore (+1.02)
- Wyndham Clark (+0.98)
- Mackenzie Hughes (+0.86)
- Andrew Putnam (+0.83)
5. Greens in Regulation %
The recipe for success at Harbour Town Golf Links is hitting fairways and greens. Missing either will prove to be consequential — golfers must be in total control of the ball to win.
Greens in Regulation % over past 24 rounds:
- Brice Garnett (+75.0%)
- Scottie Scheffler (+69.9%)
- Corey Conners (+69.0%)
- Shane Lowry (+68.3%)
- Patrick Rodgers (+67.6%)
6. Course History
Harbour Town is a course where players who have strong past results at the course always tend to pop up.
Course History over past 24 rounds:
- Patrick Cantlay (+2.34)
- Cam Davis (+2.05)
- J.T. Poston (+1.69)
- Justin Rose (+1.68)
- Tommy Fleetwood (+1.59)
The RBC Heritage Model Rankings
Below, I’ve compiled overall model rankings using a combination of the five key statistical categories previously discussed — SG: Approach (24%), Good Drives (20%), SG: SG (14%), SG: Pete Dye (14%), GIR (14%), and Course History (14%)
- Shane Lowry
- Russell Henley
- Scottie Scheffler
- Xander Schauffele
- Corey Conners
- Wyndham Clark
- Christiaan Bezuidenhout
- Matt Fitzpatrick
- Cameron Young
- Ludvig Aberg
2024 RBC Heritage Picks
Patrick Cantlay +2000 (FanDuel)
With the exception of Scottie Scheffler, the PGA Tour has yet to have any of their star players show peak form during the 2024 season. Last week, Patrick Cantlay, who I believe is a top-5 players on the PGA Tour, took one step closer to regaining the form that’s helped him win eight events on Tour since 2017.
Cantlay limped into the Masters in poor form, but figured it out at Augusta National, finishing in a tie for 20th and ranking 17th for the week in Strokes Gained: Ball Striking. The former FedEx Cup champion will now head to one of his favorite golf courses in Harbour Town, where he’s had immaculate results over the years. In his six trips to the course, he’s only finished worse than 7th one time. The other finishes include three third places (2017, 2019, 2023) and one runner-up finish (2022). In his past 36 rounds at Harbour Town, Cantlay ranks 1st in Strokes Gained: Total per round at the course by a wide margin (+2.36).
Cantlay is winless since the 2022 BMW Championship, which is far too long for a player of his caliber. With signs pointing to the 32-year-old returning to form, a “signature event” at Harbour Town is just what he needs to get back on the winning track.
Tommy Fleetwood +3000 (FanDuel)
I truly believe Tommy Fleetwood will figure out a way to win on American soil in 2024. It’s certainly been a bugaboo for him throughout his career, but he is simply too talented to go another season without winning a PGA Tour event.
At last week’s Masters Tournament, Fleetwood made a Sunday charge and ended up finishing T3 in the event, which was his best ever finish at The Masters. For the week, the Englishman ranked 8th in the field in Strokes Gained: Approach, 10th in Strokes Gained: Ball Striking and 16th in Strokes Gained: Putting.
Harbour Town is a perfect layout for Fleetwood, and he’s had relative success at this Pete Dye design in the past. In his four trips to the course, he’s finished inside of the top 25 three times, with his best finish, T10, coming in 2022. The course is pretty short and can’t be overpowered, which gives an advantage to more accurate players such as Fleetwood. Tommy ranks 8th in the field in Good Drive % and should be able to plot his way along this golf course.
The win is coming for Tommy lad. I believe there’s a chance this treasure of a golf course may be the perfect one for him to finally break through on Tour.
Cameron Young +3300 (FanDuel)
Cameron Young had a solid Masters Tournament last week, which is exactly what I’m looking for in players who I anticipate playing well this week at the RBC Heritage. He finished in a tie for 9th, but never felt the pressure of contending in the event. For the week, Young ranked 6th in Strokes Gained: Off the Tee and 6th in Strokes Gained: Ball Striking.
Despite being one of the longest players off the tee on the PGA Tour, Young has actually played some really good golf on shorter tracks. He finished T3 at Harbour Town in 2023 and ranks 20th in the field in Good Drive% and 16th in Greens in Regulation in his past 24 rounds. He also has strong finishes at other shorter courses that can take driver out of a players hand such as Copperhead and PGA National.
Young is simply one of the best players on the PGA Tour in 2024, and I strongly believe has what it takes to win a PGA Tour event in the very near future.
Corey Conners +5500 (FanDuel)
Corey Conners has had a disappointing year thus far on the PGA Tour, but absolutely loves Harbour Town.
At last week’s Masters Tournament, the Canadian finished T30 but ranked 20th in the field in Strokes Gained: Approach. In his past 24 rounds, Conners ranks 3rd in the field in Strokes Gained: Approach, 3rd in Greens in Regulation % and 24th in Good Drive %.
In Conners’ last four trips to Harbour Town, his worst finish was T31, last season. He finished T4 in 2021, T12 in 2022 and ranks 8th in Strokes Gained: Total at the course over his past 36 rounds.
Conners hasn’t been contending, but his recent finishes have been encouraging as he has finished in the top-25 in each of his past three starts prior to The Masters, including an impressive T13 at The PLAYERS. His recent improvement in ball striking as well as his suitability for Harbour Town makes Conners a high upside bet this week.
Shane Lowry (+7500) (FanDuel)
When these odds were posted after Lowry was announced in the field, I have to admit I was pretty stunned. Despite not offering much win equity on the PGA Tour over the last handful of years, Shane Lowry is still a top caliber player who has the ability to rise to the top of a signature event.
Lowry struggled to score at The Masters last week, but he actually hit the ball really well. The Irishman ranked 1st for Strokes Gained: Approach on the week and 7th in Strokes Gained: Ball Striking. As usual, it was the putter that let him down, as he ranked 60th in the field in Strokes Gained: Putting.
Harbour Town is most definitely one of Lowry’s favorite courses on the PGA Tour. In his six starts there, he’s finished in the top 10 three times, including third twice. Lowry is sensational at Pete Dye designs and ranks 7th in Strokes Gained: Total in his past 36 rounds on Dye tracks.
Lowry is perfect for Harbour Town. In his past 24 rounds, he ranks 5th in Strokes Gained: Approach, 2nd in Good Drive% and 5th in Green in Regulation %. If he figures it out on the greens, Shane could have his first win in America since 2015.
Lucas Glover +12000 (FanDuel)
This is one of my weekly “bet the number” plays as I strongly believe the odds are just too long for a player of Glover’s caliber. The odds have been too long on Glover for a few weeks now, but this is the first event that I can get behind the veteran being able to actually contend at.
Glover is quietly playing good golf and returning to the form he had after the understandable regression after his two massive victories at the end of 2023. He finished T20 at The Masters, which was his best ever finish at Augusta National. For the week, Lucas ranked 18th for Strokes Gained: Approach and 20th in Strokes Gained: Ball Striking.
Over his past 24 rounds, Glover ranks 9th in Strokes Gained: Approach and 13th in Good Drive %. Harbour Town is a short course that the 44-year-old will be able to keep up with the top players on Tour off the tee. He’s played the course more than 20 times, with mixed results. His best finishes at Harbour Town include a T7 in 2008, but recently has a finish of T21 in 2020.
Glover has proven he can contend with the stars of the Tour on any given week, and this number is flat out disrespectful.
- LIKE30
- LEGIT5
- WOW2
- LOL1
- IDHT1
- FLOP2
- OB0
- SHANK2


Dave Portnoy places monstrous outright bet for the 2024 Masters

John Daly stuns fans into silence with brutal opening tee shot on PGA Tour Champions

Things got heated at the Houston Open between Tony Finau and Alejandro Tosti. Here’s why

Tiger Woods arrives at 2024 Masters equipped with a putter that may surprise you

Report: Tiger Woods has ‘eliminated sex’ in preparation for the 2024 Masters

Two star names reportedly blanked Jon Rahm all week at the Masters

2-time major champ announces shock retirement from the sport at age of 33

Neal Shipley presser ends in awkward fashion after reporter claims Tiger handed him note on 8th fairway

Paulina Gretzky opens up on receiving death threats following DJ’s move to LIV Golf

Report: LIV Golf identifies latest star name they hope to sign to breakaway tour


Collin Morikawa WITB 2024 (April)
Collin Morikawa what’s in the bag accurate as of the RBC Heritage. More photos from the event here. Driver: TaylorMade...


WITB Time Machine: Jordan Spieth’s winning WITB, 2022 RBC Heritage
At the 2022 RBC Heritage Jordan Spieth defeated Patrick Cantlay on the first playoff hole after nearly holing his greenside...


Jason Day WITB 2024 (April)
Jason Day what’s in the bag accurate as of the RBC Heritage. Driver: Ping G430 LST (9 degrees @10) Shaft: TPT...


Ludvig Åberg WITB 2024 (April)
Ludvig Åberg what’s in the bag accurate as of the RBC Heritage. Driver: Titleist TSR2 (9 degrees, D4 SureFit setting)...
-
 19th Hole1 week ago
Dave Portnoy places monstrous outright bet for the 2024 Masters
-
 19th Hole3 weeks ago
Things got heated at the Houston Open between Tony Finau and Alejandro Tosti. Here’s why
-
 19th Hole1 week ago
Tiger Woods arrives at 2024 Masters equipped with a putter that may surprise you
-
 19th Hole2 weeks ago
Report: Tiger Woods has ‘eliminated sex’ in preparation for the 2024 Masters
-
 19th Hole5 days ago
Two star names reportedly blanked Jon Rahm all week at the Masters
-
 19th Hole4 days ago
Neal Shipley presser ends in awkward fashion after reporter claims Tiger handed him note on 8th fairway
-
 19th Hole3 days ago
Report: LIV Golf identifies latest star name they hope to sign to breakaway tour
-

 19th Hole2 weeks ago
Addiction, spinal fusion, and scam artists – Everything Anthony Kim revealed in candid interview with David Feherty
KENS CUSTOM CLUBS. PXG DEALER
Apr 30, 2019 at 6:04 pm
Chop saw is a no no, to much dust a good wet saw with proper blade and also a complete bench collection system, throw in a good launch monitor and 25 years experience also club fitting schools and club building schools and you might be getting close also a moment of inertia machine to ho beyond swingweight and make every iron feel the same could go on with more list never ends if you want to keep up with technology.
geohogan
Mar 4, 2019 at 1:19 pm
Please, where is the fire extinguisher?
Grinding sparks ignited on the bench after I finished grinding.
I almost lost my home to a fire on my work bench.
There is wood and flammable chemicals. Have to have a working fire extinguisher and know how to use it. cheers
Tom D
Oct 17, 2016 at 3:22 pm
Heck, I’d love to get a loft/lie machine and I’m closer to 60 that to 16!
Andrew Nielsen
Oct 9, 2016 at 10:30 pm
Great article and appreciate the tip on the Gryphon Mitre Saw. Been looking for a small chop saw just for shafts and the Gryphon is perfect. Any recommendations on Bench top drill presses?
Skip VanB
Oct 7, 2016 at 3:19 pm
Ryan,
Great fun article! That’s a nice shop you have. Where did the base for your work bench, the one with your vice come from?
Ryan Barath
Oct 7, 2016 at 9:48 pm
Hi Skip,
I’m gonna be straight up, I am a very lucky guy to not only be married to a great lady, but to also have a very talented brother-in-law. He’s is not only a welder, but also a great designer of all things metal. This base was completely custom built to the space that I had and specs that I gave him ( although I installed the vice on my own after the bench was built )
But for most, there are a bunch of bench kit system that very easily allow you to build to your spec at a very reasonable cost. You just need to buy the metal or plastic fibre brackets and then have the base pieces cut to length.
Really hope this helps.
Ryan
alan
Oct 6, 2016 at 7:53 am
nice article thanks. i tinker around in my garage and get by.
my wife is canadian. we head up to muskoka usually once a year. when we are on the 403 bridge i look over at hamilton and wonder who would wanna live in hamilton. now i know!
Wesley
Oct 5, 2016 at 10:57 pm
Great article Ryan. I have all these tools but some are less costly like club scout. Folks don’t forget there are plenty of places like harbor freight to get tools that will perform same function for significantly less cost than golf specific suppliers.
Ryan Barath
Oct 6, 2016 at 1:08 am
Exactly!
I really tried to stress that you can stretch your dollar by purchasing either used or more cost effective options with certain tools. This is also very effective since most people are only going to go as far as using the tools irregularly and because of that lighter duty machines can be just as effective.
Travis S
Oct 5, 2016 at 10:55 pm
If you had to guess how much would everything cost for this complete setup? Just the necessities tools and machines not the extra parts like ferrules, tape and etc?
Ryan Barath
Oct 6, 2016 at 1:10 am
from new you’re looking at probably close to $5000 but if going used like I did and if you are willing to invest some time in building a few things yourself you can do it for less than half.
Travis S
Oct 5, 2016 at 10:52 pm
What a great story I just started tinkering this year and installed a vice. I would kill for all that and appreciate your enthusiasm and modest cost effective setup. Keep up the good work!
Grizz01
Oct 5, 2016 at 10:17 pm
If you are building your own clubs and tinkering around. You don’t need all that crap.
KK
Oct 5, 2016 at 7:02 pm
Missing hotmelt setup. Otherwise absolutely fantastic.
Ryan Barath
Oct 5, 2016 at 9:25 pm
100%
I have used them many times before, but just like with the chop saw, I don’t want to buy a cheap one at the moment and I’m waiting to buy the champ model used on tour vans.
DJ
Oct 5, 2016 at 4:15 pm
Regarding dust collection systems. A really good club fitter I went too never had a vacuum system to control dust, specifically when cutting graphite shafts. He had to quit his business since all those years of breathing graphite led to him losing 40% lung capacity. Reason enough to invest in a high quality system if you are going to make this more than a hobby.
Ryan Barath
Oct 5, 2016 at 8:57 pm
Exactly!
Breathing in any sort of small particles for a long period of time is never good. Its the exact reason I do all of my finishing work and grind work in a proper metal shop, and with a dust mask.
John G
Oct 5, 2016 at 3:15 pm
Nice article for beginner but we know that when one starts repairing/rebuilding/building clubs from everywhere, tools and parts really-really add up fast.
When I started many years ago, most all my tools came from Mitchell and this or that special tool or part is always on going.
Steven
Oct 5, 2016 at 2:25 pm
Wow, that is an impressive setup. I don’t know if I want to build or alter clubs, but looking at the setup makes me want to try.
Blade Junkie
Oct 5, 2016 at 1:02 pm
You don’t know how lucky you are in the USA having big houses, basements and huge garages to put all this stuff. Many of us in the UK are making do with a 6′ x 3′ garden shed LOL.
Jason Thompson
Oct 5, 2016 at 10:58 am
I’m curious what large scale workshops you have built? I know the guys who did Modern Golf’s and you weren’t even employed there.
NFG
Oct 5, 2016 at 10:49 am
I want to be like this guy, sweet set up!! My work shop is small but I can do what I need to do.
alexdub
Oct 5, 2016 at 10:43 am
Great write-up! This is one of the better features from GolfWRX in a while. Who doesn’t love repair shop man caves>?
Ryan Barath
Oct 5, 2016 at 8:59 pm
Thanks!
This really was a subject I wanted to cover and share. I’m glad you like it.
Christopher
Oct 5, 2016 at 10:20 am
Can you share your plans you used for that bench ruler. I like that setup!
Ryan Barath
Oct 5, 2016 at 9:04 pm
Here’s the Link to my GolfWRX post from last year where I posted exactly how I made it.
http://www.golfwrx.com/forums/topic/1197824-my-very-easy-diy-bench-ruler-plans-why-spend-when-you-can-spend-and-be-accurate-home-shop-pics-incd/page__p__11807904__hl__+build%20+bench%20+ruler#entry11807904
RAT
Oct 5, 2016 at 10:02 am
Interesting , gone from just a little to making it a vocation. Start up – pick 3 of the most important, forget the small hand tools and etc.
Jim
Oct 5, 2016 at 9:59 am
Drill Press is a must for accurate, straight/tight hosel bores.
Tom
Oct 5, 2016 at 12:04 pm
amen to that
Tom
Oct 5, 2016 at 9:05 am
Great hobby to get involved in if your a serious golfer. I do it so that I can buy inexpensive sets of irons. Take measurements, make adjustments for junior player just starting he game.
David W.
Oct 5, 2016 at 8:23 am
Good stuff! Not going to build anything myself, but a great read.
Charlie
Oct 5, 2016 at 7:54 am
Were you seeing just how much you could bend a Mizuno MP T11 wedge before it snaps?
Ryan Barath
Oct 5, 2016 at 9:08 pm
I wasn’t sure someone would catch that or not.
It was a Mizuno wedge I bent completely flat: 0 LIE, 0 LOFT. I thought it was going to break when i did it but it just kept going. I actually have two, 1 is a paper weight (pictured) and the other is an assembled club that’s around 14″ long. It looks hilarious and is fun to try and hit a ball with.