Instruction
The 6 new rules of core training for golfers

There’s a myriad of different core exercises, a wealth of opinion on how to train the core and body of knowledge that has increased dramatically during the past decade or so and continues to grow, so it’s no wonder core training is a somewhat contentious and confused subject.
The problem with a lot of golfers’ core training stems from not understanding the anatomy and function of the core, and not utilizing proper progression strategies to actually improve core function over time. Static exercises like planks and side planks are great, but doing them for ever-increasing lengths of time in the name of progression invites fatigue and loses many of the benefits of the exercise with regard to muscle activation and spinal control. Hyper specific “core” exercises that mimic the golf swing may have a place, but if you don’t posses the segmental stabilization to execute them in the first place they aren’t going to do anything for you, and may even leave you worse off.
With that in mind, this article will be presenting the rules of core training I have developed and used with all the golfers I train. Live by these when training your core and you will move better (we need proximal stability to demonstrate distal mobility, so yes training your core can make you more flexible!), keep your spine healthier and generate more club head speed.
New Rule No. 1: Train the function of the core, not the anatomy, for back health and performance
The muscles of the core and lumbopelvic hip complex work in tandem to protect the spine, particularly your lumbar spine, which isn’t actually designed to move all that much. Most notably, these areas protect your spine during movements in the form of anti-rotation, anti-flexion and anti-extension.
Of course, we don’t want to avoid moving into rotation, flexion and extension at all costs during our daily lives or the golf swing. That’s not my point. However, spinal injury has been linked to the number of these moments we do so it make sense to:
- Not increase that number in the gym (particularly by doing sit-ups or crunches).
- Train to be strong in resisting these movements, which will reduce injury potential.
The work done by Dr. Stuart McGill proves this. By performing core training exercises that force your trunk and spine into excessive flexion (i.e., crunches and sit-ups), the facet joints and vertebral discs within your vertebral column take a beating. The same can be said for excessive extension.
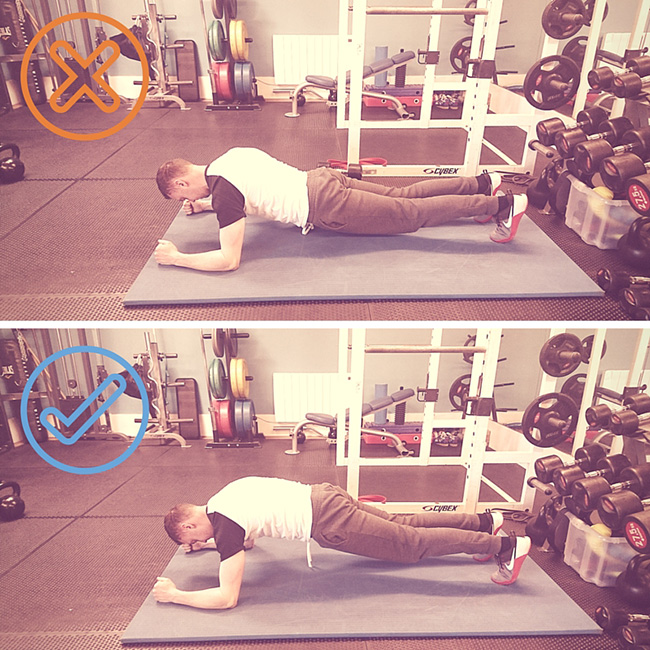
The standard front plank is a great anti-extension exercise, but you have to do it right. The aim of a plank should be to teach the core musculature to hold the spine in neutral posture where the spine, hips, and legs are linear, not arched or drooping. Common compensations are shrugging the ribs up, shrugging the hips up, rolling the shoulders or hips forward, or pretty much anything that’s not neutral.
A good front plank should make your glutes incredibly tired from forcibly making them contract so that your hip flexors stretch and the abs bite down harder. For most, this will also encourage a slightly posteriorly tilted pelvis to prevent them from setting up with hips low and anterior pelvic tilt.
New Rule No. 2: Earn the right to rotate
Power lives in the transverse plane. If you want to unleash strength, power and force, you must harness control of rotation. The keyword here is control: concentric and eccentric control. To put it another way, rotational stability ensures rotational forces are transferred effectively, thereby reducing energy leaks that slow down your swing.
As research from the aforementioned Stuart Mcgill shows, no core muscle has a primary vector for trunk rotation. Trunk rotation, and resisting it, are carried out by a blend of all core muscles. The abdominal obliques are primary drivers of torso rotation and anti-rotation, along with deep stabilizer muscles in the back. When you want to rotate to the right, you engage the left external oblique and the right internal oblique. Rotation to the left uses the right external oblique and the left internal oblique. They work as functional pairs.
As you know, the torso connects to the rest of the body (arms and legs), so you have cross-body connections from the gluteus maximus to the opposite side latissimus to generate force transmission on the posterior chain. This force transmission system is known as the posterior oblique subsystem and is a primary reason you can move your arms and legs together. This movement pattern sling is crucial to stabilization. Stability always precedes force production. When it doesn’t, you have decreased performance and become more vulnerable to injury.
Variations like Pallof presses and chops are obviously great for this, however, single-arm presses and pulls are hugely underrated in this regard. Utilizing half- and tall-kneeling positions are also great for dialing in that neutral pelvic and spine position so important for efficient power transfer. One of my favorites to tap into anti-rotation and the posterior chain connection is the tall-kneeling, single-arm cable pull.
New Rule No. 3: Master your breathing
Credit to Dean Somerset for putting me on to the importance of breathing techniques in both core work and performance.
A go-to response for many when doing core exercise is to hold their breath. While this isn’t a bad response per se, especially if they’re trying to use a valsalva to increase spinal stability during a movement like a deadlift, not being able to inhale and exhale in pace with an exercise can actually reduce the effectiveness of a core intensive exercise.
Additionally, the speed of breathing can dictate whether a movement is more of a relaxation or mobility movement, or whether the goal is speed and reactive capability development. In either case, being able to breathe through an entire set is vitally important to see the best potential improvements. For core control and stability exercises (planks, side planks, dead-bugs, etc.), I usually prescribe the exercise be done for 5 times with 3-5 second inhalations and 3-5 second exhalations rather than simply holding the position for 20 or 30 seconds. Try it. You’ll be amazed at the difference.
For speed and power work (see Rule 4), inhales are best with more of a sniffing action where air is taken in quickly and with some development of negative pressure through the ribs and abdomen, and exhaled forcefully and quickly. This short, sharp exhale causes the abdominal muscles to brace very hard and very quickly, this improves stiffness and therefore the efficiency of power transfer through the core.
Try this while you’re reading this article: Place a hand on your stomach and sniff in quickly through your nose and feel what the abdominal muscles do. Then exhale sharply through pursed lips, like you would if you were throwing a very crisp jab. Did you feel how hard the abs became for the second you inhaled and exhaled? That’s your power center.
New Rule No. 4: The glutes are also a part of the core
The ability to forcefully extend the hip, while maintaining position and neutral spine, is vital for efficiently generating and transferring force in the golf swing. The collective role of the glute muscles is to extend the hip, abduct (bring the leg away from the middle of your body), externally rotate and internally rotate the hip joint, all of which are involved in the golf swing so you can see how their function maybe important for golfers.
I am a big believer in the role of the glutes as the primary hip extender, allowing hip extension without losing neutral spine. The use of the lumbar spine, for example, to extend the hips can place the lumbar spine in a more compromised position, with the increased possibility of low back pain that accompanies this, while it also places the pelvis into anterior tilt and places the abs in a stretched position affecting their ability to transfer force. Utilizing the quadruped position teaches athletes to set the core and fire the glutes. Extrapolating this function and applying it to the golf swing is exactly what we want to accomplish.
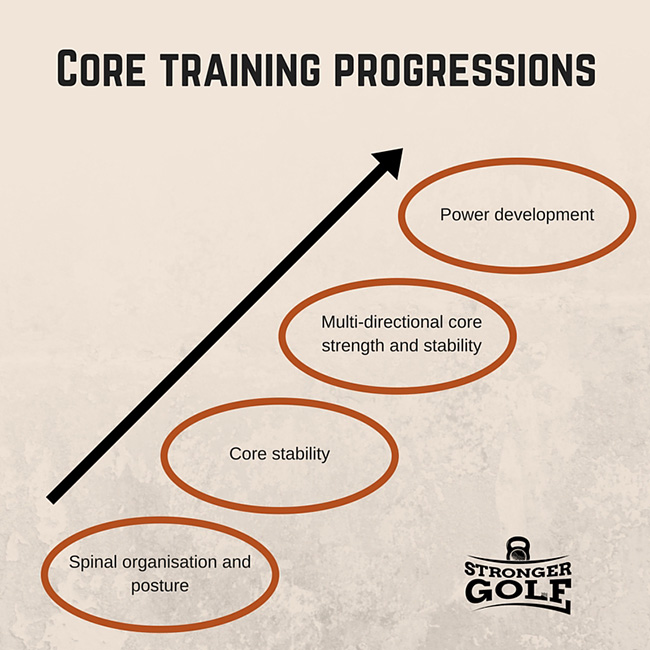
New Rule No. 5: Follow proper progression
First, you’ll want to organize your spine and find a posture that feels best for your body. These two areas are very important if your goal is to achieve a strong core that functions well.
Next, your goal should be to achieve proper core stability. If you can stabilize the muscles in your core in the presence of change (i.e., movement), then you’ll achieve a greater level of health and a happier lower back.
After that, it’s the right time to emphasize strengthening your core by adding forms of external resistance (i.e., medicine ball, resistance band, cable column, Valslides, etc.). When you have a good foundation of all of these elements, you can begin to add power and explosive movement patterns into your core training routines.
This progression is important, as it will help to bulletproof your spine for long-term health and performance. Let’s think about a basic core exercise, such as the Plank Hold. During this exercise, your job is to brace your core muscles, create full-body tension and to hold posture, while gravity and your bodyweight try to tell you otherwise. On a higher level, you’re performing an anti-extension exercise, where you’re deliberately trying to avoid spinal extension, specifically in the lumbar spine. Basically, you don’t want to let your hips dip down toward the floor.
In order for you to be able to properly perform all of this at the same time, it’s necessary for you to have core stability. That’s the key. That’s also why I believe it is imperative to learn how to stabilize your core before adding strength. Similarly, just like training any other movement, we want to develop strength and force production before we work on power and the ability to develop that force quickly. Be sure to master exercises at each stage before moving forward along the progression line.
New Rule No. 6: Core training should be vector, load and speed specific
This one piggy backs on the previous rule. Training movements like a Pallof press to overhead raise or half-kneeling cable chop that require the core to produce force or resist motion through transverse and frontal plane, is great for golf as the game is after all a multi-plane movement, and as such it make sense to train this way. However, all of this occurs in a relatively slow and controlled manner.
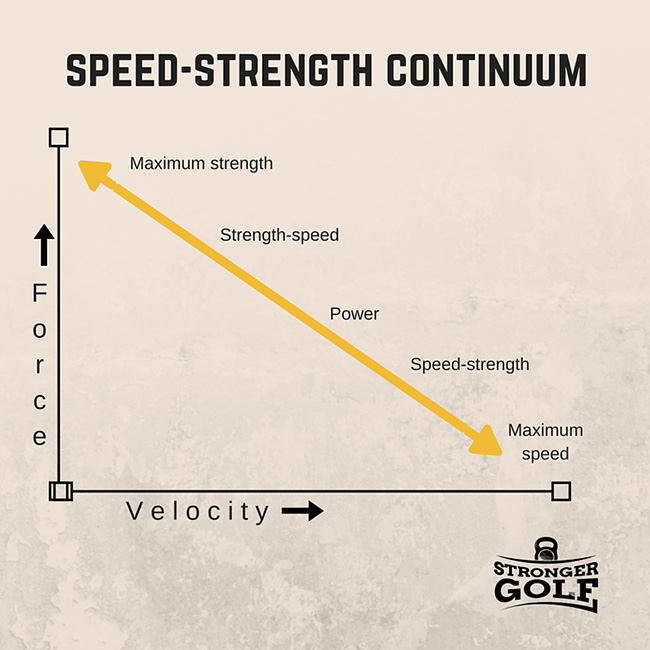
Athletes who compete in relatively specific directions and actions without the elements of contact and chaos (i.e. golf), can benefit from training with a high degree of specificity to their goal activities. Take a look at the speed/strength continuum (pictured below) and picture where golf sits in that continuum.
Hopefully, you would agree that golf makes most sense categorized as a high-speed, low-force activity (force most easily equates to load, i.e. how heavy the implement being used is, in this case the golf club). As such, it makes sense to train the core to perform at high velocity. Here are a few great options:
Once again, make sure you have mastered the earlier progressions before moving onto power work.
Closing Thoughts
Now, take a look at your current core training and ask are you:
- Training core function in a multi-directional manner?
- Earning the right to rotate?
- Utilizing breathing properly?
- Training the glutes, too?
- Following a good core training progressions?
- Does that progression end in a high-velocity, high-performance core?
If not, put some of the exercise and ideas discussed here into practice. And if you have any further questions feel free to post them in the comments section or drop me an email at [email protected].
- LIKE119
- LEGIT23
- WOW9
- LOL2
- IDHT8
- FLOP3
- OB8
- SHANK101
Instruction
The Wedge Guy: The easiest-to-learn golf basic
My golf learning began with this simple fact – if you don’t have a fundamentally sound hold on the golf club, it is practically impossible for your body to execute a fundamentally sound golf swing. I’m still a big believer that the golf swing is much easier to execute if you begin with the proper hold on the club.
As you might imagine, I come into contact with hundreds of golfers of all skill levels. And it is very rare to see a good player with a bad hold on the golf club. There are some exceptions, for sure, but they are very few and very far between, and they typically have beat so many balls with their poor grip that they’ve found a way to work around it.
The reality of biophysics is that the body moves only in certain ways – and the particulars of the way you hold the golf club can totally prevent a sound swing motion that allows the club to release properly through the impact zone. The wonderful thing is that anyone can learn how to put a fundamentally sound hold on the golf club, and you can practice it anywhere your hands are not otherwise engaged, like watching TV or just sitting and relaxing.
Whether you prefer an overlap, interlock or full-finger (not baseball!) grip on the club, the same fundamentals apply. Here are the major grip faults I see most often, in the order of the frequency:
Mis-aligned hands
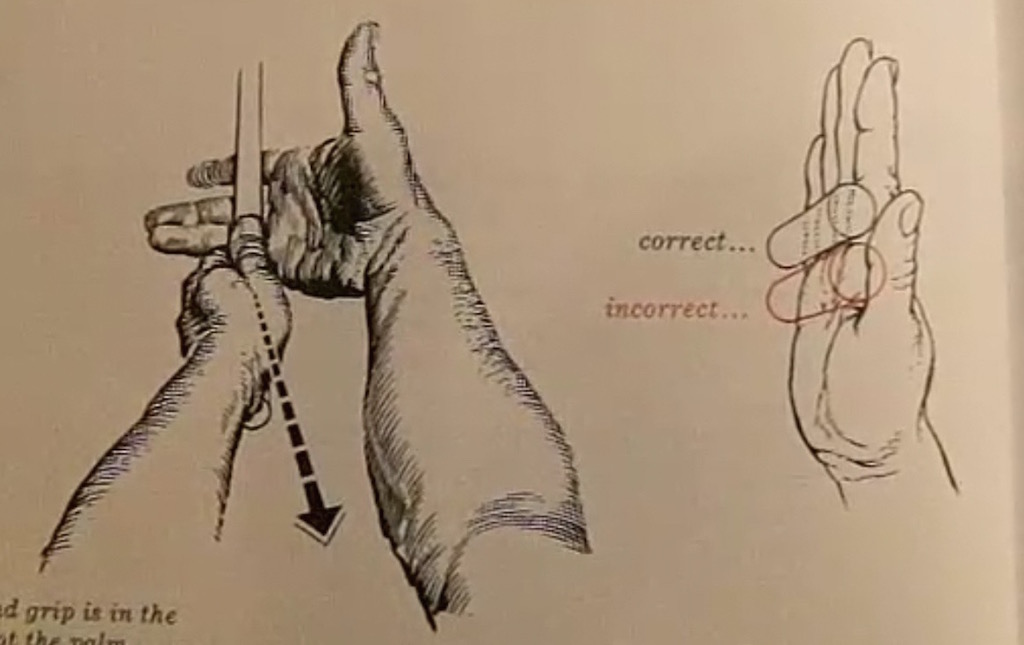
By this I mean that the palms of the two hands are not parallel to each other. Too many golfers have a weak left hand and strong right, or vice versa. The easiest way to learn how to hold the club with your palms aligned properly is to grip a plain wooden ruler or yardstick. It forces the hands to align properly and shows you how that feels. If you grip and re-grip a yardstick several times, then grip a club, you’ll see that the learning curve is almost immediate.
The position of the grip in the upper/left hand
I also observe many golfers who have the butt of the grip too far into the heel pad of the upper hand (the left hand for right-handed players). It’s amazing how much easier it is to release the club through the ball if even 1/4-1/2″ of the butt is beyond the left heel pad. Try this yourself to see what I mean. Swing the club freely with just your left hand and notice the difference in its release from when you hold it at the end of the grip, versus gripping down even a half inch.
To help you really understand how this works, go to the range and hit shots with your five-iron gripped down a full inch to make the club the same length as your seven-iron. You will probably see an amazing shot shape difference, and likely not see as much distance loss as you would expect.
Too much lower (right) hand on the club
It seems like almost all golfers of 8-10 handicap or higher have the club too far into the palm of the lower hand, because that feels “good” if you are trying to control the path of the clubhead to the ball. But the golf swing is not an effort to hit at the ball – it is a swing of the club. The proper hold on the club has the grip underneath the pad at the base of the fingers. This will likely feel “weak” to you — like you cannot control the club like that. EXACTLY. You should not be trying to control the club with your lower/master hand.
Gripping too tightly
Nearly all golfers hold the club too tightly, which tenses up the forearms and prevents a proper release of the club through impact. In order for the club to move back and through properly, you must feel that the club is controlled by the last three fingers of the upper hand, and the middle two fingers of the lower hand. If you engage your thumbs and forefingers in “holding” the club, the result will almost always be a grip that is too tight. Try this for yourself. Hold the club in your upper hand only, and squeeze firmly with just the last three fingers, with the forefinger and thumb off the club entirely. You have good control, but your forearms are not tense. Then begin to squeeze down with your thumb and forefinger and observe the tensing of the entire forearm. This is the way we are made, so the key to preventing tenseness in the arms is to hold the club very lightly with the “pinchers” — the thumbs and forefingers.
So, those are what I believe are the four fundamentals of a good grip. Anyone can learn them in their home or office very quickly. There is no easier way to improve your ball striking consistency and add distance than giving more attention to the way you hold the golf club.
More from the Wedge Guy
- The Wedge Guy: Golf mastery begins with your wedge game
- The Wedge Guy: Why golf is 20 times harder than brain surgery
- The Wedge Guy: Musings on the golf ball rollback
- LIKE84
- LEGIT13
- WOW5
- LOL1
- IDHT0
- FLOP4
- OB1
- SHANK8
Instruction
Clement: Stop ripping off your swing with this drill!

Not the dreaded headcover under the armpit drill! As if your body is defective and can’t function by itself! Have you seen how incredible the human machine is with all the incredible feats of agility all kinds of athletes are accomplishing? You think your body is so defective (the good Lord is laughing his head off at you) that it needs a headcover tucked under the armpit so you can swing like T-Rex?
- LIKE0
- LEGIT2
- WOW2
- LOL0
- IDHT0
- FLOP0
- OB0
- SHANK2
Instruction
How a towel can fix your golf swing
This is a classic drill that has been used for decades. However, the world of marketed training aids has grown so much during that time that this simple practice has been virtually forgotten. Because why teach people how to play golf using everyday items when you can create and sell a product that reinforces the same thing? Nevertheless, I am here to give you helpful advice without running to the nearest Edwin Watts or adding something to your Amazon cart.
For the “scoring clubs,” having a solid connection between the arms and body during the swing, especially through impact, is paramount to creating long-lasting consistency. And keeping that connection throughout the swing helps rotate the shoulders more to generate more power to help you hit it farther. So, how does this drill work, and what will your game benefit from it? Well, let’s get into it.
Setup
You can use this for basic chip shots up to complete swings. I use this with every club in my bag, up to a 9 or 8-iron. It’s natural to create incrementally more separation between the arms and body as you progress up the set. So doing this with a high iron or a wood is not recommended.
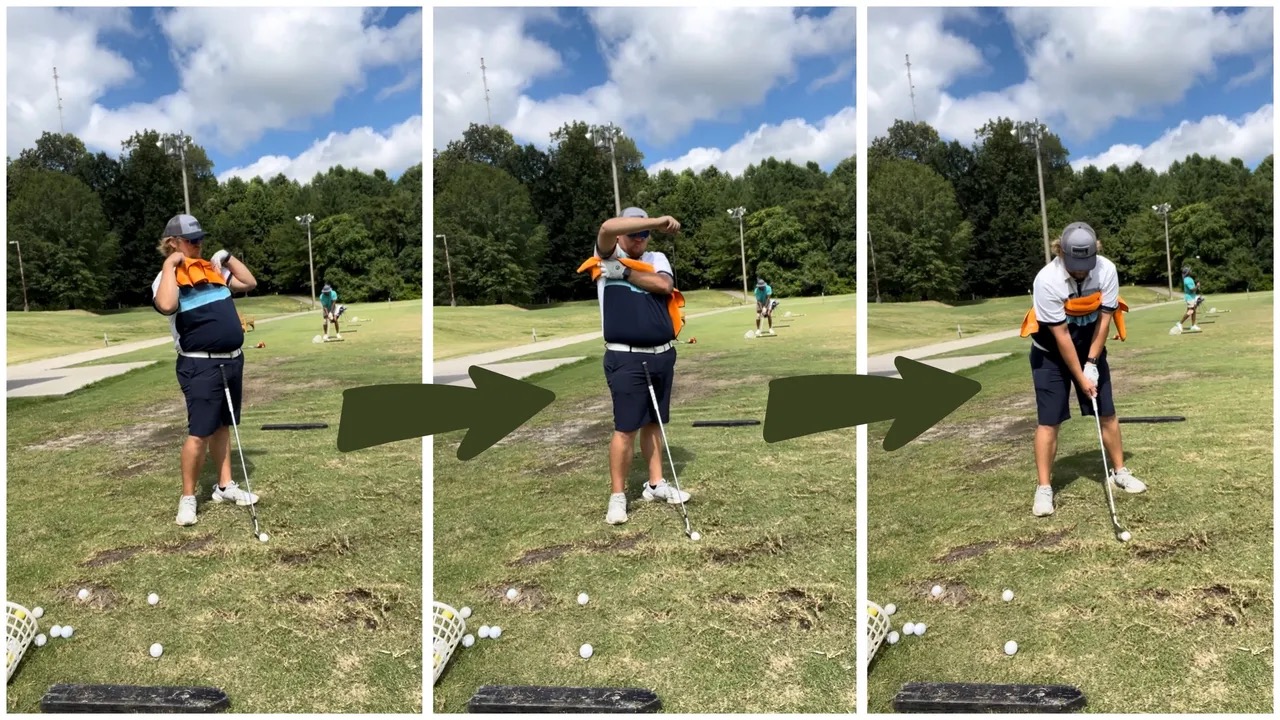
While you set up to hit a ball, simply tuck the towel underneath both armpits. The length of the towel will determine how tight it will be across your chest but don’t make it so loose that it gets in the way of your vision. After both sides are tucked, make some focused swings, keeping both arms firmly connected to the body during the backswing and follow through. (Note: It’s normal to lose connection on your lead arm during your finishing pose.) When you’re ready, put a ball in the way of those swings and get to work.
Get a Better Shoulder Turn
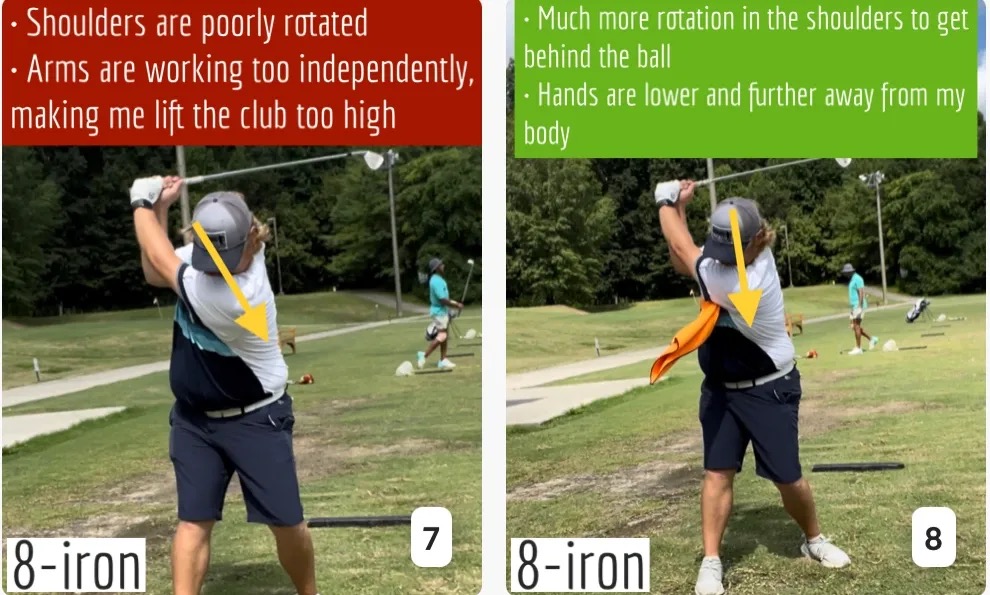
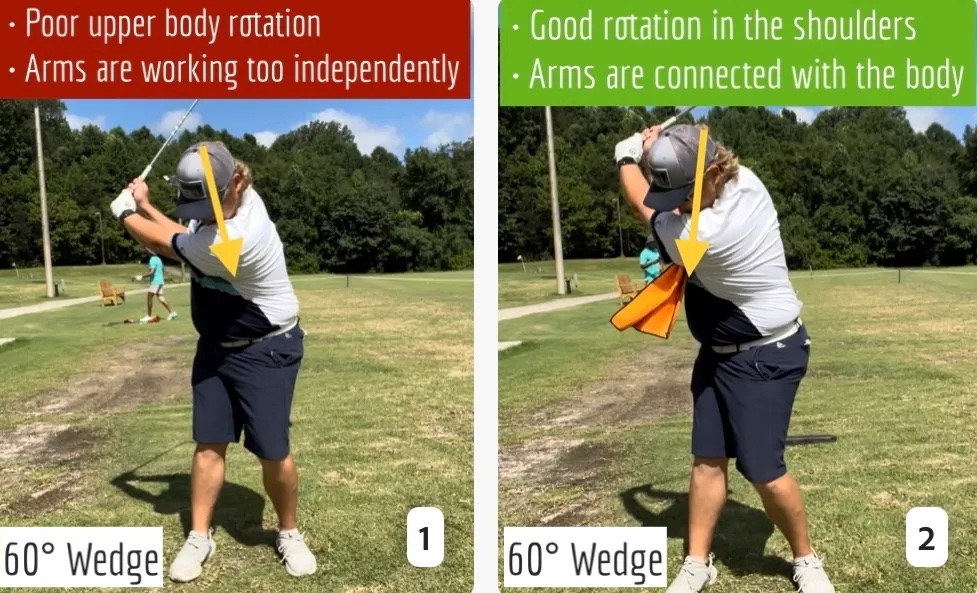
Many of us struggle to have proper shoulder rotation in our golf swing, especially during long layoffs. Making a swing that is all arms and no shoulders is a surefire way to have less control with wedges and less distance with full swings. Notice how I can get in a similar-looking position in both 60° wedge photos. However, one is weak and uncontrollable, while the other is strong and connected. One allows me to use my larger muscles to create my swing, and one doesn’t. The follow-through is another critical point where having a good connection, as well as solid shoulder rotation, is a must. This drill is great for those who tend to have a “chicken wing” form in their lead arm, which happens when it becomes separated from the body through impact.
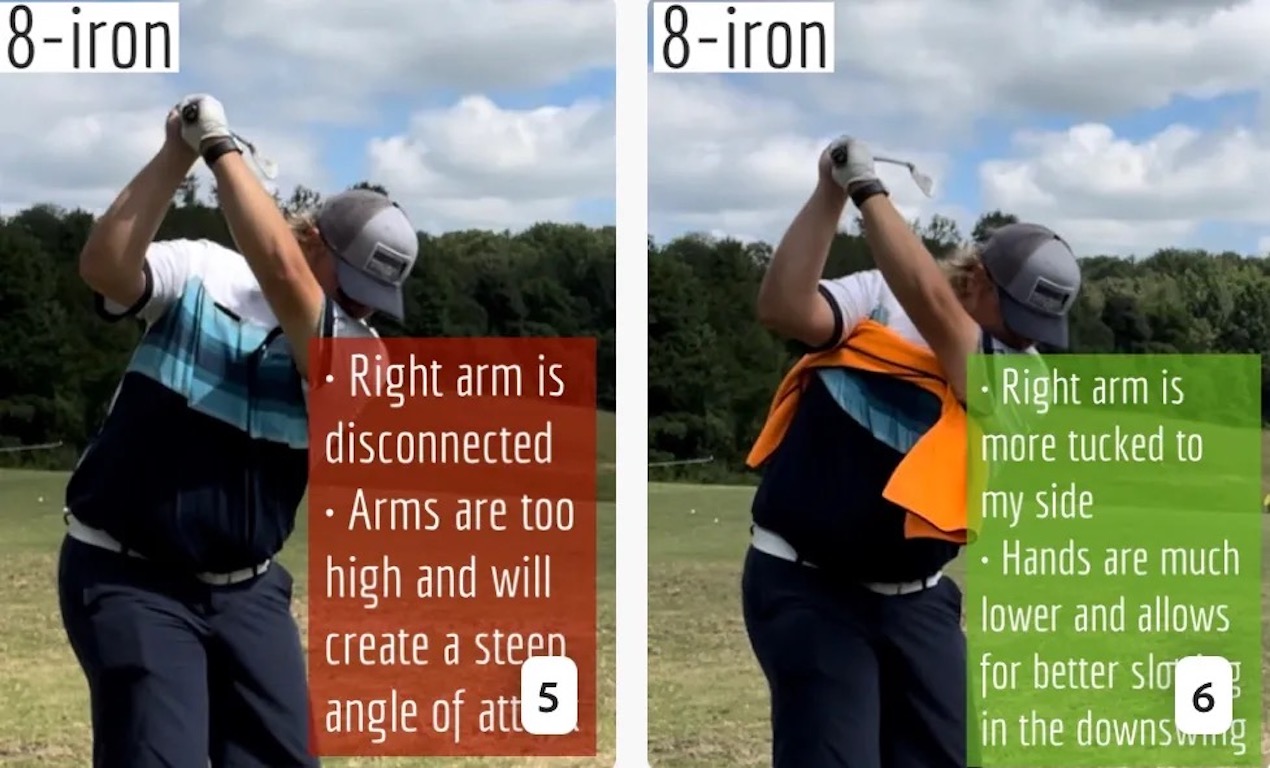
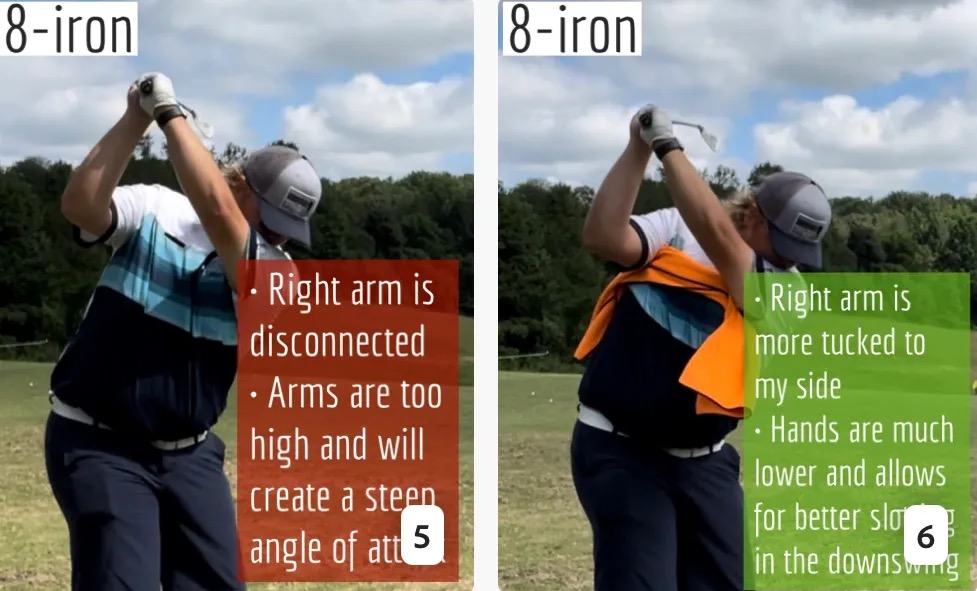
In full swings, getting your shoulders to rotate in your golf swing is a great way to reinforce proper weight distribution. If your swing is all arms, it’s much harder to get your weight to naturally shift to the inside part of your trail foot in the backswing. Sure, you could make the mistake of “sliding” to get weight on your back foot, but that doesn’t fix the issue. You must turn into your trial leg to generate power. Additionally, look at the difference in separation between my hands and my head in the 8-iron examples. The green picture has more separation and has my hands lower. This will help me lessen my angle of attack and make it easier to hit the inside part of the golf ball, rather than the over-the-top move that the other picture produces.
Stay Better Connected in the Backswing
When you don’t keep everything in your upper body working as one, getting to a good spot at the top of your swing is very hard to do. It would take impeccable timing along with great hand-eye coordination to hit quality shots with any sort of regularity if the arms are working separately from the body.
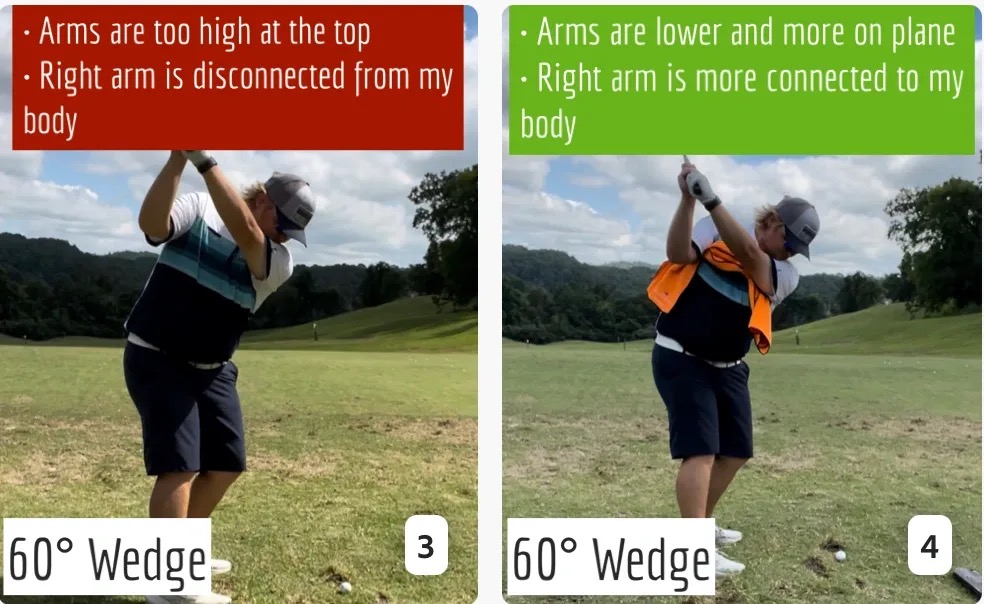
Notice in the red pictures of both my 60-degree wedge and 8-iron how high my hands are and the fact you can clearly see my shoulder through the gap in my arms. That has happened because the right arm, just above my elbow, has become totally disconnected from my body. That separation causes me to lift my hands as well as lose some of the extension in my left arm. This has been corrected in the green pictures by using this drill to reinforce that connection. It will also make you focus on keeping the lead arm close to your body as well. Because the moment either one loses that relationship, the towel falls.
Conclusion
I have been diligent this year in finding a few drills that target some of the issues that plague my golf game; either by simply forgetting fundamental things or by coming to terms with the faults that have bitten me my whole career. I have found that having a few drills to fall back on to reinforce certain feelings helps me find my game a little easier, and the “towel drill” is most definitely one of them.
- LIKE12
- LEGIT2
- WOW2
- LOL0
- IDHT0
- FLOP2
- OB0
- SHANK8
-

 19th Hole6 days ago
Dave Portnoy places monstrous outright bet for the 2024 Masters
-

 19th Hole2 weeks ago
Things got heated at the Houston Open between Tony Finau and Alejandro Tosti. Here’s why
-

 19th Hole7 days ago
Tiger Woods arrives at 2024 Masters equipped with a putter that may surprise you
-

 19th Hole2 weeks ago
Report: Tiger Woods has ‘eliminated sex’ in preparation for the 2024 Masters
-
 19th Hole1 day ago
Two star names reportedly blanked Jon Rahm all week at the Masters
-

 19th Hole2 weeks ago
Addiction, spinal fusion, and scam artists – Everything Anthony Kim revealed in candid interview with David Feherty
-

 19th Hole2 weeks ago
Anthony Kim says doctors told him that he ‘may not have much time left’ ahead of LIV return
-

 19th Hole1 week ago
Brooks Koepka and Sergio Garcia make significant equipment changes as 2024 Masters looms





Rob Pearse
Jul 5, 2016 at 2:52 pm
Excellent info. Luckily my education allows me to understand it, where most cannot. High level info for people with the appropriate background. Very difficult for the vast majority of golfers to understand, unfortunately.
But I loved it.
Jam
Jul 4, 2016 at 2:09 pm
I’d love to see pics or a video of separate moves I should be doing
Ma
Jul 6, 2016 at 12:18 pm
Somebody lock him and lose the key
MaxClubheadSpeed
Jul 15, 2016 at 12:05 pm
I’d like to kiss her abs!
8thehardway
Jul 4, 2016 at 10:25 am
I don’t have the vocabulary for this… may I suggest expanding each rule into a separate article that provide layman-friendly explanations and perhaps an illustration showing where in the swing a particular Rule targets?
chisag
Jul 4, 2016 at 11:35 am
“As you know, the torso connects to the rest of the body (arms and legs), so you have cross-body connections from the gluteus maximus to the opposite side latissimus to generate force transmission on the posterior chain. This force transmission system is known as the posterior oblique subsystem and is a primary reason you can move your arms and legs together. This movement pattern sling is crucial to stabilization. Stability always precedes force production. When it doesn’t, you have decreased performance and become more vulnerable to injury.”
Seems like valuable information. A translation to English would be very welcome.
George
Jul 4, 2016 at 10:00 am
100 bucks a month to get some videos?! Talk about a rip off
M. Blum
Jul 4, 2016 at 9:45 am
Thank you for writing an article that actually says something. I usually just scan fitness articles, since so many of them say the same thing. But, when I saw your mention of Dr. McGill, I stopped and paid attention.
Keep up the great work and please do continue writing.
Ronald Montesano
Jul 4, 2016 at 7:38 am
I think the reason for so many “shank” votes is the dearth of imagery. With so much informative theory, a balance needs to be struck with exercise examples and photos/video of the exercises/movements/positions. I’m quite intrigued and look forward to follow-up articles.
Equipo
Jul 8, 2016 at 9:15 am
Word
KK
Jul 3, 2016 at 8:07 pm
Very technical but very informative. Thank you. I am amazed so many people dislike information that is useful for becoming a more fit and better golfer.