Instruction
Game of the Weekend: Drawback

Most golfers regularly suffer from the inability to take their game from the practice area to the course. Why is this? Why can they hit it, chip it or putt it so great when practicing, but struggle once they set foot on the course? To answer this question, we first need to understand what most golfers are experiencing when they’re on the course.
Common answers include:
- I only get one try.
- I’m thinking about my score too much.
- There’s a consequence to a bad shot.
- I get too mechanical.
- I experience different lies on the course.
- I feel a lot of pressure.
After reading that list, it may be more obvious why practice is easy and playing well on the golf course is a different story. It also makes sense that those who perform better on the course bring the elements of variability, consequence, pressure and score to their practice sessions.
“How do you prepare for such pressure-packed situations like the Ryder Cup?” Ian Poulter, Europe’s most clutch Ryder Cup player, was asked. His answer: “Everything is a game.” He, too, turns his practice sessions into competitive, game-like situations.
My name is Trent Wearner, and I’m the author of a new GolfWRX series called “Game of the Weekend” that I know will help you shoot lower scores. I’m going to introduce you to a great new golf game every Friday, and you can take my training further by logging your scores into an interactive practice website called www.golfscrimmages.com. There you can find a couple dozen games for every area of the game that will help you make practice as difficult as, or even more challenging than what you experience on the golf course.
Game of the Weekend: Drawback
- Gear needed: A putter and one ball. Ball marker is encouraged.
- Time needed: About 15 minutes to play one round.
If Drawback was the only putting game you ever practiced, you would become a fantastic pressure putter from all distances.
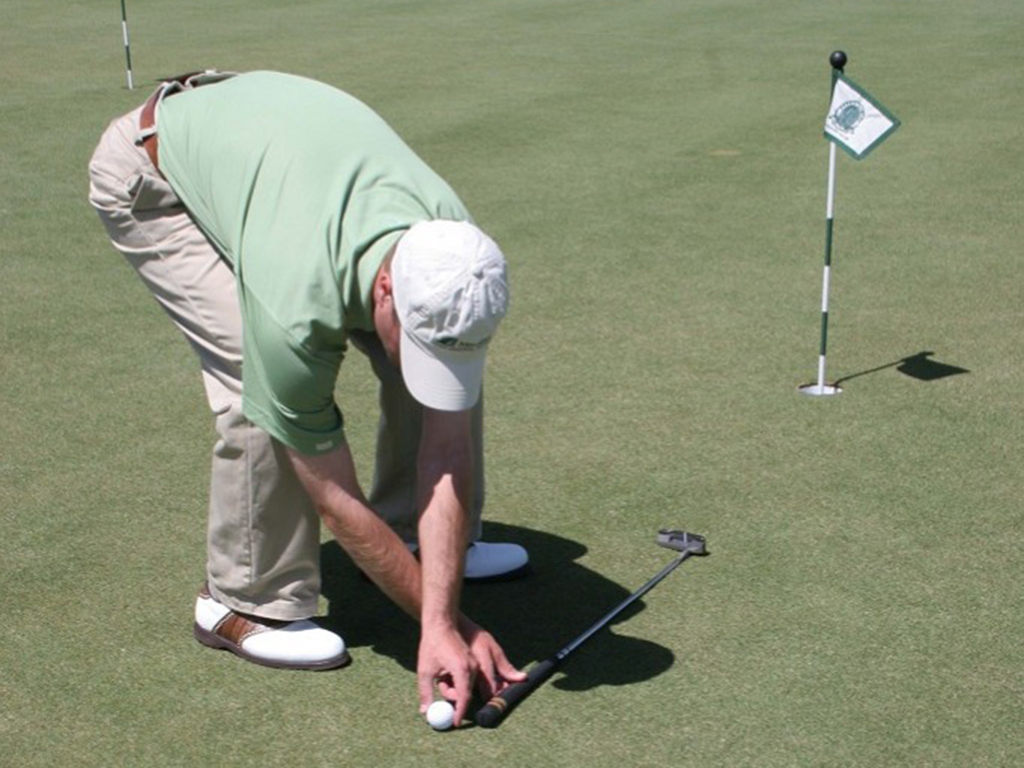
The Rules: You will play 9 holes of this putting game. The first hole should be from 20 feet away, the second hole from 30 feet away, and the third from 40 feet away. Then repeat that process an additional two times for a total of 9 holes. If your first putt goes in the cup on each hole, you record a score of one. If it doesn’t go in, you must draw the ball back one putter length. (Note: Those of you who use a long putter or belly putter should only draw it back 3 feet). If that putt goes in, you score a 2. If it misses, you must draw the ball back one putter length again, continuing in this same manner until the ball is holed. Total the number of putts it takes you on all nine holes and enter that score.
The Benefits: Here’s what this game helps you with.
- On the first putt of each hole, your mindset will soon change from “a good lag putt is acceptable” to “I want to hole this first putt.” Trust me, you won’t want to fiddle with all of the drawing back business. The mentality of striving to hole putts instead of just getting them close is a big step to lowering your scores.
- Odds are that you won’t be able to make the majority of your 20-, 30- and 40-foot putts, so it’s inevitable that you will have a large number of pressure-packed short putts from 3-8 feet and that’s where you’ll gain ice in your veins.
- By playing this game often, you’ll become accustomed to drawing it back after your first putt. When you get on the course and don’t have to draw it back, however, the on-course play will feel so much easier. And when the course feels easier than the practice area, you know you’re doing something great for your game!
For this game, I encourage golfers to go through their entire pre-shot routine before every putt. Depending on your routine, that probably means marking your ball, reading the putt and taking a certain amount of practice strokes. Remember, we want this drill to feel just like putts on the golf course.
Have fun getting better this weekend!
More Games
- Game of the Weekend: 100
- Game of the Weekend: Go Low
- Game of the Weekend: Chipping Median
- Game of the Weekend: 18 holes of up-and-down… with a twist
- LIKE81
- LEGIT6
- WOW1
- LOL4
- IDHT3
- FLOP2
- OB1
- SHANK4
Instruction
Clement: Laid-off or perfect fade? Across-the-line or perfect draw?

Some call the image on the left laid off, but if you are hitting a fade, this could be a perfect backswing for it! Same for across the line for a draw! Stop racking your brain with perceived mistakes and simply match backswing to shot shape!
- LIKE0
- LEGIT0
- WOW0
- LOL0
- IDHT0
- FLOP0
- OB0
- SHANK0
Instruction
The Wedge Guy: The easiest-to-learn golf basic

My golf learning began with this simple fact – if you don’t have a fundamentally sound hold on the golf club, it is practically impossible for your body to execute a fundamentally sound golf swing. I’m still a big believer that the golf swing is much easier to execute if you begin with the proper hold on the club.
As you might imagine, I come into contact with hundreds of golfers of all skill levels. And it is very rare to see a good player with a bad hold on the golf club. There are some exceptions, for sure, but they are very few and very far between, and they typically have beat so many balls with their poor grip that they’ve found a way to work around it.
The reality of biophysics is that the body moves only in certain ways – and the particulars of the way you hold the golf club can totally prevent a sound swing motion that allows the club to release properly through the impact zone. The wonderful thing is that anyone can learn how to put a fundamentally sound hold on the golf club, and you can practice it anywhere your hands are not otherwise engaged, like watching TV or just sitting and relaxing.
Whether you prefer an overlap, interlock or full-finger (not baseball!) grip on the club, the same fundamentals apply. Here are the major grip faults I see most often, in the order of the frequency:
Mis-aligned hands
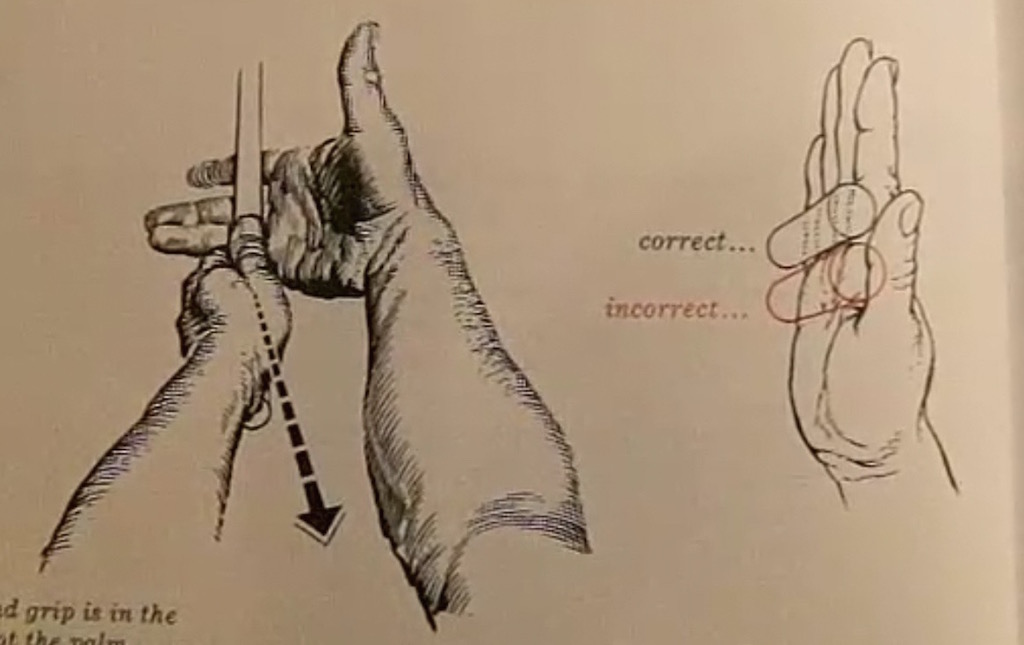
By this I mean that the palms of the two hands are not parallel to each other. Too many golfers have a weak left hand and strong right, or vice versa. The easiest way to learn how to hold the club with your palms aligned properly is to grip a plain wooden ruler or yardstick. It forces the hands to align properly and shows you how that feels. If you grip and re-grip a yardstick several times, then grip a club, you’ll see that the learning curve is almost immediate.
The position of the grip in the upper/left hand
I also observe many golfers who have the butt of the grip too far into the heel pad of the upper hand (the left hand for right-handed players). It’s amazing how much easier it is to release the club through the ball if even 1/4-1/2″ of the butt is beyond the left heel pad. Try this yourself to see what I mean. Swing the club freely with just your left hand and notice the difference in its release from when you hold it at the end of the grip, versus gripping down even a half inch.
To help you really understand how this works, go to the range and hit shots with your five-iron gripped down a full inch to make the club the same length as your seven-iron. You will probably see an amazing shot shape difference, and likely not see as much distance loss as you would expect.
Too much lower (right) hand on the club
It seems like almost all golfers of 8-10 handicap or higher have the club too far into the palm of the lower hand, because that feels “good” if you are trying to control the path of the clubhead to the ball. But the golf swing is not an effort to hit at the ball – it is a swing of the club. The proper hold on the club has the grip underneath the pad at the base of the fingers. This will likely feel “weak” to you — like you cannot control the club like that. EXACTLY. You should not be trying to control the club with your lower/master hand.
Gripping too tightly
Nearly all golfers hold the club too tightly, which tenses up the forearms and prevents a proper release of the club through impact. In order for the club to move back and through properly, you must feel that the club is controlled by the last three fingers of the upper hand, and the middle two fingers of the lower hand. If you engage your thumbs and forefingers in “holding” the club, the result will almost always be a grip that is too tight. Try this for yourself. Hold the club in your upper hand only, and squeeze firmly with just the last three fingers, with the forefinger and thumb off the club entirely. You have good control, but your forearms are not tense. Then begin to squeeze down with your thumb and forefinger and observe the tensing of the entire forearm. This is the way we are made, so the key to preventing tenseness in the arms is to hold the club very lightly with the “pinchers” — the thumbs and forefingers.
So, those are what I believe are the four fundamentals of a good grip. Anyone can learn them in their home or office very quickly. There is no easier way to improve your ball striking consistency and add distance than giving more attention to the way you hold the golf club.
More from the Wedge Guy
- The Wedge Guy: Golf mastery begins with your wedge game
- The Wedge Guy: Why golf is 20 times harder than brain surgery
- The Wedge Guy: Musings on the golf ball rollback
- LIKE86
- LEGIT13
- WOW6
- LOL1
- IDHT0
- FLOP4
- OB1
- SHANK8
Instruction
Clement: Stop ripping off your swing with this drill!

Not the dreaded headcover under the armpit drill! As if your body is defective and can’t function by itself! Have you seen how incredible the human machine is with all the incredible feats of agility all kinds of athletes are accomplishing? You think your body is so defective (the good Lord is laughing his head off at you) that it needs a headcover tucked under the armpit so you can swing like T-Rex?
- LIKE0
- LEGIT2
- WOW2
- LOL0
- IDHT0
- FLOP0
- OB0
- SHANK2
-

 19th Hole2 weeks ago
Dave Portnoy places monstrous outright bet for the 2024 Masters
-

 19th Hole3 days ago
Justin Thomas on the equipment choice of Scottie Scheffler that he thinks is ‘weird’
-

 19th Hole2 weeks ago
Tiger Woods arrives at 2024 Masters equipped with a putter that may surprise you
-

 19th Hole3 days ago
‘Absolutely crazy’ – Major champ lays into Patrick Cantlay over his decision on final hole of RBC Heritage
-

 19th Hole3 weeks ago
Report: Tiger Woods has ‘eliminated sex’ in preparation for the 2024 Masters
-

 19th Hole1 week ago
Two star names reportedly blanked Jon Rahm all week at the Masters
-

 19th Hole1 week ago
Report: LIV Golf identifies latest star name they hope to sign to breakaway tour
-

 19th Hole1 week ago
Neal Shipley presser ends in awkward fashion after reporter claims Tiger handed him note on 8th fairway


JR
Aug 31, 2015 at 9:50 am
Good Stuff! I will be using this next time I take some students outside. Been looking for new/interesting short game drills.
Brian
Aug 24, 2015 at 10:49 pm
Played this a lot as a kid but we played if you are short any distance you draw it back, but if you were with in the leather past the hole you didn’t move the ball, anything outside the leather past the hole got drawn back as well. Great drill to help with the weight and line of you putts.
rymail00
Aug 21, 2015 at 10:53 pm
Trent,
I really like the concept of this game/drill. It sounds fun and I’m looking forward to more articles and games/drills. I enjoy practicing as much as playing. So I’m always looking open to drills to keep it fun and productive.
Keep’em coming!
Ryan
Trent Wearner
Aug 22, 2015 at 7:40 am
Thanks Ryan – we’ll definitely be adding more over the coming weeks. Enjoy!
Chance
Aug 21, 2015 at 12:58 pm
I like the idea of this article. Seems like a great drill! Cant wait to see more!
Ryan K
Aug 21, 2015 at 12:49 pm
This seems like a really great idea, I’ll try it out!
Adam
Aug 21, 2015 at 11:11 am
I’m definitely going to give this game a go!