Instruction
Three common swing faults: The hunched setup posture

I work in a busy golf Australian golf academy, so I get to train with a lot of different golfers who come to us for instruction. They vary greatly in abilities, and range from professionals to plus-figure handicaps all the way to rank beginners. And while it’s true that everyone is an individual and no two swings are the same, I do tend to see some of the same patterns over and over again from golfers, regardless of their golfing ability and body shape.
This article is the first of a three-part series that focuses on three common swing faults, and what golf fitness experts like me can do to fix them.
The Issue: Hunched Setup Posture
While a hunched setup posture is not swing fault in itself, it causes so many poor movements that it simply has to be included. Hunched posture basically consists of a combination of a forward head position, forward and inwardly rotated shoulders and a rounded upper back. It is becoming more frequent and starting at much younger ages due to long periods of time with a fixed focus on phones and computer screens.
The Fix: Release and Activation Exercises
We target the tight muscles that are dragging the posture forward — pecs, biceps, abdominals — with a combo of massage therapy, spiky ball release (self massage) and stretching. Once these muscles have been loosened up, we look to activate the essential postural muscles that were switched off: upper back muscles, lumbar erector spinae, deep neck flexors and deep core. We do this by using activation drills that can be done at home with minimal equipment and double up as a great pre-round warm up.
What we mean by the muscle “switching off” is that the neural connection between brain and muscle has been under-utilized and control of the muscle is far from ideal. This results in being literally unable to use that muscle for the purpose for which it was intended, in this case holding us in good posture.
For the majority of the exercises we prescribe we use the Ramsay Posture Belt (above), a great bit of kit that allows us to get into good posture and then make small but very rapid muscle activations and reopen that neural pathway back to the brain. That makes us more aware of those key postural muscles and more likely to use them during setup and swing. Many of the postural exercises we use involve going through the levels of 33, 66, 99. Here is a basic explanation as to what that means exactly:
The late Ramsay McMaster developed the 33-66-99 principle as a guideline for intensity. He believed it could be applied as a philosophy to everything from your energy levels, pre-round warm up and golf swing tempo out on the course.
“It’s about making people aware of their energy levels as well as their feels, range of movement, endurance and body controls,” Ramsay said. “If 99 percent is your peak and when you feel sharp, then 33 percent is when you feel sluggish, tired and fatigued physically.”
My understanding and interpretation when applying the principle to posture exercises and golf movement pattern drills is to consider 33-66-99 as three different levels. “33” is like the start level, doing the movements slowly and really concentrating on using good technique and learning the exercise. Golfers can move to “66” once they have mastered 33 and are able speed the movement up and use more intensity while still holding good form and posture, thus increasing bio feedback and gaining more awareness of key areas in your body. “99” is where golfers are working at near maximum intensity and speed, and looking to really fire up their golf body “feels” and ingrain the movement pattern into muscle memory.
Check out this mini program of release and activation drills to help you with your posture and set up!
Equipment Needed
- Ramsay Posture Belt: The ultimate tool for training golf posture and movement patterns.
- Spikey Ball: Versatile self massage and release tool.
- Knee Band: Can be used around the knee, ankle or foot to activate and strengthen glute muscles.
Note: All product are available from http://www.randallfitsystems.com/content/products
Here are some alternatives you might find lying around at home that you can substitute for the recommended products. They are not as effective, but adequate for lower-level exercises.
- For the Ramsay Posture Belt, golfers can substitute a resistance band or theraband tubing.
- For the Spiky Ball, golfers can substitute a tennis ball, cricket ball or golf ball.
- For the knee Band, golfers can substitute a resistance band tied in a loop.
The Program
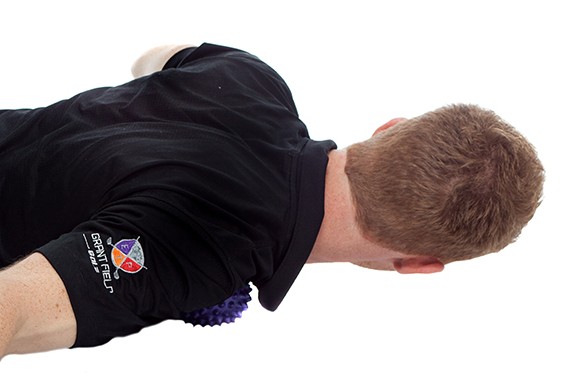
- Self-Massage Pec: 30 seconds each side
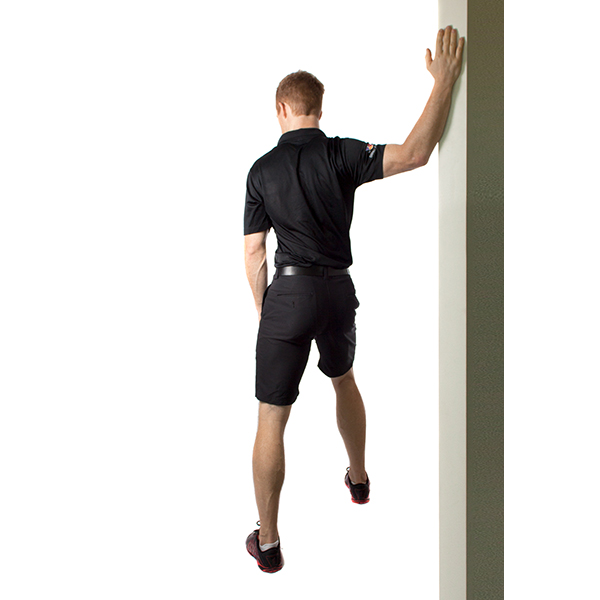
- Bent Arm Chest Stretch: 30 seconds each side
- Wall Initial Posture Drill: 45 seconds
- Setup Posture Drill: 45 seconds
Perform the four exercises as a circuit, doing three sets of each with 20 seconds rest between exercises.
No. 1: Self-Massage Pec
Purpose
- Reduce muscle tension/increase range of motion.
Positioning
- You are lying face down.
- Position spikey ball under pectoral muscle close to shoulder.
- Elevate that same arm.
Form
- Slowly move the ball around on you find sore spot. Stay on it until pain reduces.
- Move on to the next spot.
- Spend no more than 2 minutes on one spot.
Tips
- Try to differentiate between “good” and “bad” pain. Good pain will reduce after 10-to-30 seconds. Bad pain will feel sharp and not reduce at all.
- Lift the hips slightly off the floor to add more pressure through the pectoral.
No. 2: Bent Arm Chest Stretch
Purpose
- Stretches pec major and internal rotators.
Positioning
- Facing away from anchor (doorway,wall, strap).
Form
- Step away from anchor point with arms in 90-90 position.
- Push torso forward and away.
- Aim for externally rotated position.
- Feel stretch in chest and under armpit.
Trainer Tips
- Watch for the rib cage lifting up.
No. 3: Wall Initial Posture Drill
Purpose
- Initial stage of exercises for development of postural awareness.
Positioning
- Posture belt, knee band.
- Stand with your back against the wall.
- Hands and arms in front position.
Form
- Stomp and pulse working through three speeds 33-99.
Tips
- Watch head position, retract chin.
No. 4: Set Up Posture Drill
Purpose
- Initial stage of exercises for development of postural awareness.
Positioning
- Posture belt, knee band.
- In setup position.
- Hands and arms in front loop.
Form
- Stomp and pulse working through three speeds 33-99.
- Maintain posture.
Tips
- Watch head position, retract chin.
- Check form in mirror.
- LIKE7
- LEGIT1
- WOW1
- LOL0
- IDHT1
- FLOP0
- OB0
- SHANK7
Instruction
The Wedge Guy: The easiest-to-learn golf basic
My golf learning began with this simple fact – if you don’t have a fundamentally sound hold on the golf club, it is practically impossible for your body to execute a fundamentally sound golf swing. I’m still a big believer that the golf swing is much easier to execute if you begin with the proper hold on the club.
As you might imagine, I come into contact with hundreds of golfers of all skill levels. And it is very rare to see a good player with a bad hold on the golf club. There are some exceptions, for sure, but they are very few and very far between, and they typically have beat so many balls with their poor grip that they’ve found a way to work around it.
The reality of biophysics is that the body moves only in certain ways – and the particulars of the way you hold the golf club can totally prevent a sound swing motion that allows the club to release properly through the impact zone. The wonderful thing is that anyone can learn how to put a fundamentally sound hold on the golf club, and you can practice it anywhere your hands are not otherwise engaged, like watching TV or just sitting and relaxing.
Whether you prefer an overlap, interlock or full-finger (not baseball!) grip on the club, the same fundamentals apply. Here are the major grip faults I see most often, in the order of the frequency:
Mis-aligned hands
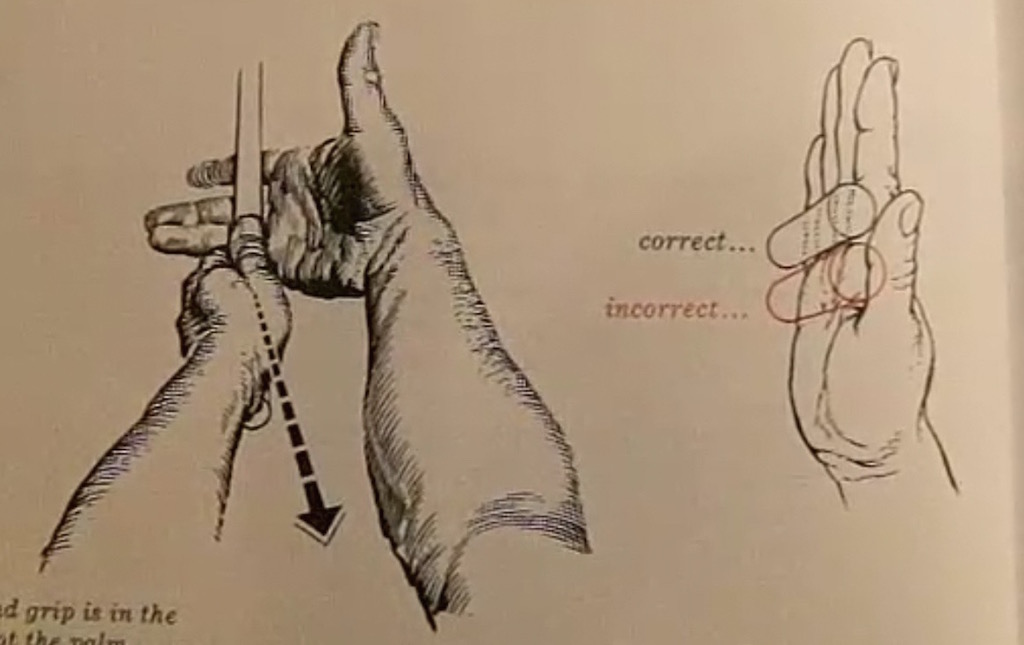
By this I mean that the palms of the two hands are not parallel to each other. Too many golfers have a weak left hand and strong right, or vice versa. The easiest way to learn how to hold the club with your palms aligned properly is to grip a plain wooden ruler or yardstick. It forces the hands to align properly and shows you how that feels. If you grip and re-grip a yardstick several times, then grip a club, you’ll see that the learning curve is almost immediate.
The position of the grip in the upper/left hand
I also observe many golfers who have the butt of the grip too far into the heel pad of the upper hand (the left hand for right-handed players). It’s amazing how much easier it is to release the club through the ball if even 1/4-1/2″ of the butt is beyond the left heel pad. Try this yourself to see what I mean. Swing the club freely with just your left hand and notice the difference in its release from when you hold it at the end of the grip, versus gripping down even a half inch.
To help you really understand how this works, go to the range and hit shots with your five-iron gripped down a full inch to make the club the same length as your seven-iron. You will probably see an amazing shot shape difference, and likely not see as much distance loss as you would expect.
Too much lower (right) hand on the club
It seems like almost all golfers of 8-10 handicap or higher have the club too far into the palm of the lower hand, because that feels “good” if you are trying to control the path of the clubhead to the ball. But the golf swing is not an effort to hit at the ball – it is a swing of the club. The proper hold on the club has the grip underneath the pad at the base of the fingers. This will likely feel “weak” to you — like you cannot control the club like that. EXACTLY. You should not be trying to control the club with your lower/master hand.
Gripping too tightly
Nearly all golfers hold the club too tightly, which tenses up the forearms and prevents a proper release of the club through impact. In order for the club to move back and through properly, you must feel that the club is controlled by the last three fingers of the upper hand, and the middle two fingers of the lower hand. If you engage your thumbs and forefingers in “holding” the club, the result will almost always be a grip that is too tight. Try this for yourself. Hold the club in your upper hand only, and squeeze firmly with just the last three fingers, with the forefinger and thumb off the club entirely. You have good control, but your forearms are not tense. Then begin to squeeze down with your thumb and forefinger and observe the tensing of the entire forearm. This is the way we are made, so the key to preventing tenseness in the arms is to hold the club very lightly with the “pinchers” — the thumbs and forefingers.
So, those are what I believe are the four fundamentals of a good grip. Anyone can learn them in their home or office very quickly. There is no easier way to improve your ball striking consistency and add distance than giving more attention to the way you hold the golf club.
More from the Wedge Guy
- The Wedge Guy: Golf mastery begins with your wedge game
- The Wedge Guy: Why golf is 20 times harder than brain surgery
- The Wedge Guy: Musings on the golf ball rollback
- LIKE85
- LEGIT13
- WOW6
- LOL1
- IDHT0
- FLOP4
- OB1
- SHANK8
Instruction
Clement: Stop ripping off your swing with this drill!

Not the dreaded headcover under the armpit drill! As if your body is defective and can’t function by itself! Have you seen how incredible the human machine is with all the incredible feats of agility all kinds of athletes are accomplishing? You think your body is so defective (the good Lord is laughing his head off at you) that it needs a headcover tucked under the armpit so you can swing like T-Rex?
- LIKE0
- LEGIT2
- WOW2
- LOL0
- IDHT0
- FLOP0
- OB0
- SHANK2
Instruction
How a towel can fix your golf swing
This is a classic drill that has been used for decades. However, the world of marketed training aids has grown so much during that time that this simple practice has been virtually forgotten. Because why teach people how to play golf using everyday items when you can create and sell a product that reinforces the same thing? Nevertheless, I am here to give you helpful advice without running to the nearest Edwin Watts or adding something to your Amazon cart.
For the “scoring clubs,” having a solid connection between the arms and body during the swing, especially through impact, is paramount to creating long-lasting consistency. And keeping that connection throughout the swing helps rotate the shoulders more to generate more power to help you hit it farther. So, how does this drill work, and what will your game benefit from it? Well, let’s get into it.
Setup
You can use this for basic chip shots up to complete swings. I use this with every club in my bag, up to a 9 or 8-iron. It’s natural to create incrementally more separation between the arms and body as you progress up the set. So doing this with a high iron or a wood is not recommended.
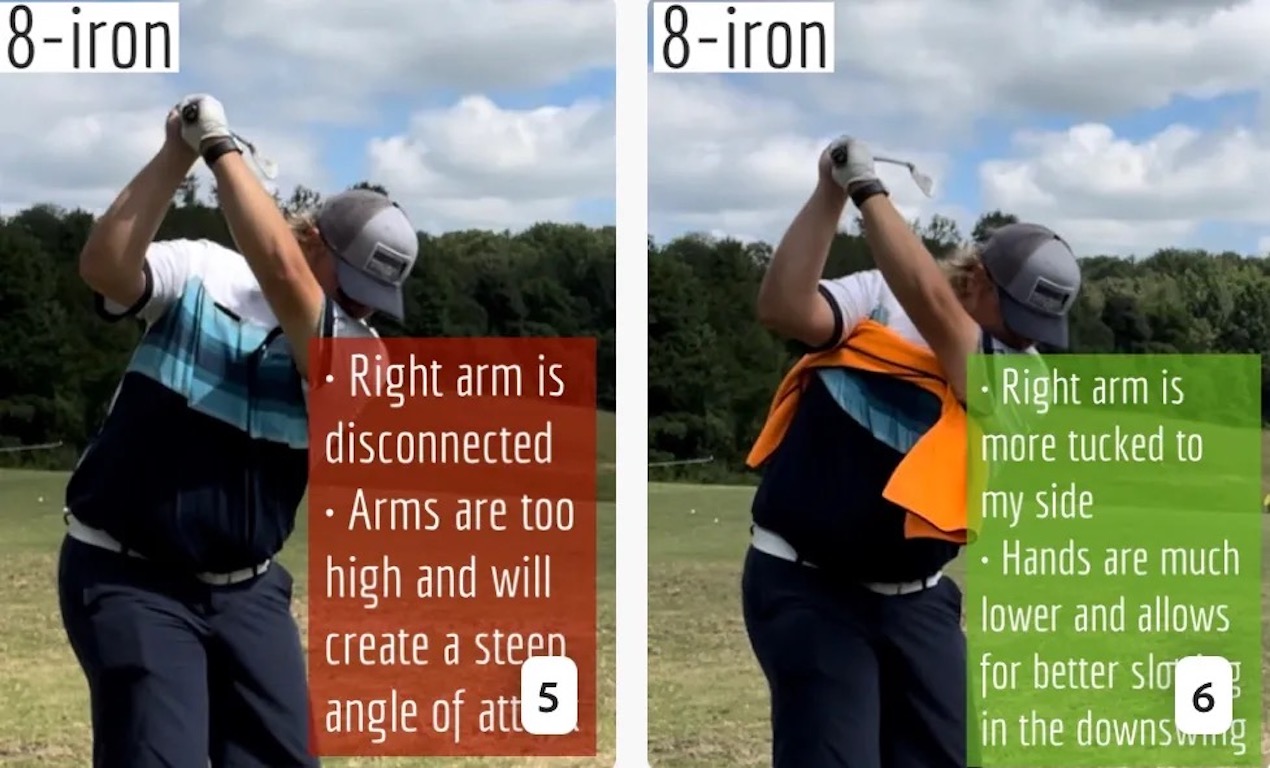
While you set up to hit a ball, simply tuck the towel underneath both armpits. The length of the towel will determine how tight it will be across your chest but don’t make it so loose that it gets in the way of your vision. After both sides are tucked, make some focused swings, keeping both arms firmly connected to the body during the backswing and follow through. (Note: It’s normal to lose connection on your lead arm during your finishing pose.) When you’re ready, put a ball in the way of those swings and get to work.
Get a Better Shoulder Turn
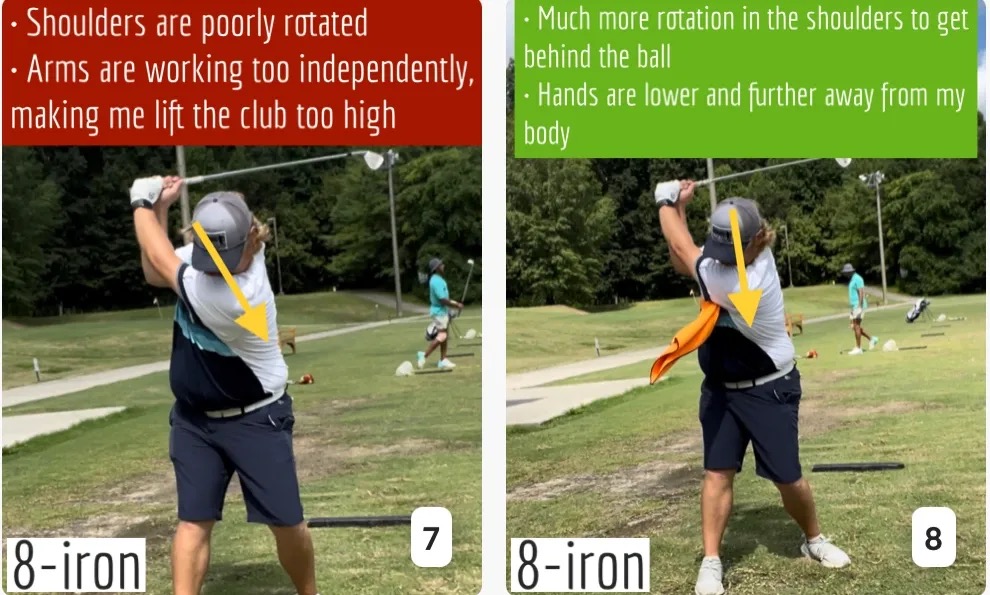
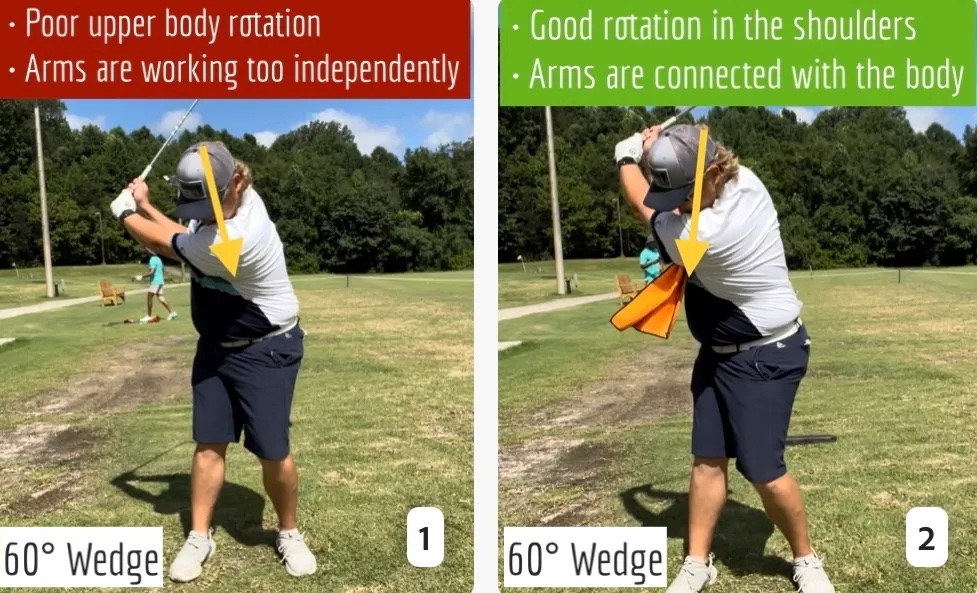
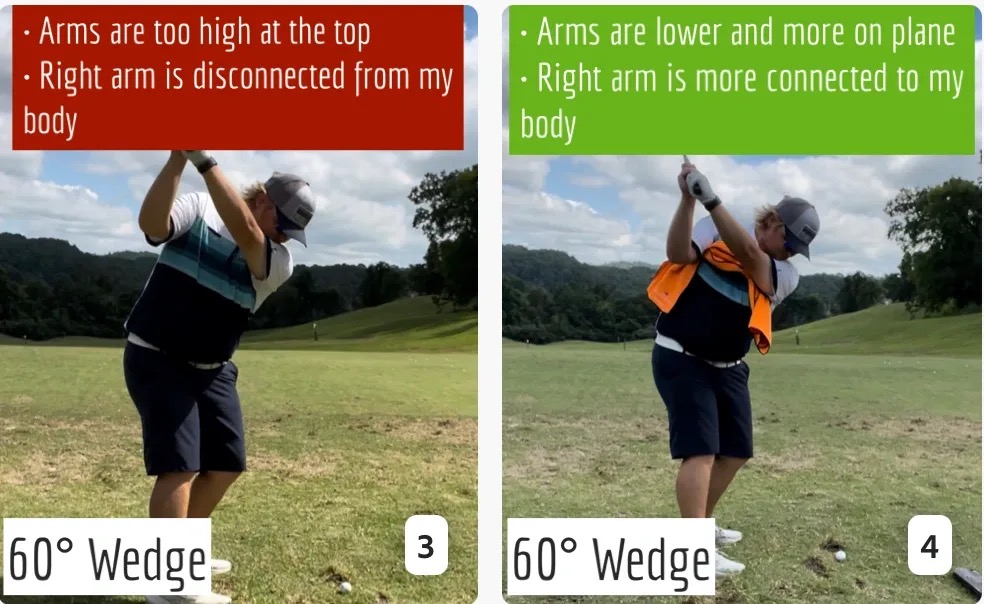
Many of us struggle to have proper shoulder rotation in our golf swing, especially during long layoffs. Making a swing that is all arms and no shoulders is a surefire way to have less control with wedges and less distance with full swings. Notice how I can get in a similar-looking position in both 60° wedge photos. However, one is weak and uncontrollable, while the other is strong and connected. One allows me to use my larger muscles to create my swing, and one doesn’t. The follow-through is another critical point where having a good connection, as well as solid shoulder rotation, is a must. This drill is great for those who tend to have a “chicken wing” form in their lead arm, which happens when it becomes separated from the body through impact.
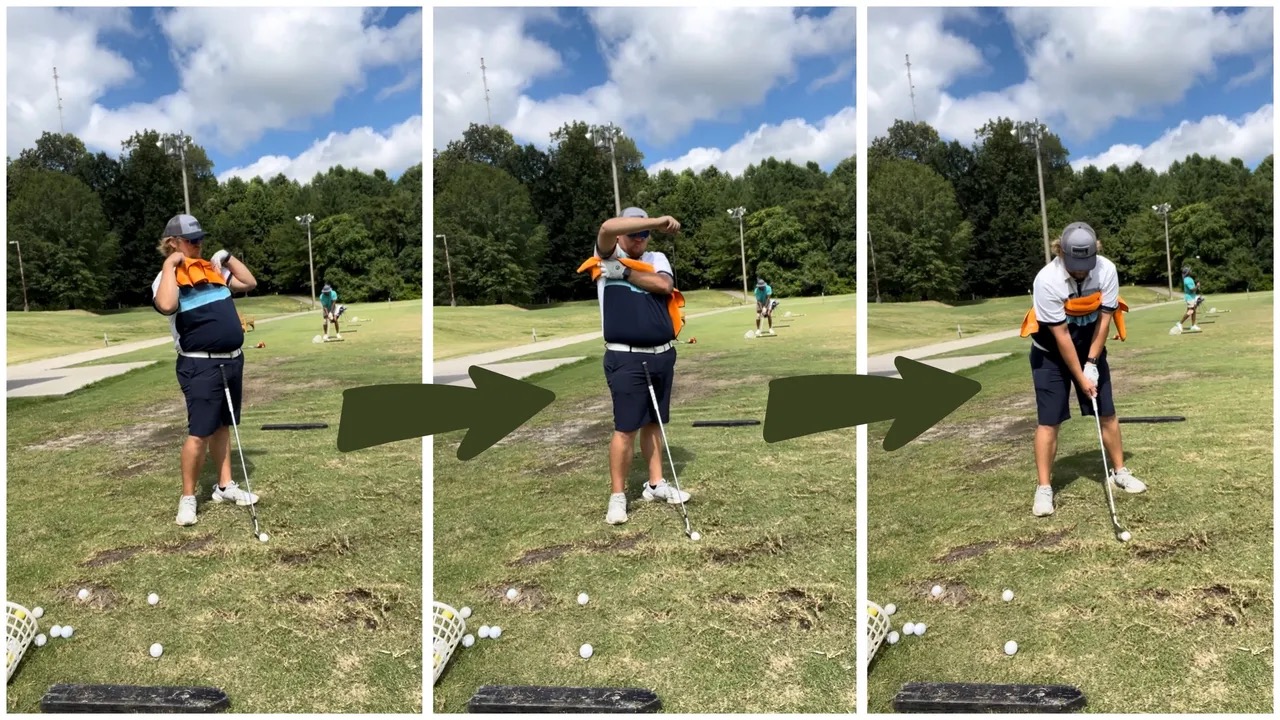
In full swings, getting your shoulders to rotate in your golf swing is a great way to reinforce proper weight distribution. If your swing is all arms, it’s much harder to get your weight to naturally shift to the inside part of your trail foot in the backswing. Sure, you could make the mistake of “sliding” to get weight on your back foot, but that doesn’t fix the issue. You must turn into your trial leg to generate power. Additionally, look at the difference in separation between my hands and my head in the 8-iron examples. The green picture has more separation and has my hands lower. This will help me lessen my angle of attack and make it easier to hit the inside part of the golf ball, rather than the over-the-top move that the other picture produces.
Stay Better Connected in the Backswing
When you don’t keep everything in your upper body working as one, getting to a good spot at the top of your swing is very hard to do. It would take impeccable timing along with great hand-eye coordination to hit quality shots with any sort of regularity if the arms are working separately from the body.
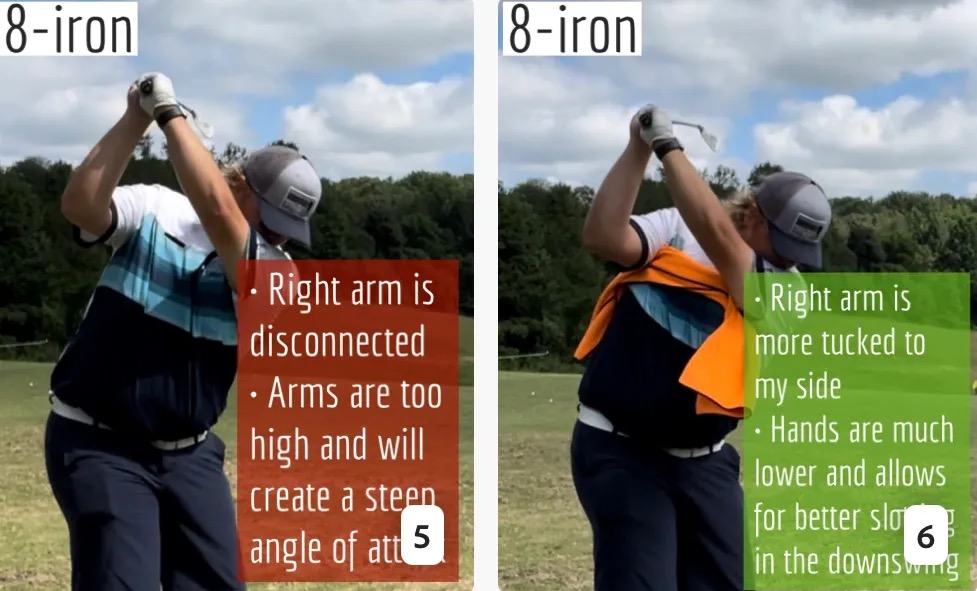
Notice in the red pictures of both my 60-degree wedge and 8-iron how high my hands are and the fact you can clearly see my shoulder through the gap in my arms. That has happened because the right arm, just above my elbow, has become totally disconnected from my body. That separation causes me to lift my hands as well as lose some of the extension in my left arm. This has been corrected in the green pictures by using this drill to reinforce that connection. It will also make you focus on keeping the lead arm close to your body as well. Because the moment either one loses that relationship, the towel falls.
Conclusion
I have been diligent this year in finding a few drills that target some of the issues that plague my golf game; either by simply forgetting fundamental things or by coming to terms with the faults that have bitten me my whole career. I have found that having a few drills to fall back on to reinforce certain feelings helps me find my game a little easier, and the “towel drill” is most definitely one of them.
- LIKE12
- LEGIT2
- WOW2
- LOL0
- IDHT0
- FLOP2
- OB0
- SHANK8
-

 19th Hole6 days ago
Dave Portnoy places monstrous outright bet for the 2024 Masters
-
 19th Hole2 weeks ago
Things got heated at the Houston Open between Tony Finau and Alejandro Tosti. Here’s why
-

 19th Hole1 week ago
Tiger Woods arrives at 2024 Masters equipped with a putter that may surprise you
-
 19th Hole2 weeks ago
Report: Tiger Woods has ‘eliminated sex’ in preparation for the 2024 Masters
-
 19th Hole2 days ago
Two star names reportedly blanked Jon Rahm all week at the Masters
-

 19th Hole1 day ago
Neal Shipley presser ends in awkward fashion after reporter claims Tiger handed him note on 8th fairway
-

 19th Hole2 weeks ago
Addiction, spinal fusion, and scam artists – Everything Anthony Kim revealed in candid interview with David Feherty
-

 19th Hole2 weeks ago
Anthony Kim says doctors told him that he ‘may not have much time left’ ahead of LIV return










Pingback: Transform Your Swing: Discover the Mental Secrets to Golf Success – Reprogram Therapy
Eric
Mar 17, 2014 at 12:08 am
Some of the best ball strikers of all time including Jack Nicklaus, Arnold Palmer, and Sam Snead had postures that were hunched over. I’m not sure I agree with the premise of this article.
Nick Randall
Mar 18, 2014 at 1:18 am
Hi Eric, thanks for the comment – you make a very valid point.
But I believe there are two things that support the idea that better posture will help the majority of golfers:
1 – As equipment has evolved, so has the golf swing. Hunched posture may well have helped the swing mechanics that produced good ball striking with the equipment of the day. But now modern equipment responds better to modern swing mechanics which require good posture in order to perform them correctly.
2 – There will always be talented individuals who have risen to the top of any discipline doing it “their way”. Jim Furyk can be used a counter argument to most principles of the golf swing. Whilst there is one Jim Furyk who has had a very successful career in golf, there a million others who play off high handicaps and struggle with their ball striking.
Chris Miller
Apr 10, 2014 at 6:19 pm
Yes those guys did play with a hunched over posture, and had great success, however it is important to note that all 3 had back pain at some point in their careers. Nicklaus had problems with budging discs, although I speculate this might have been from his hip problems and maybe not his posture. Snead had to withdraw from the Masters I believe because of back pain and Arnold Palmer is having surgery soon for spinal stenosis. I cannot remember ever hearing about Arnold having back pain in his career.
My point is you want to minimize your risk for injury. Too much hunched over posture (flexion) at address combined with the lateral bending and rotation of the golf swing is the pretty much the definition of a disc herniation. Actually the forces in the spine during the golf swing equal 8x your body weight or roughly 7500 Newtons, when around 5500 Newtons can cause disc herniation. 50% of golfers and 80% of the population will have back pain at some point, keeping a neutral posture will help to minimize this risk.
Ryan
Mar 12, 2014 at 2:47 pm
Really great article, Nick. Very interesting exercises, I am excited to try them!
Ryan
http://agedefyinggolf.com
Nick Randall
Mar 12, 2014 at 6:38 pm
Thanks Ryan, appreciate your support!
Winmac
Mar 8, 2014 at 10:05 pm
I truly agree to this article in terms of hunching will cause inconsistency and bad golf swings. I am naturally hunched, and it’s hard to emulate the same swing everytime. So at times, I got crispy, good shots and the next hole, I hit fat or top.
Will try to do the exercises and remember to straighten up.
Nick Randall
Mar 12, 2014 at 6:42 pm
The variation in quality of contact is something I see a lot. Swinging from bad posture requires a lot of compensation and there is an increased reliance on timing. Sometimes your timing just doesn’t come to the golf course with you!
Good luck with the exercises, if you want access to more then check out: http://golffitapp.com/ and download the iPhone / iPad app
Jack
Mar 7, 2014 at 9:58 pm
Can’t say I agree with this article… At all.
Nick Randall
Mar 12, 2014 at 6:43 pm
Can I ask why Jack?
Jack
Mar 14, 2014 at 2:26 am
Because a “hunched” position allows for you to stay connected easier and rotate around the spine. Didn’t mean to sound like a**, had a few beverages and tend to be blunt ha
ryan k
Mar 7, 2014 at 6:09 pm
Good article in general let alone golf specific. As a physio, I utilize these same principles daily and very much support the information put forth in this article. Nice to see this information had made its way to your profession. Australia/New Zealand area had always been ahead of the game in the rehabilitation world. Keep it up!
Nick Randall
Mar 12, 2014 at 6:46 pm
Thanks Ryan, I have been very lucky to work alongside some of the best golf coaches and physios in Australia and New Zealand.
They have taught me so much and there is a strong culture of continuing education, experimentation and development.
We are also really well supported by organisations such as Golf Australia and Golf Queensland.